3 Quick Fall Craft Projects for Your Home and Table
Do you need to find ideas for your fall decor or table settings? I can’t set a table without making some DIY handmade projects. These 3 quick fall craft projects will give you some inspiration.
Of these 3 quick fall craft projects, the first one is definitely meant to be used as part of a table setting. The other two can be included in any fall decor or vignette throughout your home during this season.
Buying accessories retail can save time, for sure. But, to get custom items, you need to make them yourself. You’ll save money, get exactly the look you want, and have the satisfaction of making your own creations.

Most importantly, I want you to think of these 3 quick fall craft projects as inspiration. You may want to use different colors or different patterns. I promise they are all easy, quick, inexpensive. But you will get a lot of bang for your buck.
3 Quick Fall Craft Projects for Your Home and Table
This post contains links to products used in the projects. If you should order any product from this blog, I may receive compensation, but you won’t pay a penny more.
First, let me share with you the color scheme of this fall decor because you are going to figure it out very quickly: it’s navy, which I started using in our fall living room on the mantle and our coffee table, and copper.
I love this combination for fall. The navy represents the cooler temperatures of fall and the deepening night skies. The darker shade of blue is just more suitable for fall. Copper reflects the burnished colors of fall leaves, the warmth we want to snuggle into this time of year, and the metallics that we all love.
The fall Craft Projects
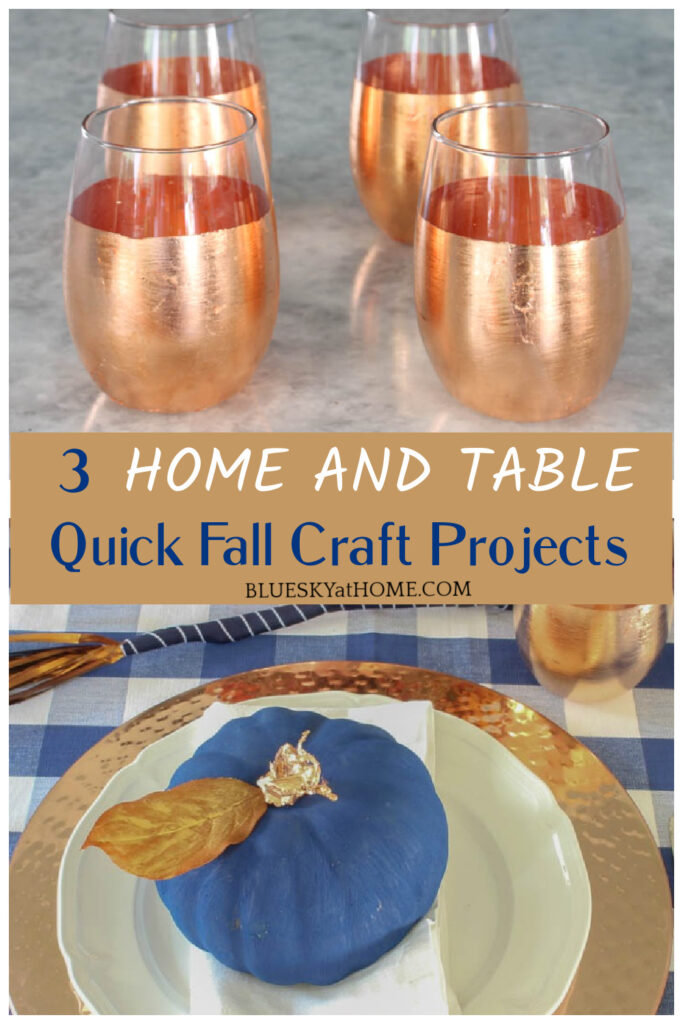
Fall Craft Project Number 1 – Adding Copper Leaf to Glasses
This is the craft project that is definitely meant for a table setting ~ glassware. This is where the copper is the star. Stemless wine glasses from Dollar Tree were my starting point. The only negative is the price stickers which do not easily peel off.
TIP: You can order online from Dollar Tree and pick it up at the closest store and there are no shipping charges!!
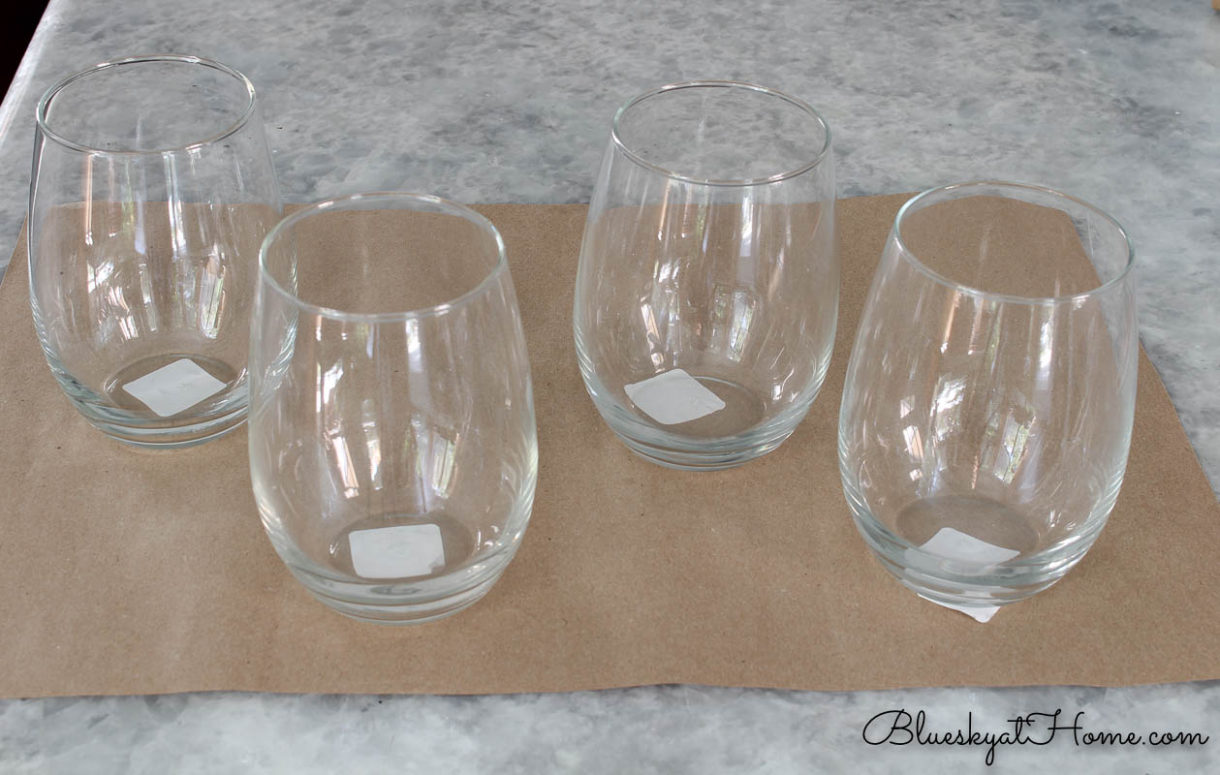
Step 1 – I use Goo Gone to remove the stickers. Once the stickers have been removed, I wash the glasses with warm soapy water and dry them thoroughly with lint-free towels.

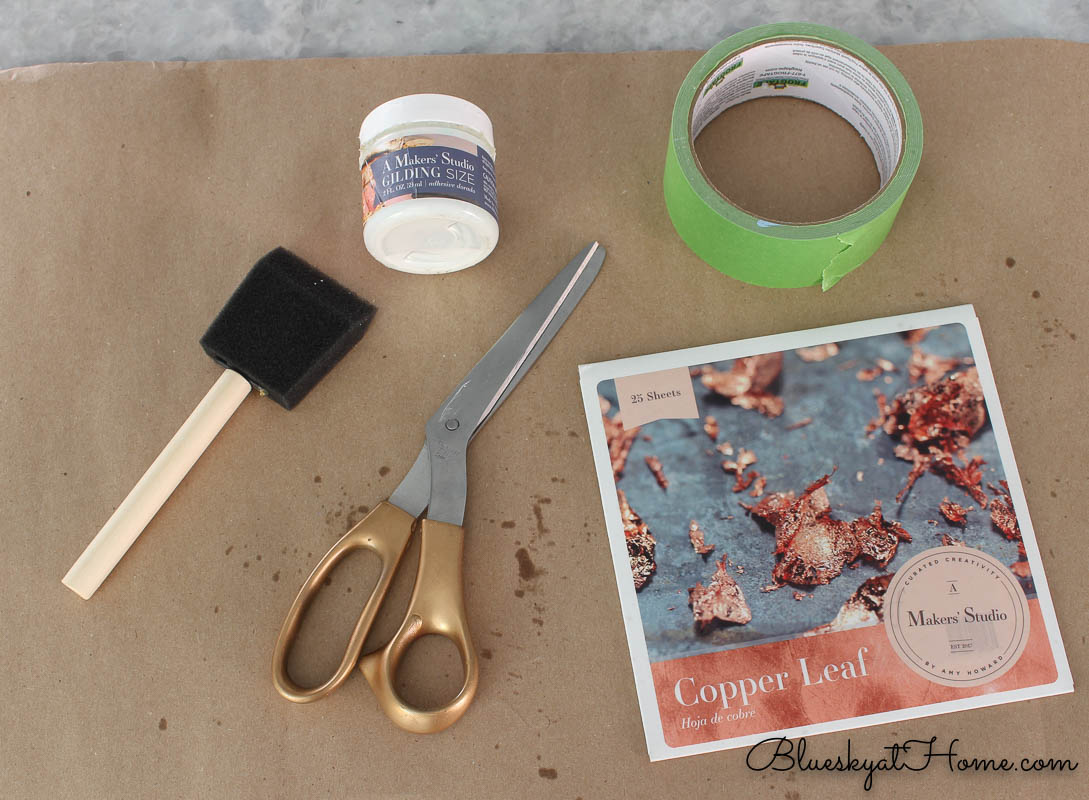
For this fall craft project, you will need:
- painter’s tape
- small sponge brush
- scissors
- Copper Leaf
- Gilding Size
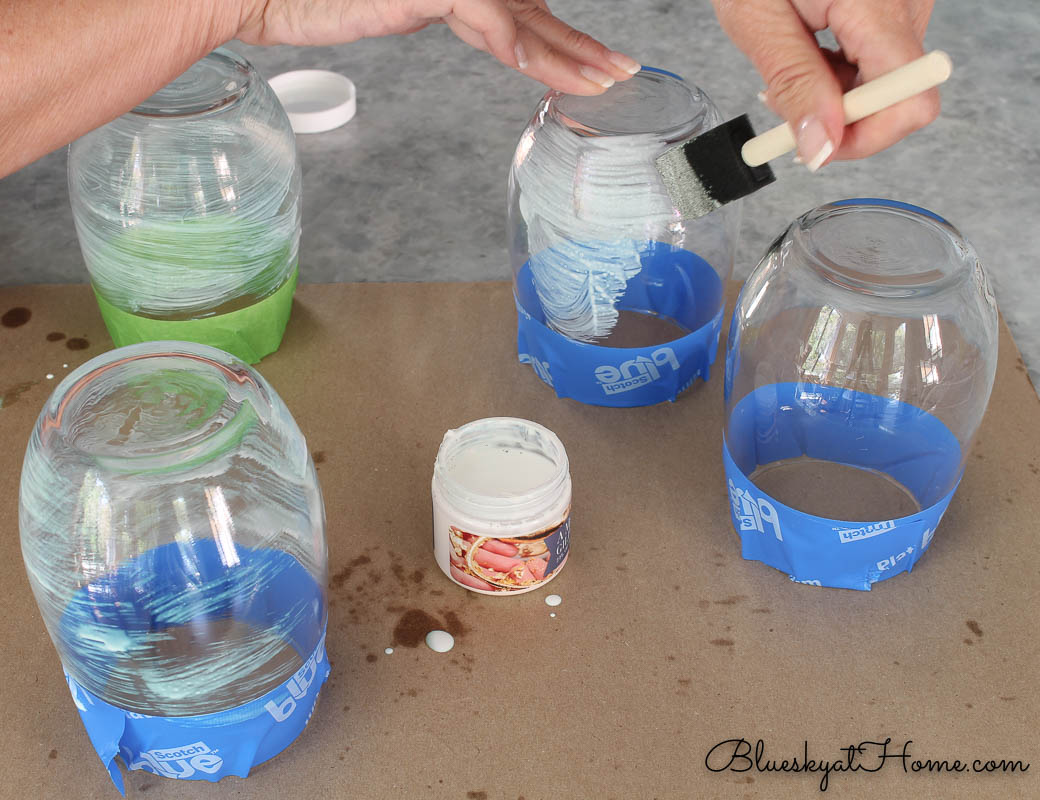
Step 2 – Rim the top edge of your glasses with painter’s tape. I started with Frog Tape, but switched to the Scotch Blue 3M tape because it is more “giving” for rounded surfaces. You put the tape on so liquid will not touch the Gild and people won’t put their lips on it.
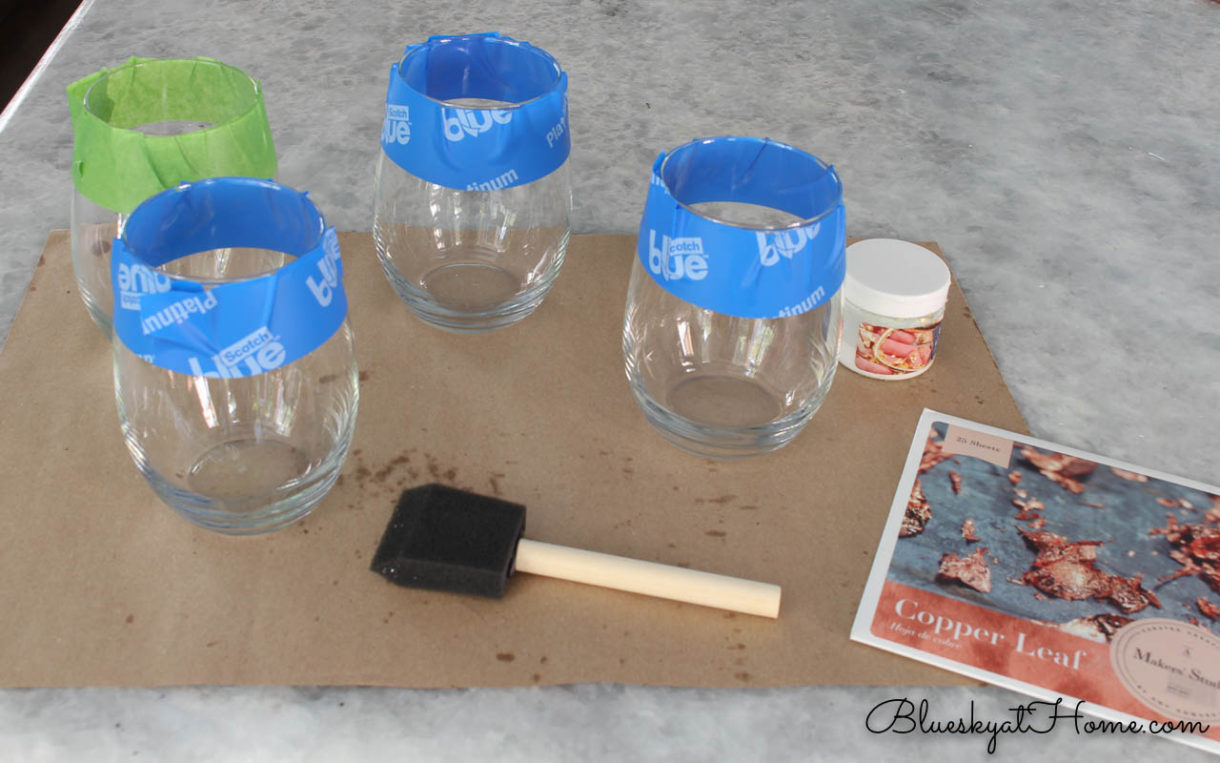
Step 3 – Shake the Gilding Size. Then, using the sponge brush, apply the Gilding Size all over the sides of the glass. I did not apply it to the bottom of the glass. The Gilding Size will be white. Allow it to dry to tack for about 15 minutes.
NOTE: “to tack” means that it is slightly sticky when you barely touch it with your finger.
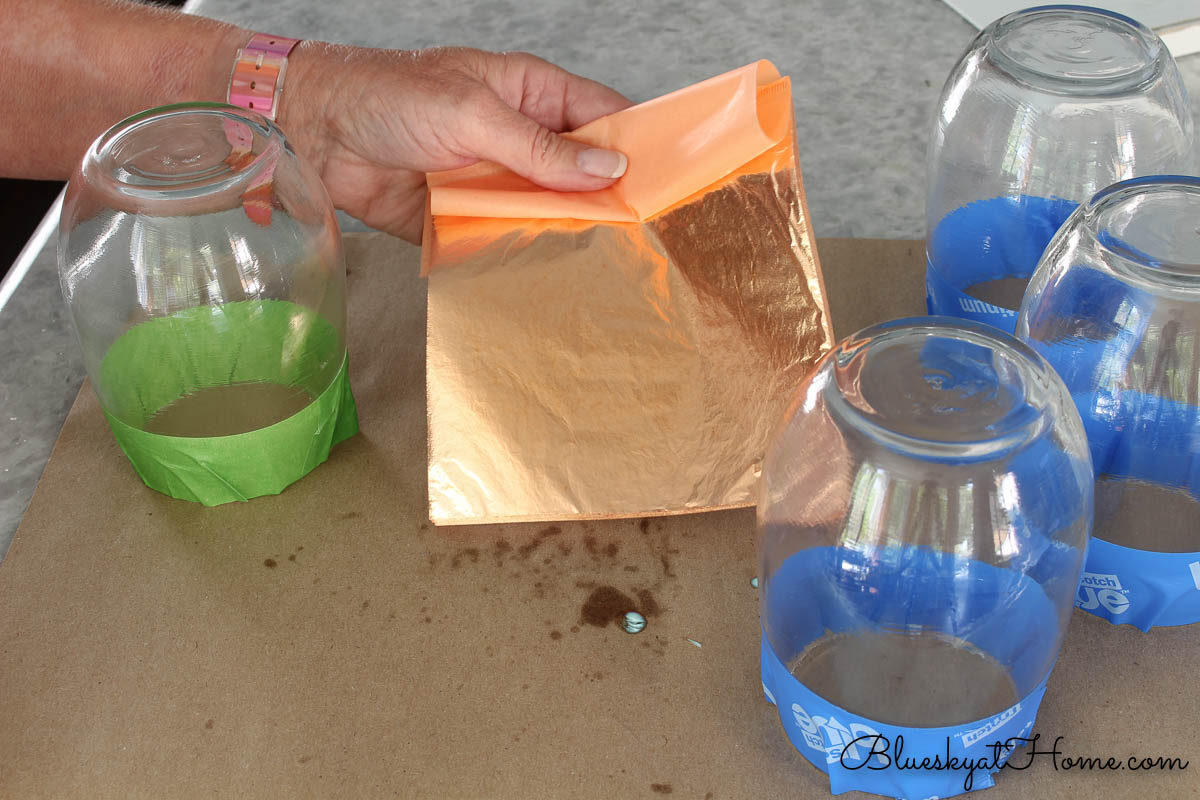
Step 4 – Remove the Copper Leaf from the package and fold back the orange tissue paper, revealing the first page of Copper Leaf. There are 25 pages in each “book” of leaf.
Step 5 – Press the page of Copper Leaf against the side of the glass, with the top of the Leaf just above the bottom of the painter’s tape. Remove the book of Leaf. Then turn the page of the orange tissue to the next Copper Leaf. Repeat until the surface of the glass is covered with Copper Leaf.
*NOTE: The Leaf will stick to any place where you applied the Gilding Size. If there are places where the Gild did not stick, use the sponge brush to apply more Gilding Size and then add more Leaf.
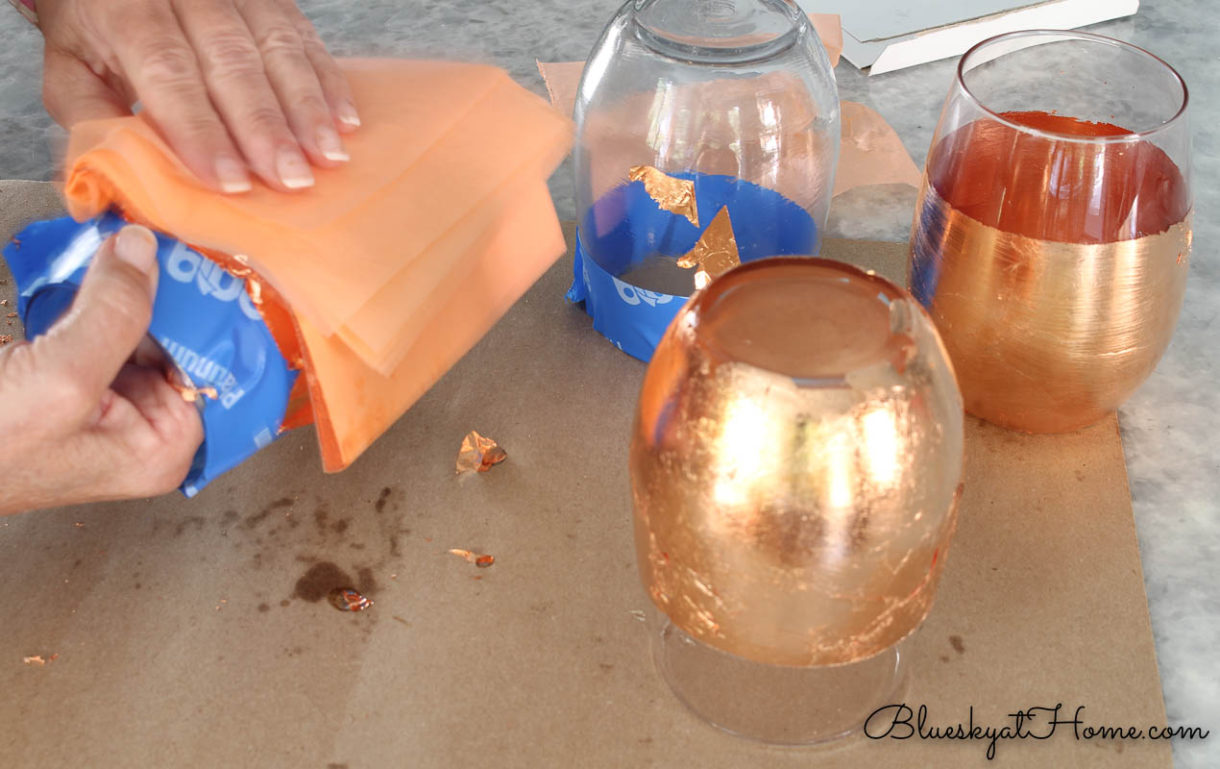
Step 6 – I usually start smoothing the Leaf with my finger to remove any loose pieces of Leaf.
Step 7 – Gently remove your painter’s tape from the glass. Some of the size will be attached to the tape, but will not come off the glass.
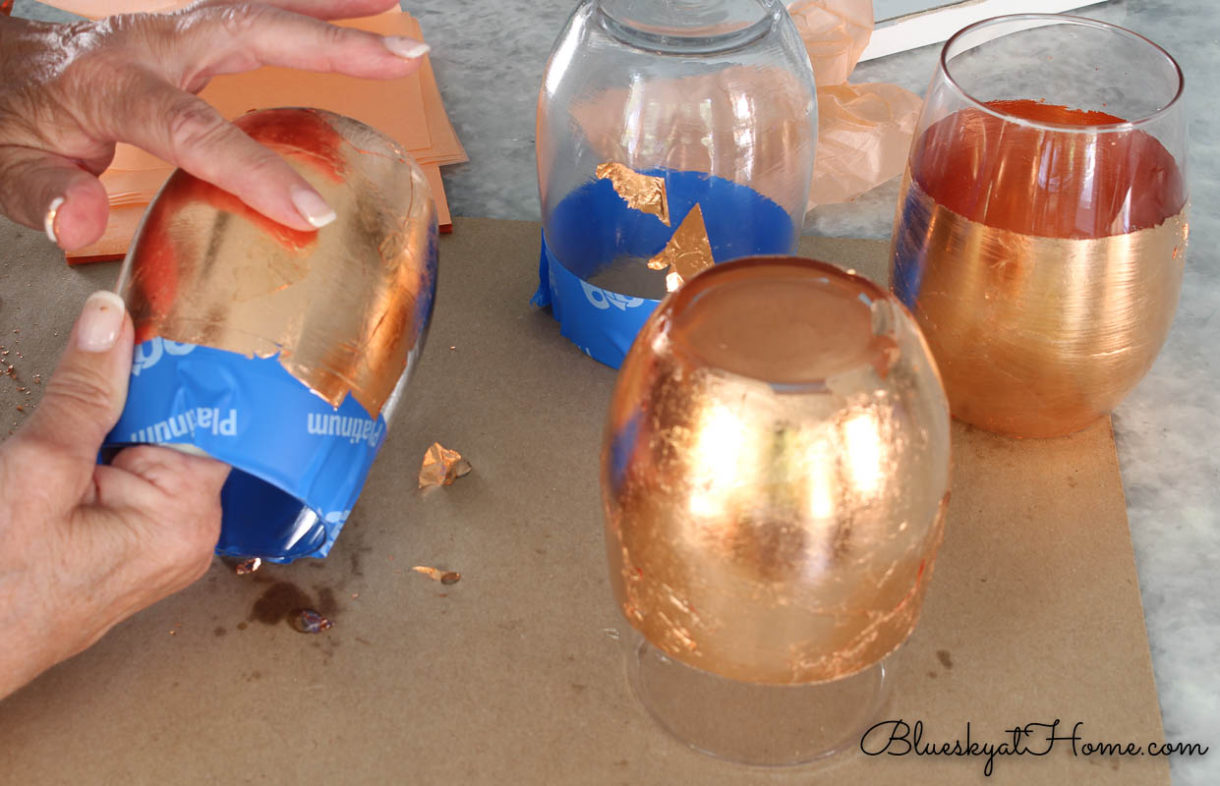
Step 8 – Use the orange tissue paper to “burnish” the Copper Leaf all over the surface of the glass. Pieces of extra leaf will fall away from the glass. I use any larger pieces to apply to another glass.
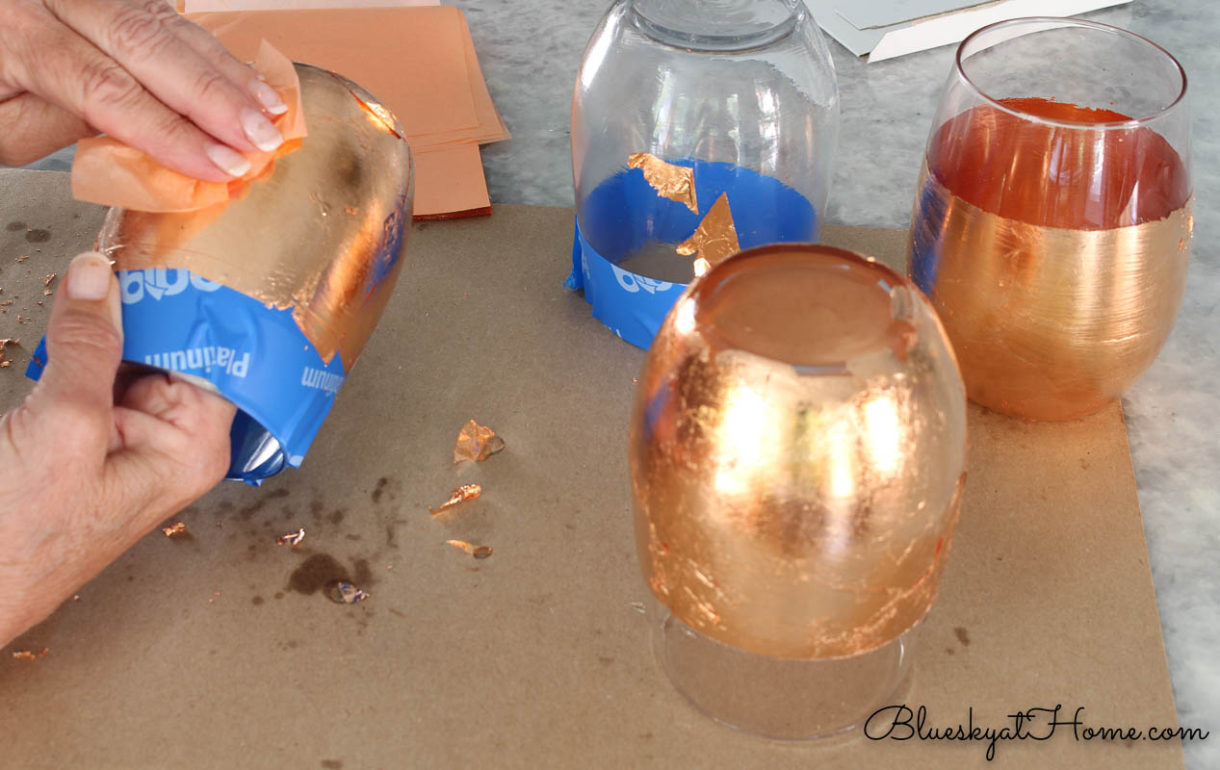
That’s it. So easy and quick. I love the look, shiny bright with the warmth of fall.

I used about 10 pieces of Copper Leaf for this craft fall project. You know that these Copper Leaf glasses will grace my fall table.
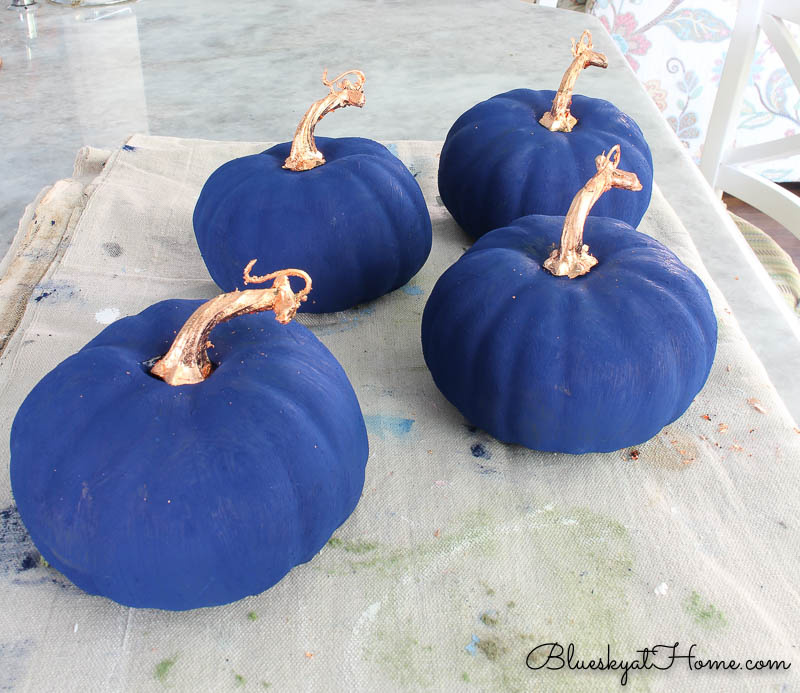
Fall Craft Project Number 2 – Painting Pumpkins
This project combines paint and Copper Leaf. Although I will be using this project as part of my tablescape, it could easily be used on a mantle, a table, or a coffee table for fall decor. Here’s where the navy comes into play.
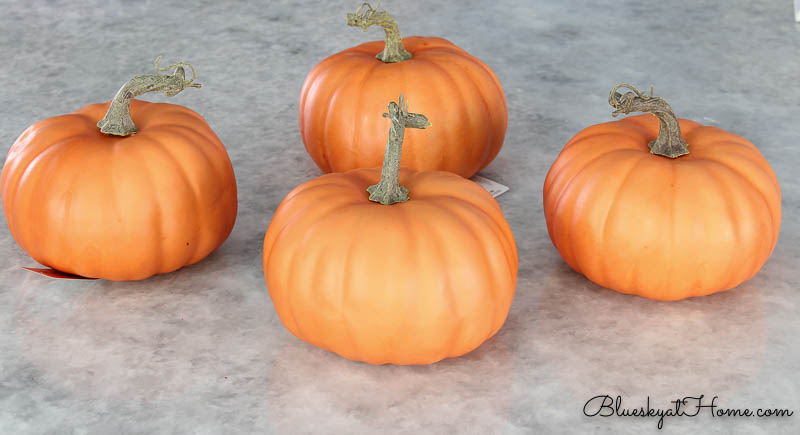
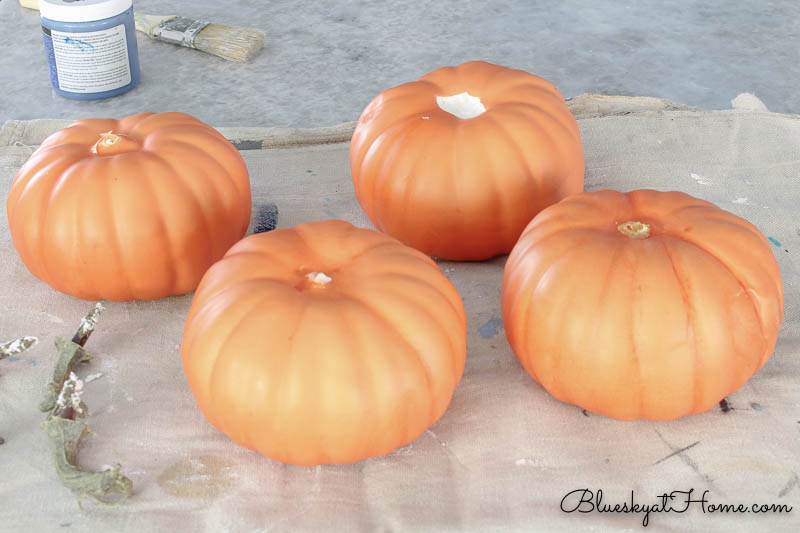
You can’t have a fall tablescape or decor without a pumpkin somewhere. You know these pumpkins from Joann are not going to stay orange, right? These pumpkins were on sale for $2.39, which was a great price since they have a nice size and feel to them. I did buy some all-styrofoam pumpkins first at Dollar Tree, but I thought these were nicer.
Supplies for this fall craft project:
- number of pumpkins you need; these are, I think, vinyl-covered styrofoam.
- paint of your choice
- sponge brush
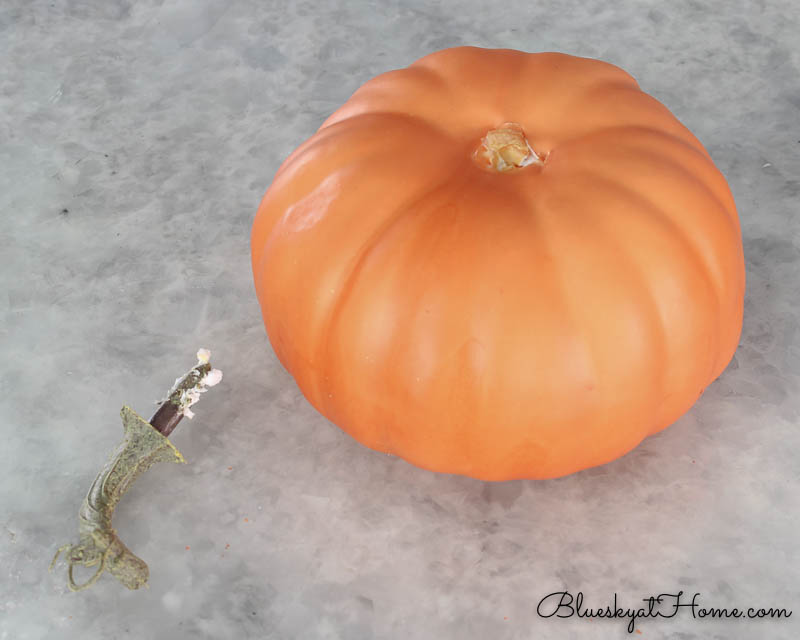
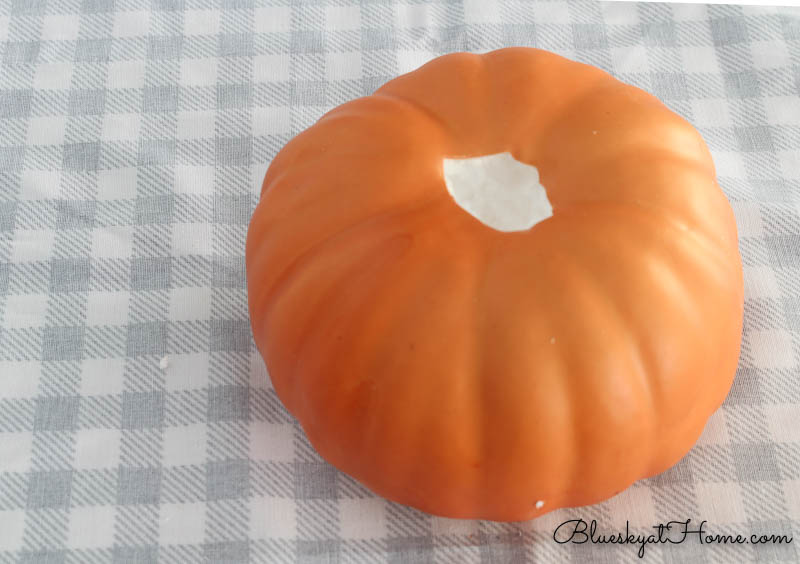
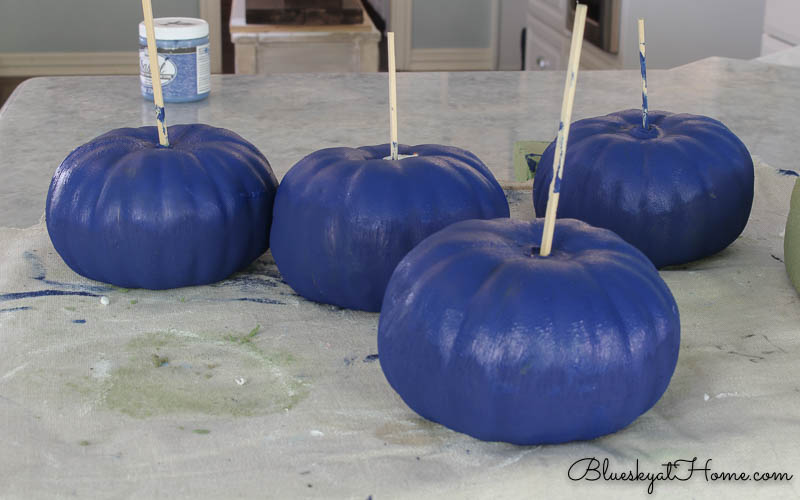
Step 1 – Remove the stem, which comes out easily just by pulling.
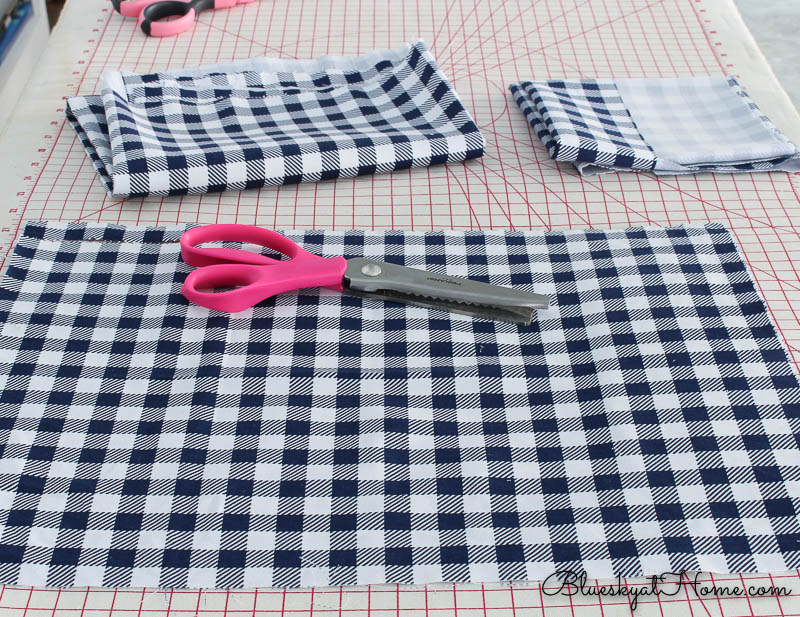
Originally, I was going to cover the pumpkins in fabric, so I dug out a bigger hole. I bought the navy check fabric at Joann. It was 3/4 of a yard and normally $16.99 a yard. Because it was a scrap piece on the bolt, I got it for $2.55.
After trying to get the fabric to gather and lay nicely around the pumpkin and stuffing the excess into the big hole, I just didn’t like the look. That’s when the idea just to paint the pumpkins was born. I’m so glad I changed my mind because I like the painted look so much better.
For my paint, I decided to use a deep blue textured paint from Folk Art. I received a set of about 13 paints after Haven a few years ago and used it for the first time this past summer. I used this blue to paint a terra cotta pot. This paint is very thick, but goes on easily.
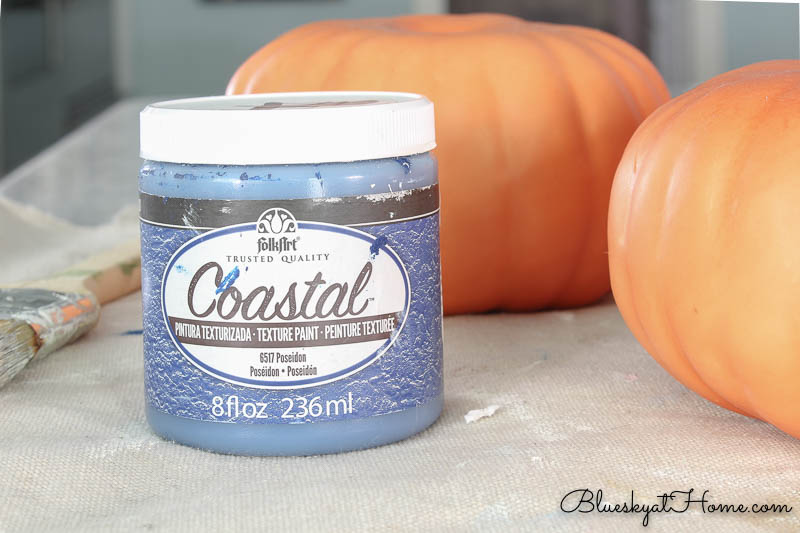
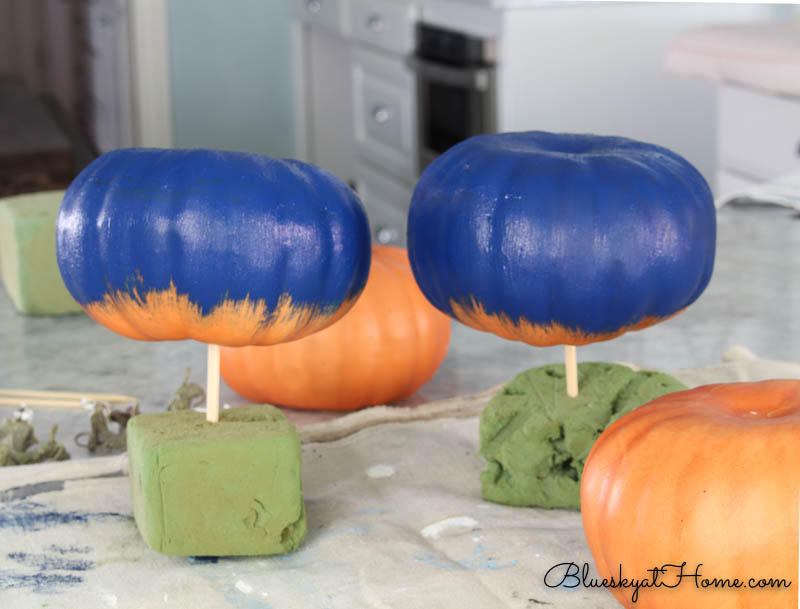
Step 2 – Starting on the bottom, paint the pumpkins. I used thick wood skewers to hold the pumpkins while I painted. I stuck the skewers in old pieces of florist foam. They easily dried on the skewers.
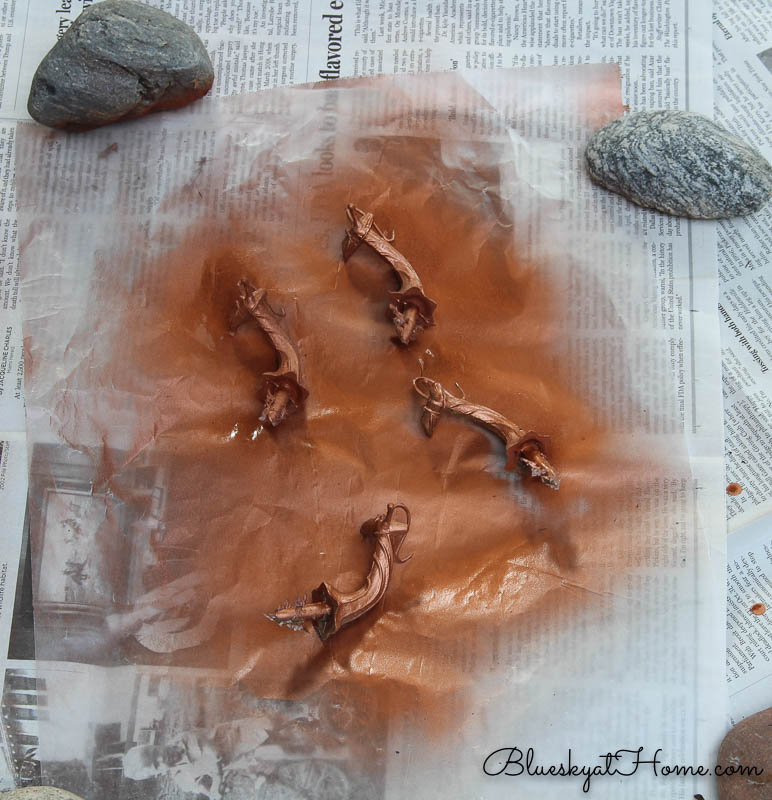
Step 3 – Spray paint the stems. While the bottom of the pumpkins was drying, I went outside on the driveway and used Krylon Copper Metallic Spray Paint to paint the stems. (I had already checked my supplies to make sure I had some on hand.)
I closed the garage doors so I wouldn’t accidentally spray my car. Rocks helped to hold the newspaper down. Use wax paper so the stems don’t stick to the newspaper.
Step 4 – Paint the top of the pumpkins. I removed the skewers from the florist foam and turned the pumpkins right side up on my drop cloth. I let the bottoms and the tops dry for about 25 minutes on each side.
Step 5 – Put the stems back in the pumpkins. Just push the end of the stem back in the hole.
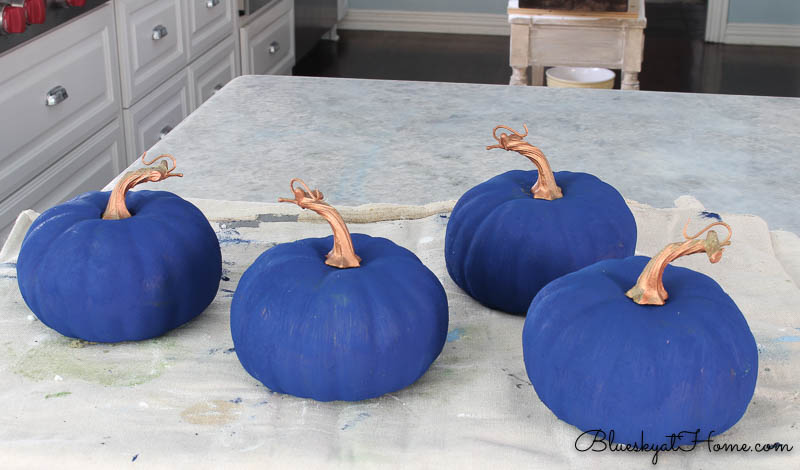
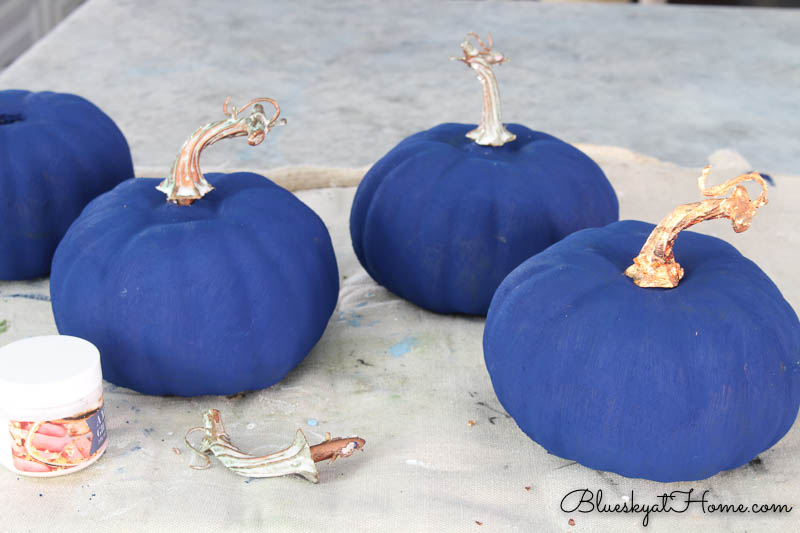
At this point, I was a little disappointed in the stems. I wanted the copper stems to be more pronounced and brighter. Solution? Out came the Copper Leaf and the Gilding Size again. I tried one stem first to see if it worked since I had never Gilded over paint.
It worked like a charm.
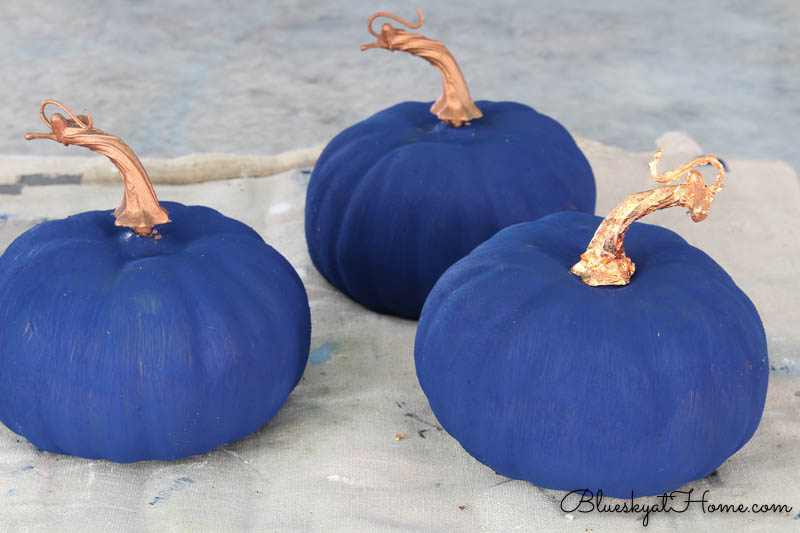
I slightly pulled the stems out from the pumpkins and brushed the Gilding Size on. The process is exactly the same as for any Gilding and Leaf project. I did remove the stem from the pumpkin with the larger hole.
So much better with the brighter copper stems. Easy peasy.
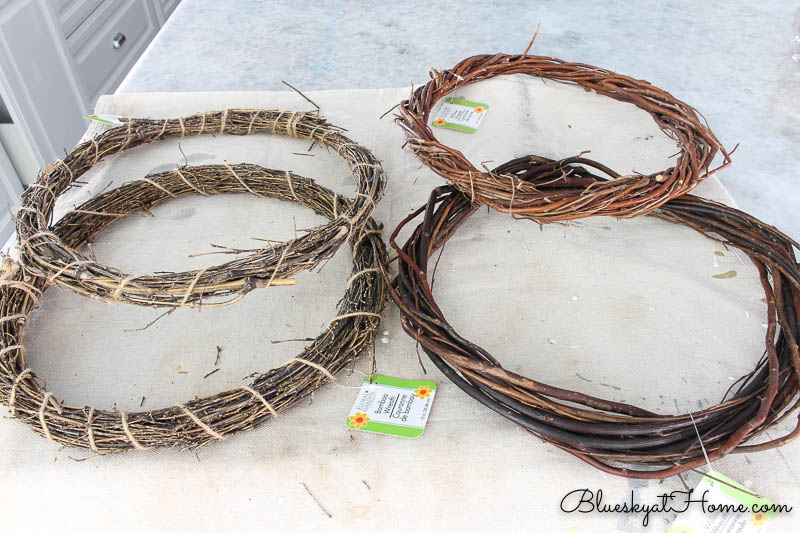
Fall Craft Project Number 3 – Wreaths
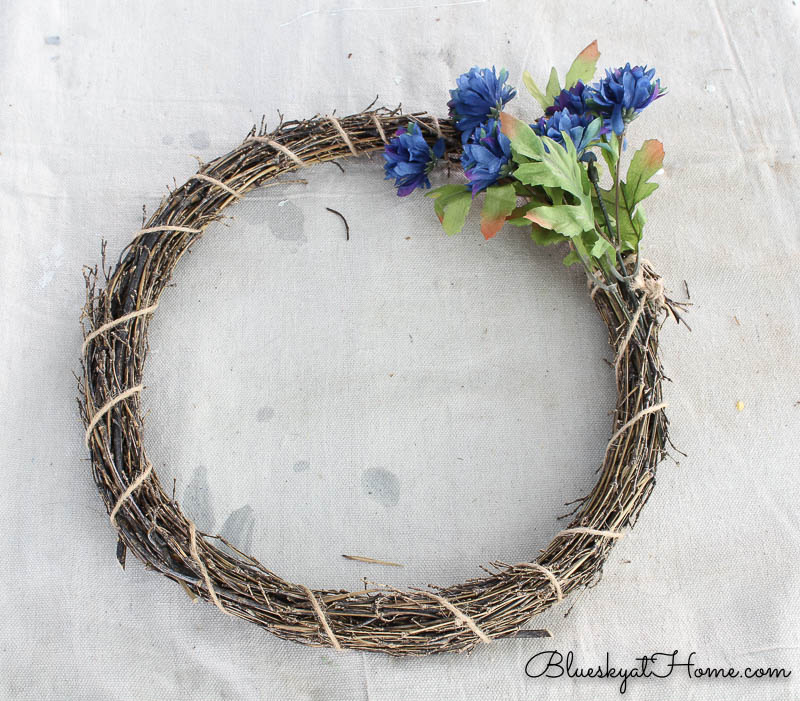
While on my same trip to Dollar Tree to buy my stemless wine glasses and return the styrofoam pumpkins, I saw these twig wreaths in 2 different styles, about 12 inches in diameter. I bought both styles because I couldn’t decide which one I liked better. This project is also one that could be used in many places in your home.
I decided to use the smaller twig wreath with the twine wrapped around it. I also brought out some other possible items for the wreath: a bag of thin jute and raffia (both from Dollar Tree) and a bag of wood fall leaves from Target Dollar Spot. As it turned out I didn’t use any of them for this project. I did use some blue flowers from Joann.
It’s hard to find blue flowers that look somewhat natural. The flowers were on sale for $2.99.
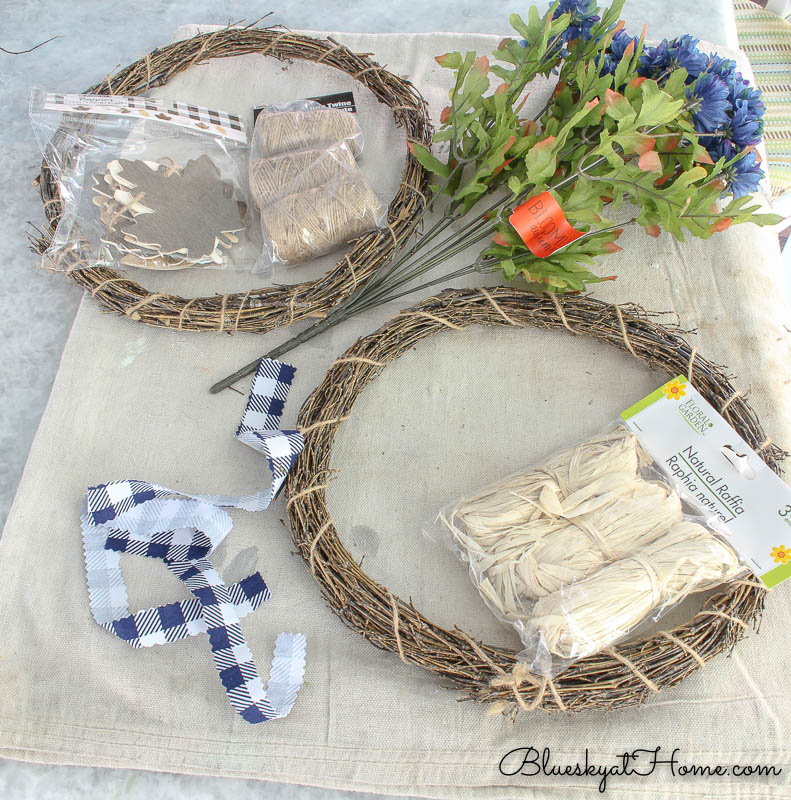
Step 1 ~ Here is the fabric I thought I would use for the pumpkins. I decided to make some “ribbon” from it for my wreath. I used my pinking shears to cut about 1/2-inch strips. You could also use any ribbon that fits your color scheme. As you will see when I share my tablescape, the check fits in.
Step 2 ~ cut off as many flowers as you need from the main stem. I used 3 pieces with multiple flowers. It was easy to push the stems under the twine around the twig wreath.
Step 3 – Wrap part – as much as you like – of the wreath with jute, ribbon or burlap ribbon. I had this burlap ribbon in my burlap box and it was easy to wrap around the wreath. I just wrapped it on the bottom half of the wreath. Then I tucked in each end under the burlap to hold it in place.
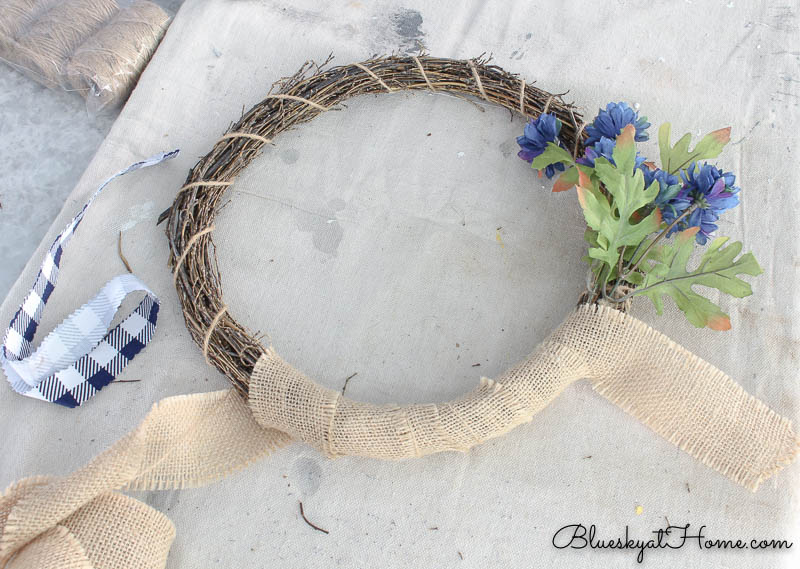
Step 4 – Make a bow at each end of the burlap ribbon. The ribbon picks up the color of the flowers and hides the end of the burlap.
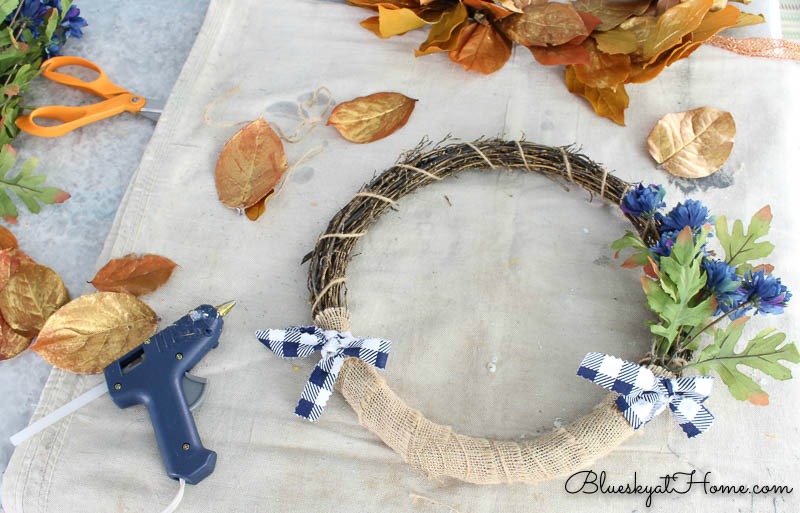
At this point, I thought the wreath still needed something else. More pop of copper? As it turned out, out in the garage in our fall decor boxes, I found the wreath from last year. I had used Gold Metallic paint (which also comes in Copper Metallic) to give the wreath more pizzaz. I thought the leaves were close enough to copper, so I pulled some off.
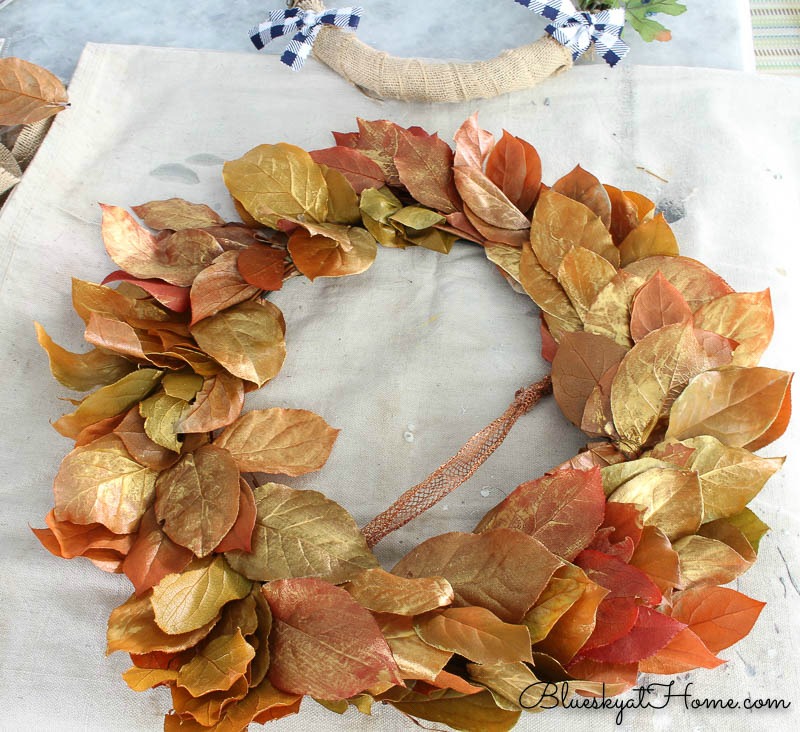
You really can’t do a craft project without using a glue gun at some point. The leaves gave the wreath the finishing touch it needed. Now I just have to make one more for my fall tablescape. I may make the ribbon for the bow longer next time.

What do you think of the 3 quick fall craft projects that I’m going to use for my fall tablescape? I made both the copper wine glasses and the navy and copper pumpkins in one afternoon. I made the wreath another day in less than an hour. So, if needed, you could make all three projects in one day.
I recently shared these 3 fall projects that you should check out.
Here’s another project using Gilding Leaf you might like: How to Make Gold Leave Votive Candle Holders.
Here is the navy and copper fall tablescape that I used these DIY projects in. PIN one or PIN them all!

Don’t Forget:


These are adorable! Thanks for sharing on Happiness is Homemade! I have chosen your post as my featuring on this week’s party. I’d love for you to share on Traffic Jam Weekends as well!
Such wonderful fall projects! Almost makes me look forward to fall. Almost. Thanks for sharing! Smiles, Linda at Paper Seedlings
Thank you for visiting Bluesky at Home, Linda. I’m so glad that you enjoyed the projects. Hope you will subscribe and see more great projects.
Carol,
I love all these adorable projects. The copper leaf looks so good. I’d love to share a link to this project with my followers on my Sunday , Dirt Road Adventures! I hope that’s ok!
Have a great day.
Carol, I love all the fall things you have shared these past weeks (2 weeks ago, actually) at Share Your Style!!! Happy to feature your post at this past SYS #274. <3
Enjoy all your cute blue pumpkins and I love the fall wreaths!!
Hugs,
Barb 🙂
I love navy pumpkins this year! The color just goes so well with the copper and orange. I really like the glasses you covered in copper leaf. I have never tried to use it and you make it look very easy. Thanks for sharing. #HomeMattersParty
Thank you, Donna. Copper is my favorite metallic for fall. It goes so well with the navy.
Thank you for sharing these great ideas at Embracing Home and Family! The glasses are so striking!
Hi Carol. Your fall crafts are chosen as one of our features for this week at Meraki Link Party.. Congratulations.
Naush
Thanks so much, Naush. I appreciate the feature.
Thank you very much for sharing your Fall decor projects at Meraki Link Party.
Naush
http://www.doodlebuddies.net
All great for fall. Those beautiful blue pumpkins are my favorite! Thanks for sharing at Vintage Charm. xo Kathleen
I love the blue pumpkins too, Kathleen. Happy to share.
Who doesn’t love quick and easy crafts? Thank you for sharing at Party In Your PJ’s.
Hi Ann. Quick and easy is a good thing.
My pleasure, Ann. Quick and easy are great.
I’m another one who never would have thot of blue and copper together. It will pick up the blues in your living room so nicely. I have loved copper since I was a child. I have unfond memories of polishing my mother’s Revere Ware copper bottomed pans. BUT, when I got married, I wanted the same thing; been using ’em since ’73! So glad it is coming back! I made several of Navage Patch’s pumpkins using the copper dish scrubbers–except I used cheapos which are not as nice. The 1/2 cinnamon stick stems are cute, though!
These are such cute ideas. I love the blue. Thanks for sharing! Visiting today from the Happy Now link up. Have a great day!
Thank you so much, Marielle. I’m so happy you are visiting. I hope that you’ll subscribe to receive more posts with great projects.
Those are all wonderful Carol! Great projects – I definitely want to try! Thanks for the inspiration, and Happy Tuesday!
Carol, I love your tutorial. The pumpkin, the wreath and the copper glasses are stunning. We are hosting Meraki Link Party weekly from Monday thru till Thursday at https://doodlebuddies.net/2020/09/14/meraki-link-party-5/
We’d love for you to share your posts with us.
Best regards
Naush
Beautiful Carol. I love the copper wine glasses, a very cool idea. I have never used copper sheets, so learning something new is fantastic. The wreaths are lovely. The Dollar tree is a wonderful resource.
Love the blue pumpkins!
All of these are beautiful! I love the blue and gold colors together.
Love these three ideas and am looking forward to seeing them on your table. I need to remember that I can buy online from Dollar Tree and have it shipped free to the store.
i never would have thought to combine copper and blue; I think of red with gold and blue with silver; you’re teaching me to think outside the box! I would love to know how the glasses survive gentle dishwashing, too!
Kathy, It’s a new combo for me too, but I’m loving it. I did use turquoise and copper together a couple of years ago for a tablescape and loved it. Be sure to check back for my navy and cooper tablescape. The glasses may be hand~washed and don’t scrub.
Great crafts and you were right…quick too. Love the blue of your pumpkins and the crafted stemless wine glasses are really pretty. I’ve never used this product. It looks great! Can you wash them? Just curious. TFS
Wow! Love ALL three of these, I think the wreath is my favorite… but, I love wreaths! I have never tried gold leaf, but you’ve inspired me!
Carrie
curlycraftymom.com