How to Make Gold Leaf Votive Candle Holders
Here we are into the second week in November and with Thanksgiving less than 2 weeks away, are you already thinking about holiday gifts. You usually don’t hear from me on Saturday, but today is the 10th of the month and my friends at Ten on the 10th sharing gifts to make under $10. I have the perfect gift and I’m going to show you how to make gold leaf candle holders.
I’ve become a little obsessed (can you be a little obsessed?) with gilding in the past weeks. Gilding is a centuries~old practice that was used to promote a sense of wealth and royalty to anything from throne chairs to candelabra to marble church columns, which we saw on our recent trip to Budapest. Today we use gilding to add sparkle and pizazz to a variety of home decor accessories.
Once you know how to make gold leaf votive candle holders, there is a whole new world out there to embellish so many items for your home and for gifts. I’ll share a list at the end of the post. And then you can hop on over to see what other gift items you can make for under $10.

Make Gold Leaf Votive Candle Holders
This post contains links to products that I love, use and highly recommend. If you should order any product, I may receive compensation, but you do not pay one penny more.
We have dozens of small votive candle holders in our home. They are so inexpensive that I thought why not embellish them with gold leaf for our home during the holidays. And then I thought they would make wonderful gifts ~ because who doesn’t like a little candle?
Ideas for Using Gold Leaf Votive Candle Holders
We all need that little gift that says, “I’m thinking of you.” But often, cost prohibits us from spending a lot of money when you may need dozens of that type of gift. These gold leaf votive candle holders are perfect for these occasions:
- hostess gifts
- teacher gifts
- stocking stuffers
- party favors
- little gifts to have on hand for friends who drop by
- that last minute gift for your Aunt Martha
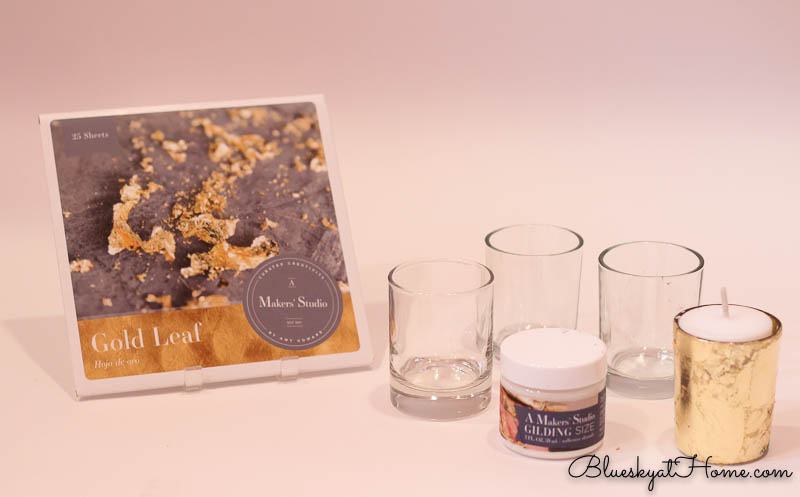
Supplies for Making Gold Leaf Votive Candle Holders
The small glass candle holders are usually about $1.25 each. If you can’t find them locally you might want to order a dozen on Amazon for about $1.00 each. Votive candle holders are usually 2 ~ 2 1/2 inches tall and about 2 inches round.
A week ago I held my first A Maker’s Studio Pop~Up party and each guest made a gold leaf gilded wine glass ($1.00 at the Dollar Tree). I also found tea candle holders with stems that I thought would make great candidates for gilding and that gave me the idea to make gold leaf votive candle holders, which as I said, I already have several on hand.
Here’s what you will need to make the gold leaf votive candle holders:
1 package of Gold Leaf from A Maker’s Studio (25 sheets to a package)
1 2~ounce jar of Gilding Size
1 foam dome brush
1 piece of cardboard
number of candle votive holders you want to make
Steps to Make the Gold Leaf Candle Holders
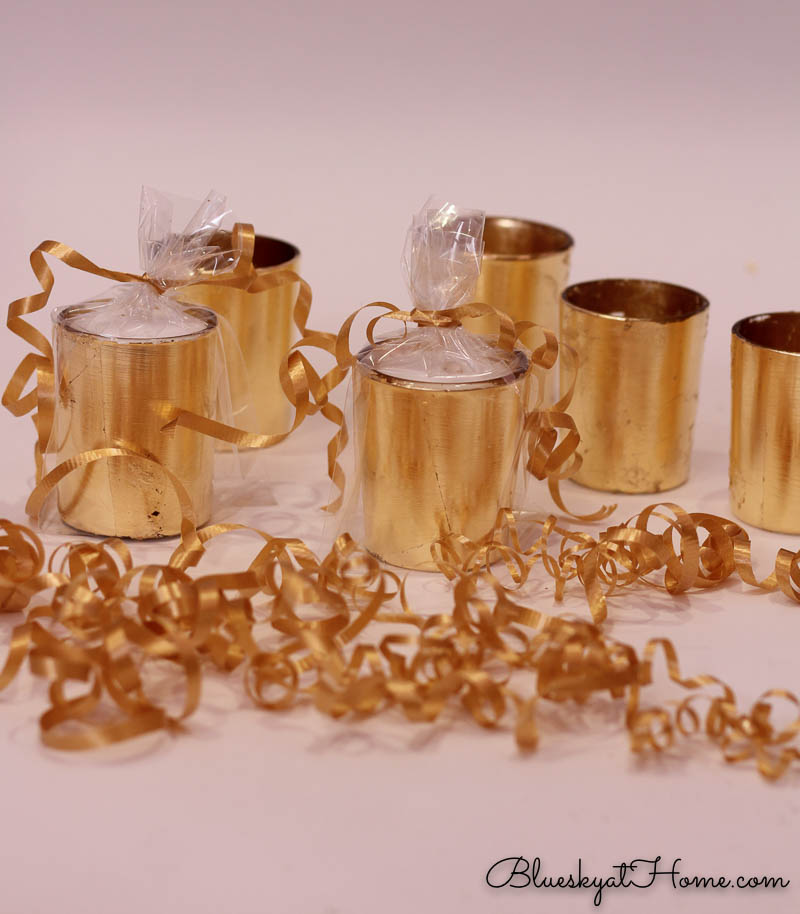
I made 6 Gold Leaf votive candle holders and used less than 1/2 of a package of Gold Leaf. I had already used about 1/4 of a jar of Size for my Pop~Up party. I could hardly tell that I had used any more after I completed my votive candle project. So ~ a little goes a long way.
- If your votive candle holders are new and have stickers on them, remove the stickers and any residue. I use Goo Gone. Wash and dry.
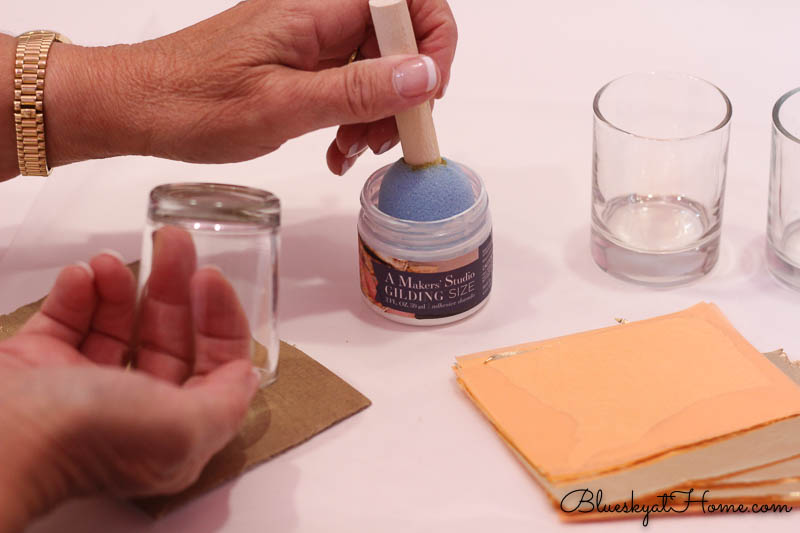
- Prepare your workspace. For gilding, I like to work on a piece of wax paper so I can pick up any small pieces of gold leaf and discard them.
- Lightly dip your foam dome brush into the jar of Gilding Size and offload onto the piece of cardboard to remove excess Size.
- Brush the Gilding Size onto your votive candle holder. Wherever you apply the Size is where your Gold Leaf will adhere. The Size goes on white so you can see where it has been applied.
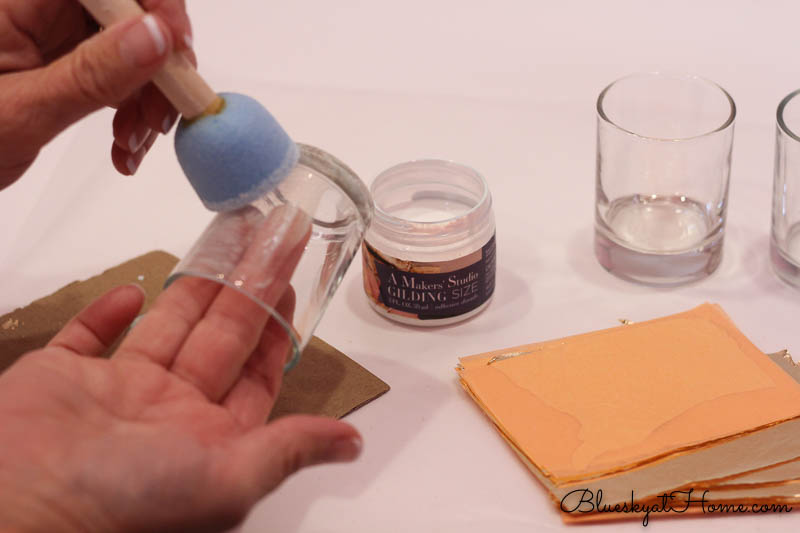
- Allow the Size to dry about 15 minutes to come “to tack”. Use your ring finger to lightly touch the Size; it should feel slightly tacky.
- While the Size is coming to tack, open your Gold Leaf package and remove the Gold Leaf. The Gold Leaf is in a “booklet”, bound at one side. For this project, I cut the booklet in half through the bound side. The 1/2 size fits just about perfectly around most of the votive candle holder.
- Orange tissue paper separates each piece of Gold Leaf. Open the first piece of orange tissue and turn it back like a page. Pick up the booklet and apply the first sheet of gold leaf around the candle holder and rub it down with your fingers. Apply a second piece of Gold leaf to the rest of the candle holder.
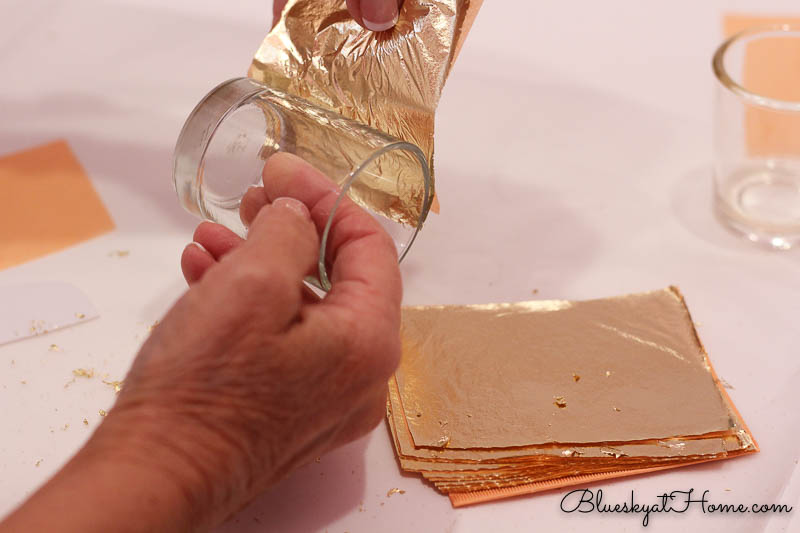
NOTE: The sheets of Gold Leaf may tear off and that’s O.K. Try to keep any pieces of Gold Leaf on your piece of wax paper and use them to fill in any spots on your candle holder.
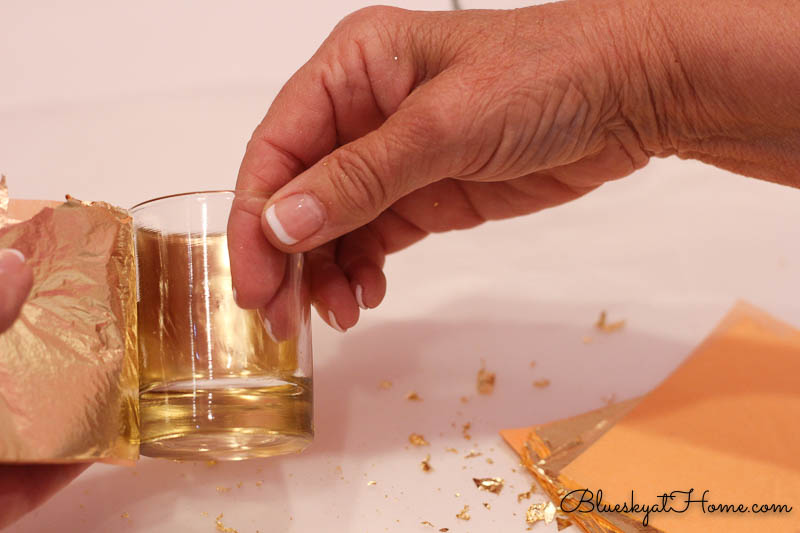
- Using a piece of the orange tissue paper, rub it over your Gold Leaf. This is called burnishing and this step smooths the Gold Leaf and gives it a shiny appearance.
- Repeat this process until you have finished the number of candle holders you are making.
That’s it. That wasn’t so hard!! How to make Gold Leaf votive candle holders is one of the easiest and most rewarding DIY projects I’ve done. I was a little scared to try Gilding, but once I started, I realized how easy it is. And with practice, it gets easier and easier.
By the way, Gilding also comes in Silver, Copper and Variegated. Which one would you choose?
Cost of this Project
Votive Candle Holders ~ I used ones I already had, but let’s just assume that I paid $1.25 each
Gold Leaf ~ 1 package of 25 sheets is $8.25 ~ I used 1/4 of a package, but let’s call it $2.00
Gilding Size ~ 1 jar is $7.25. I used maybe 1 tablespoon; I’ll estimate $1.00
Foam dome brush ~ already had bought a big package
Piece of cardboard ~ freebie from a cardboard box
Total ~ $5.25 divided by 6 votives = less than $1.00 each.
I had bought a package of 1 dozen votive candles at Joann on sale for $4.99 = .42 each. So we’ll call each votive candle holder cost me $1.40.
I obviously bought the Gold Leaf and the Sizing, but I’ll get many more projects out of those supplies so that’s why I try to prorate the cost.
Packaging your Gold Leaf Votive Candle Holders
You have to package a gift. Here are 2 ways you could do that for these votive candle holders.
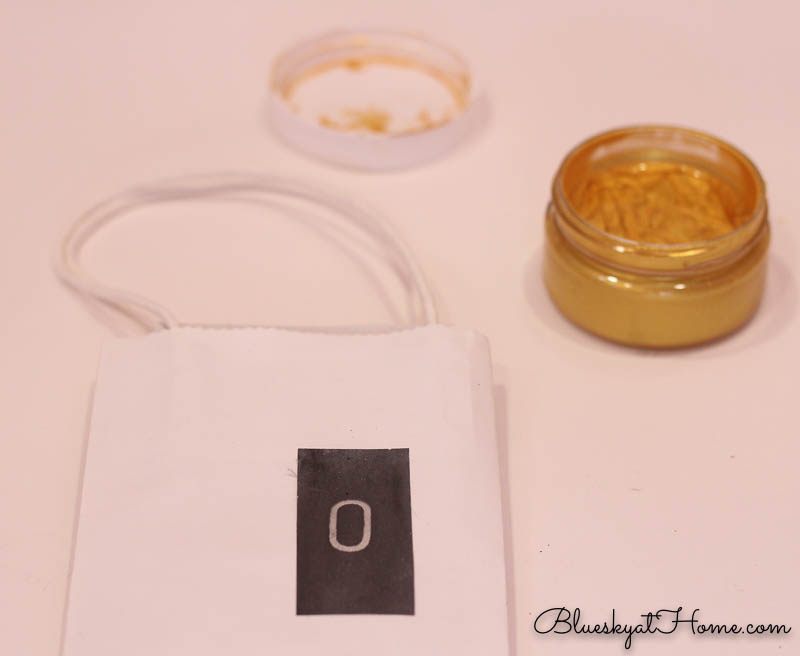
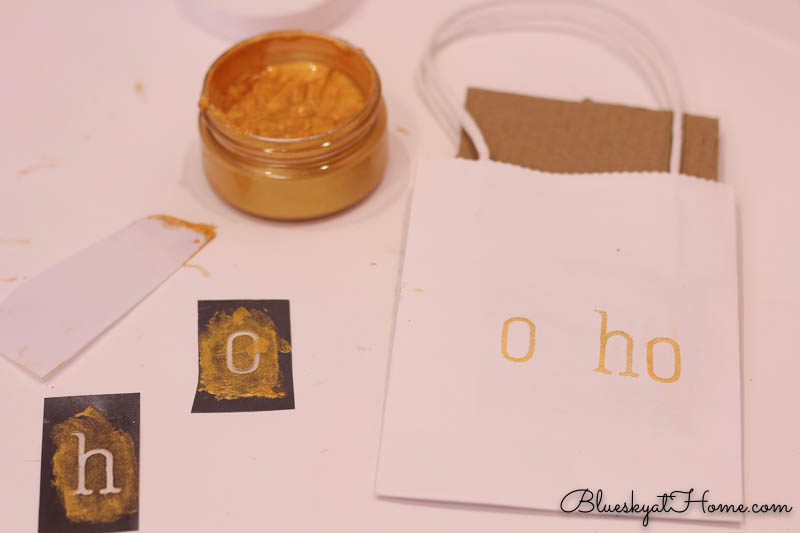
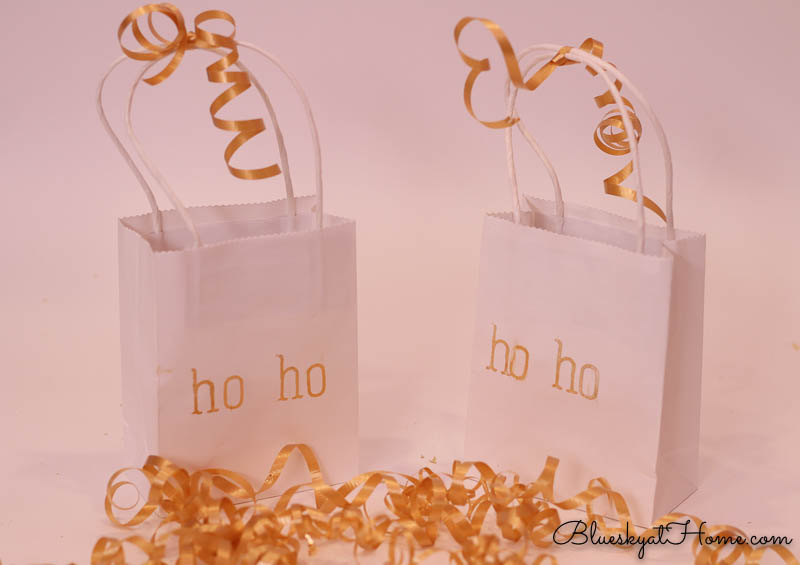
I had a package of small white gift bags on hand, the just~right size for this sweet little Gold Leaf votive candle holders. As a little extra embellishment, I stenciled “ho ho” on the bag, using Metallic Gold ChalkArt from A Maker’s Studio and our Alphabet 4 Mesh Stencil, which is a typewriter font. I predict that Metallic Gold and Metallic Silver will be popular colors for holiday DIY projects. (Check out this project if you would like to see more information on using ChalkArt and Stencils. It was my very first project using these wonderful products.)
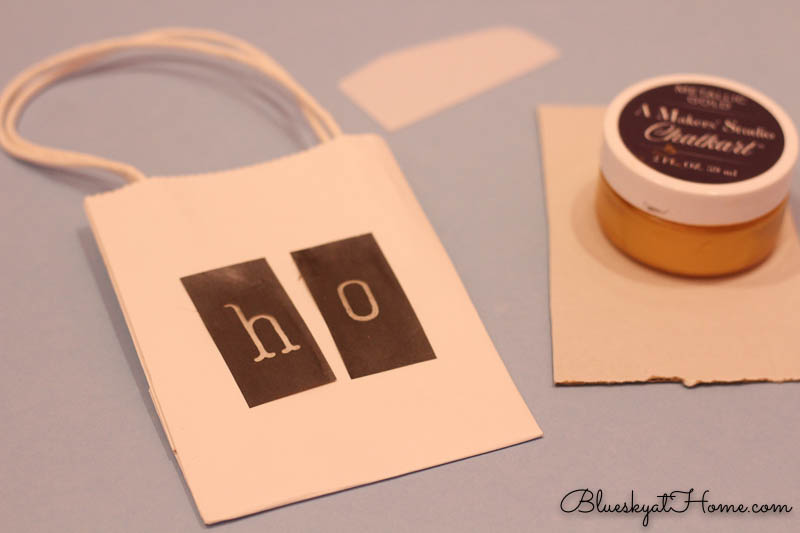
I’m left~handed, so I work right to left.
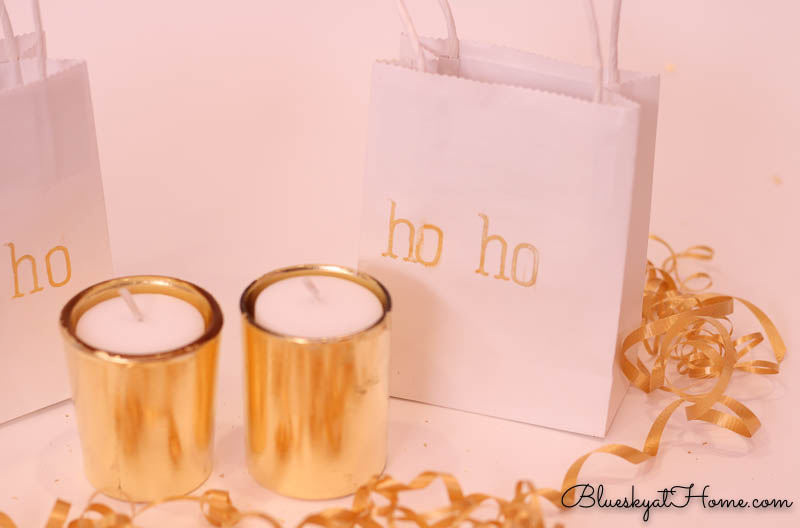
I tied the bags with gold curly ribbon ~ another freebie. After the black and gold balloons from my Halloween tablescape deflated, I cut off the ribbon to save for other projects ~ I do not let anything go to waste.
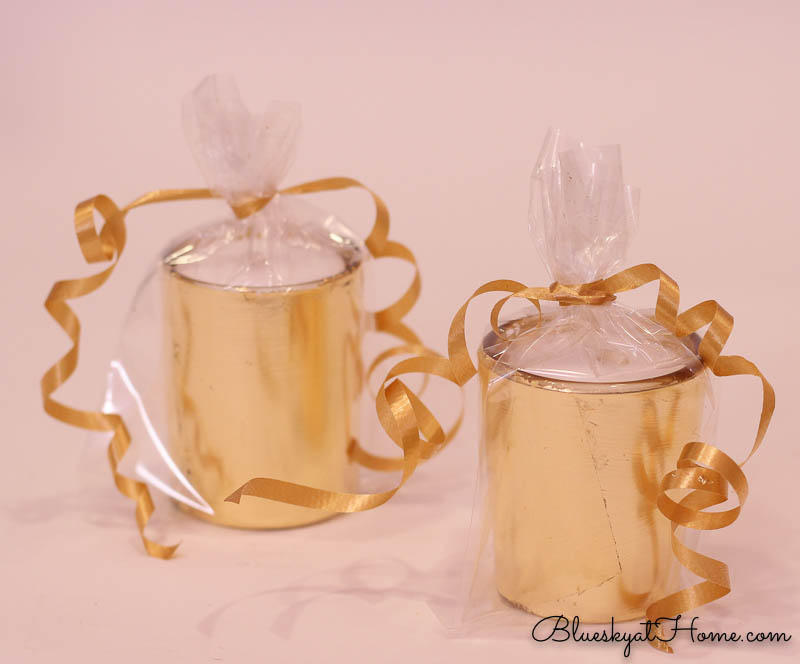
As another packaging option, I had 2 packages of clear plastic gift bags ~ they are in the baking section of Joann ~ that come in several sizes. The ones I used were the 4 X 5-inch size. This is a great option when you want your recipient to see the Gold Leaf votive candle holder. I would use this gift packaging option if I were giving the candle as a party favor ~ wouldn’t this be cute at each guest’s place with a name tag? Or place all the packaged votive candles on a pretty tray by the front door for guests to pick up as they leave your party.
Using the Gold Leaf Votive Candles in Your Home
Oh, the possibilities!
- On any table
- A tablescape (Can you see this coming for Christmas?)
- The powder bath
- In a guest bath
- Guest room nightstand (With a note to your company that the votive candle is a little take~away gift from you.)
- Several votive candle holders gathered on a tray and lit for a party
I bet you can come up with more ideas. I hope you’ve enjoyed learning how to make a Gold Leaf votive candle holder and that you will try it yourself. You can order the Gold Leaf and the Gilding Size and the ChalkArt and stencils on my Maker Studio website.
Be sure to PIN this for later so you can have the joy of making these gold leaf votive candleholders.


Carol these are absolutely gorgeous! Anyone would be glad to be the recipient of these votive candle holders, especially me!
So cute. I’m into gold these days. What a fun project.
Katie, then you should absolutely try the Gold Leaf and the Metallic Gold ChalkArt. They are my favorite new DIY products.
I’ve tried my hand at gold leaving a few times. I love the finished look of these votives.
Alice, you would love the Gilding products from A Maker’s Studio. I hope you’ll try them.
I have never tried gold leaf but these are adorable and who doesn’t love gold? Very cute. TFS,
Carol I love those cute little bags! I love working with gold leaf – even if it is a little messy. Or maybe that’s just me. Such cute ideas and they would be perfect small favor gifts or hostess gifts. Thanks for sharing!
Tammy, thanks so much. This Gold Leaf is not at all hard to use and I was very hesitant. I hope you will order from A Maker’s Studio and try it out. I have more ideas up my Do it yourself sleeve.
These are beautiful and I really thought they’d be much more difficult to make! I’m itching to try now! Thanks!
Kim, Gold (or Silver or Copper) is really easy to use. Hope you’ll order some and give it a try.
I’ve never tried to gold leaf anything. I’m quite intimidated by the process, but your tutorial gives me hope.
Lisa, I was intimidated at first but it’s really easy. So many possibilities. You could absolutely do it.
These turned out so pretty! I would love to shout it from the rooftops and tell everyone how easy these are to make. I’m so glad we had our craft day so I could learn how easy this really is. 🙂
Stacey, you can shout all over the place, girlfriend. I’m loving the possibilities.
What sweet little gifts!! Have you ever covered a frame with golf leaf? Try it – you will love it! Your clear directions and steps will make this project so easy for anyone to follow! Great idea!!
Thanks so much, Patti. I haven’t tried a frame yet, but it’s on my list. I’ve seen a video of Amy Howard doing a frame and it’s stunning. I hope you’ll try it.