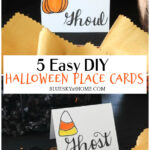
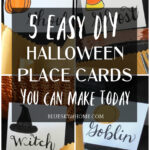
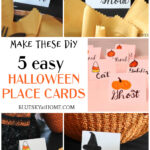
5 Easy DIY Halloween Place Cards
Are you planning a Halloween party with friends? If it is going to be a sit-down dinner, it would be fun to have place cards. Let me show you how to make 5 easy DIY Halloween place cards.
Place cards add a sense of “specialness” even to the most casual of events, even a Halloween party. These 5 easy DIY Halloween place card ideas will be sure to impress your guests.
We’re not talking picnic at the park or a football tailgate but in your home. When you have set a beautiful table, a pretty card with a guest’s name is a wonderful personal touch.
Place cards also give you an opportunity to add another element to your tablescape theme or colors to your table. This is especially fun for a Halloween party.
DIY place cards allow you to show your guests that you have taken the time to make the event special.
Place cards can be fancy or simple, but the most important element is that you add your own touch. Here are 5 easy DIY Halloween place cards to give you ideas for your own.

5 Easy DIY Halloween Place Cards
- Why Place Cards?
- Inspiration for the Halloween Place Cards
- Supplies for the Halloween Place Cards
- Halloween Place Card Style Number 1
- Halloween Place Card Style Number 2
- Halloween Place Card Style Number 3
- Halloween Place Card Style Number 4
- Halloween Place Card Style Number 5
- Other Ways to Use Place Cards
- Check Out All these Halloween Tablescapes
Why Place Cards?
- Place cards give you another opportunity to add your tablescape theme or colors to your table.
- In addition to adding elegance to a dinner table, place cards also reduce the ‘jockeying” for seating at the table.
- They give you control over who sits next to whom.
- You can “break up” couples, sit boy-girl-boy-girl, make sure your two friends who have never met but have common interests, sit next to each other.
- Seat yourself at the head of the table or closest to the kitchen.
Inspiration for the Halloween Place Cards
I made these DIY easy Halloween place cards for last year’s Halloween tablescape. As I’ve mentioned before, I am by no stretch of the imagination an artist. I can’t draw. But I can follow directions when other more talented people provide the instructions.
In preparing for the Halloween tablescape, I researched Pinterest for ideas. I have also been practicing my hand-letter skills using Amy Latta’s wonderful hand-lettering for Relaxation.
Remember my first-hand lettering project making tags for a Thanksgiving place setting? I even practiced on the airplane on our trip to Cape Cod and Boston (long flight!)a few years ago. (I just received Amy’s brand new book Hand Lettering for Faith and I can’t wait to dive in.)
Amy’s blog Amy Latta Creations also provided me with the breakdown of how to draw a few simple Halloween-inspired objects. One I figured out all by myself (pat on the back).
So grab your favorite beverage and sit down with me while we make these 5 easy DIY Halloween place cards.
Supplies for the Halloween Place Cards
You only need just a few supplies to make all of these place cards and you may already have them all on hand.
- unlined 3 X 5-inch index cards or cardstock
- writing pens – see below*
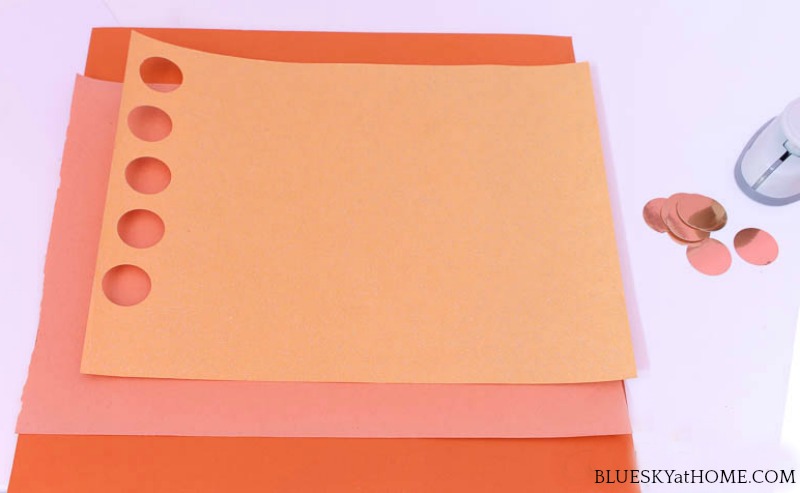
- colored craft paper, such as construction paper or scrapbook paper
- round or oval punch

- glue or adhesive
I had all these supplies on hand.
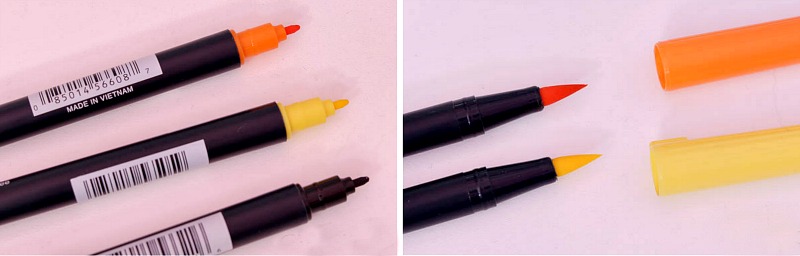
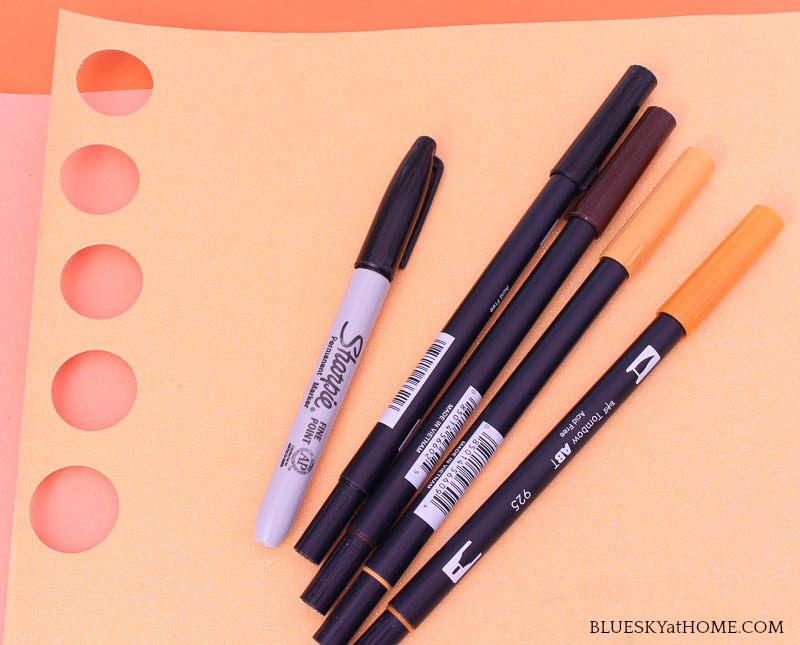
Let’s talk about writing pens. When I started really working on my hand lettering, I bought the 10-pack Tombow Duel Brush Pens in the Primary Palette. You could also use Fine Point Sharpies (not extra fine), but they will bleed through your paper.

The Tombow Duel Brush Pens havetwo2 different tips. The picture on the left is the fine tip for lettering and outlining. The brush tip is for filling in and brush lettering. For these place cards, you need pens in Black, Brown, Orange and Yellow.
I already had scrapbook paper in 3 shades of orange. The lightest one had a bit of a sparkle to it so that is the one I used for 1 of the place card styles.
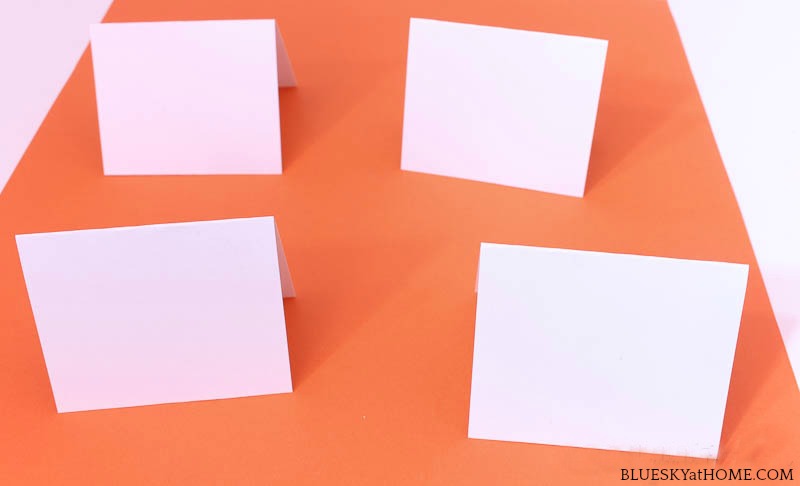
Regular 3 X 5-inch unlined index cards are the perfect size for the place cards. You could also cut card stock to size.
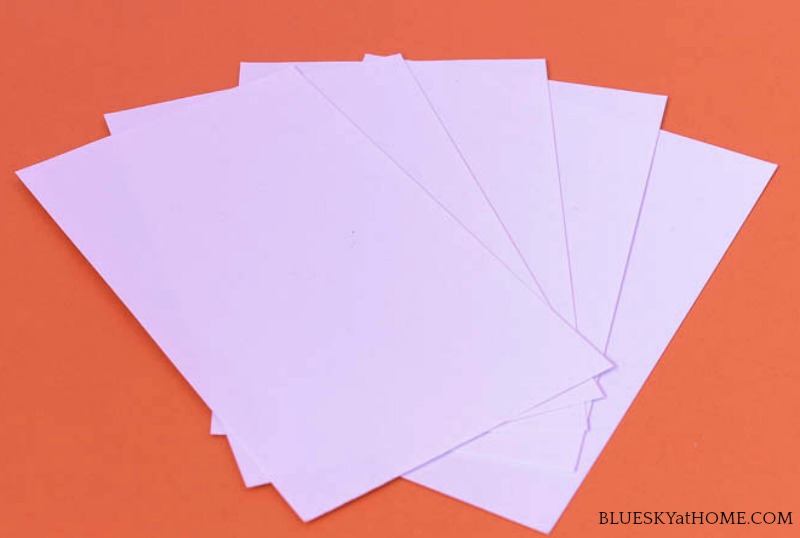
Before you begin, fold your index cards in half to make a 2 1/2 X 3-inch space for your design.
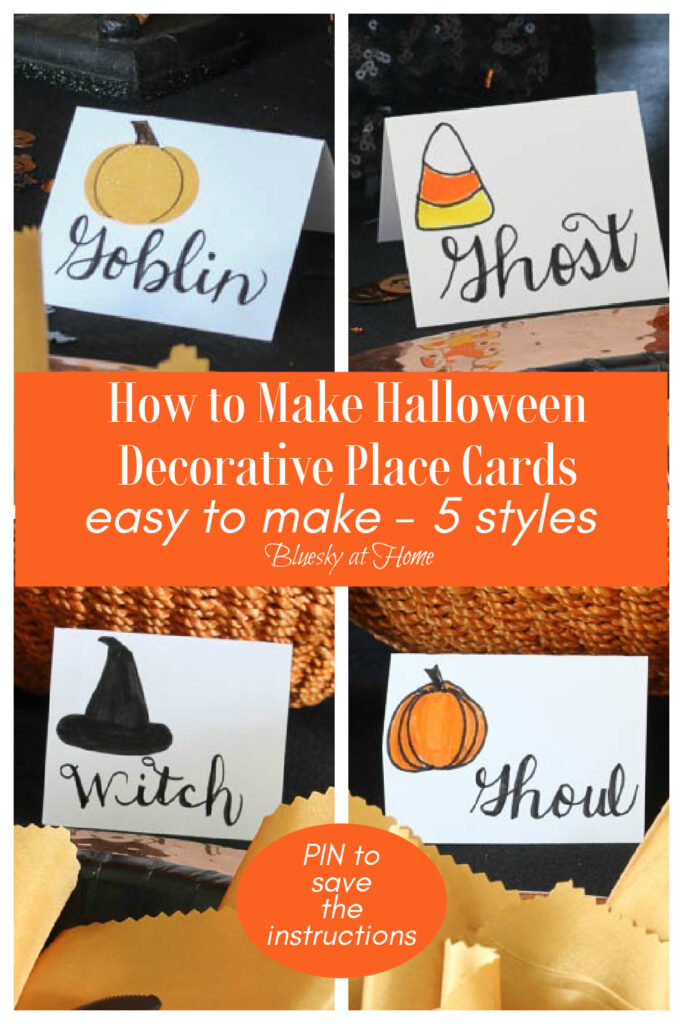
Before I show you how to make these 5 easy DIY Halloween place cards, let me say that I only needed 4 place cards.
Normally I would pick one style and use it for all of the place cards at my table. But I wanted to practice my drawing and hand lettering skills, so I played around and came up with 5 different ones and used 4 of them for my tablescape.
Today I have practiced enough that I use the Tombow Fudenosuke Pens and use the brush hand lettering method.

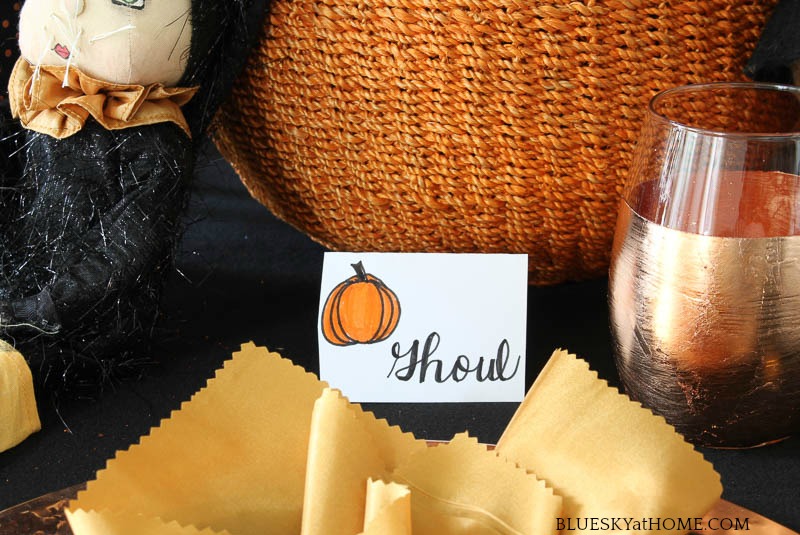
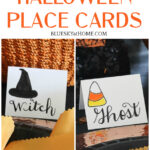
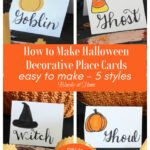
Halloween Place Card Style Number 1
Let’s start with a simple one that doesn’t require any drawing.
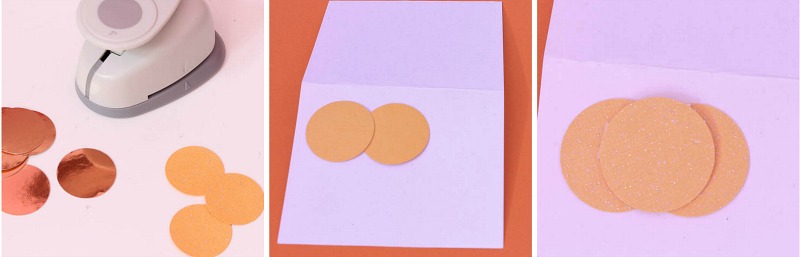
For this place card, you will just use your round or oval punch. I have a round punch so that’s what I used. My round punch is 1/2 inch, but you can use any size you like. I started with copper metallic paper, but switched to the orange sparkle paper. Totally up to you.
Left to right:
1. Punch 3 circles.
2. Place 2 circles overlapping in the top left corner of your index card and glue down. I used this scrapbook adhesive, but a dot of glue would work too.
3. Place your 3rd circle in the center of the first 2 circles and adhere. Do you see a pumpkin starting to appear?
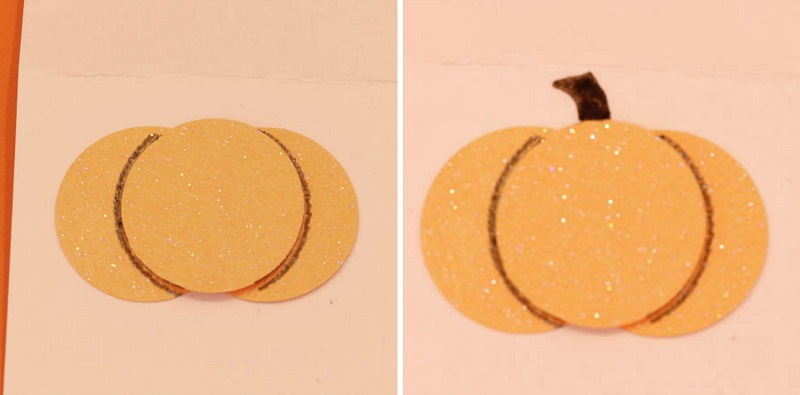
4. Using your fine tip pen in black or brown, draw around the sides of the top circle.
5. Using a brown pen, draw a stem on the top of your pumpkin.
Voila! You just made a pumpkin.
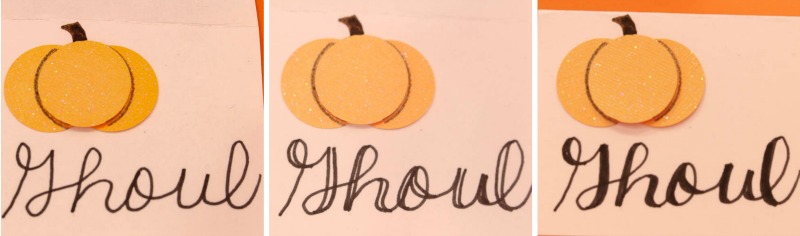
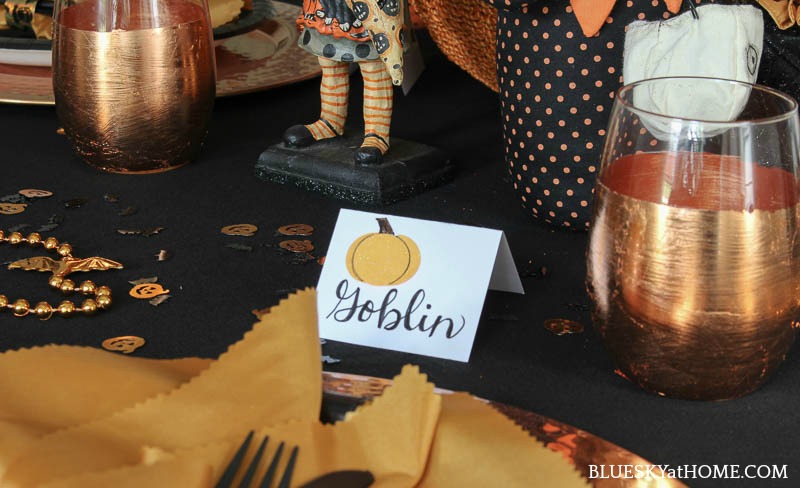
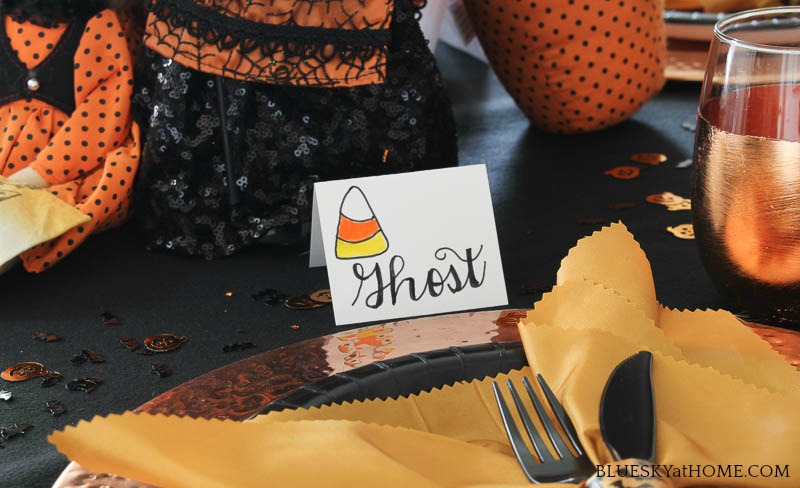
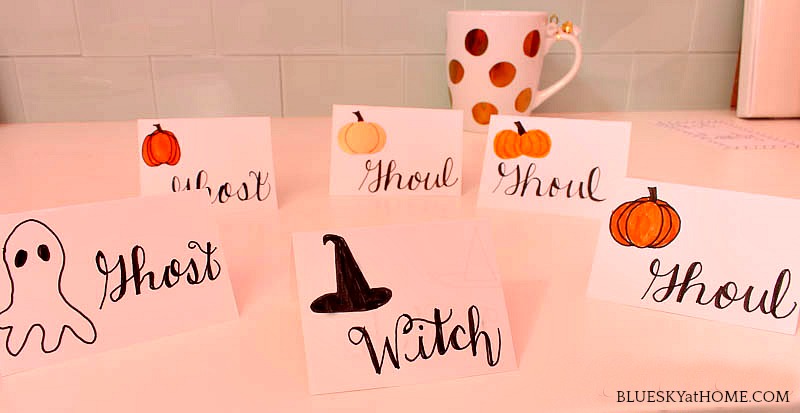
For my imaginary guests, I used the words Ghoul, Goblin, Ghost, Witch and Cat.
I don’t want to give you a lesson in hand lettering because at the time I made these place cards, I was just learning myself, but here is what I have learned so far.
- Write as vertical as you can, with just a slight slant.
- Spread your letters out.
- Relax and hold your paper firmly so it doesn’t move around.
- For letters with loops (h, l, g, y, for example) widen the loops more than you normally would
- After you have written your word, go back with your fine point pen and add an extra line on the DOWNWARD strokes
- Using either your fine point Sharpie or the Tombow Dual Brush, fill in the space you made.
TIP: These are your place cards, so use whatever style of writing you like. It doesn’t have to be perfect. It doesn’t have to look like mine or ones you see in hand-lettering books. Everyone’s handwriting is different and that’s what makes it special.
I actually made several place cards for practice. Here is how this style ended up on the tablescape.
Halloween Place Card Style Number 2
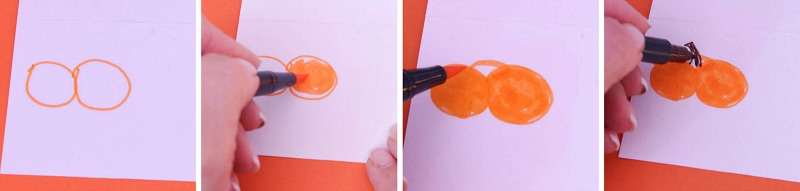
Now we are going to draw the simplest pumpkin. You can do this, I promise. I found this technique when I was searching for DIY Halloween projects on Pinterest. It is from Linda at Mason Jar Crafts Love. It is so easy, a kid can do it. That is not a Halloween trick.
From left to right:
1. Make 2 circles next to each other in orange.
2. Fill the circles in. Draw a line at the top to connect them. This is a step that I added. I think it gives the pumpkin more depth.
3. Draw your stem in brown. Then go back and fill in with orange around the stem.
Left to right:
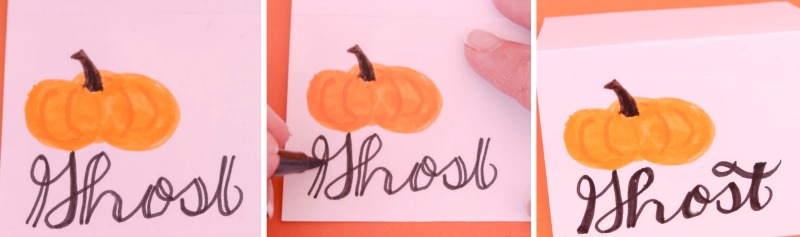
1. With a darker orange pen, draw 4 lines – like a parenthesis – down the pumpkin sides.
2. Add your word as I did above or in your own handwriting style.
Although this Halloween place card was one of my favorites, I didn’t use it in my tablescape. I used pumpkin styles 1 and 3.
Halloween Place Card Style Number 3
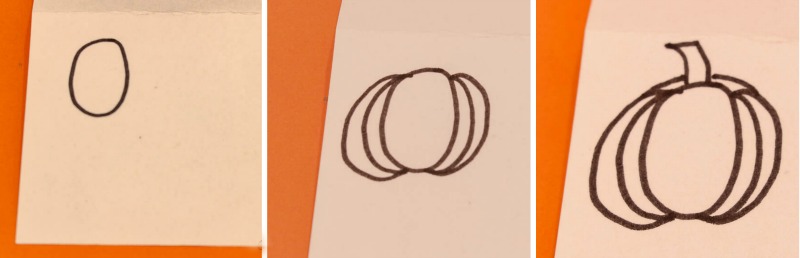
This pumpkin method is from Amy Latta of Amy Latta Creations – my hand lettering guru. I discovered that it was easier for me to reverse the order that Amy uses (is that because I’m a lefty?), but I suggest you try it both ways and see which is easier for you.
Left to right:
1. Draw an oval on the front of the card.
2. Draw 2 sets of parenthesis on each side of the oval, touching at the tops and bottoms of the oval.
3. Draw your stem.
4. Draw 2 lines connecting the outer parenthesis to the stem.
You just made another pumpkin. Let the pumpkin sit for several minutes and then fill in with orange and brown for the stem. This makes sure that the brown outline won’t mix with the colors.
You are done with this pumpkin style. Can you believe you drew a pumpkin?
Halloween Place Card Style Number 4
This idea also came from Amy Latta. Who knew how easy it was to draw candy corn? For this style, you will need your black, orange and yellow pens.
Left to right: 1. Draw a tall triangle with rounded angles.
2. Draw 2 lines, slightly curved, to divide the triangle into thirds, but with the top being bigger than the others.
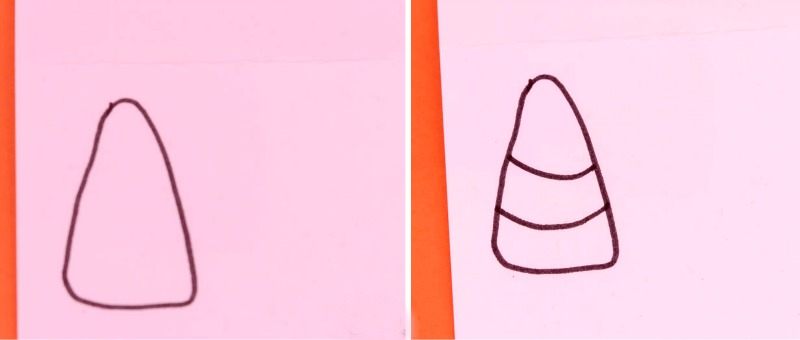
3. Fill in the middle section with orange and the bottom section with yellow and you have your candy corn place card.
TIP: Allow your outline to sit for several minutes before adding your orange and yellow. This makes sure that the black outline won’t mix with the colors.
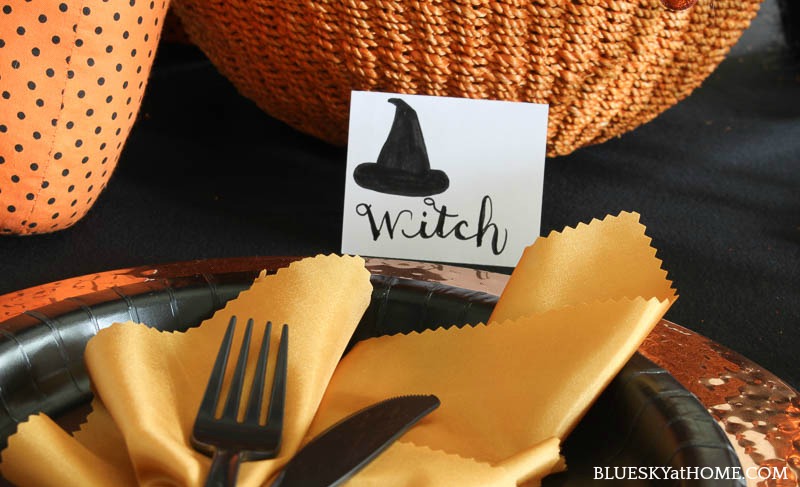
Halloween Place Card Style Number 5
I never thought I could draw a witch’s hat. Just like the pumpkins and the candy corn, it’s easy when you think about an object as different parts.
Left to right:
1. Draw a tall triangle with a rounded point at the top.
2. Draw a point at the top of the triangle, pointing to 1 side.
3. Draw a rounded line from 1 side of the triangle to the other. Think of it as an oval, but you can’t see the back side.
4. Fill in the outline with black pen.
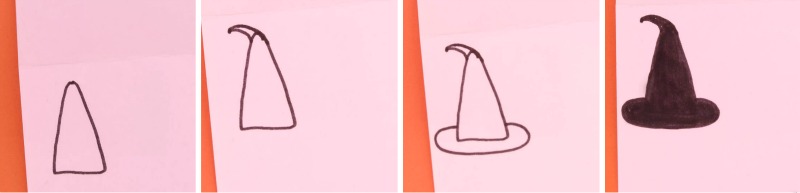
Now you have a witch’s hat. Wasn’t that easy?
As you can see, I made multiple place cards for practice. I even made a ghost, just for fun. In real time, you could easily make these DIY Halloween place cards in less than 15 minutes.
I know that if I can make these DIY Halloween place cards, you can too.
You could also use the pumpkin place cards for Thanksgiving. Or try making these cute turkey-themed Thanksgiving placecards.
Other Ways to Use Place Cards
- Cut the back from the card. Punch 1 hole at the top or side and use just the front of the card as a gift tag.
- Cut the back from the front of the card. Punch 2 holes and put twine through to use as a napkin ring
- Cut the back from the front of the card. Round the corners of the card, glue a pop stick or skewer to the back of the card, and use it as a cupcake topper.
- Use as menu cards for a buffet.
Check Out All these Halloween Tablescapes
- Halloween Tablescape on the Patio
- Black and Copper Halloween Tablescape
- Black and Gold Halloween Tablescape
Which place card design is your favorite? If you try one, email me a picture. I’d love to see what you’ve created. Until next time, happy drawing. Oh, please give me a treat and be sure to PIN and share.


These are adorable! Thank you for detailing every step. I think these ideas would be pretty easy to transfer to other holidays, too. I’ve pinned this for future reference!
Thanks so much for joining the Grace at Home party at Imparting Grace. I’m featuring you this week!
These are so cute and fun not to mention creative as well. I’m sure it will make your guests and family feel extra special too. Thanks for sharing them. #HomeMattersParty
I’m a huge fan of place cards. I used to be in charge of making them at all our family Thanksgivings when I was growing up. (My sisters called me Martha:)) These are adorable. Thanks for sharing at Vintage Charm! xo Kathleen
This looks like such a fun craft and a great way to personalize a Halloween table, Carol! I’ve always wanted to try hand lettering myself. Fun hopping with you, as always!
Thank you so much, Crissy. Great to be hopping with you again. You should try handlettering ~ it’s fun, relaxing, and a stress reliever.
These are so cute, Carol! You’ve made the steps simple enough that anyone can make them!
Hi Debra. Great to meet you on this hop. Thanks for the feedback.
What simple, festive ideas! Thank you for sharing! I’m visiting from the Embracing Home and Family link up. Have a great weekend Carol!
Hi Marielle. Thank you for coming over from the link party.
Wow…two blog hops on one post.. I’ve never seen that before! You’ll have to let me know how it goes for you. Fun little cards and great tutorial!
Hey, Julie. I know 2 is not always better than one. Wish they had been on different days!
These place cards are adorable, Carol! I love your creativity and your lettering is just beautiful!! Pinned!
Those are just darling Carol! I love the names of your guests, too! 🙂 I’m with you – I love place cards and try to use them as often as I can. These would be so fun for a Halloween dinner. Thanks for the great hand-lettering tips too. I’m going to try that out someday soon! Take care over there and Happy Wednesday!
These are just adorable! I love setting a pretty table and these would just put the finishing touch on any fall tablescape!
Karin
I love using place cards even when it’s mostly family. All of your ideas are so cute and your writing technique looks great!
These are so darn cute and clever! Love them. Great job and very detailed and easy to follow tutorial.
Carol you always make the cutest things. Love the placecards. They are so darling. Happy Fall.
Such a fun project! I love all of your placecards, and you did an AMAZING job on the tutorial! Even this gal who couldn’t draw a straight line might have a chance! LOL!
Cute Cute Carol!! Great tutorial too, I love the Towbow dual tipped pens, they are great for lettering. Did you know you can use them like watercolor and blend them, all you need is a waterbrush or a brush and some water. Using circles to make pumpkins is so smart!
Carol love these cute little place cards and how you walked us through drawing and hand lettering. I can follow along and make my own pumpkins and the other drawings using your instructions.
Thanks for sharing this craft!
Hugs,
RR
Carol, these are such cute little place cards. The glittery pumpkins made from three circles are so easy and so unexpected. I actually love your names, I think it would be so much fun to just put those names on the place cards and see who would choose which character they are!!
Those place cards are so cute! I’m thinking for my Thanksgiving table. Thank you for the inspiration.
Thanks, Corine. I’ll come up with some for Thanksgiving too!!
Carol I love using place cards. They add so much fun to a table and yours are just the cutest. I loved them all!
The placecards are adorable. Thank you for sharing.
These are super cute I just pinned them. Making some this week.
Happy Halloween,
Kippi
I love these! I think #1 is my favorite.
I love these and the pumpkin would be great for Thanksgiving too.
Your trip sounded fantastic. Boston is a wonderful city. It sounds like you had fantastic weather and a great time there too.
Hope all your treasures made it home safely
Cindy