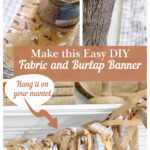
How to Make an Easy DIY Fabric and Burlap Banner
Now that September is almost here, fall decorating is “heating up”. With so many possible fall projects to make, how about an easy DIY fabric and burlap banner? Banners are a great way to add fall decor to many spaces in your home.
Whether you call it a banner or garland, this decor item is so versatile. A DIY fabric and burlap banner is easy to make and very inexpensive.
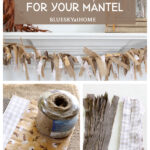
Banners are especially effective on fireplaces because they can be strung across the mantel. They add color, textures, and patterns. They provide a focal point for fall decorating.
For those of us who have mantels, they are one of the best places to decorate for any season, any holiday, or any day. Our eyes always gravitate to them.
Mantels also provide a flat surface for display and a backdrop for our accessories, art or decorations.
Mantels and banners/garland go hand in hand ~ like love and marriage or a horse and carriage. O.K. enough about that. Let’s get to this cute fabric and burlap banner project.

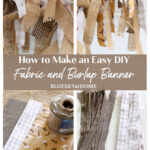
Fabric and Burlap Banner: Easy DIY Fall Decoration
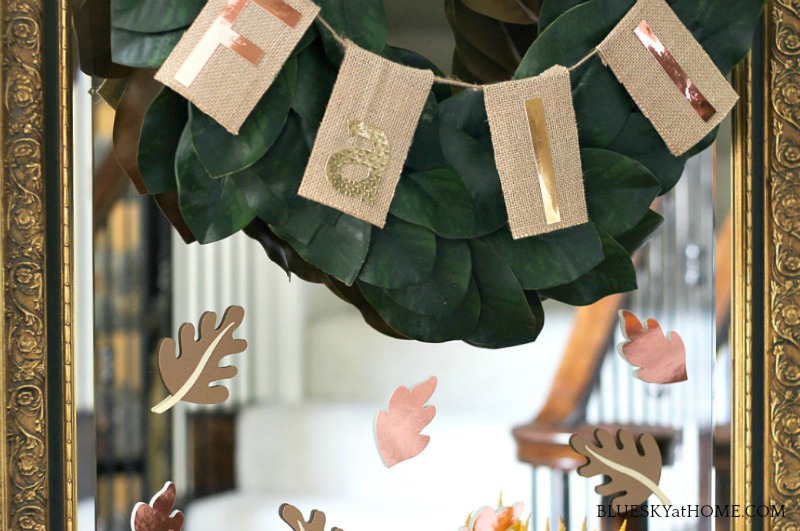
I made this fabric and burlap banner for my brand new fall mantel. I think it’s the perfect finishing touch.
How do you make a fabric and burlap banner? I’m going to show you how.
Fabric and Burlap Banner
- Fabric and Burlap Banner: Easy DIY Fall Decoration
- Examples of Fall Burlap Banners
- Inspiration for the. Fabric and Burlap Banner
- Supplies for the Fabric and Burlap Banner
- Measuring the Jute Twine
- Cutting the Burlap and Fabric Strips
- Assembling the Fabric and Burlap to the Banner
- Adding the Banner to the Mantel
Examples of Fall Burlap Banners
I’ve made many banners for different seasons and events. Here are a couple:
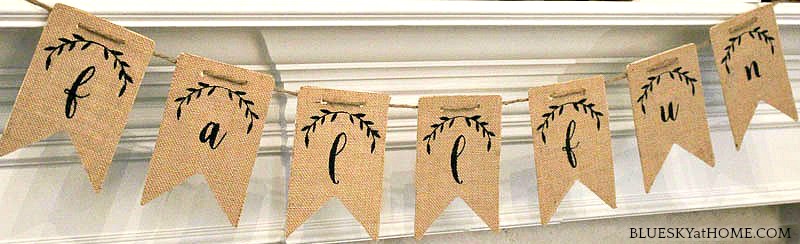
This new DIY fabric and burlap fall banner has a totally different look. It’s probably also the easiest one I’ve ever made.
Inspiration for the. Fabric and Burlap Banner
I was shopping for florals for my fall mantel at Hobby Lobby. As I walked down aisles just to browse, I spied a cute burlap and fabric banner.

On closer inspection, I could see how the fabric and burlap were attached together. Strips of fabric and burlap were loosely looped around thin twine. How easy is that?
I immediately knew that I wanted to make this banner. Wouldn’t you?
I loved the check fabric, but I didn’t want black and white for my fall mantel. Why not change the fabric to a pattern and color I liked?
I guess you can call this a Hobby Lobby hack.
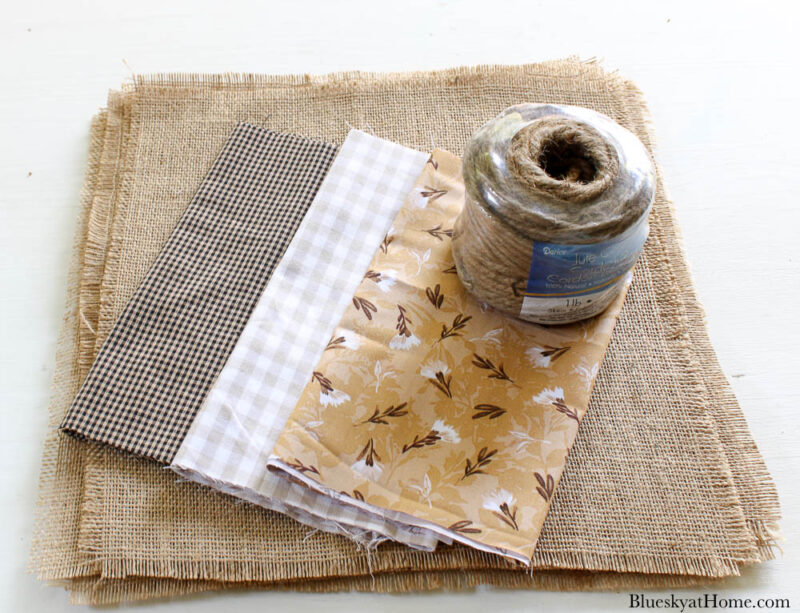
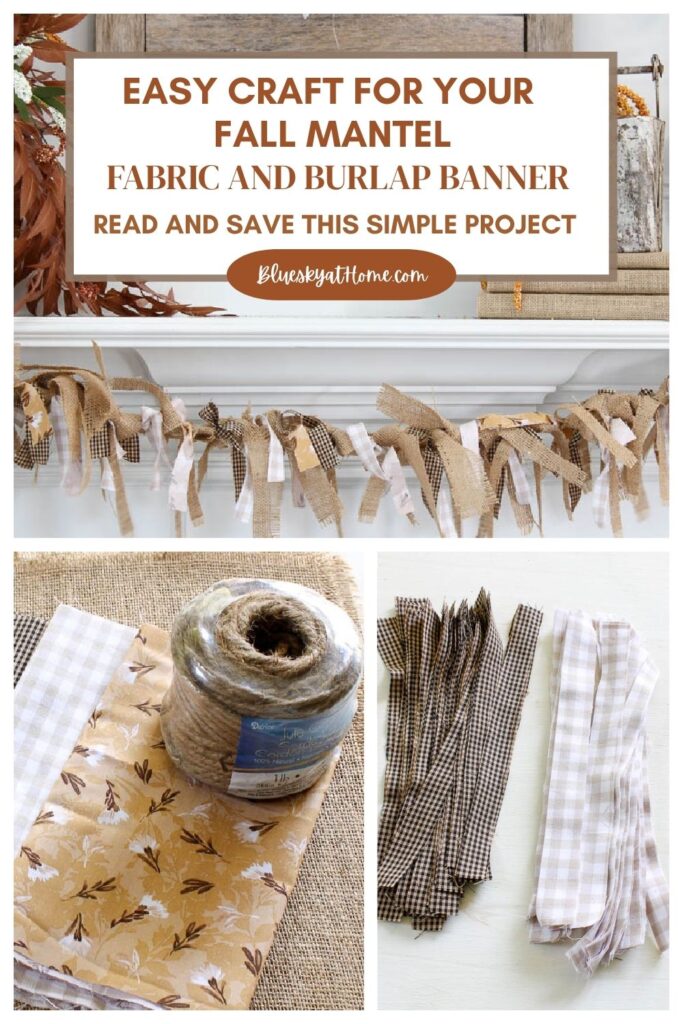
Supplies for the Fabric and Burlap Banner
This fall banner only requires 3 supplies plus scissors:
- your fabric of choice ~ 1, 2, or 3 different patterns (see some that I picked out below)
- good sewing scissors
- burlap ~ I already on hand, but here is an option
- jute twine ~ also, already on hand
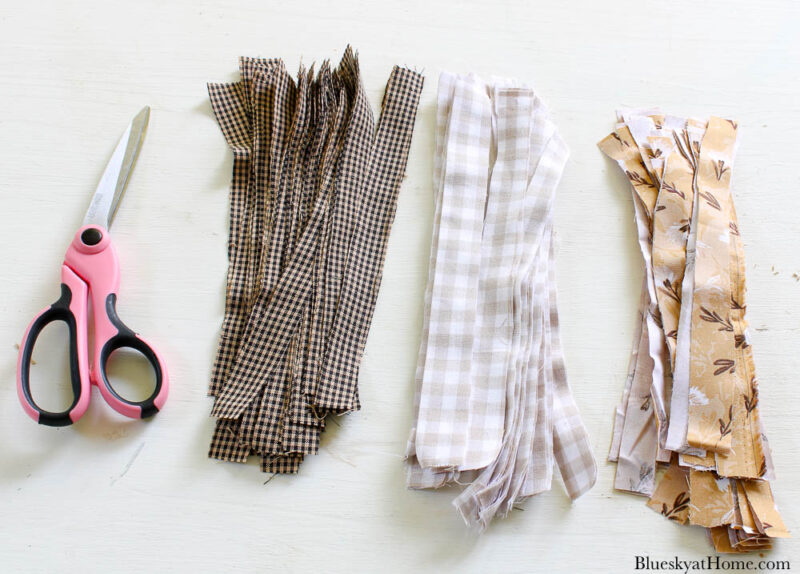
Since I was at Hobby Lobby, I walked over to the fabric area. Honestly, I had trouble finding a color and pattern I liked. Finally, I found three fabrics: a brown and black check, a taupe and white check, and an overall leaf pattern.
I bought 1/4 yard of each. Each piece was $1.50.
The inspiration banner used very thin twine. At home, I knew that I had a thicker jute twine. I also had 10 burlap placemats that I had made years ago that I could use for my banner.
Measuring the Jute Twine
I started by measuring the width of our mantel, which was 76 inches. This was before I started decorating the mantel.
Then I opened the jute twine package. I measured out 76 inches. Next, I added extra inches for tying the banner to the mantel and a little bit of slack for the banner. Just to be sure, I cut off an extra 25 inches.
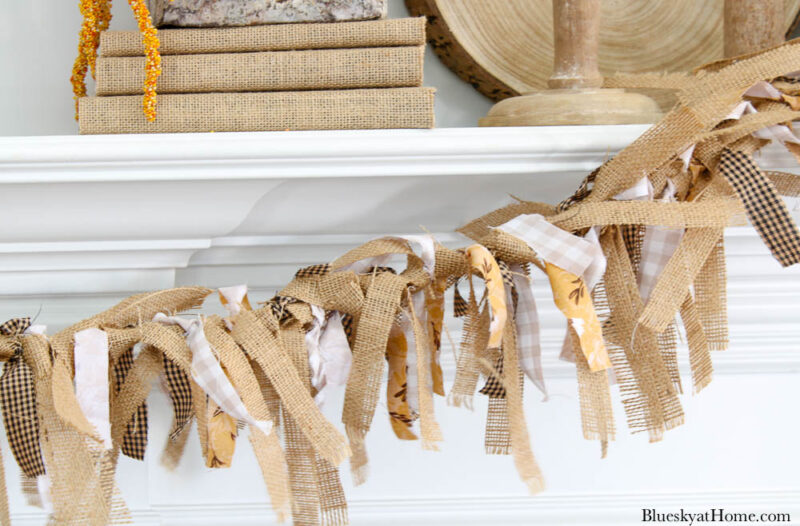
Cutting the Burlap and Fabric Strips
To start, I cut 1~inch strips from the burlap placemats. I didn’t measure but just eyeballed it. I got 10 strips from one placemat.
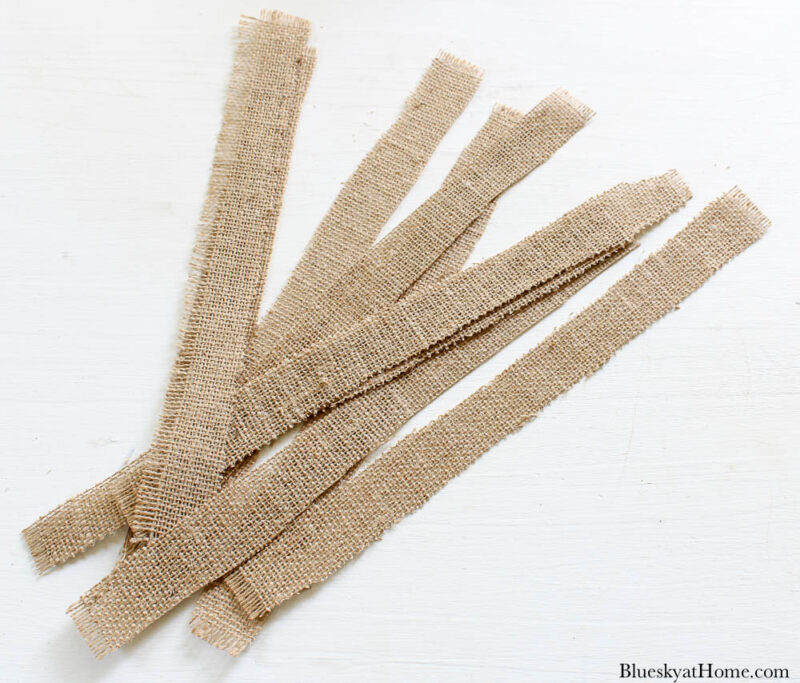
At first, I planned to use my pinking shears to cut both the burlap and fabric. After a few cuts, I decided it would be easier to use my sharp sewing scissors.
Each piece of fabric was 9 inches long, which was perfect for making the banner. Again, I cut 1~inch strips of each fabric. Not knowing how many strips I would need, I cut the entire piece of fabric on the fold. I got about 45 ~ 48 strips from each piece of fabric.
NOTE: Not sure why I didn’t use my rotary cutter and cutting mat for the fabric strips. It would have been so much easier and faster.


Assembling the Fabric and Burlap to the Banner
Once you have all three of your supplies, you are ready to start looping the fabric and burlap on the jute twine.
First, begin by adding the burlap strips. All you have to do is make a loose loop around the jute twine.
TIP: Don’t pull tight because you want to be able to move and adjust the burlap and the fabric.
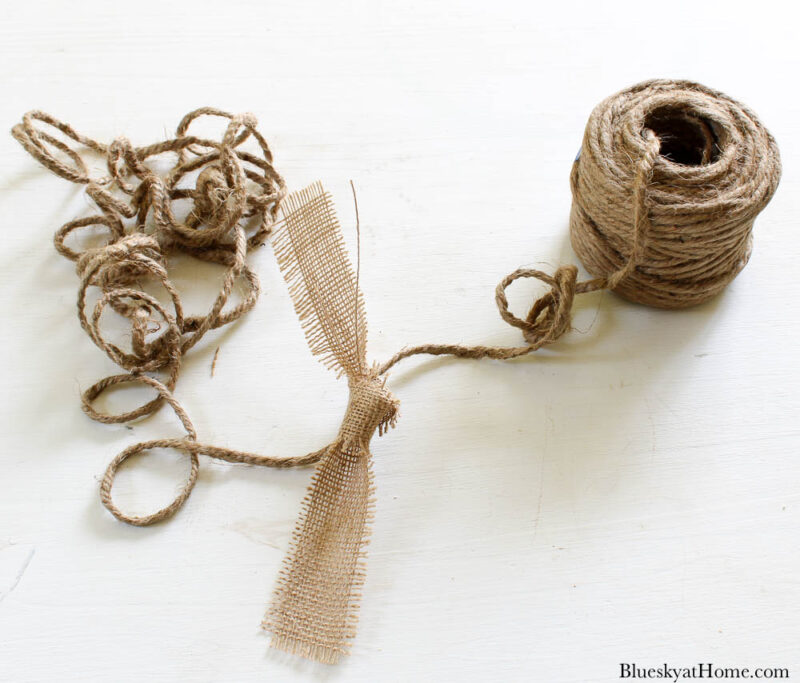
I added about 30 strips of burlap to the jute twine. Then I looped one strip of fabric in between two burlap loops. I alternated the three different fabrics.
Next, I repeated the pattern. When I finished filling in the fabric strips between all the burlap, I pushed the loops together for a tight fit.
NOTE: You can change the look of the banner by changing the pattern of the fabric.
I had plenty of fabric strips, but I did have to cut more burlap strips. I continued until I had covered the length of the jute twine, leaving about 12 inches on each end.
NOTE: I wanted a tight fit for my fabric and burlap loops, but you could definitely spread them out more if you wanted.
Adding the Banner to the Mantel
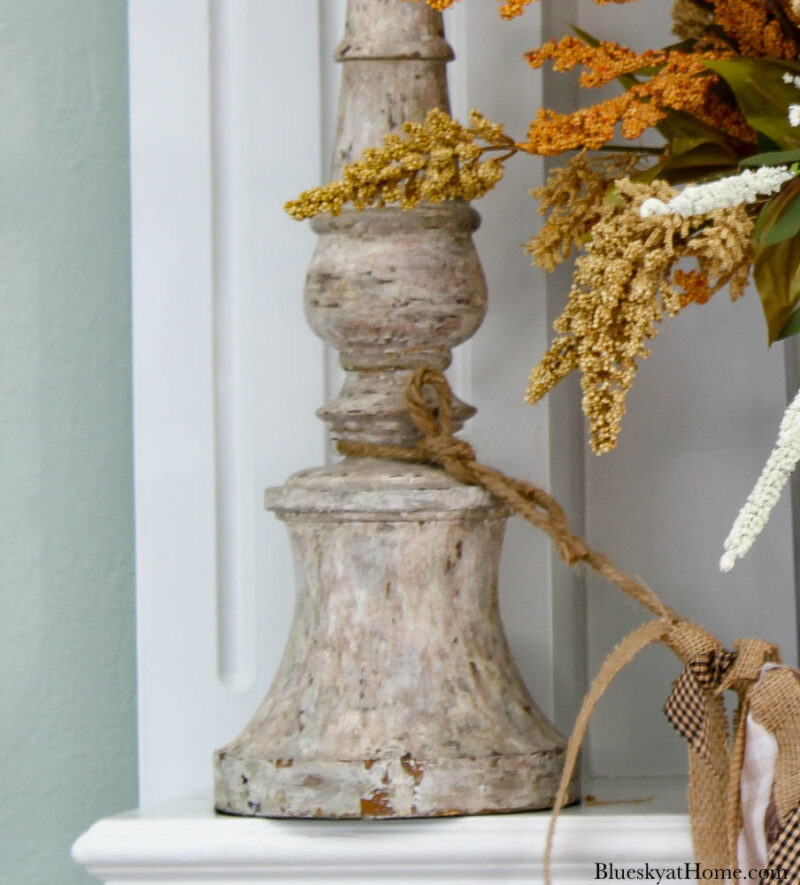
With the 12 inches of jute twine on each end, I looped the ends of the banner around the large candlesticks. These candlesticks have come in handy for holding banners.
TIP: You could also put small hooks into the back of the mantel to loop and tie your twine or other types of banners.
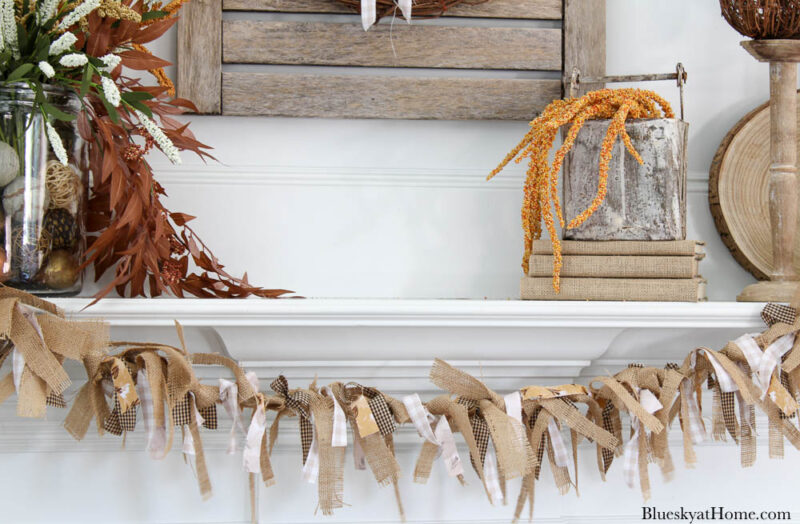
Finally, I adjusted and fluffed the fabric and burlap loops across the width of the mantel.
Was this a fast DIY project? Not exactly. Cutting the strips of fabric and burlap didn’t take long. The time-consuming part was looping the strips onto the jute twine. This is a great time to watch your favorite Netflix show. I watched three episodes of Virgin River.
It was really easy and very inexpensive with a big payback. My total cost was $4.87 for the fabric, including tax. If you had to buy jute twine and burlap, the cost would be more, but still a bargain of a project.
I had plenty of fabric strips left over. Not wanting to waste any and needing some embellishment for my wreath, I tied several strips together and added them to the grapevine wreath.
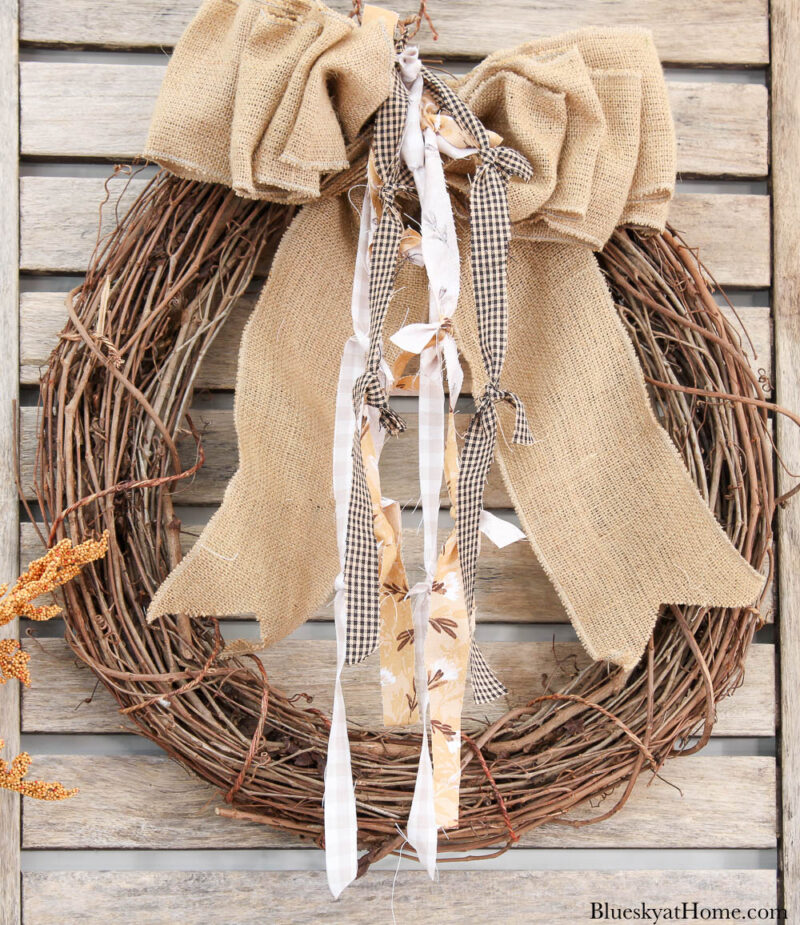
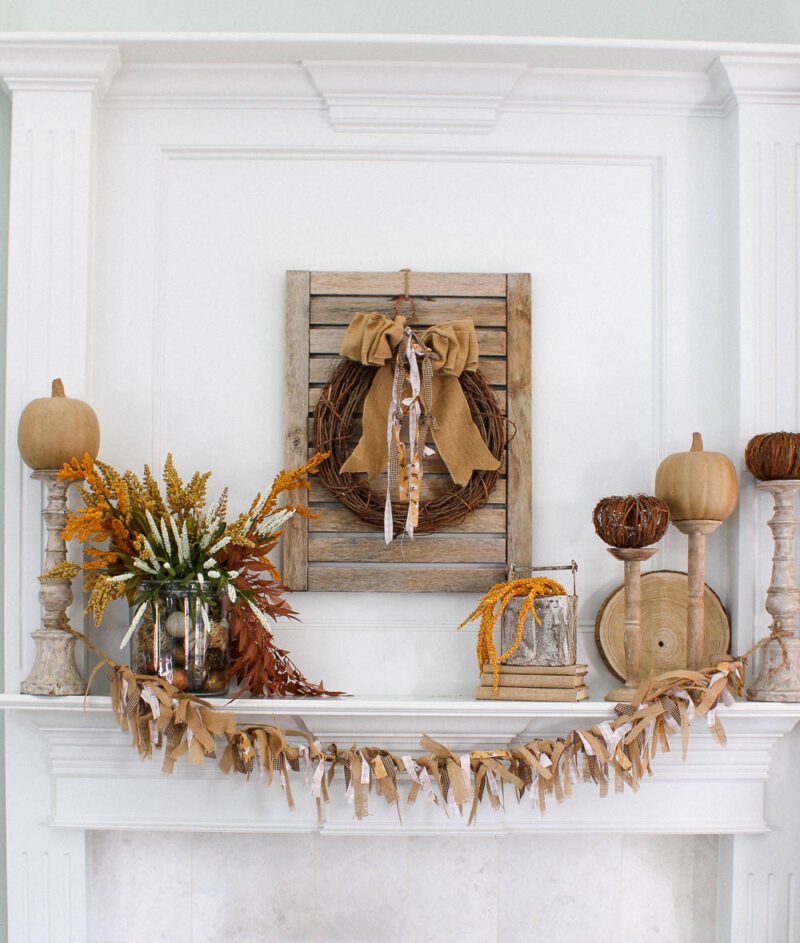
My new fall banner and fall mantel were complete. I think it added just the right touch of natural, rustic, and farmhouse vibe to the entire fall mantel and fireplace.
I will definitely find a use for the rest of the fabric strips.
The nice thing about this project is that you can totally change the look for other seasons or holidays.
Just purchase different fabrics. Then you can remove the fall fabric banner and replace it with Halloween, Thanksgiving, Christmas, or a patriotic holiday fabric and burlap banner.
I truly hope that you’ll PIN this fall banner project. I think it’s a great one. Even kids could make it.


I really like this banner and the wreath, as well. I’m not a big fan of neutrals, but I do love burlap, and I like the checked and print fabrics which coordinate with the camel color of the burlap. I will probably make both of these projects. Neutrals can be attractive.
Made a burlap wreath for my granddaughter which is seasonally changeable. The “Garland ” idea would be perfect to do for her Christmas mantle.
I love raggedy cloth banners. Your fall one is very attractve, although I’d put more autumn colors in mine. I currently have one in reds and greens with red apples attached, for my “back to school apples for the teacher” decor. Thanks for sharing.
What an adorable & super affordable fall decor piece! I’ll be featuring it on tomorrow’s Crafty Creators. Thanks for sharing!
Love it!! I made a garland similar to this last year for summer and it was so fun! Shopping at stores usually brings me so much inspiration. Perfect idea for fall!
Every time I see one of your banners I smile. Who wouldn’t?! Love the colors and whimsy. Fall is almost here – woo hoo! Enjoying the rain? It’s nice to see things turning green again. Have a great weekend.
I adore banners, garlands, and buntings. Your banner is gorgeous!
Happy Fall,
Kippi
Your fall banner is darling Carol! Thanks for sharing it with us at Farmhouse Friday – we’re featuring you at tomorrow’s party!
I saw it!! Thank you so much.
I haven’t decorated my mantel yet this year but your post have given me inspiration to make a new garland for it. I already had scrap fabric to use up so it is perfect timing. Thanks for sharing your idea and your mantel is lovely this year. #HomeMattersParty
I saw the same garland in Hobby Lobby and tucked it away in my brain for a future project. You beat me to it! I love the fabrics that you chose and your mantel looks beautiful. Thanks for sharing at Vintage Charm. xo Kathleen
Love the pretty banner & how you tied it in with the burlap ribbon on your wreath. Pinned!
Pinned! love this pretty banner and how you styled your fireplace mantle…just perfect! 🙂
Carol, I love this!! I have making one on my Fall to do list!! I’d love to add it to my weekly roundup!!
Super cute Carol! I love your banner and mantel. The texture of the burlap works so well with your candle holders and neutral elements on your mantel to transition into fall. So smart to repurpose those placemats for your banner.
I love your fall banner, Carol! Pinned and scheduled to share on my FB page.
Your burlap garland is lovely and I really like how you mixed the fabrics!
Great job on your fall mantel, very nice!
I like the way the garland is snugged in
front and does not extend across the
whole front of your mantel, much better
to look at with the rest of your design.
I am having a blush color going on with
my Christmas this year, thinking of the stairs
and replace the green garlands. I am glad
I read your lovely post today.
It’s always lots of fun to get inspired and re-create something we saw and admired! I remember seeing that garland at HL and liked it very much! I love how you handcrafted yours, Carol! It looks perfect for Fall and quite lovely on your mantel! Your family and friends will surely love it!
I think I’ll make one of these for the mantel upstairs. I liked Virgin River. Wouldn’t it be fun to visit there some day?! I’d love it!
This is fabulous Carol; I just love the combination of neutral colours you’re decorating with! It’s projects like this that make me wish we had a mantle; it must be so fun to decorate it each season!
Your mantel with the burlap banner looks perfect for Fall Carol! I love the soft colors and texture your clever garland adds and the repetition of the fabric added to the wreath really ties everything together. Even if it’s still hot and humid outside, we can have a touch of Fall inside! Lovely~
Great project! I had to smile when I saw your burlap placemats. For my daughter’s wedding 2 years ago, I bought 12″ wide rolls of burlaps and fringed the edges of 160 placemats! I STILL can’t believe I did that. I found the “straight” of the burlap by pulling one string and cut the placemats apart on that line. These strings became tassels on later pointed end table runners! It was a lovely outdoor farmhouse (tent for the rain!) wedding with hay bales, sunflowers, purple accessories, and bouquets in Mason jars. I have been on a garland-making rampage for the last year; when I sell them in my booth, I include 2 pearl headed pins; they make a tiny hole in sheetrock and making hanging the garland EASY!