How to Make Fabric into Inexpensive Art
Have you ever thought of using fabric as custom wall art? It’s such an easy way to add affordable wall decor to any room in your home. I’m going to show you how to make fabric into inexpensive art for your home.
How do you know when a room is complete? All the big stuff – furniture and lighting, wall color, and window treatments – are just right, but something else is needed to complete the scene.
The problem may be that you need accessories, especially colorful and personalized wall decor. Have you struggled to find the right art for a room?
When we were updating our dining room a few years ago, frustration was setting in. At first, I couldn’t find that perfect piece of art in the right size, the right shape, the right style, or the right color.
Oh, and not to mention, you don’t want to pay a bazillion bucks for it. And you need two of whatever it is you need.
Then I took a different approach, and I hit on an idea. It’s a brilliant idea if I do say so myself. I have to tell you about it and show you how brilliant an idea it is.

This post contains affiliate links to products used to create this project. If you should order any item from this site, I may receive compensation, but you do not pay a penny more. Your purchase is greatly appreciated as it helps support the continued publication of this site.
Decorating Delimmas
A few years ago, our dining room makeover during the One Room Challenge was almost perfect. Almost.
Selecting our beautiful mirrors and art was a major decision. Our mirrors of choice from Wayfair (love, love them!) had arrived. I figured out how to hang them easily.
For any project, whether new or a makeover, so many design decisions have to be made.
On both sides of our front bay window, we have two walls that are only 24 inches wide. They balance the bay window. The bay window is the main focal point.
That side of the room was missing that final element that would add color, pattern, and interest. I wanted unique wall art ideas for those walls.

What do you do when you’ve looked and searched and you’re getting stressed and discouraged and ready to give up and just put up with blank walls? That’s when you start thinking outside the proverbial box.
That proverbial box led me to fabric. Fabric led me to picture frames. I had to figure out how to make fabric into inexpensive DIY wall art.
Art for the Dining Room
During the One Room Challenge, I looked on Instagram, Etsy, decor websites, and Amazon for just the right art for the dining room. We had three walls that needed art.
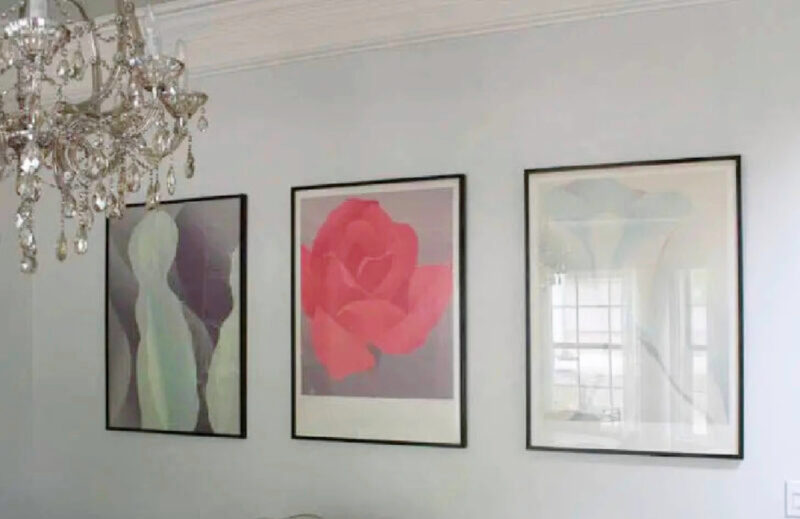
I found the perfect peony print from Wayfair and placed it on the wall adjacent to the bay window. This piece was one of the first accessories I found, and I fell in love with it.
The fact that I love peonies and the dominant color was pink with a bit of lavender filled my vision of pink accessories. The price was so reasonable and it was already framed.

For the very large wall in the dining room, we used these 3 large pieces with very muted colors and an abstract style.
Sweet Shark found them in his office, where they had been in storage for 20 years. They filled the wall beautifully and picked up the pink and lavender color in the peony print.
Finding the Right Art For the Bay Window Walls
Back to art for the small walls. I was looking for art with certain criteria.
- ideally 8 x 10 or 11 X 14 inches
- 2 pieces that complemented each other
- had pinks, lavender and maybe other colors to complement what we already had
- was somewhat abstract in style; no flowers since all our other art in the room was floral
- not expensive; I didn’t have a specific budget in mind, but I really didn’t want to pay more than $100 total for the art and the frame
I looked and looked and looked. Although I found art with the right colors and style, everything was way too big and unframed. I would have been fine with unframed canvases if the size and color were right.
Finding two complementary pieces was also a challenge. Finally, I decided to just put the search on the back burner for a while.
Then a couple of weeks later, walking to the drapery hardware aisle at Joann (totally different project), I turned down the fabric aisle. I love fabric and just like browsing to see what’s new.
Suddenly, I spotted a fabric with bright pastel colors in an abstract pattern. I really liked it, but didn’t have a project in mind for it.

Then, as I walked down another aisle, I saw another fabric with the same colors, but more muted, in a soft paisley pattern. Suddenly, my creative gears started turning.
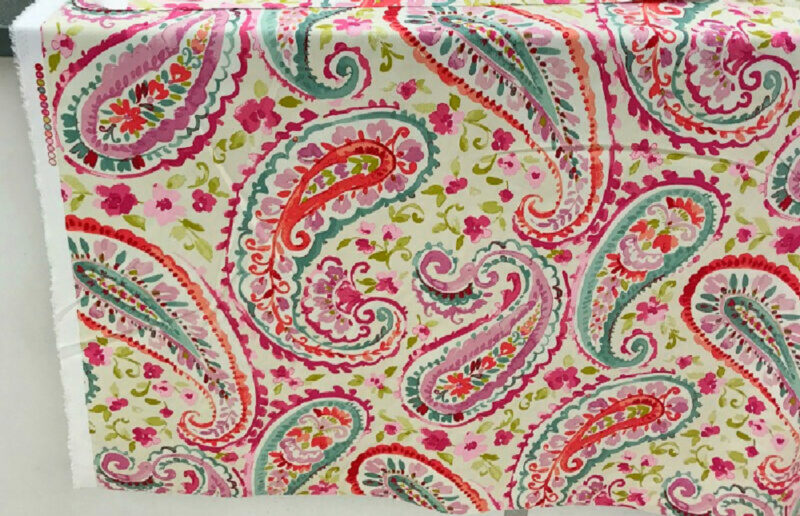
Would these two fabrics work together on my dining room walls? (They obviously did or we wouldn’t be having this conversation.)
I carried one large bolt over to the other fabric and held them up together. Yes, I think they would. Because it was fabric, I could cut it into whatever size I wanted.
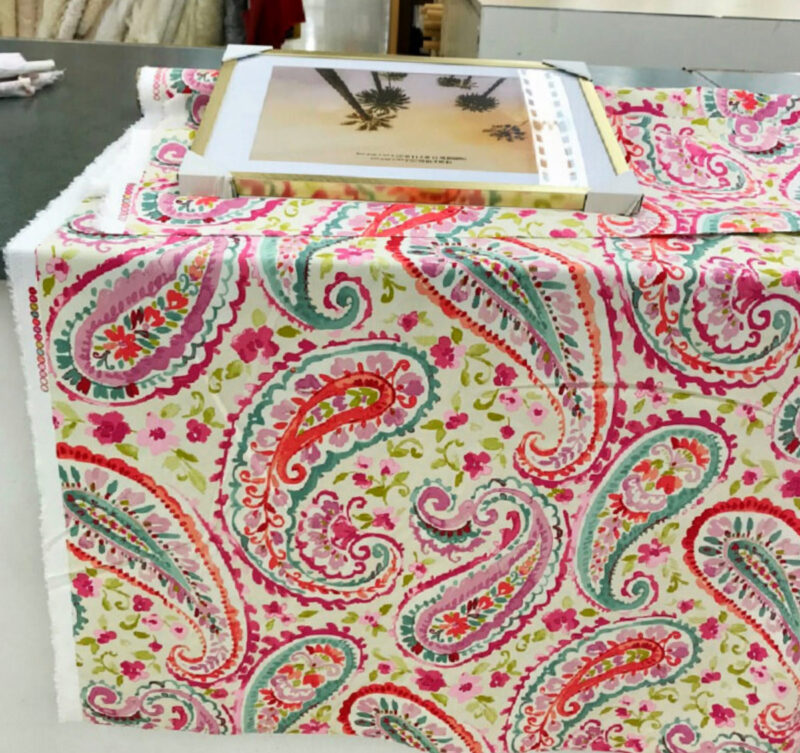
Next step, I would need to find frames. I walked over to the frame area (Please don’t let anyone buy that fabric while I’m away!) and started looking for frames.
I decided that a frame at least 11 X 14 would be the right size. Well, of course, I found the right size frame, but there was only one!
Then, walking to the end of the aisle, I found the perfect frame – and there were two of them! The hardware on our drapes and the finish on the mirror were gold. And these frames were gold!
The frames were 14 1/4 X 18 1/4 inches. The white mat was 10 1/2 X 13 1/2. The posted price was $49.99. Darn. That was way more than I wanted to pay.

I looked down and saw a sale sign. 60% off. I love Joann sales. What? OMG, that would be $20 each. Sold! (Do you miss Joann as much as I do?)
I grabbed those frames and ran back to the fabric aisle and grabbed those 2 bolts and headed to the cutting table.
And guess what? The fabric was 50% off. Instead of $30 a yard, it was $15 a yard. How much did I need? I thought 1/2 a yard each would do it, so that meant my fabric cost was $7 each. So my total cost for each piece of “art” was $27 + tax.
TIP: Purchase your frame first. Then you can cut the fabric to the amount you need.
This easy DIY art project came together in minutes!
Making Fabric into Art
Now the fun begins. Are you ready to learn how to make fabric into inexpensive art? Me, too. I knew that the two patterns would work together.

Step 1 – Iron the fabric. Art should not have wrinkles.
When I need to iron large pieces of fabric for projects, I prefer to use my large ironing mat. I set it on the kitchen counter and lay the fabric on top.

Step 2 – Take the frames apart. I realized that rather than measuring the fabric, it would be easiest to use the mat as my guide. I just used a pencil to draw a line around outside of the mat. I wanted the fabric to be the same size as the glass so it would fit snugly.
NOTE: It doesn’t matter which side of the fabric you draw your pencil line on.


Step 3 – Cut the fabric on the inside of the drawn line.
TIP: Be sure that the pattern of your fabric is straight before you mark the fabric and cut. You don’t want a crooked pattern.
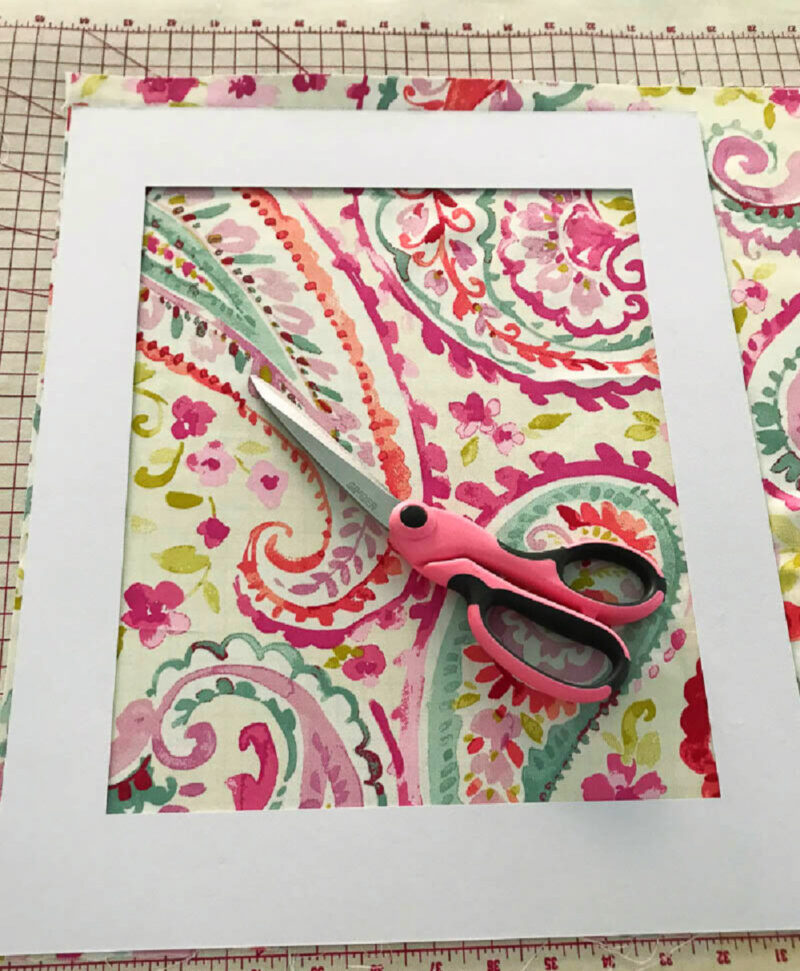
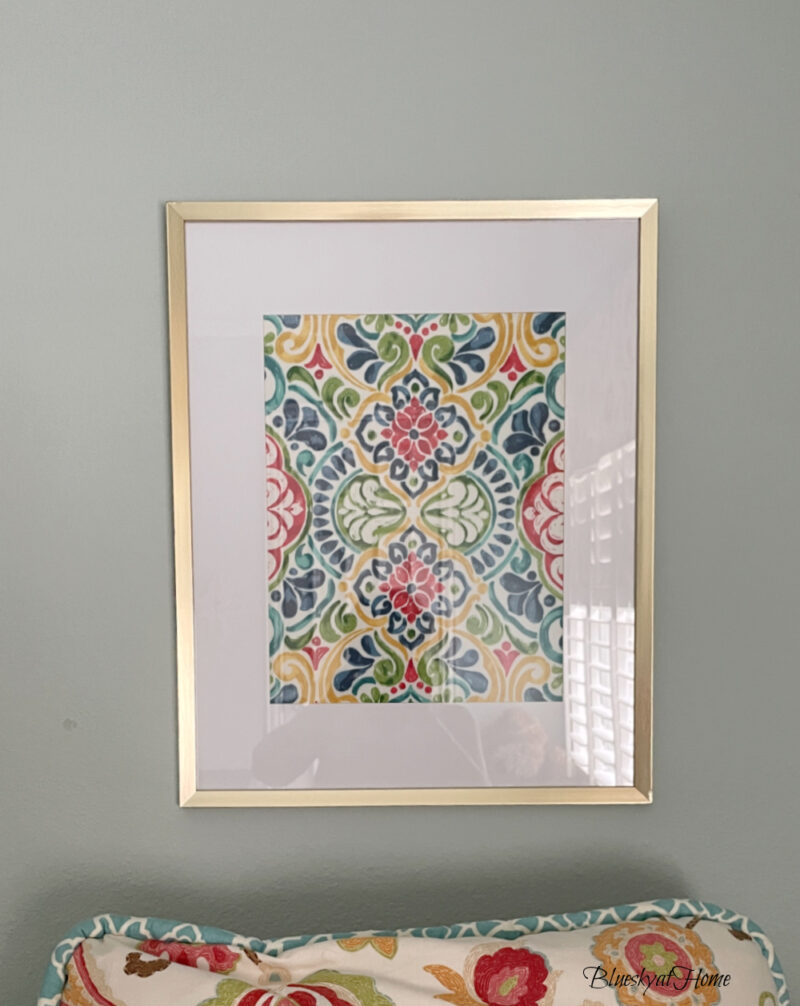
Step 4 – With the frame’s glass side down, place the fabric right side down and reassemble the frame.

Step 5 – Reassemble the frame.

Because I only needed 10 1/2 inches of fabric width, I have over 40 inches X 18 inches of fabric left of each piece – enough for a small pillow or another DIY project – that will bring down the cost of the fabric per project even more.
Here are two ways that I used the rest of the fabric: Spring Wreath with Fabric and Flowers and Summer Flower Wreath.
TIPS for Working with Fabric Wall Art
- Always iron your fabric before cutting or framing it to avoid wrinkles showing in the final project.
- Choose fabrics with sturdy weaves for easier handling and durability.
- Use a staple gun or strong adhesive to secure the fabric tightly to prevent sagging.
- Consider repeating fabric patterns in other decor elements, like pillows or drapes for a cohesive look.
Frame Choices
Here are some great frame choices similar to the ones that I used:


Hanging The Fabric Art
Hanging these pieces of fabric art was easy.
First, we measured the amount of width of each wall (24 inches) to get the center.
Second, we measured from the floor up to get the height. I wanted the frames at eye level. We just used a picture nail.
NOTE: The standard height for hanging artwork at eye level is 57 inches from the center of your photograph to the floor. If this seems low to you, you can hang your art or photographs a little higher at 60 inches.
On the wall closest to the peony print, I hung the bolder pastel.

On the far wall, I hung the softer paisley fabric art.

I love how the gold frames continue the metallic theme of the rest of the hardware. The size of the frames fits the size of the walls just right.
Most of all, I love how well the colors and the patterns of the home decor DIY project complement the existing art and style of our dining room.
The modern wall art DIY pieces contrast nicely with the antique china cabinet and our traditional dining table and chandelier.

So the moral of this story is – think outside the art box.
Even fabric can be used as a wonderful decorative resource. If you’ve never thought of using fabric as art, I hope that knowing how to make fabric into inexpensive art will inspire you and open possibilities of handmade wall art for your home decor. I know it has for me.
With all the fabulous home decor fabrics on the market, I can see using fabric as art in many places, especially children’s rooms, nurseries, offices, and kitchens.
In fact, when I updated one of our upstairs guest rooms (the one that our grandkids use), I repeated the process with two new fabric patterns as an inexpensive art project. I also found these fabrics at Joann.

It’s a great way to use extra fabric that is used in other places in your decor; for example, repeat the fabric in a pillow as art. It’s affordable and an easy DIY project.
Besides fabric, how about using a dish towel to make art? Any other ideas for out-of-the-box art? Please share.


Thank you Carol for the tips. I saw the most beautiful fabric today that I wanted to create art with and had no idea where to start. Have you used wallpaper yet? There are so many beautiful ones nowadays.
Connie, Good for you. That’s a great feeling when you find a fabric you love. Just follow the instructions in the blog post. I would also add that if your fabric has a lot of pattern and color, you want to visualize what part of the pattern your want to be the focal point of your art. What size will the exposed part of the fabric be? Will you use a mat around the fabric? I would have the mat and the frame before you measure or cut your fabric. Use those to “bull’s eye the area of the fabric you want to be the art. You can move the mat/frame around on the fabric until you find the exact “art” you want to use. Hope that helps. Let me know how it turns out.
I love the fabric you chose, and the finished pieces look wonderful in your room!
Wow, Carol!!! These are amazing! What a genius idea. The fabric looks so pretty in those gold frames. Such a budget friendly option to create super pretty art for any space! Pinned!
Thank you for sharing this fun idea on Farmhouse Friday! I’ll be featuring it tmorrow. The fabrics you chose are so fun and happy. Planning to show this to my daughter. It’s perfect for their new apartment. I’d love to try it as well but need to find space. Pinned
FABULOUS idea, Carol!
We will be featuring you starting Wednesday at the Creative Crafts Linky Party! Pinned and shared!
Creatively, Beth
BRILLIANT idea, Carol!!
I’d love for you to join us over at the Creative Crafts Linky Party every Wednesday through Sunday
https://creativelybeth.com/team-creative-crafts-linky-party/
Followed and Pinned!
Creatively, Beth
Carol, you are so amazing! I would never of thought of using fabric in a picture frame! I love what you did for your dining room! You would never know it was fabric! Such a great DIY that you shared with us! Thank you so much! I am definitely going to do some smaller pictures with fabric as I have so much!
Hi, Carol. This brought back so many memories. When we were first married we bought a huge old victorian mansion with apartments in it…and I had all that space to fill. Since I was an art major I had paintings, and also extra stretchers…and I covered them in fabrics, mounted branches on them, yarn, wire…just about anything. In the kitchen I framed gifted gorgeous linen towels in graphic designs…and everyone thought we were ‘rich’…instead of struggling…I still have two pieces tucked away…you never know…LOL.
So pretty – wow
Thank you from your SSPS Team and Esme for sharing your various links with us at #268 SSPS Linky. I am busy designing and creating an access database of IG and FB links and handles as you share your links with SSPS.
If you have an account please let me know your IG and FB information then I can add and easily tag you when you’re in the top 5 and I promote your post. Feel free to email me at [email protected] or in the comments.
These turned out so pretty! What a great idea. Thanks Carol.
Carol, those are so pretty! Sometimes fabric you spot can be prettier than any artwork you see, and this was a perfect solution!
Thanks Chloe. I thought I was lucky to spot that fabric.
Chloe, that is so true. I’ll be on the lookout for more and maybe some beautiful paper, too.
Beautifully done and very creative.
Thank you Clerissa, I’m definitely enjoying them.
I love this idea! You’re so clever! I wouldn’t have thought to frame fabric but its gorgeous!
Leen, so happy that you liked the project. I hope that you’ll try to make one of your own.
What a fabulous idea! There are so many lovely fabrics available these days, and that’s a great way to enjoy them.
Carol, it’s just beautiful. And your instructions are terrific. I love the colors you chose and the patterns are so compatible, looking great in the gold. Bravo on a successful and lovely project!
Love this idea! The fabrics you chose are so pretty and add the perfect pops of color.
I have been known to frame wrapping paper, scrapbook paper, and calendar pages. Art is everywhere if you just look. 🙂
Beautiful Carol! I have to admit that finding artwork lately has been a challenge for me too. Great idea!