2 Cute DIY Planters for St. Patrick’s Day
St. Patrick’s Day is a super fun holiday. Are you ready for some lucky green decor? Learn how to make a pretty green vignette for your home with these two cute DIY planters for St. Patrick’s Day.
St. Patrick’s Day is a few weeks away. Are you planning some St. Patrick’s Day decoratfing for your home? Good. I just came up with two sweet St. Patrick’s Day craft ideas.
You can use these easy DIY St. Patrick’s Day decor ideas as a fun centerpiece or as the focal point of a coffee table vignette. Or it could be the beginning of an easy spring tablescape.
This DIY idea features the most iconic of St. Patrick’s Day symbols – green shamrocks.
So, let’s start the St. Patrick’s Day Celebrations with some good luck of the Irish.
Since I’m Irish on my mother’s side and I have green eyes, I feel right at home on St. Patrick’s Day.
It’s a great holiday because it’s all about having fun. No gift buying, no presents to wrap, no expensive decorations to put up. I have thought about having a St. Patrick’s Day tree.
That doesn’t mean that we can’t infuse our homes with a little St. Patrick’s Day flavor. These easy DIY shamrock planters are the perfect little project.
Inspiration for the St. Patrick’s Day Planters
The inspiration for these planters came when I went to a huge estate sale. I stood in line for 45 minutes (thank goodness it was a beautiful day) waiting to get inside for the Saturday afternoon session – after everything had been marked down 50%.
Walking around this mansion, yes, it was a mansion, I was so disappointed. I couldn’t find a single thing that interested me. That’s a very rare thing.
Having waited so long to get in, I couldn’t leave empty-handed.
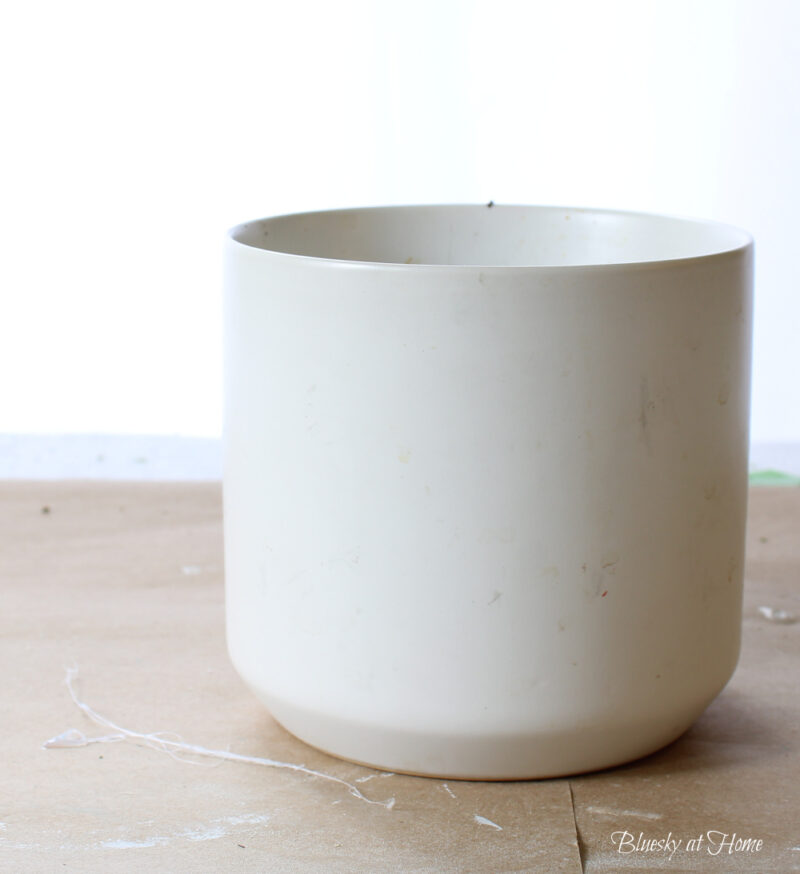
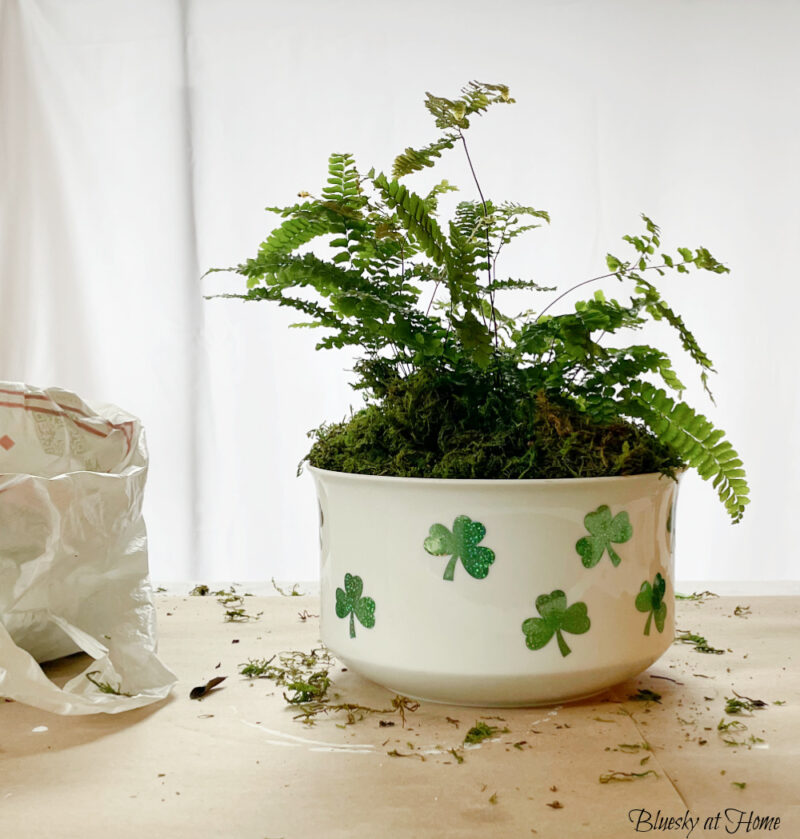
Finally, I saw a white bowl tucked in the back of a kitchen counter. I can’t pass up a nice white bowl, specially marked at $3.00.
I immediately thought “planter” when I picked up the bowl.
When I went to check out, the lady said, “that’ will be $1.62. What? I forgot everything was marked down 50%. So, including tax, that’s the cheapest purchase I’ve ever made at an estate sale.
All I needed was another flower pot – which I was sure I could find at home. I think this planter came from Trader Joe’s a few years ago. I’m sure I killed whatever was in it.

By the time I got to my car, I already had the complete vision of a St. Patrick’s Day vignette in my head.
Shamrocks, or four-leaf clovers, would be my design for this inexpensive centerpiece.
Supplies for Two St. Patrick’s Day Planters
Not counting your planters, these easy DIY planters for a St. Patrick’s Day project require just a few craft supplies.
- number of planters you want to decorate
- adhesive sparkly green vinyl
- sparkly green scrapbook paper or you may want to have a pack of multiple colors
- any leftover vinyl
- green Ceramic Paint – I used Grass is Always Greener from A Makers’ Studio
- plastic gloves
- plants for the flower pots
- green moss – I love Super Moss – a box will last for months, if not years.
NOTE: Instead of ceramic pots, you can also use clay pots and paint them.
Using a Cricut to Make Shamrocks

I love using my Cricut. If you don’t have a Cricut, you can make a template of shamrocks and cut them out with scissors. You could also use a shamrock-shaped punch.
The first thing I did was use my Cricut for 3 different parts of this project:
- vinyl stickers for one of the planters
- vinyl stencil for painting the other planter
- scrapbook paper toppers for both planters
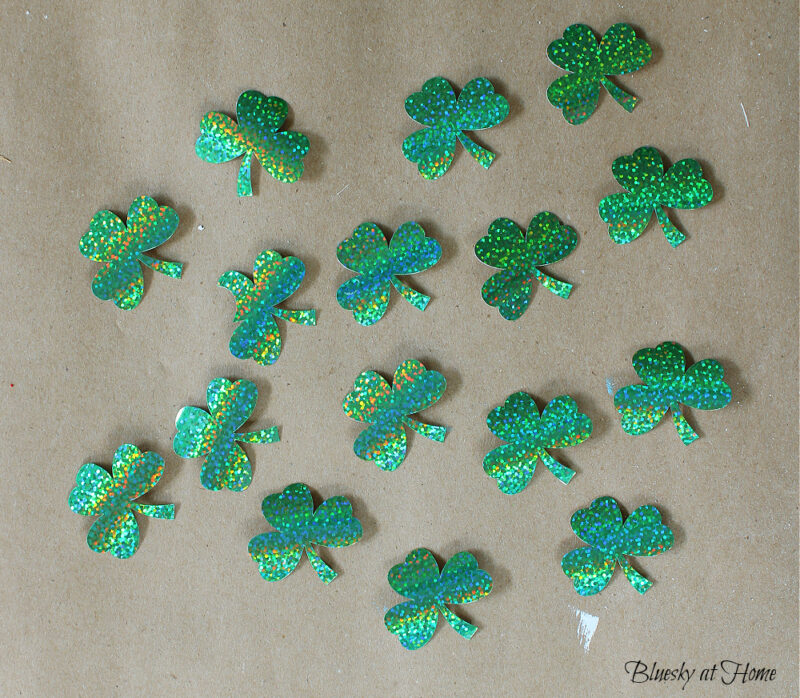
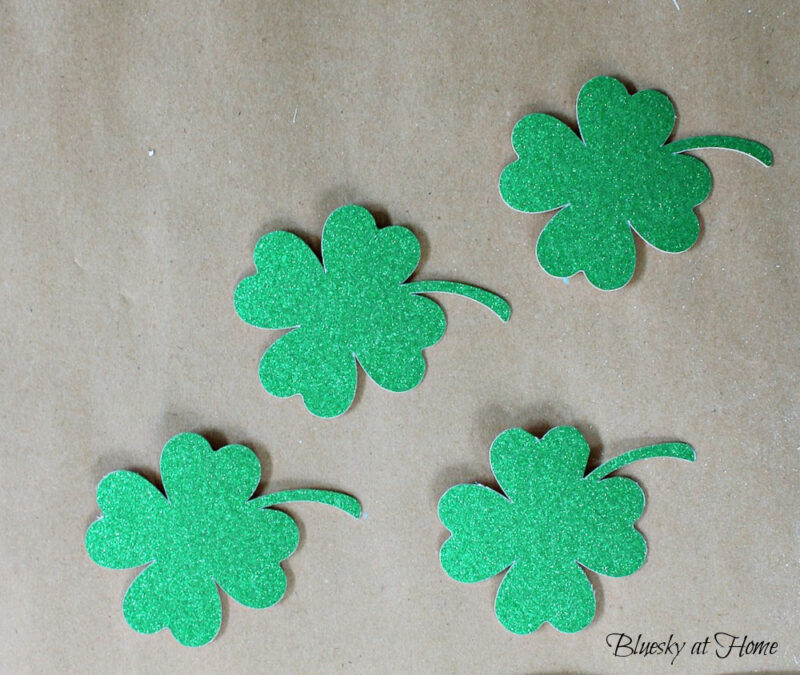
I started with the scrapbook paper for the shamrock toppers. They were about 3 X 3 inches and I made 4. You will need two for each planter.
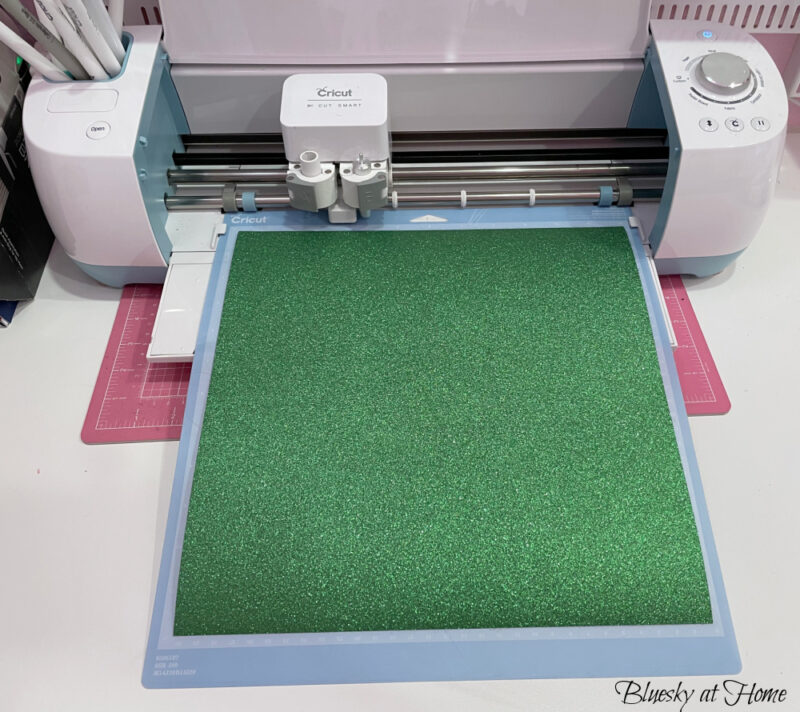
Then I made about 15 shamrocks using the sparkly vinyl. I made these smaller, about 2 inches.
Now I was ready to transform the plain planters into cute DIY planters for St. Patrick’s Day.
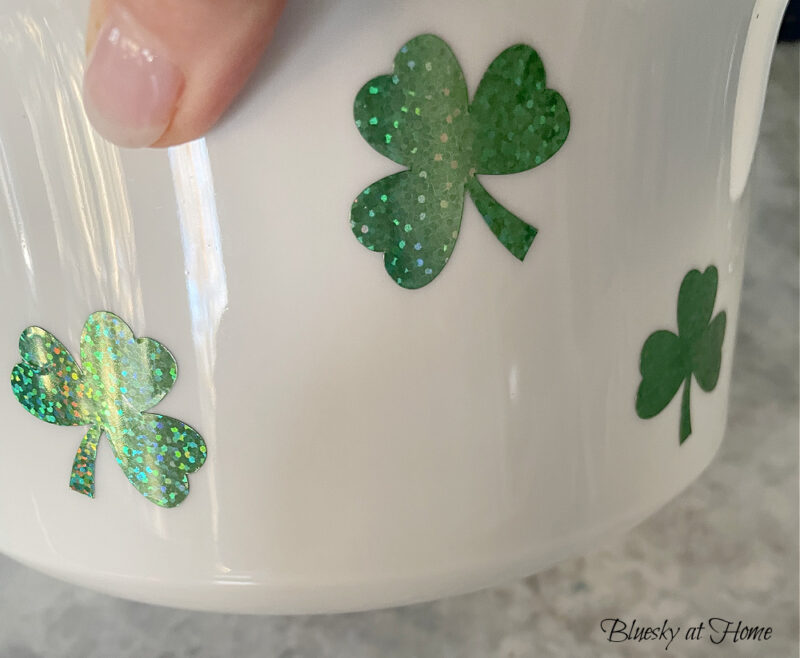
Decorating a Planter with Vinyl Shamrock Stickers
I decided to use the vinyl stickers on the larger planter.
Making vinyl stickers on a Cricut is one of the easiest things. You pick your design in Cricut Design Space, place your vinyl on a mat, and load it in the machine. Cricut does the rest.
After you remove the stickers from the mat, you separate them from the backing. You can either put them directly on your chosen surface or cover them with a piece of transfer tape. For this project, it was easy to put them right on the planter.
I attached them in a random pattern. That was it. Easy peasy.
For more ideas using vinyl stickers (decals), visit these projects:
- Farmhouse Stencil Sign Made with a Cricut
- Valentine’s Day Stickers with a Cricut and Punches
- How to Cut Vinyl Decals
Decorating a Planter with Ceramic Paint
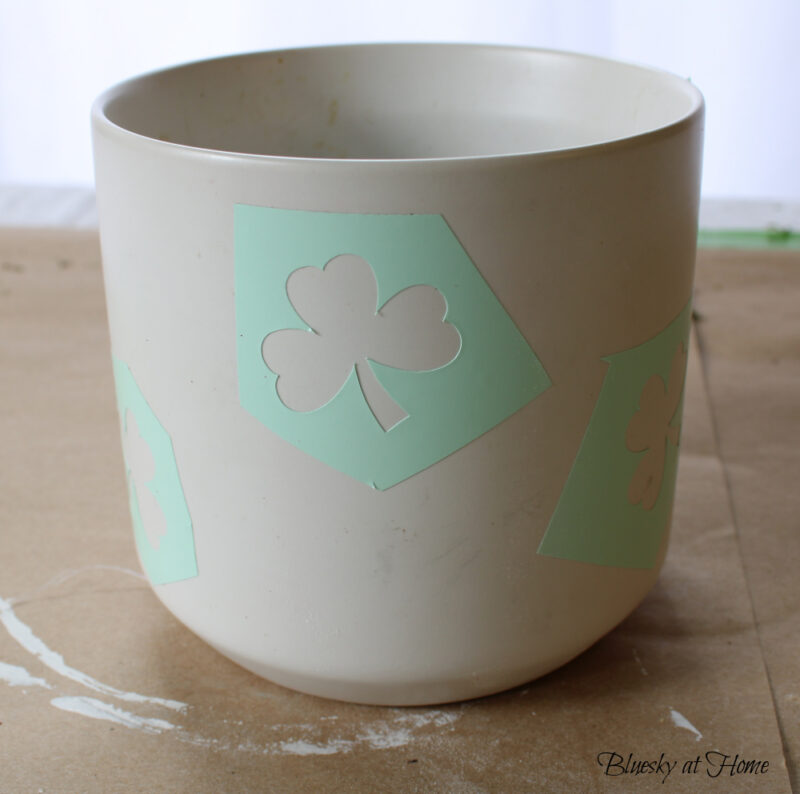
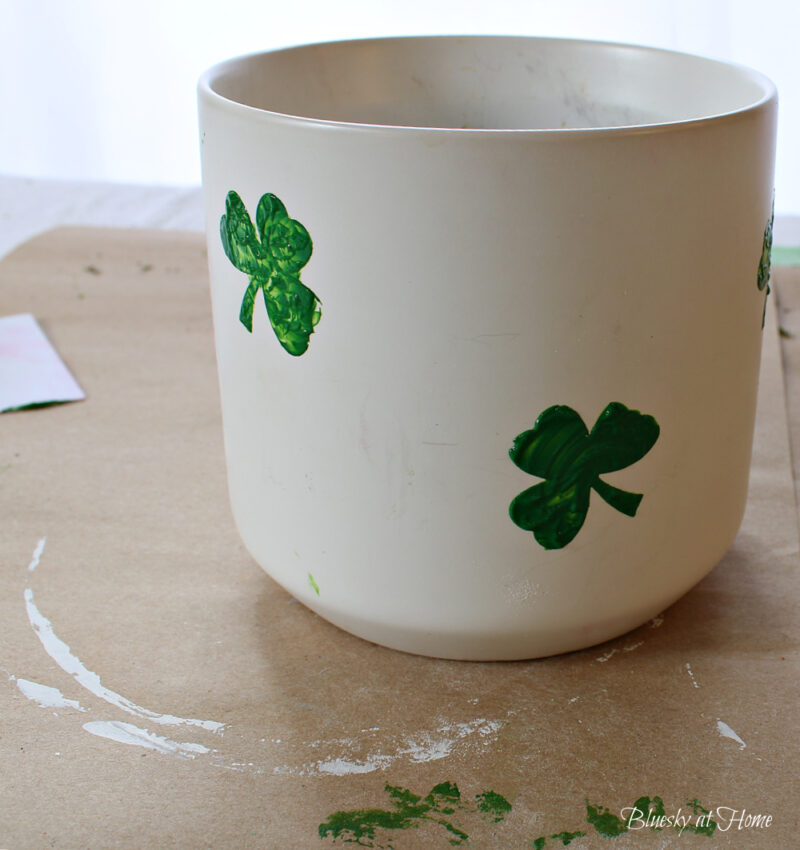
For a different look for my second planter, I made shamrock stencils from a leftover piece of vinyl using the same design as the stickers.
I cut each shamrock stencil out with scissors, leaving plenty of vinyl around the shamrock.
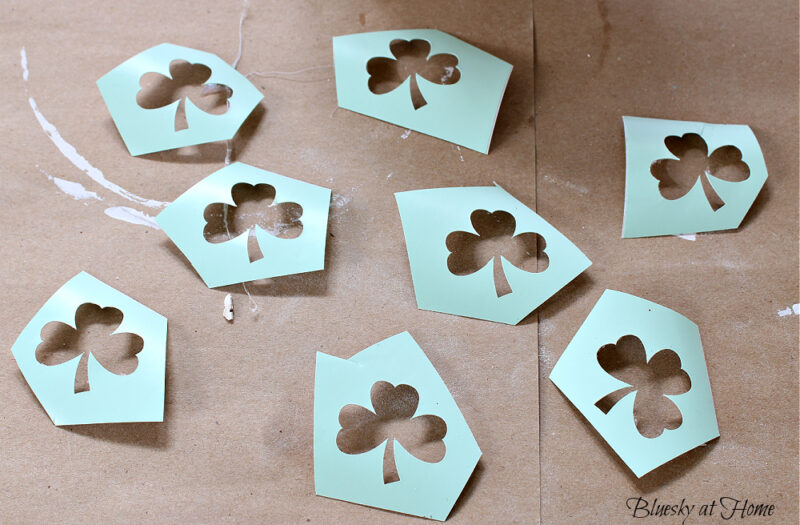
Then I stuck them on the smaller planter in a random pattern.
Normally, I would use ChalkArt paint for a stencil project. I didn’t have the right shade of green on hand and I love this Ceramic Paint. You can use it on so many other surfaces, such as glass or metal.
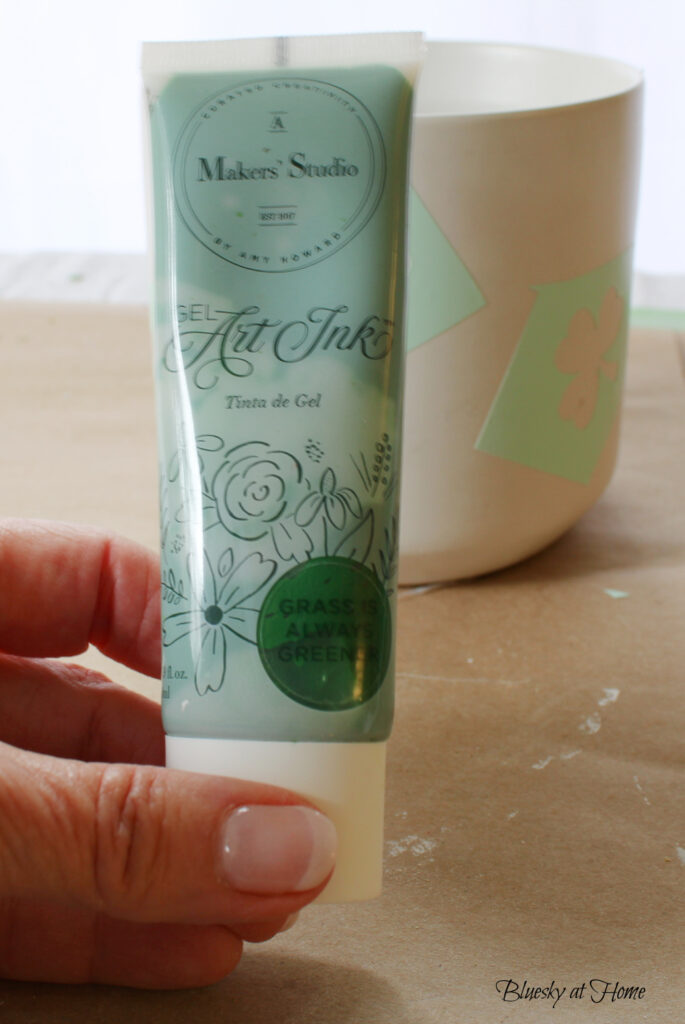
When I stencil items that are round, like glasses or vases, I find the best way to apply the paint is to use my finger. I just wear a plastic food glove, which I always have in the kitchen.
I squeeze a small amount of the green paint – Ceramic Paint for this project – on my finger and dab (stiple) it on the planter.
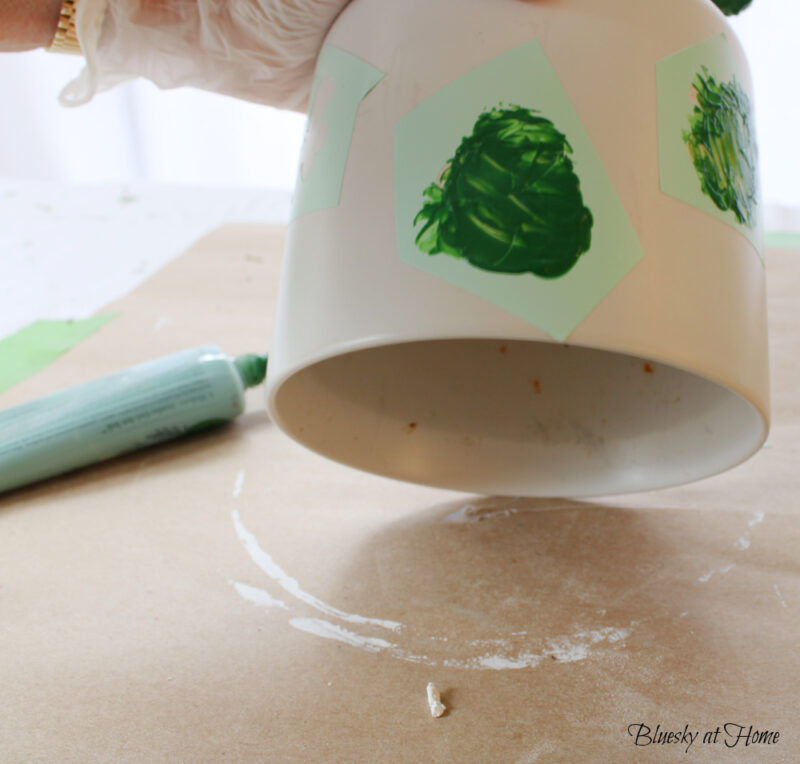
After adding the Ceramic Paint, I gently removed the vinyl stencil that I made. I repeated this process for all the stencils. I set this flower pot aside until the Ceramic Paint dried about 20 minutes.
You can make the coverage thin or thick. You will have a mottled effect, which was fine for a shamrock.
Here are more projects using Ceramic Paint and stencils:
- How to Decorate Plain Ceramic Coasters
- How to Make Farmhouse Decorative Tiles with Ceramic Paint
- How to Paint Glass with Ceramic Paint
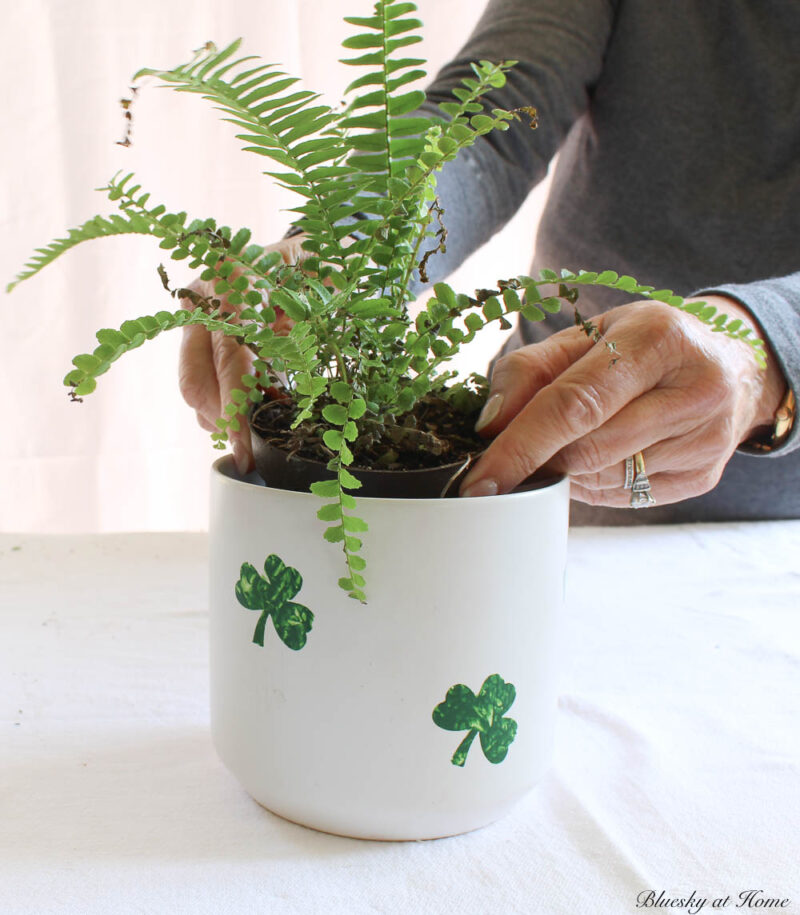
Adding your Green Plants to the Planters
I stopped at Lowe’s to find two small green plants. I would love to have found shamrocks, but no-go.
Instead, I found two ferns that would be just as good. Ferns are perfect for indoors, are certainly the right color, and in a few months I can plant them outside.
I bought one 4-inch Lemon Button Fern and a 5-inch Rosy Maiden Hair Fern. They have slightly different shades of green which is nice.
All you have to do is place them in the planters, stuff in a crumpled piece of newspaper, and top them with moss for a finished look.
NOTE: Make sure the ferns are well watered first.
I finish every plant with either green moss or Spanish moss.
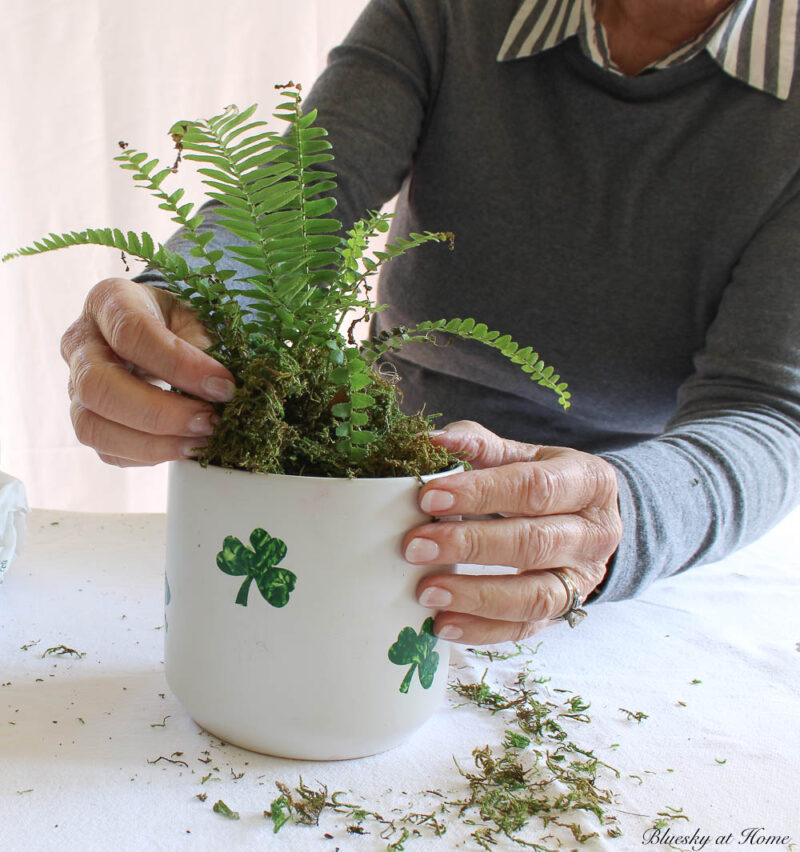
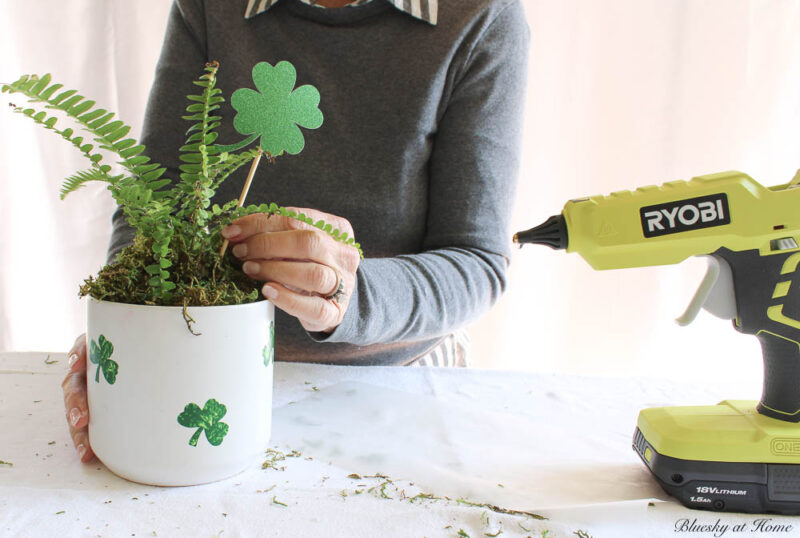
The Finishing Touch for the St. Patrick’s Day Planters
This is when I used my 4 scrapbook sparkly shamrocks that I cut out with my Cricut.
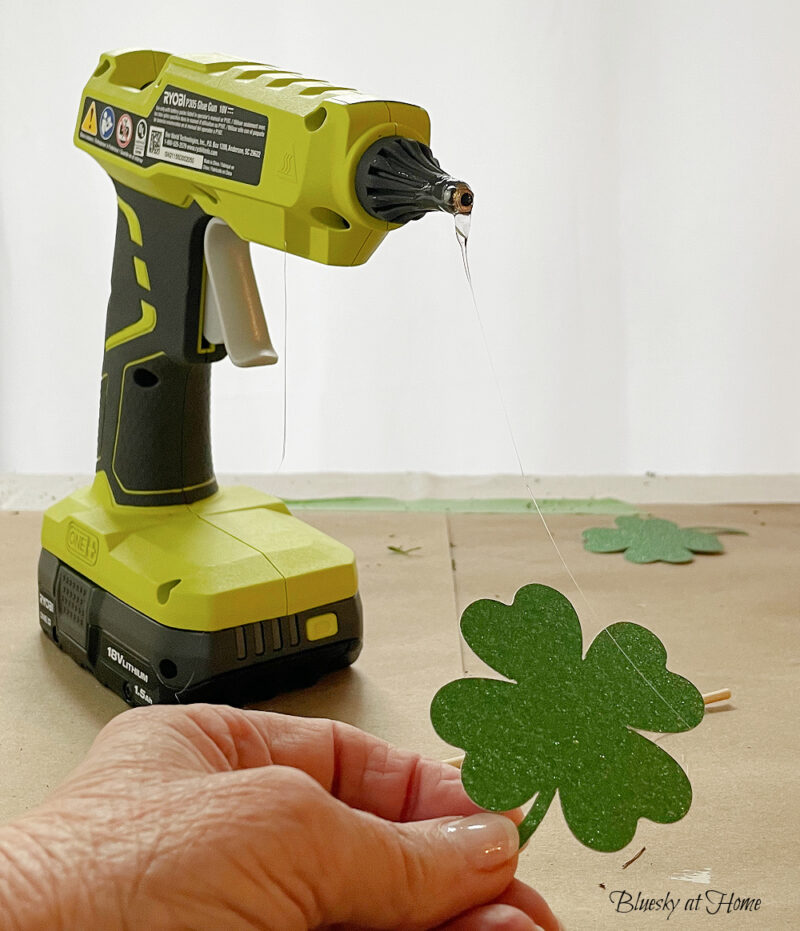
Using my brand new Ryobi hot glue gun (which I love BTW), I glued two shamrocks to wood skewers, one on each side.
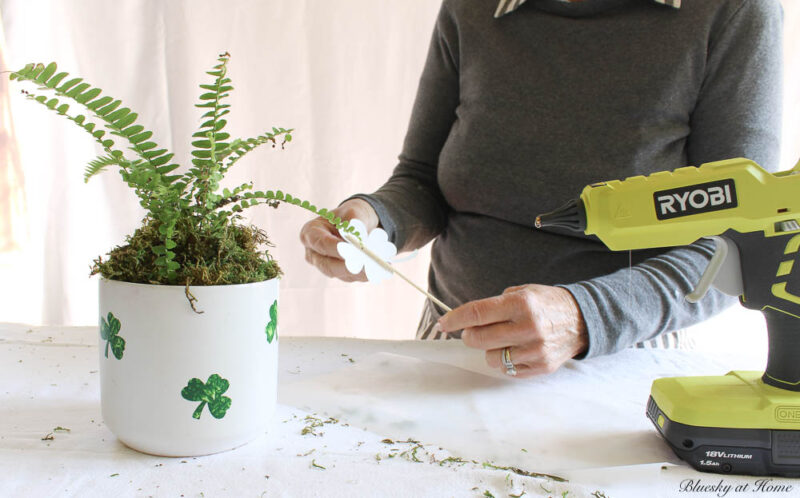
Then just stick them into the plant.
Your St. Patrick’s Day planters are done. Now it’s time to use them in your shamrock decorations.
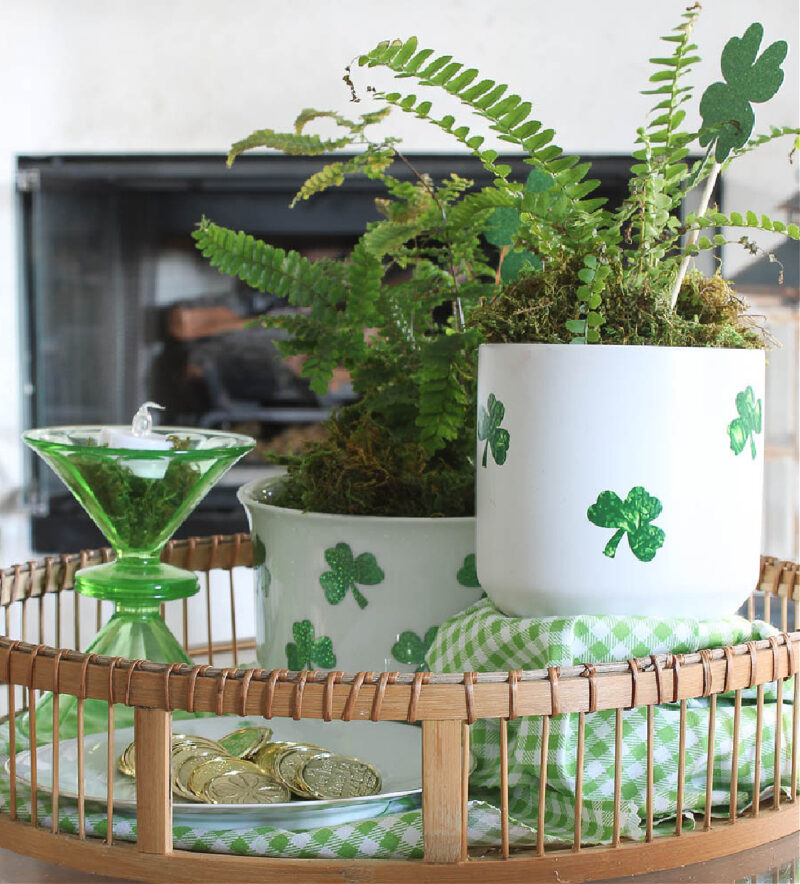
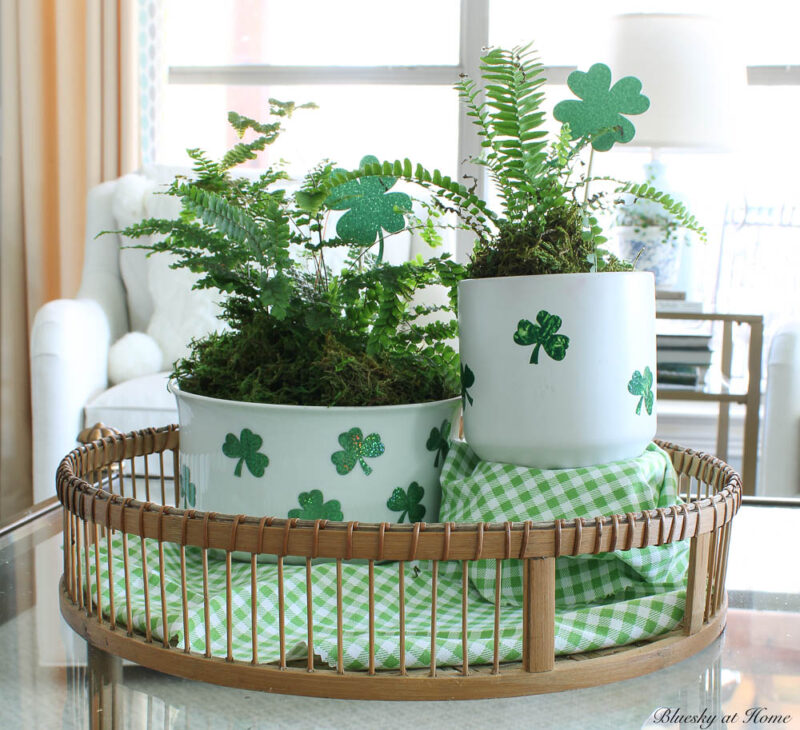
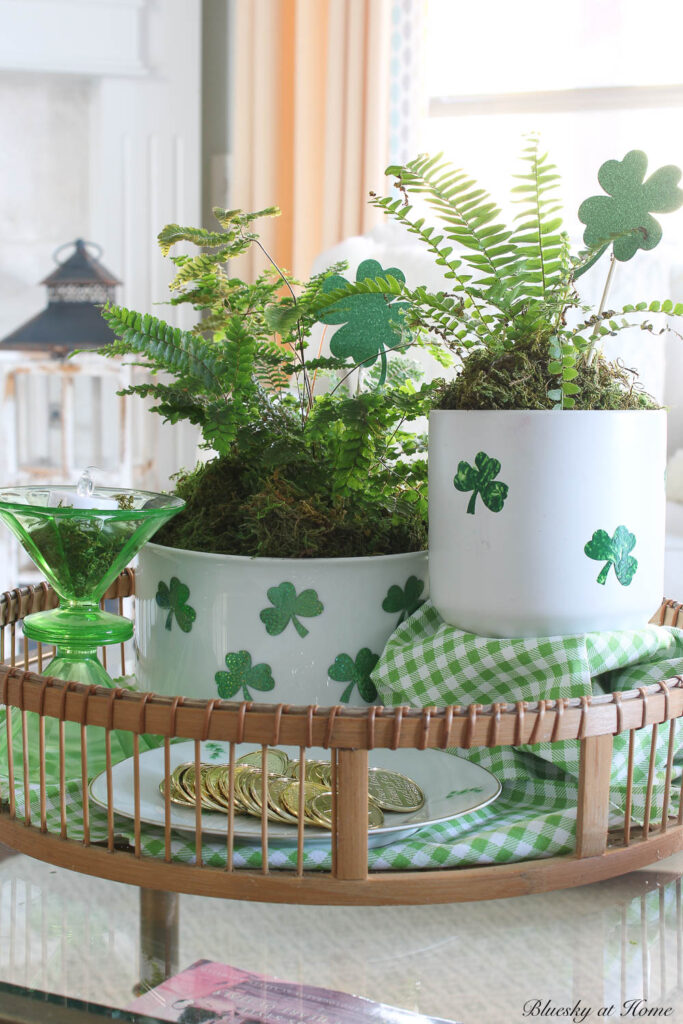
Creating Your St. Patrick’s Day Vignette
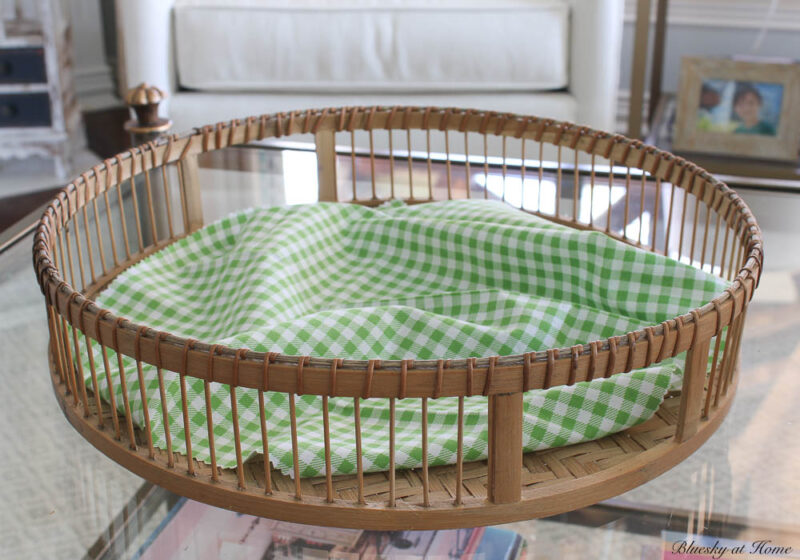
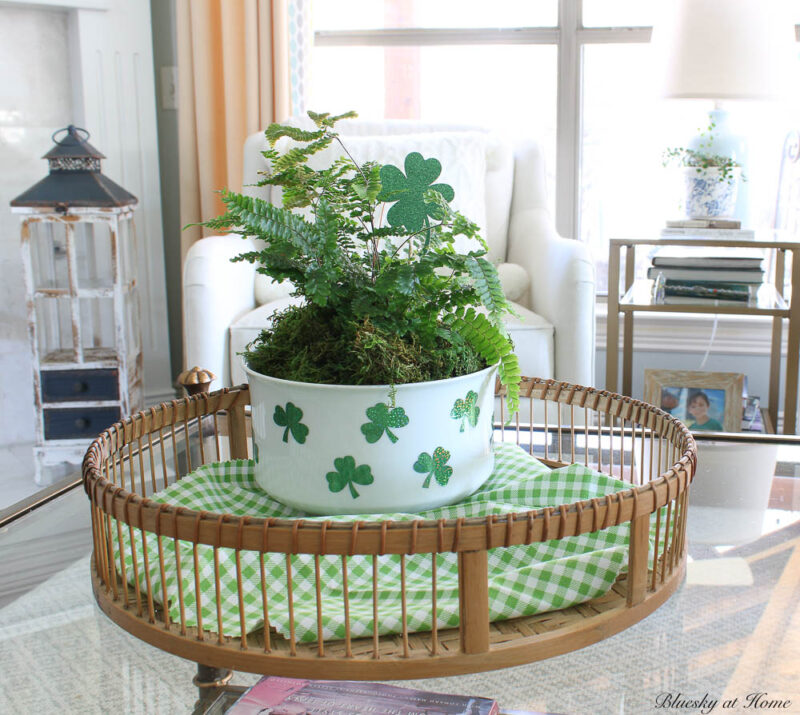
This vignette could go on a kitchen counter, a side table or your mantel. I chose to use it on our coffee table.
First, I needed a tray and used my favorite round woven one. A green and white checked napkin served as a base and added the right green color.
Next, I placed the larger of the two planters and then the smaller one.
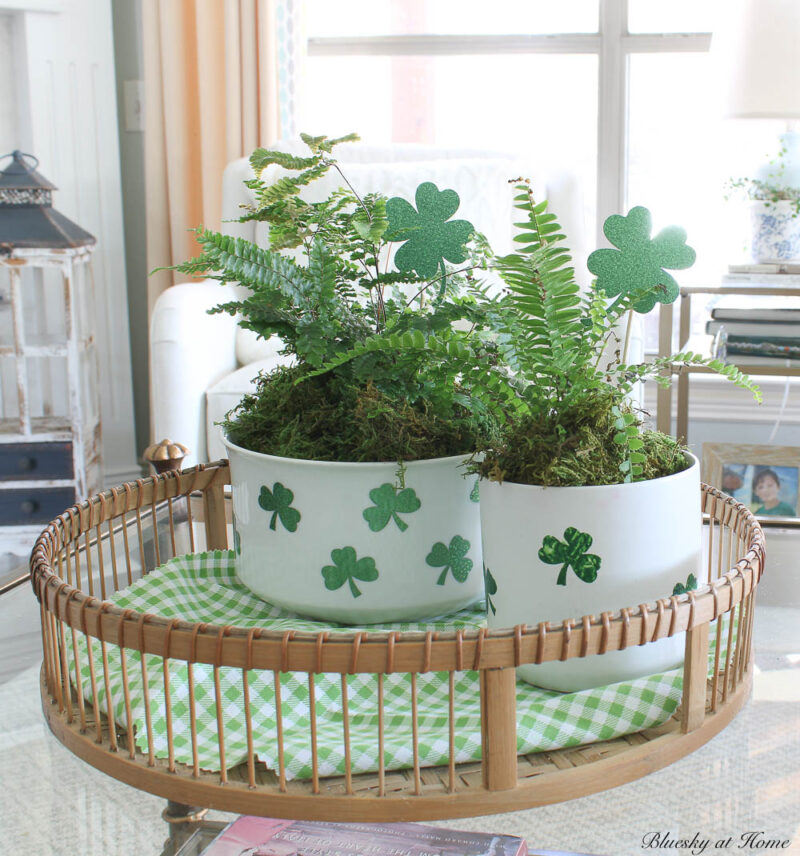
I thought some height was needed, so I set the smaller one on a cupcake stand. They are always handy for elevating decorative items.
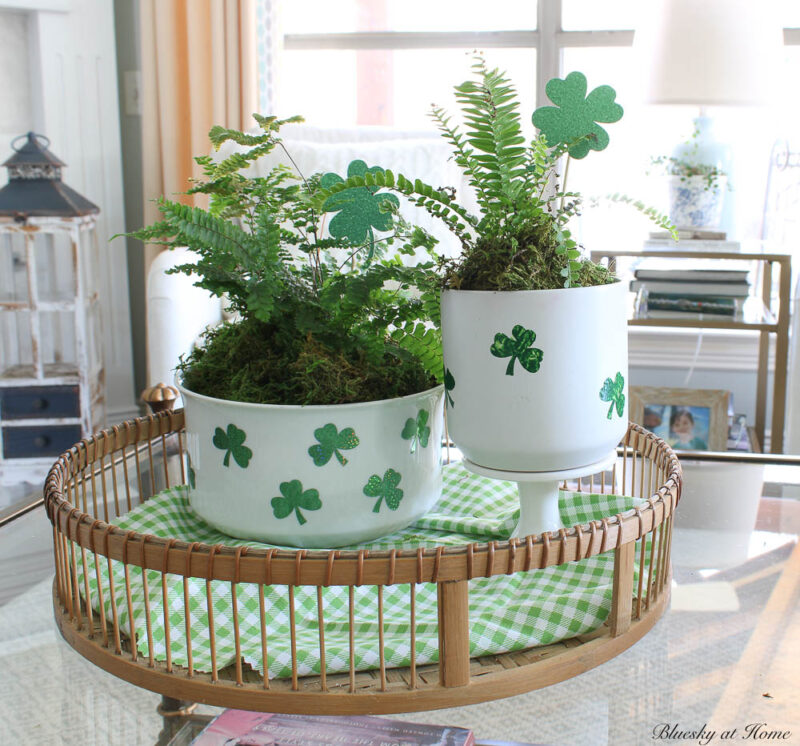
I added another napkin to hide the cupcake stand and add more texture and color.
A few years ago I found these green sherbet glasses at an antique mall. They are great for any dessert, like sherbet, ice cream, or mousse.
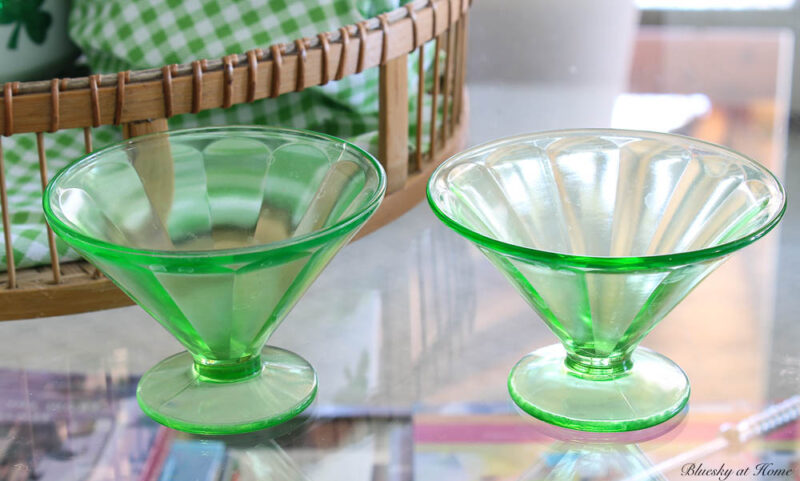
I stacked them, bottoms stuck together with double-sided tape for security, in the tray. I love their green color.
A battery-operated tea candle, which has a remote, sits atop a bit more moss.

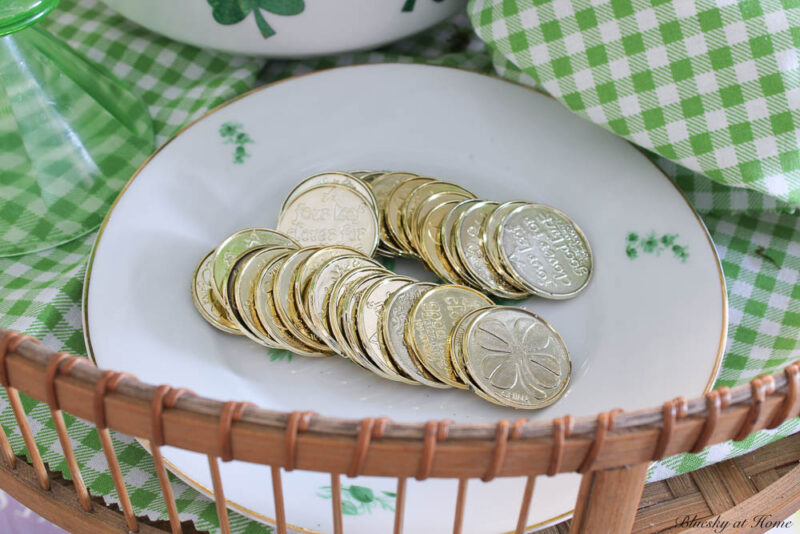
I needed pots of gold as the finishing touch in my vignette.
I didn’t have that, but another antique mall purchase (same place, same time as the sherbet glasses) is this salad plate with a pretty green motif. I have six of them and used them and the sherbet glasses in a spring tablescape a few years ago.
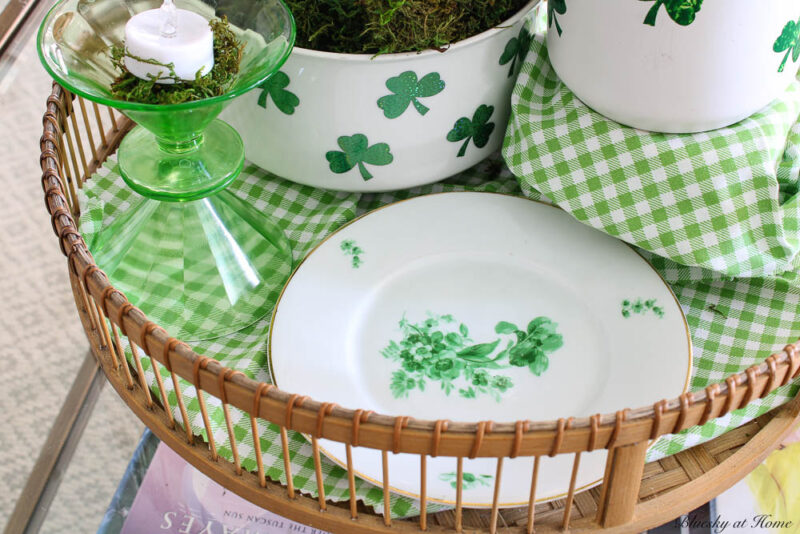
The plate worked fine. Now I just needed some gold coins. On a quick trip to Dollar Tree for a totally different item, I found packets of faux gold coins. They were perfect to complete my fun St. Patrick’s Day centerpiece.

Other Ideas for Using the St. Patrick’s Day Planters
If you decorated small terracotta pots with shamrocks (four-leaf clovers) and small plants, this craft would be great for:
- cute party favors
- a sweet hostess gift
- table decoration at place settings
- just-because gift
You could use this same idea for other holidays and events. Just use a different design (bunnies, Easter baskets, flags, etc.) to fit the theme. I’ve done this so many times.
NOTE: You can remove the stickers and wipe off the Ceramic Paint to reuse the planters.
Want more ideas for St. Patrick’s Day? Check out 17 Fun and Easy St. Patrick’s Day Crafts.
Here are some ways to transform a plain planter into something special.
I hope you will make these DIY planters for St. Patrick’s Day. With a little luck of the Irish, you can find a planter for $1.62. I just hope you don’t have to stand in line for 45 minutes.


Carol, these are adorable! I have to admit, I’m ready for all things green, both indoors and out!
Happy Valentine’s Day (with one toward rainbows and green shamrocks!)
Rita, it’s so nice to hear from you. I’m so glad you emjoyed the post. Definitely ready to get out all the springy decor.
love all the green it is so much like nature.
What pretty projects. Perfect for St. Patrick’s Day and Spring. Featuring when my party opens!
Carol these are so cute! This is exactly how I decorate for St Patrick’s Day! Thanks so much for sharing at my weekly link party, I’m happy to be featuring you this week! https://www.ourtinynest.com/2023/02/22/weekly-link-party-336/
Carol this looks so bright and fresh for spring and St Patricks Day! I’d love for you to share at my weekly link party! https://www.ourtinynest.com/2023/02/15/weekly-link-party-335/
Have a great weekend!
Hi Carol! Pinned!
Your planters turned out so cute and they look wonderful as part of your vignette! I love all the green items, especially the vintage dessert dishes. So fresh and springy. (You’re too funny “you’re sure you killed whatever was in it” LOL)
These are really cute! I hope you’ll share them at my link party Share Your Crafts.
What a CUTE idea, Carol!! I love when those ideas just come flooding in after finding a specific piece of decor. It’s so much fun!
Your vignette turned out so happy..love all the green. Pinned!
These are so cute for St. Patrick’s Day! Love the way you used different methods to add the shamrocks. I’m glad you found something at the estate sale after a 45 minute wait! Pinned!
This is a great craft for St Patrick’s. Its affordable and quaint. The green depression glass is a favorite of mine. Very pretty arrangement.
Carol,
Your handmade shamrocks are such a pretty accent on your planters, and I love the basket you used–pinned!
Blessings, Cecilia @My Thrift Store Addiction
I love everything about this arrangement Carol. From the great estate sale find to the green sherbert glasses it’s just perfect. Thanks so much for sharing!
How cute are these? Great estate sale find. I love the green glass sherbert glasses. This whole arrangement makes me long for Spring. Great job Carol!
Very cute Carol, and so clever that you can remove the shamrocks after St. Pat’s Day! Your vignette on the tray looks adorable! I love the varied heights and the gold coins. Your glue gun looks amazing, I’m going to look into getting one, my glue gun is ancient and having a cordless one sounds like a dream~thank you!
What a fun DIY craft idea for St Patrick’s Day, Carol! Your planters are quite lovely! Perfect as gift giving to friends and family, too!
How adorable Carol? This could be done with any season with the change of characters. Such a cute St. Patrick day tray vignette. Love it!
Such a fun centrepiece and lovely way to usher in Spring Carol!