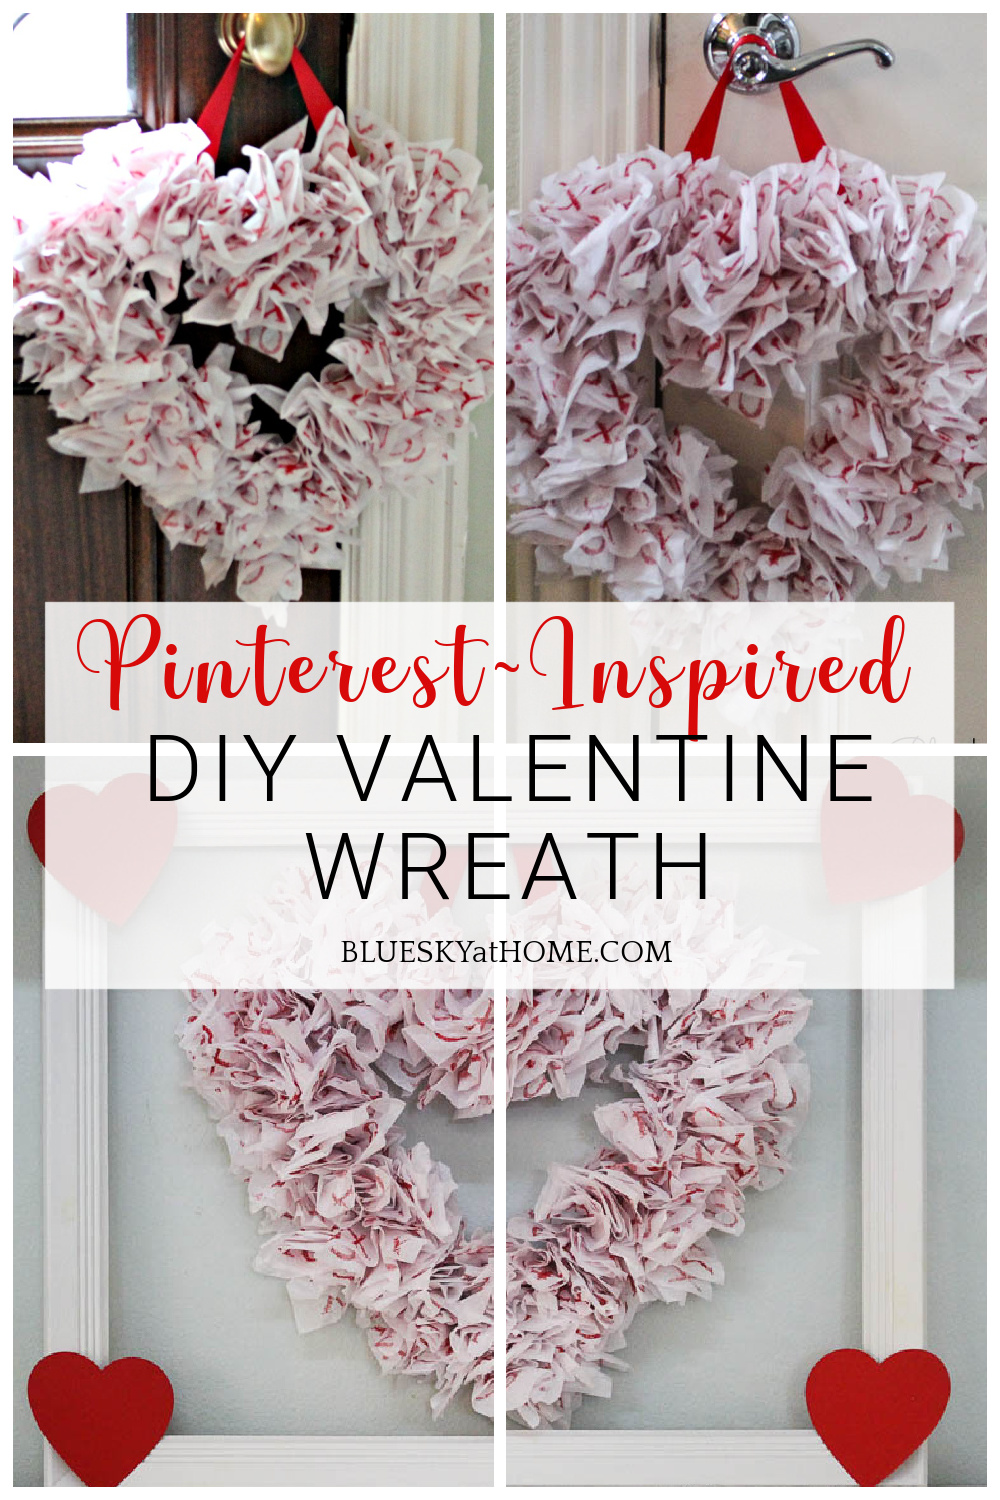
Pinterest-Inspired Easy DIY Valentine Wreath
Just when I thought holidays were behind us for a while and I focused on winter decor, here came Valentine’s Day projects. I’m excited to share a new Pinterest-inspired easy DIY Valentine wreath. It is so darn cute and so darn fun to make.
We went from red and green, to white and naturals and greenery to red – and well, red, or maybe pink. But, it’s been fun and January has definitely not been drab and boring. It’s been tons of fun and very creative.

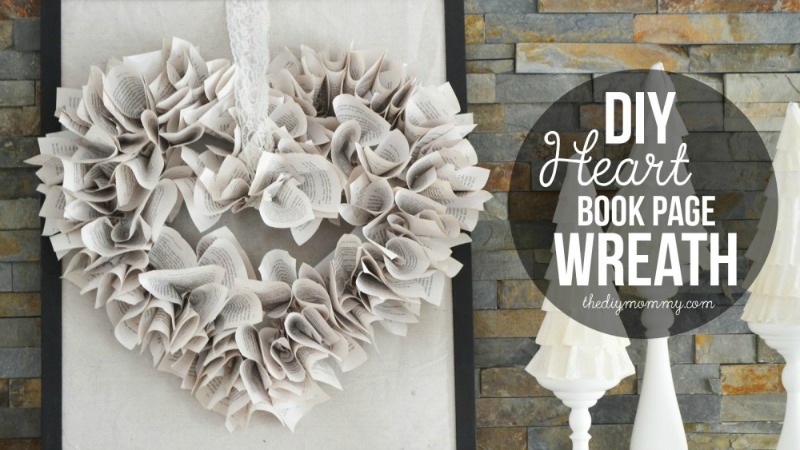
So here was the challenge: create a DIY Valentine wreath of your own vision, inspired by Christina, The DIY Mommy, a seriously talented and creative person. You should visit her original project.
Easy DIY Valentine Wreath Inspired by Pinterest
Christina’s original project was How to Make a Heart-Shaped Book Page Wreath. She used cardstock and pages from a paperback book. Super cute, uh?
I loved the paperback book page idea, but I couldn’t copy that and I was dying to use a Valentine stencil that I already had.
Every project starts with something. Whether from a need or totally in your head, or from a challenge like this one, every project starts with an inspiration and so did this one.
My DIY Valentine Wreath Inspiration
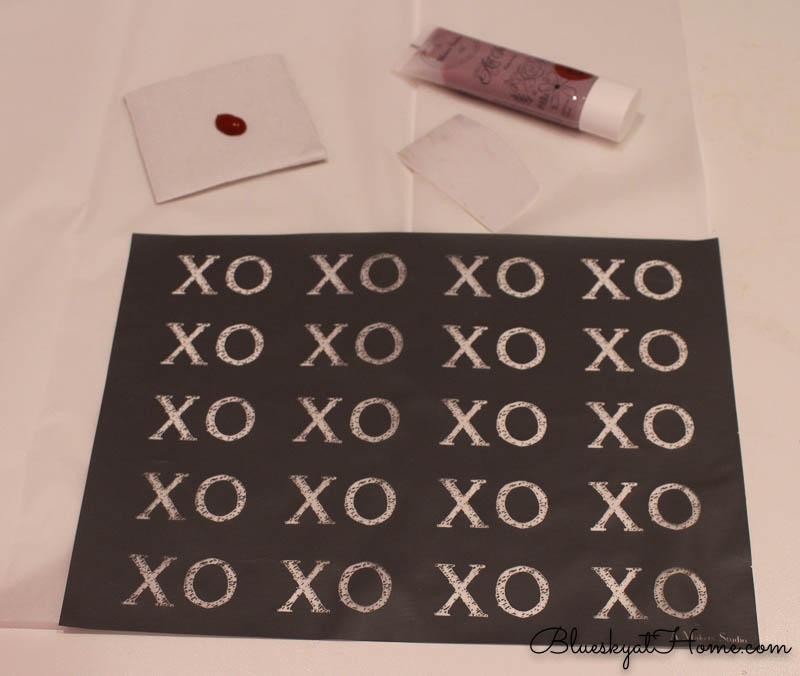
My inspiration was this XOXO stencil from A Maker’s Studio. It has been burning a hole in my DIY brain. I was just waiting for the right project to use it and this was it.

XOXO means Hugs and Kisses and it was the perfect sentiment and design for this project.
I wanted to use GelArt Inks from A Maker’s Studio in Bless His Heart, a perfect Valentine red. Gel ink is designed for fabric and paper and to be used with our mesh stencils. Fortunately, I already had a tube that I had used a tiny bit to make a Christmas pillow.
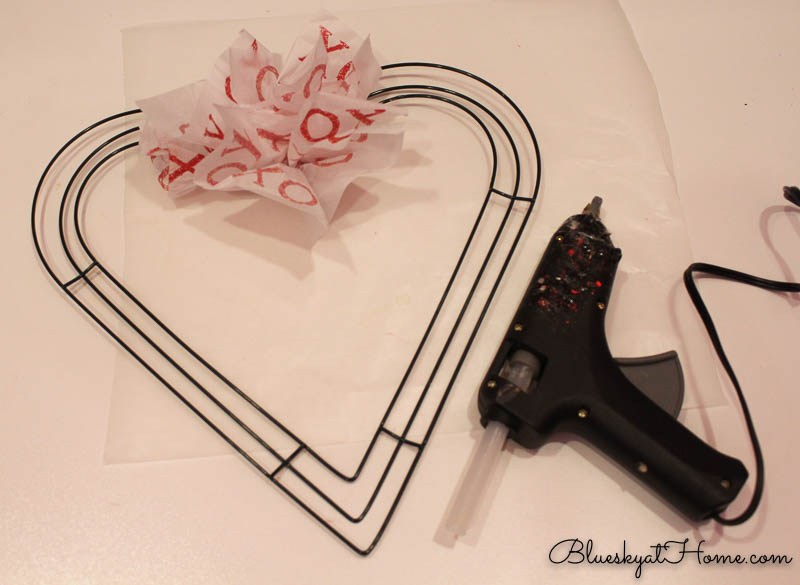
Last week while at Joann (I’ve told Sweet Shark if he ever can’t find me and needs to put out the APB, I’m either at Hobby Lobby, Joann or the tennis court.), I found this wire-shaped heart wreath for $3.89 (and a coupon). In the cart, it went.
Now I had my 2 inspiration supplies ~ the stencil and the wire heart. Time to get cooking ~ I mean creating. I forgot to take a picture of just the wire wreath before I started this project so here is a fast~forward pic.
Step 1 – What Kind of Paper?
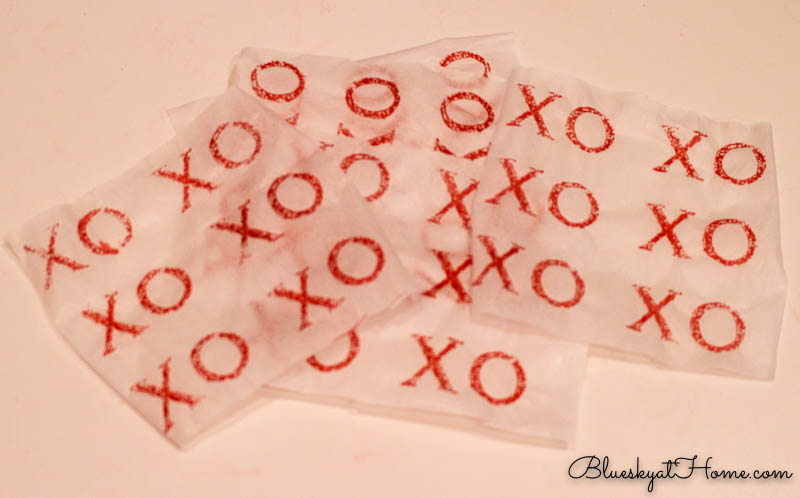
At first, I tried copy paper, cutting a recycled sheet into 5 X 5-inch squares, but it was far too stiff to fold and glue to the wire wreath. I remembered a new package of tissue paper I had bought before Christmas. Would tissue paper be too flimsy for painting on a stencil? Only one way to find out.
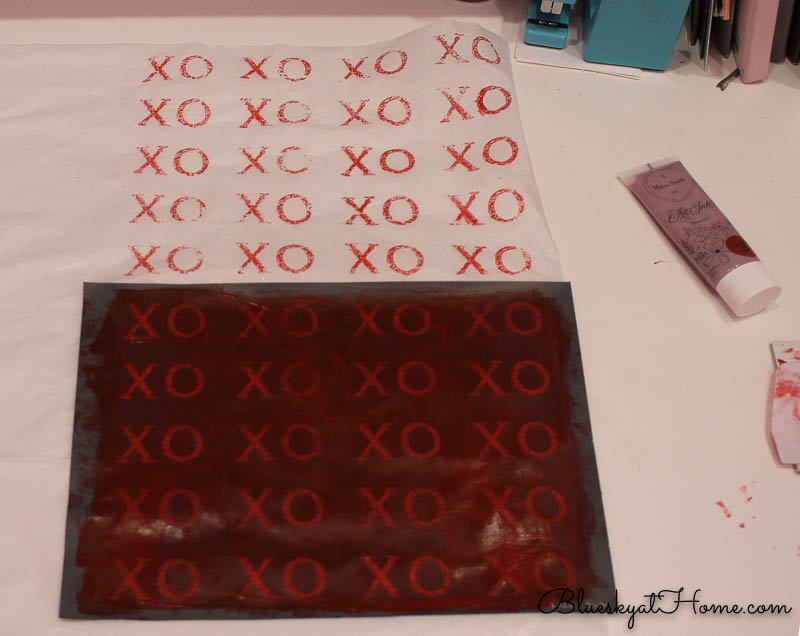
I set up my workspace, placed the stencil on the tissue paper and applied the gel ink with my plastic spreader, just like I do ChalkArt. It was a breeze to apply it. I did have to slowly and gently peel the stencil away from the tissue paper, but it worked beautifully.
TIP: remove the stencil carefully from the tissue paper. Hold the paper down with one hand and gently pull the stencil away with the other hand.
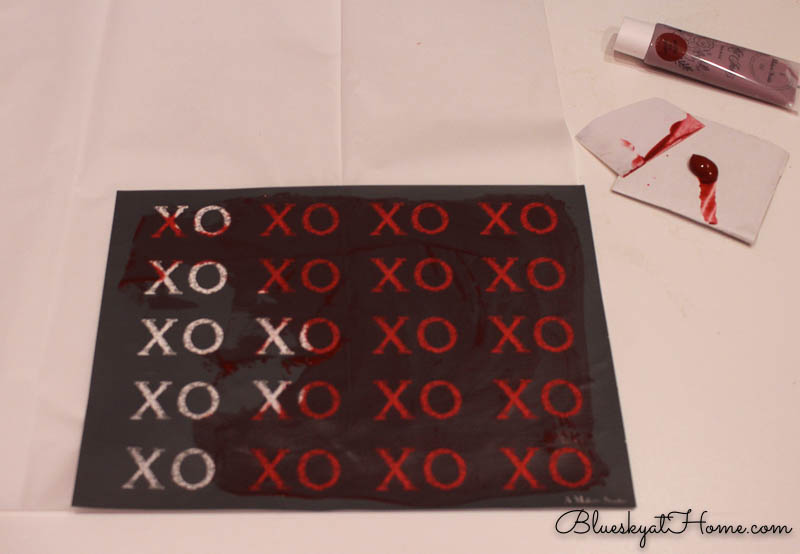
I applied the stencil 3 more times to cover the first sheet of tissue paper. It was perfect. And it dried so quickly ~ by the time I finished the 4th stencil, the first 2 sections were dry.
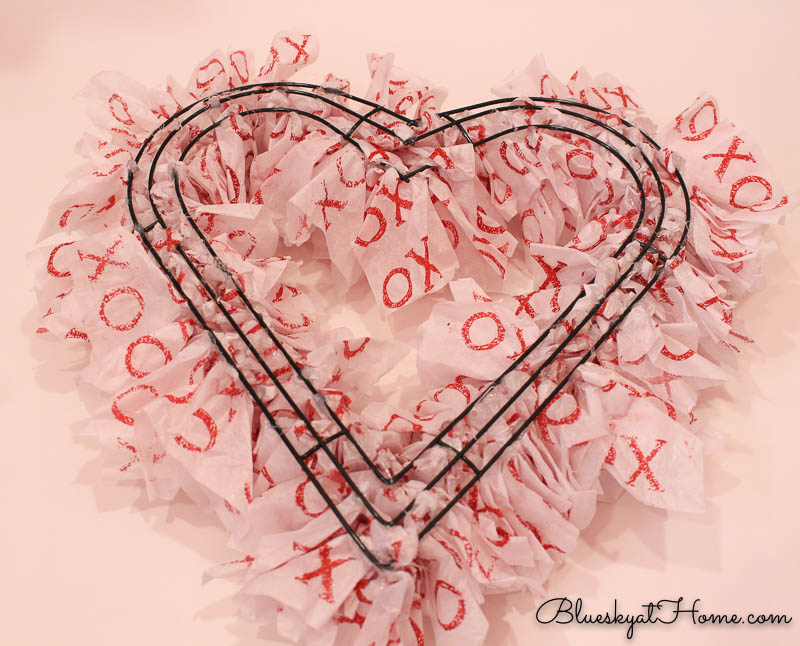
Before I stenciled another sheet of tissue paper, I wanted to see if the paper would work on my wire wreath.
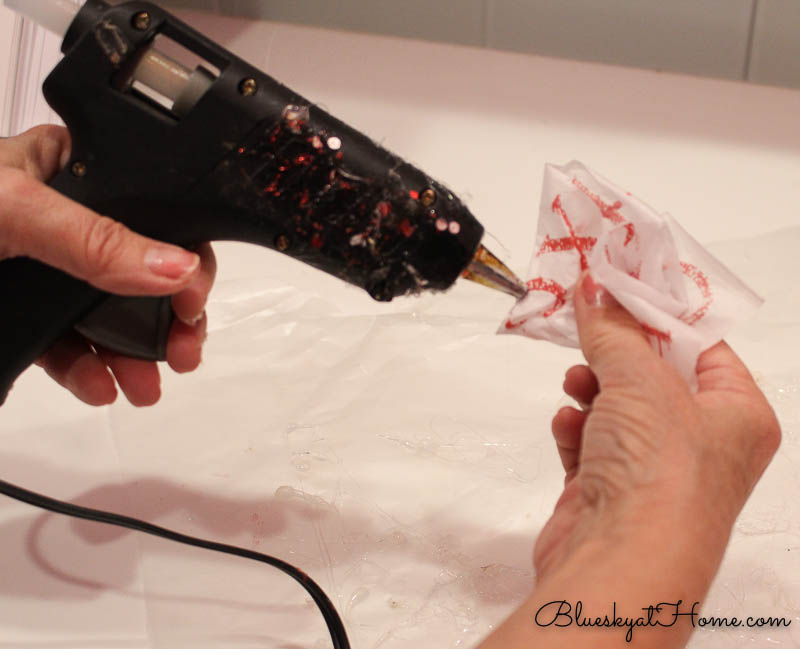
I cut a few pieces about 6 X 6-inches. I had plugged in my glue gun while I was stenciling, and it was ready.
Now Christina had folded her paperback paper twice and crimped it before gluing and attaching it to her cardstock wreath. I discovered that I didn’t have to do any folding, just pinch the tissue paper in the center of my square and crimp the paper together, forming a cone. Then I put a few dots of glue on the point and stuck it to the wire wreath.
TIP: Be sure that your stenciled design is on the outside of the crimped tissue paper.
And I did it again and again. I was on a roll. This was working. I attached all the pieces of the first sheet of tissue paper and started stenciling another sheet of tissue. Not knowing how many sheets I would need, I stenciled several sheets and set them aside.
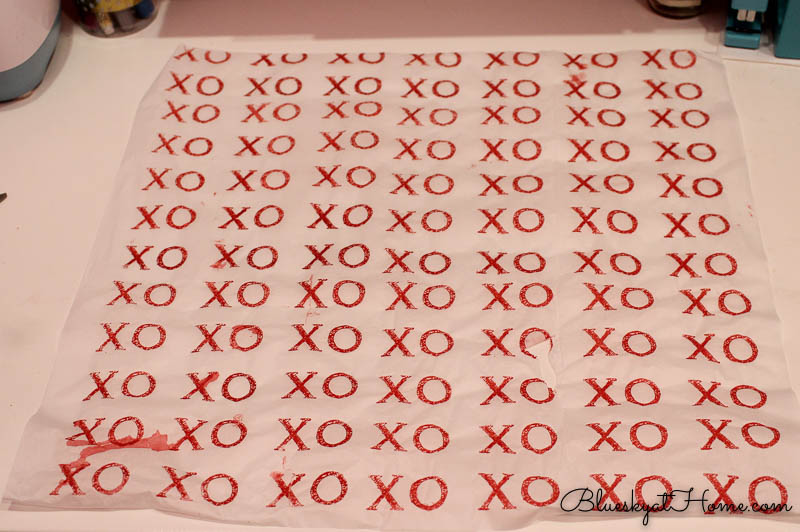
Because the tissue paper is fragile, one time I pulled too quickly and ripped one spot, which you can see in this picture. When I set the stencil aside, I got a little gel ink on the adhesive side and made a little boo~boo. I took a damp paper towel and removed the gel ink and made sure not to do that again.
This is when I turned my Mac on and started watching Season 3 of Downton Abbey while I stenciled. Yes, I know I am so behind. I did get to see Mary and Matthew get married ~ finally. And then I watched Episode 3 and saw Edith get left at the altar.
By the time, Edith was crying in bed, I had stenciled about 16 sheets of tissue paper. I really meant to stop at 12, but I got carried away meeting Cora’s mom and seeing Matthew finally agree to give his inheritance to save Downton.
Step 2 – Attaching the Paper to the Wreath
Cutting the tissue was easy and I didn’t even have to cut it in super even squares.
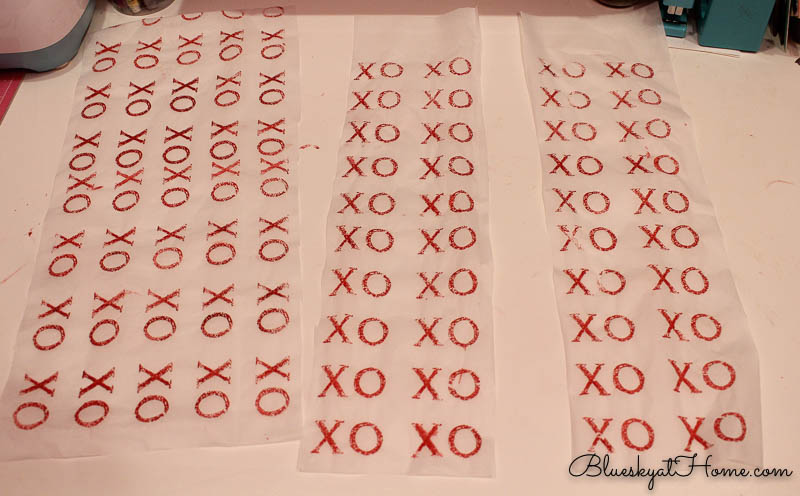
Crimping the pieces was fast and I just continued to cut a sheet, crimp the squares, and glue them onto the wreath until it was covered and full. I then went back with the last 2 sheets of paper and filled in spots that needed more fullness. I found the assembly method worked best:
- stencil all the sheets of tissue paper
- cut the stenciled tissue paper into squares – about 5 inches square
- crimp the tissue paper and glue it to the wreath
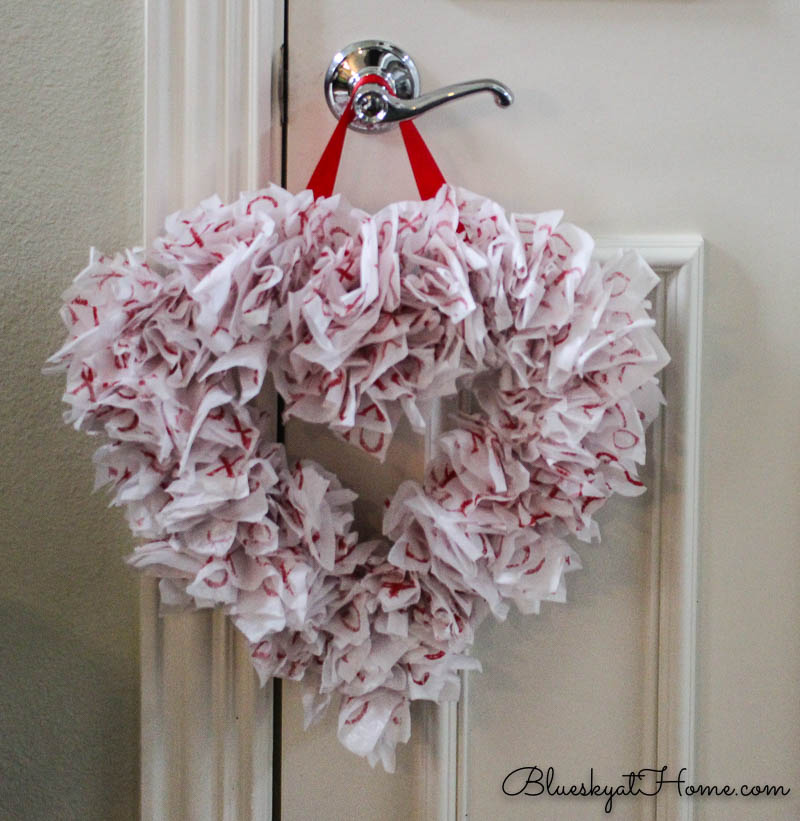
In no time (well, 2 episodes of Downton Abbey), my wreath was done. To be honest, I was thrilled with the result. It looked even better than I had imagined. Sweet Shark was really impressed.
No, this is not the pretty side. It’s the backside.
Step 3 – Making a Hanger for the Wreath
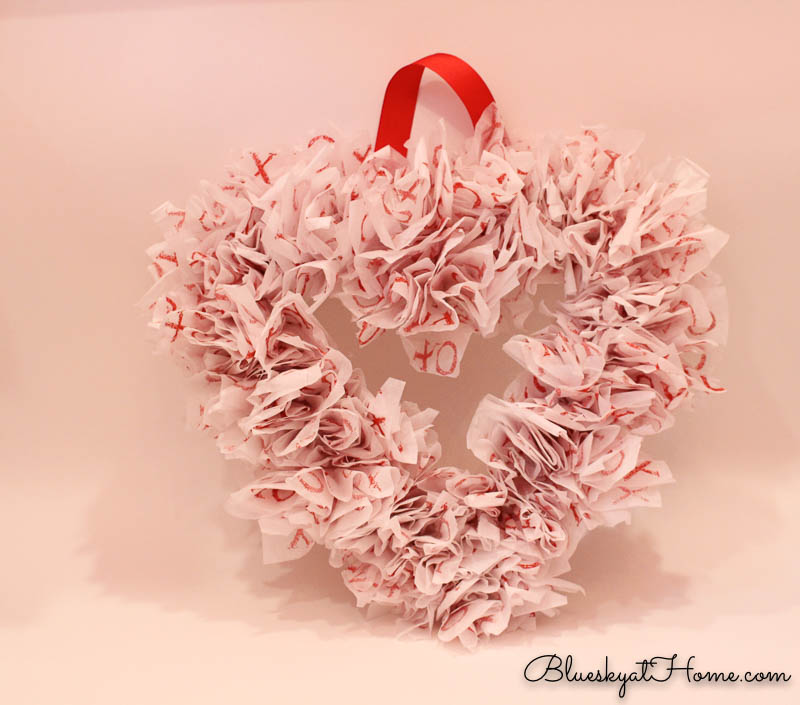
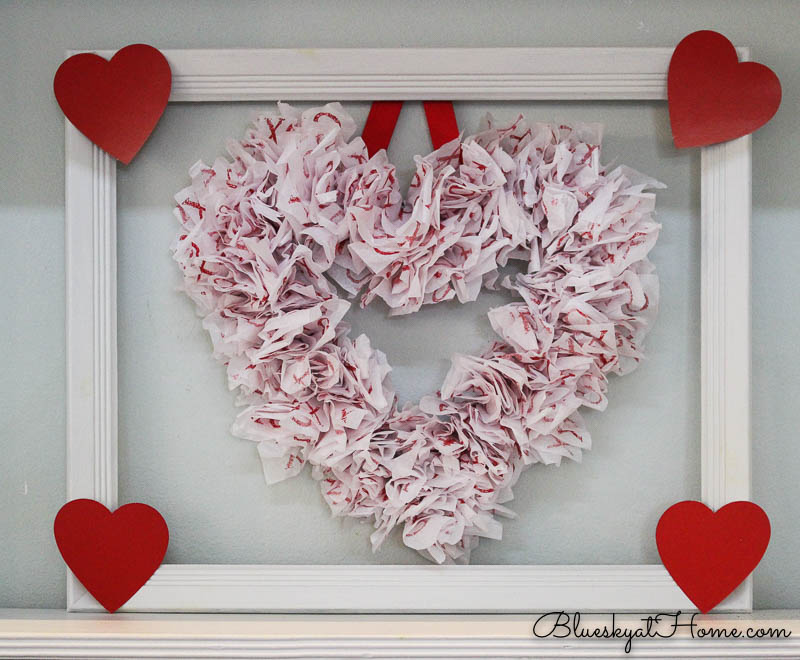
I went through my ribbon box and found both red plaid and solid red grosgrain ribbon. I decided I like the solid red ribbon best so I cut a piece about 16 inches long and used my glue gun to attach it to the top of the wreath.

Then I pinned and glued the ribbon to the wire on the back of the wreath.

All done. Sweet.
Step 4 – Hanging the Wreath
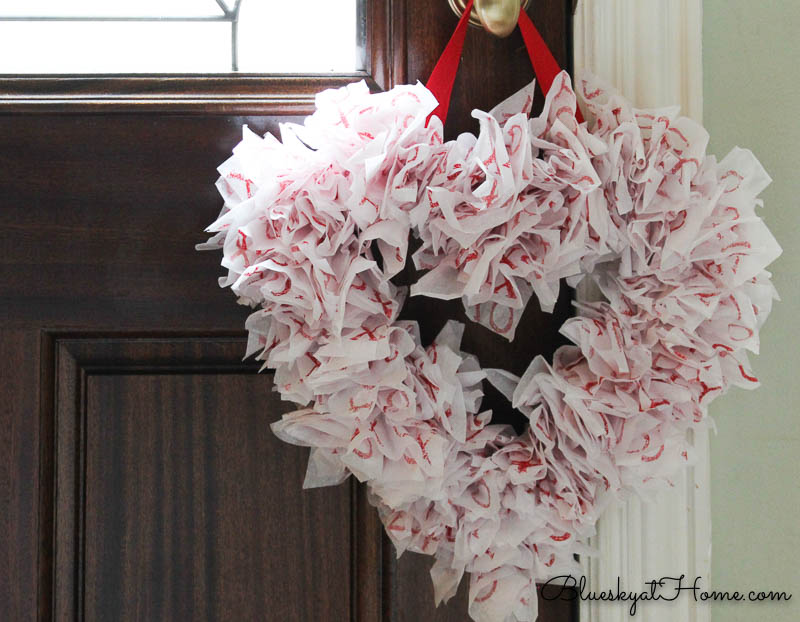
First, I tried it on our front door. It might get too much wear and tear.
And on the coat closet in the entry. More centrally located and safer from the elements.
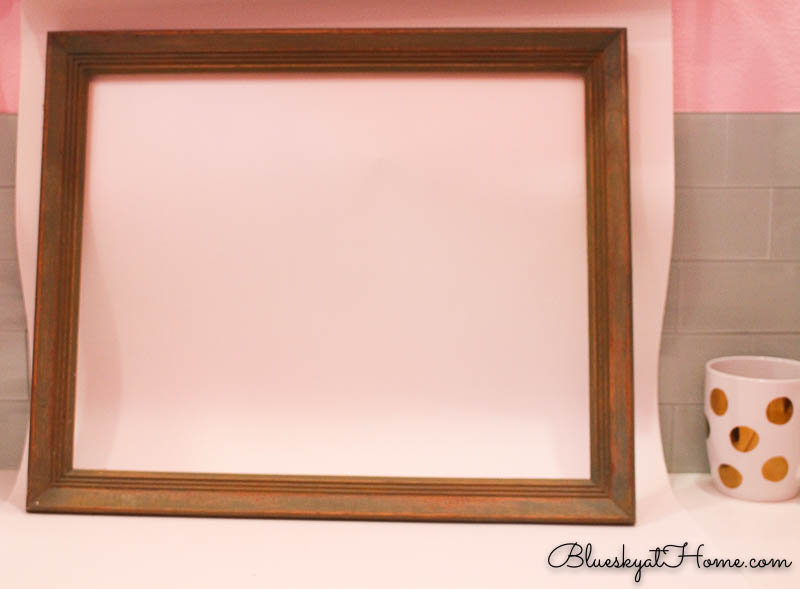
But I wanted another option. I knew I had some old frames in the garage. I found one in the right size, but it needed to be painted.
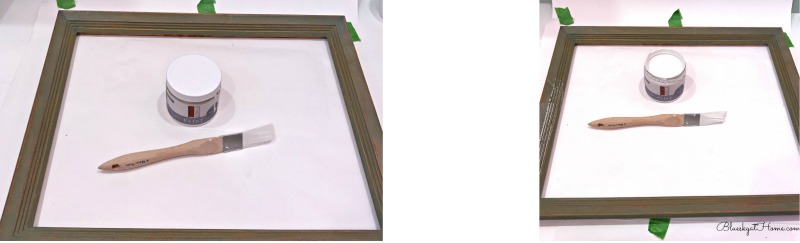
I used Rescue Restore paint, our Chalk Paint from A Maker’s Studio in Blessed, a bright true white. If you have never used this paint, I really encourage you to try it. It smells great (scented with essential oils), is water-based, no VOCs, and goes on so smoothly, and dries in about 20 minutes.
I love this triangle brush. It’s made of microfibers and is perfect for a narrow space and places with ridges and corners.
TRUE STORY: This frame was one of a pair that I bought several years ago at a garage sale for $10 apiece. They had original paint-by-numbers in them and were painted orange.
I bought them for the frames, not the pictures. I painted the frames and 6 months later put them in a friend’s booth at a flea market. A man wanted the paint-by-numbers, but not the frames. He offered me $45 each, no joke. I removed the pictures from the frames, took his $90 and kept the frames. Best deal ever. Talk about rescued, restored, and restored again.
I applied 3 coats of Blessed to cover the green-grey color that I had painted the frame the first time.
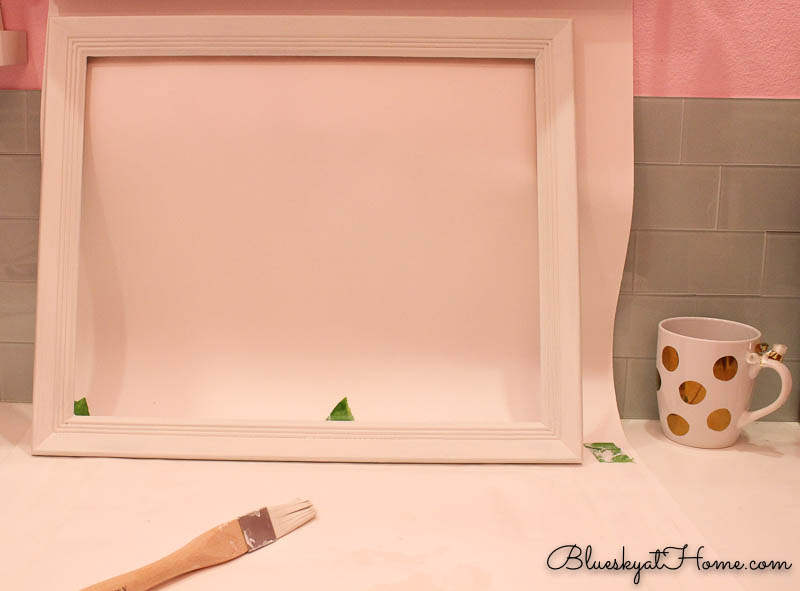
The final step was to attach the ribbon to the back of the frame with a push pin. Now I could easily place my DIY Valentine wreath inside a frame on a shelf in our living room. For extra color, I added 4 red hearts at the corners. I think this is my favorite place for my DIY Valentine wreath.
This was a fun project. I got to use my XO XO stencil, try out the GelArt Ink on tissue paper, create a sweet DIY Valentine wreath, and stretch my skills.
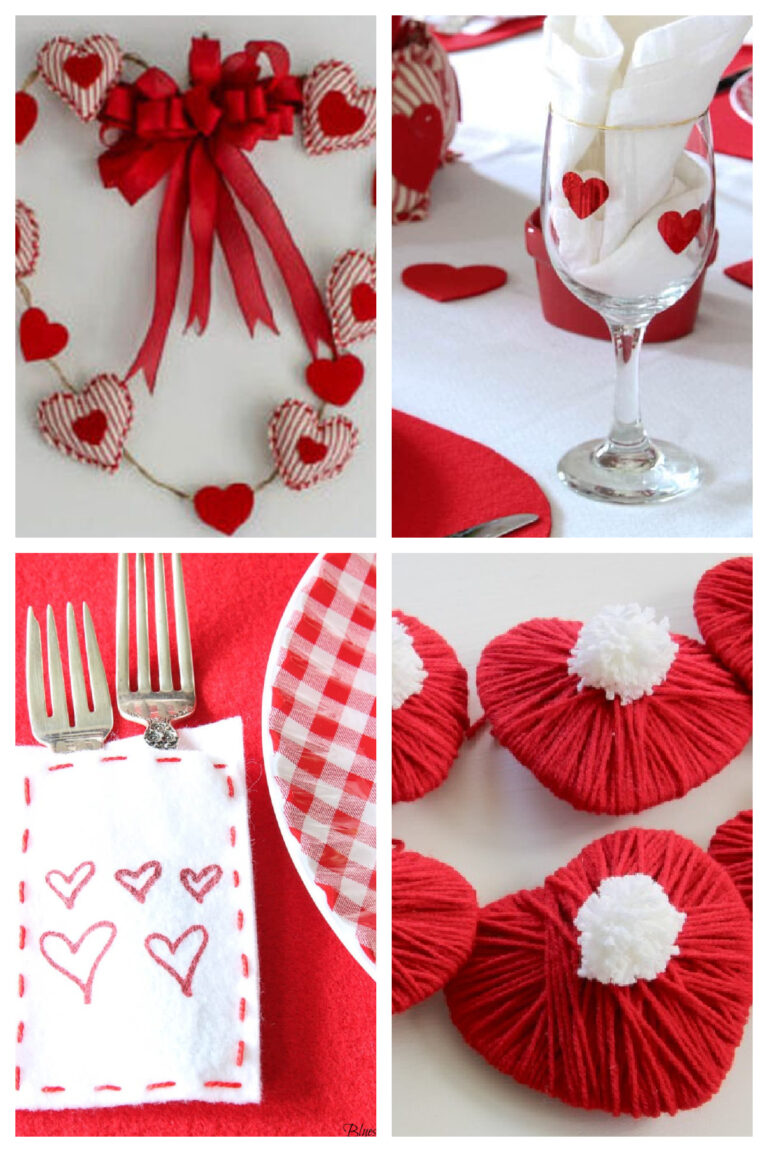
If you missed my last two Valentine DIY posts, here they are:
- (so darn cute) napkins
- the cute and inexpensive Valentine gift (love this one too)
Until then, I hope that you will PIN this project.


Definitely a fave of mine, Carol! Thanks for sharing at Homestyle Gathering! Pinned, and hope we see you tomorrow!
I’m a huge fan of tissue paper and love what you did with yours! So original. And the wreath really pops in that frame. Thanks for sharing at Vintage Charm! xo Kathleen
I love the stencil idea – your wreath is so pretty!
Such a unique and beautiful Valentine’s Day wreath — love it! Thanks for the great tutorial too.
Debbee, thanks so much.
What a beautiful wreath you created! You are so clever to think to stencil tissue paper to use for this project.
I smiled when I read that you are a tennis player. I miss playing tennis so much (I had to stop because of back issues) and it’s good to “meet” a blogger who also enjoys the game. My tennis friends still include me in lunches out, meeting up after tennis, but it’s not the same as being on the court with them.
Paula, nice to meet another player. We haven’t been able to play in 2 weeks with the weather so cold and the courts were being resurfaced. Tennis gets me out of the office and away from the computer. Thanks for the nice comment about the wreath.
Such a fun project! I like it in the frame best of all too. Nothing better than crafting while watching movies, is there?
Tara, the frame was the icing on the cake. Yep, love to watch and create at the same time.
This turned out beautiful, thank you so much for sharing.
What a darling wreath, love your stenciled papers!
Oh Carol, I love how designed your own tissue paper. I would have never thought of doing that! And I love how you hung it on that frame. Perfect! This was so fun!
Yami, thanks so much. I really enjoyed being on this Pinterest challenge with you.
Such a sweet wreath!!
Hey there, Patti. Thanks for dropping by.
Carol it is so cute. You certainly met this challenge with lots of creativity. Hugs!
What a great looking wreath. It is so pretty and to think you used tissue paper and a stencil. Love it! Great thinking out of the box. It was so good working with you on this challenge. Have a great week!
Terrie, sometimes brilliant ideas just pop in our heads. Sometimes they work and sometimes they don’t. Fortunately, this time they did. Thanks for the feedback.
Your wreath turned out so cute!! I LOVE that you stenciled tissue paper, that is so clever!!
~Emily
Thanks Emily. Stenciling the tissue paper turned out so much better than I thought it would. I was a little nervous, butthe stencils are so wonderful to use.
Carol, I love your wreath! This is just too cute!! Great job! Hugs!
Thank you Benita. Hugs back.
Carol your wreath is so cute and clever! I love the happy pop of red. You certainly rose to the challenge. Happy Tuesday!
Laura, wasn’t this a fun project. Thanks so much. Can’t wait for Valentine’s Day.
So pretty Carol! You are so talented. Thank you for joining our celebrate your story link party.
Kari @ Me and My Captain
Kari, Thank you so much. I’d like to think I’m talented, but most times, I think I am the messiest, scatter~brained DIYer ever. Happy to share.
Oh my goodness Carol! Only you stencil your own tissue paper and make it look fantastic! Love being your real life friend too. Pinned. Thanks for joining us. It meant the world to me!
Cindy, I wanted to use that stencil so badly and it turned out far better than I thought it would.Great hostess, great challenge, great group.
The party opens at 6am PST on Tuesday morning! 😉 Here’s the link:
https://myweeabode.com/homestyle-gathering-2-your-homekeeping-destination/
See you soon!