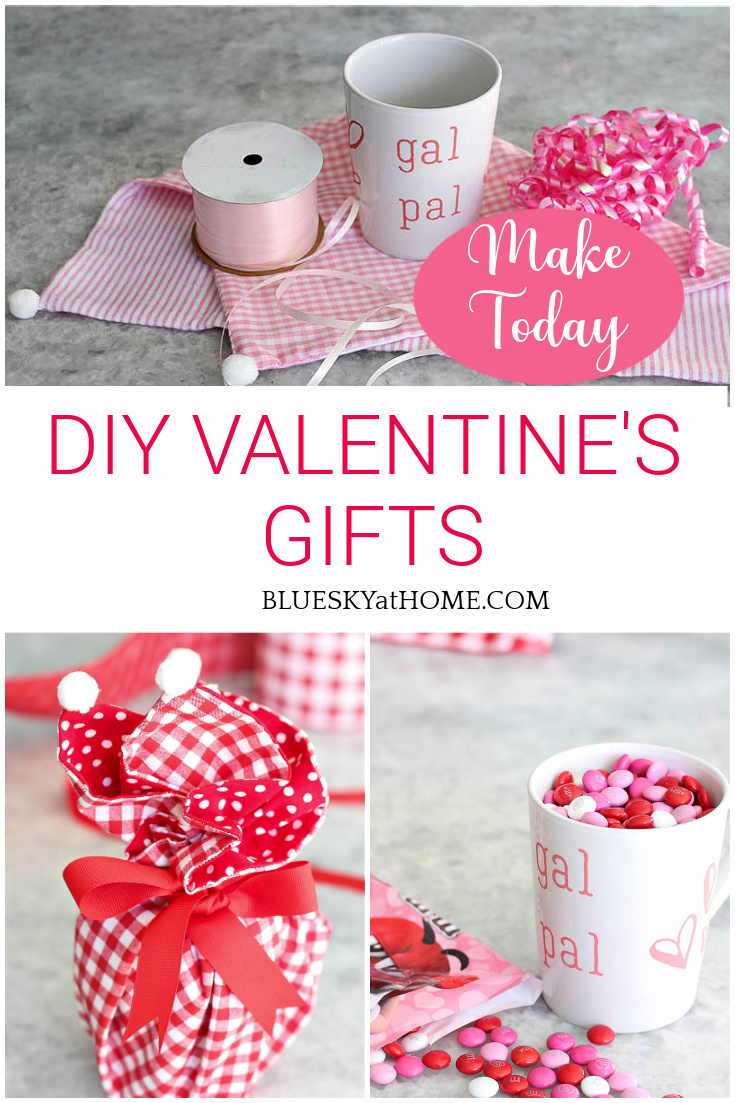
Cute and Inexpensive DIY Valentine’s Gift Project
It’s more than halfway through January, but I’m thinking about a cute and inexpensive DIY Valentine’s gift project. The great thing about Valentine’s Day is that you can give gifts to everyone you know, from your sweetheart, to your kids or your favorite girlfriends.
We all love receiving gifts, but I love making gifts for friends and family.
Making gifts is always an extra special touch that recipients appreciate. I know anyone would appreciate this cute and inexpensive DIY Valentine’s gift.

For my Valentine-inspired project, I knew I wanted to make a gift that I could give to girlfriends.
It had to be cute, of course, inexpensive to make, and something they could use.
I think my cute and inexpensive Valentine’s gift DIY project checks off all the boxes.
The Idea for my DIY Valentine’s Day Project
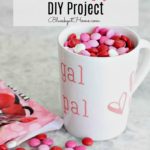
The inspiration for my cute and inexpensive DIY Valentine’s gift actually started before Christmas. I saw a great mug at my local Dollar Tree that I knew would be perfect for gifts.
So last weekend, I headed over there, crossing my fingers that the white ceramic mugs would still be in stock. And they were. I bought four.
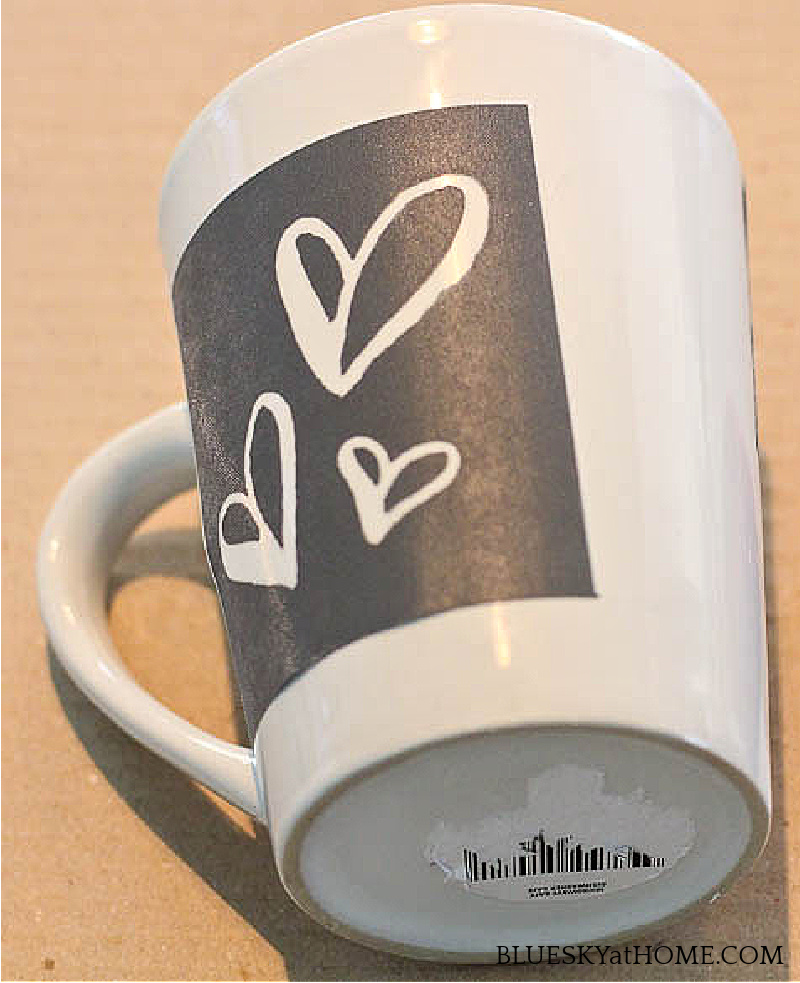
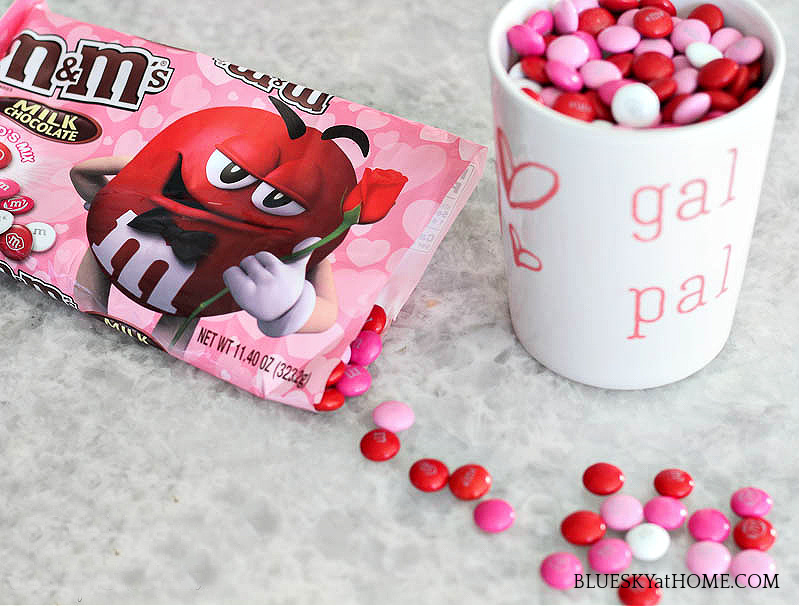
I also wanted to decorate the mug with writing and a heart.
Using stencils and Ceramic Paint from A Maker’s Studio was the easiest and best solution.
I used Always a Bridesmaid – a pink color and 2 stencils – Alphabet 4 for the letters and the small heart design from the Alphabet 3 stencil. I already had all these supplies and had used them before.
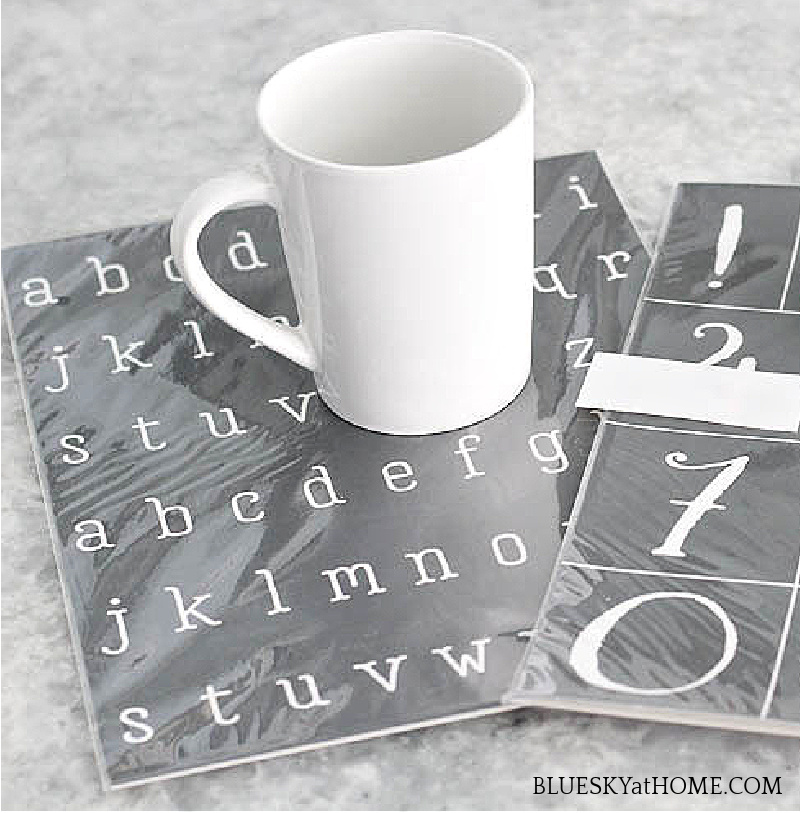
The first stencil I applied was the heart design. It’s so easy since the tri~mesh stencils have a heavy adhesive backing.
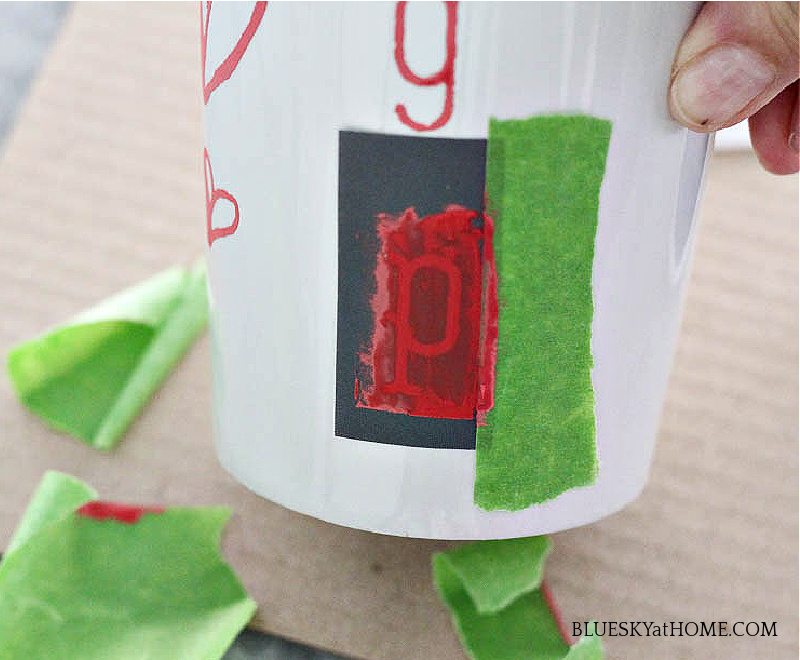
Next, I attached the letters for my “writing”. Since the Alphabet 4 stencil is a small “typewriter” font, there is not much border around each letter.
I used painter’s tape to create a larger border. This one little step made the application so easy.
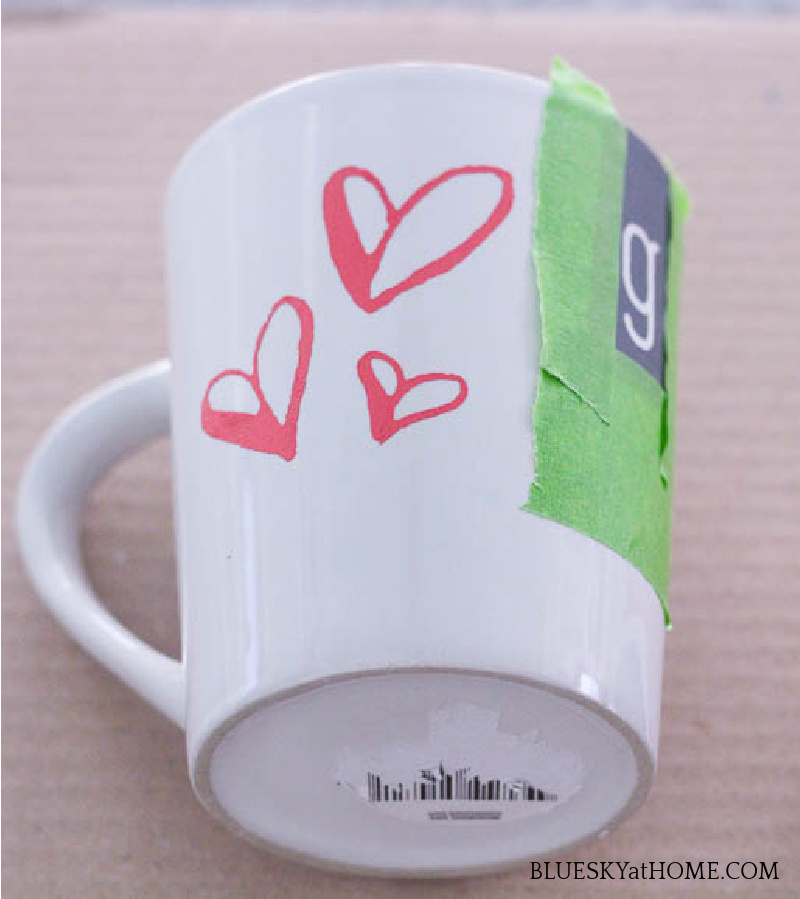
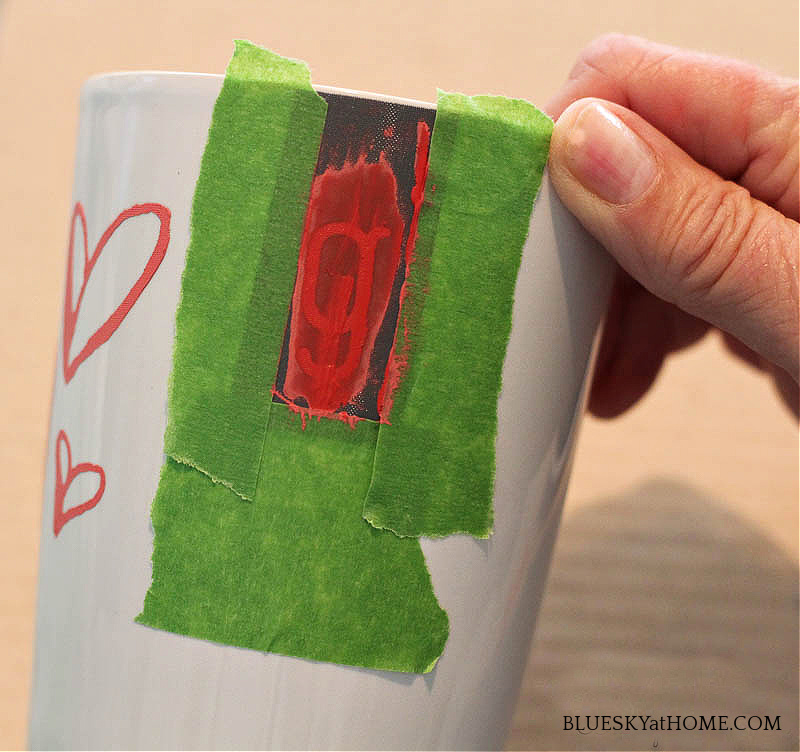
I applied both words in a left-to-right manner. Since I’m left-handed, I usually do right to left.
After I completed my letters, I added a second heart design on the other side of the mug.
Now that my design was complete. It was time to gift wrap it.
Options for Wrapping this Cute and Inexpensive Valentine’s Gift
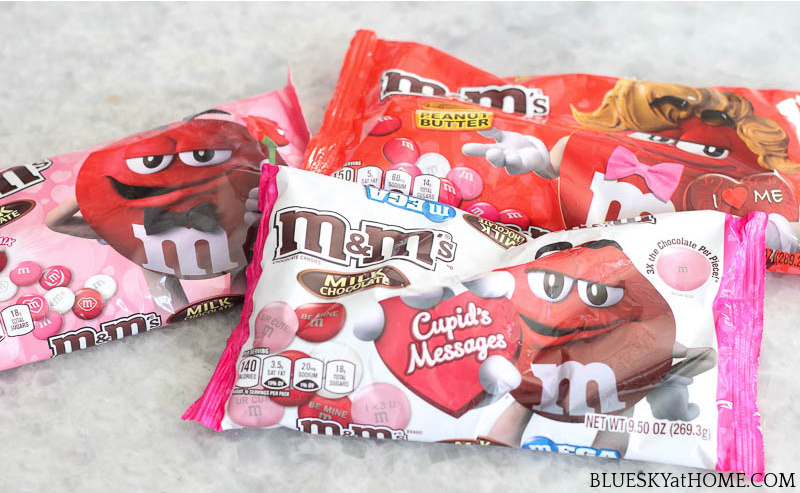
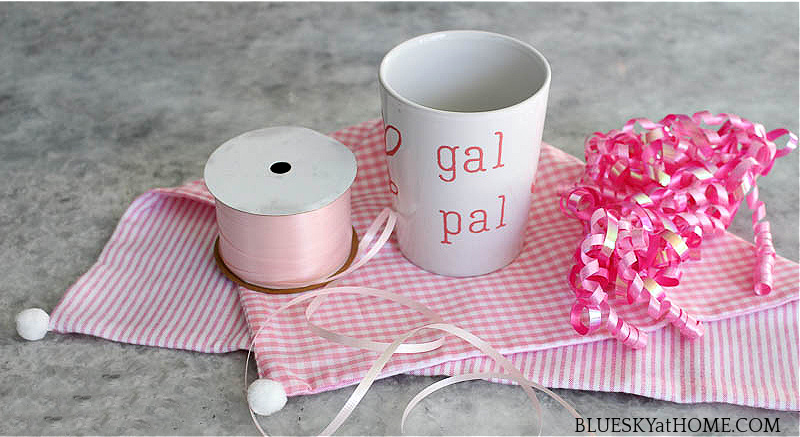
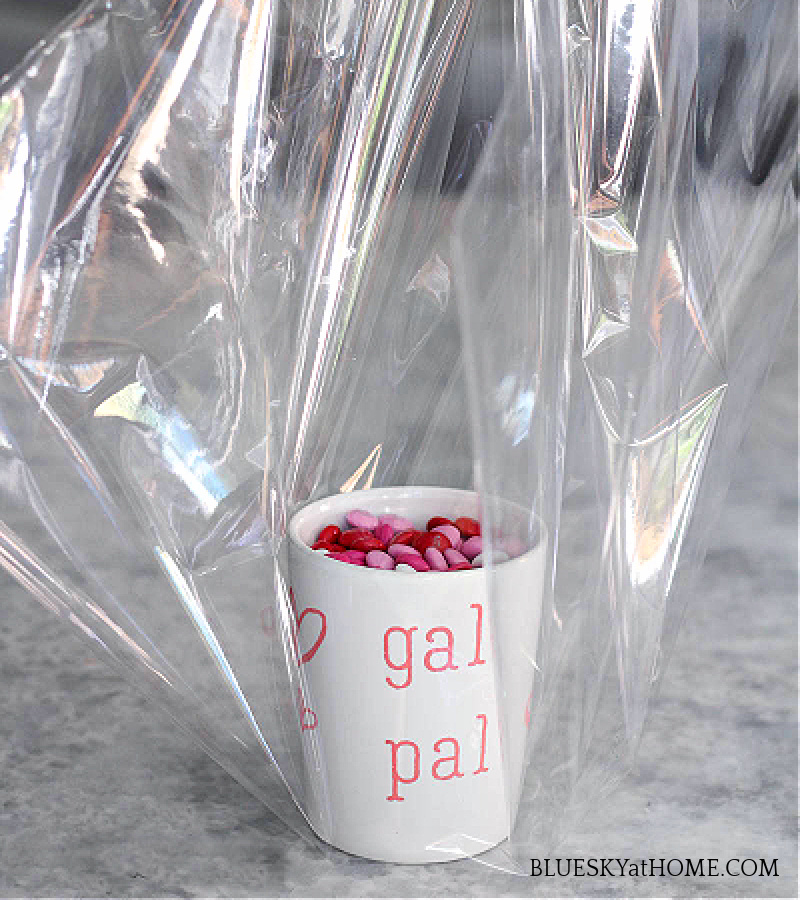
Before wrapping my Valentine’s gift mug, I filled it with Valentine M & M’s I bought 3 varieties at Target but needed only one.
Wrapping gifts can be just as much fun and creative as the gift itself. I had 3 different ideas.
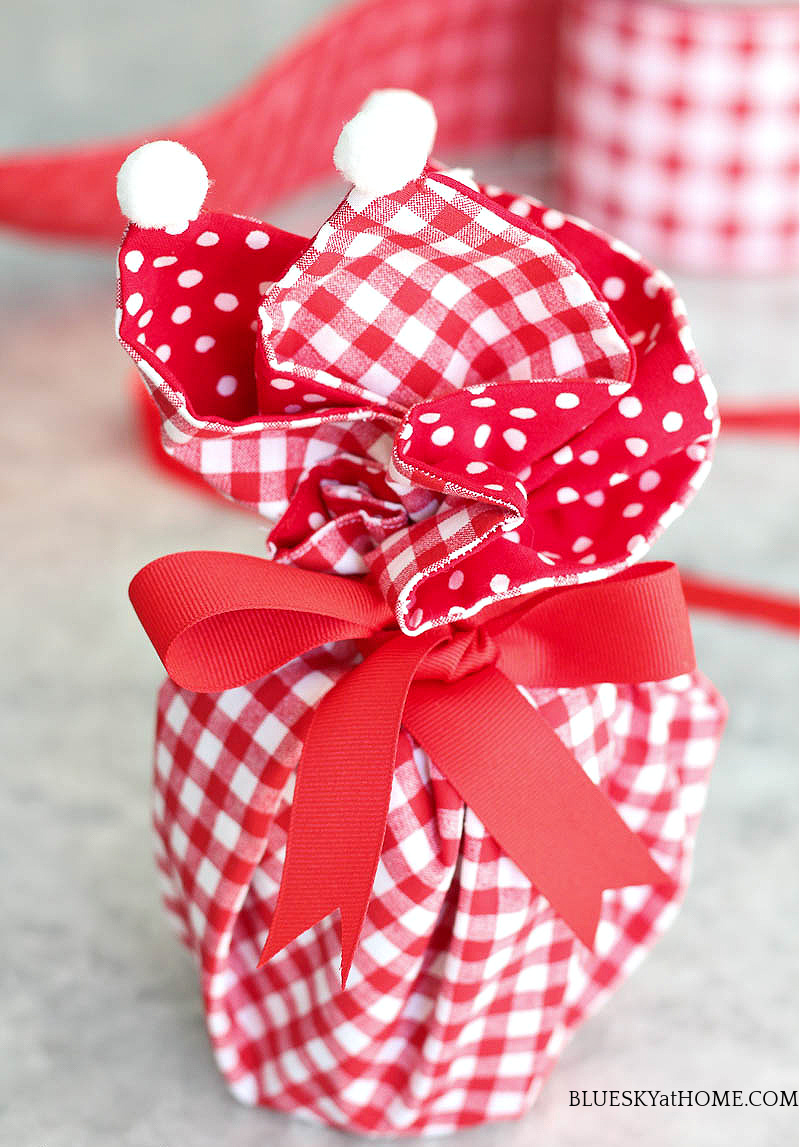
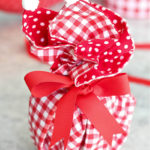
Option 1 ~ the Red Theme
Last year I made napkins for a Valentine’s tablescape. I thought they would make a cute “wrap” and serve a purpose after the gift was unwrapped.
The red napkin had checks on one side and polka dots on the other. And little pom-poms at each corner.
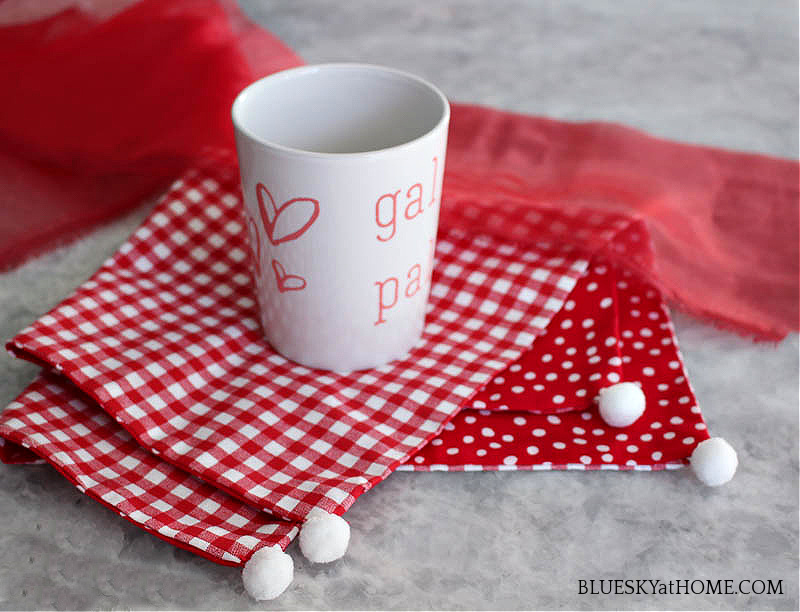
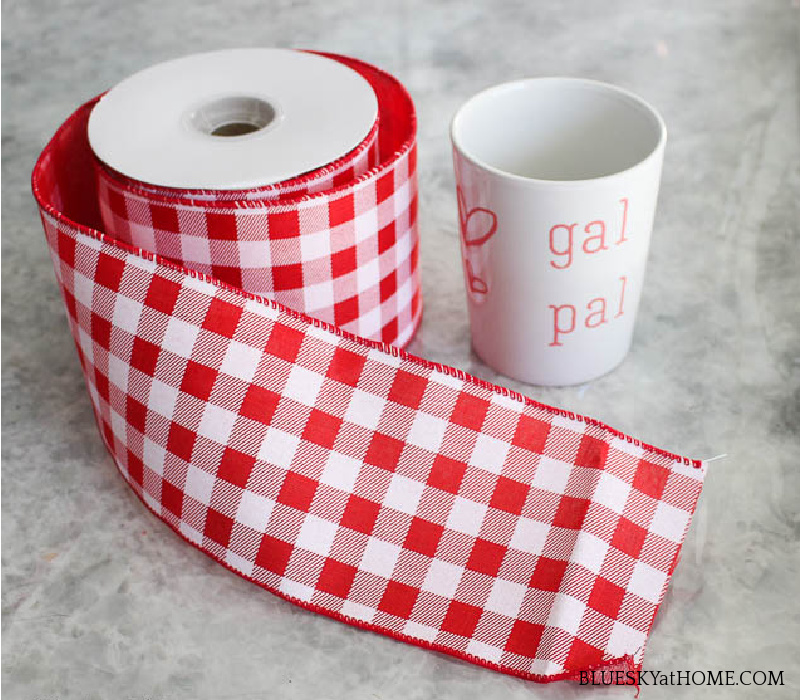
I used a red check ribbon to tie the napkin around the mug.
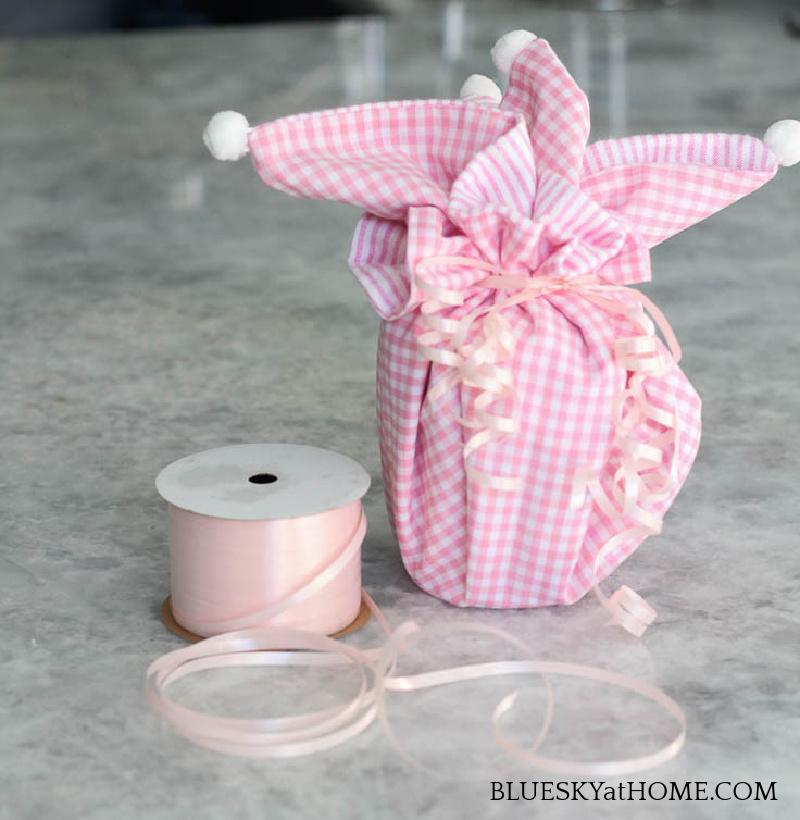
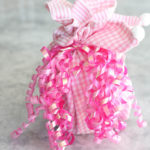
Option 2 ~ the Pink Theme
If you’ve been visiting Bluesky at Home for a while, you know I love pink. And pink is perfect for Valentine’s gifts too. I had also made pink napkins last year and used a pink theme for gift wrap.
First, I tied a jumble of pink curly ribbon from a gift I received around the napkin. Pretty cute? And free!
TIP: always keep curly ribbon to reuse!
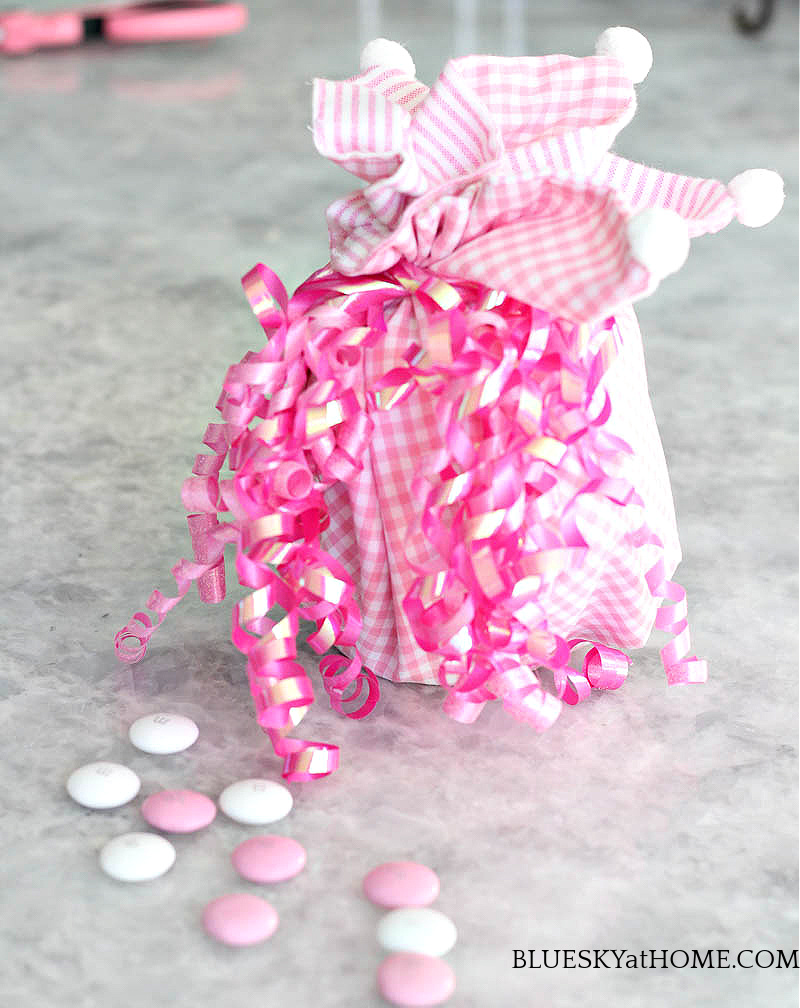
If you don’t have curly ribbon like that, you can make your own curly ribbon tie.
Option 3 ~ the Clear See-Through Theme
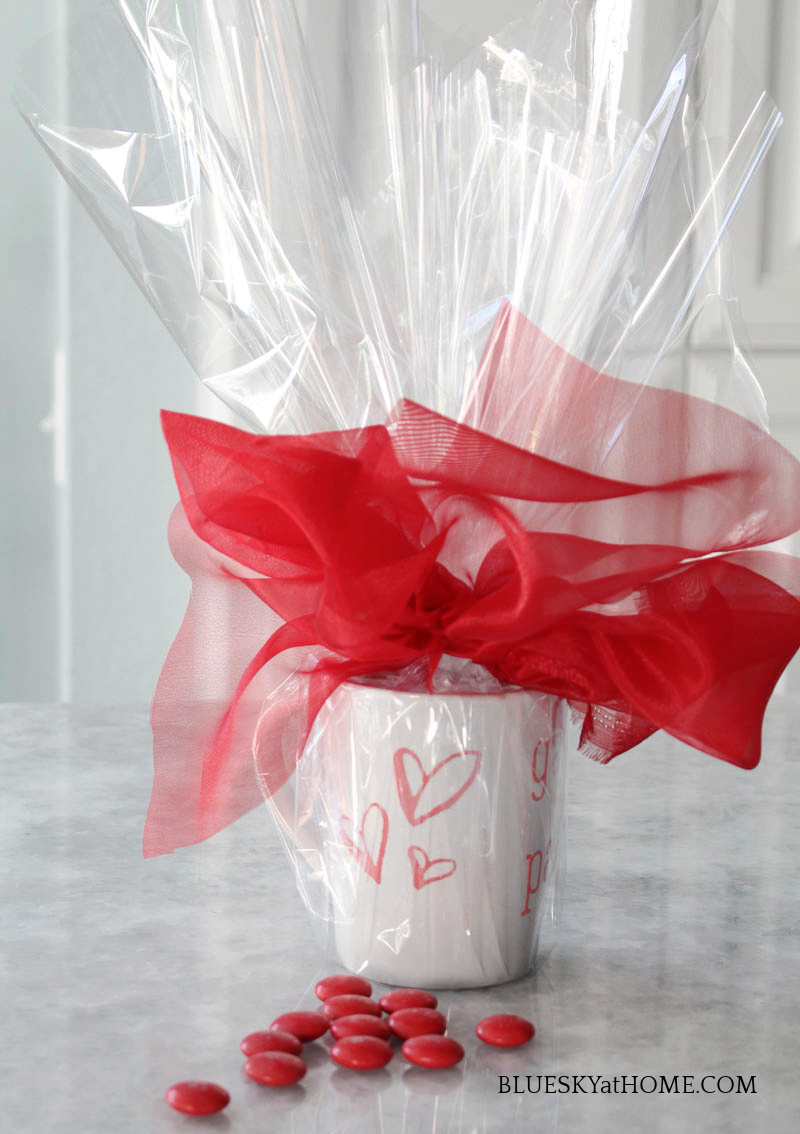
Since my mug was so darn cute, I wanted the design to show. Using clear plastic wrap allowed the design to be seen. Set the mug on the clear plastic film (buy at any craft store), making sure you have plenty of material to cover the mug plus extra for “fluff”.
I intended to use this darling red-check French ribbon that I bought on sale last week, but it turned out to be too wide and bulky.
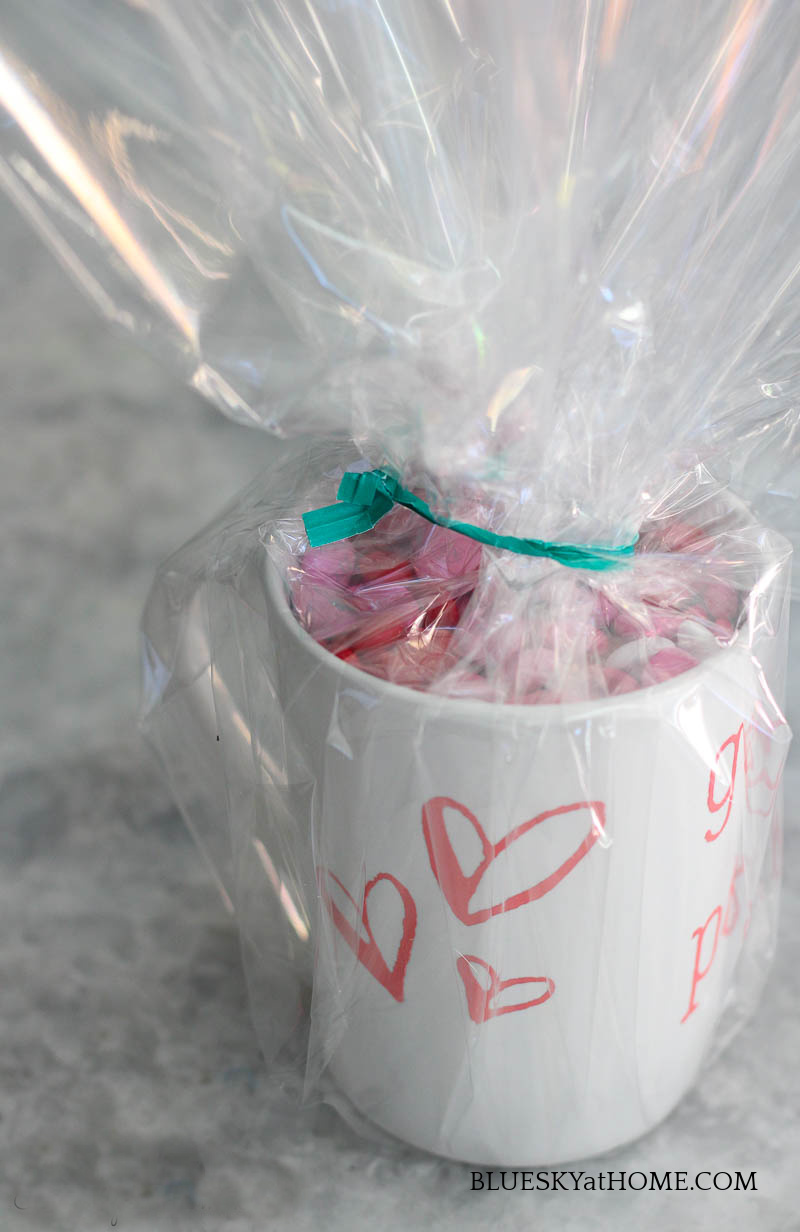
After cutting the plastic film, bring the four corners together.
I used a twist tie to hold the plastic film together.
As ribbon, I used leftover fabric that I had used to decorate our Christmas tablescape and it worked perfectly.
So there you have it: one DIY, hand-made, cute, and inexpensive Valentine’s gift and 3 ways to wrap it.
Cost:
Ceramic mug – Dollar Tree $1.00 each
M & M’s ( I used about 3/4 of a bag – Target $3.19
Total = $4.19 + tax
Everything else I used I already had. The more mugs you make, the less the cost per mug.
Guess where I’m going today? Going to Dollar Tree to buy a few more mugs.
You can make and wrap this cute and inexpensive Valentine’s gift in less than an hour. I know you can. You could also use a different container:
- You could wrap it with fabric that you have edged with pinking shears.
- Wrap it in a dishtowel.
Instead of M & M’s, you could fill the mug with:
- Red hots
- Gummy bears
- Tart hearts
- Wrapped chocolate hearts
- Hershey kisses
I hope that this project has given you ideas and inspiration. It has fired me up to create some more cute and inexpensive Valentine’s gifts. Be sure to PIN it so you can make this mug for your friends.

Congratulations Carol you were one of the features in this weeks Friday with Friends link party!
I also linked the napkins – so cute – and added it to the Pinterest board where people are loving it.
Thanks for contributing, and I hope to see you this week.
RR
Super cute! I’m partial to the pink! Thank you for taking the time to share with us at EH&F
This is such a darling little project an so sweet to share with friends. I haven’t even thought about Valentine’s gifts yet because I have to get through my husband’s 50th birthday the week before. LOL Thanks for sharing a great idea that I just might need to make at the last minute. #HomeMattersParty
What a great idea!!
What a lovely treat! I’m sure any friend would feel the love getting this gift! So cute!
So cute! Great idea!
Carol, these are super cute! Love the wrapping. Have fun with the grandkiddos!
Such a cute and easy gift to put together. Love your choice of stencils. And who wouldn’t love chocolate?:) Thanks for sharing at Vintage Charm. xo Kathleen|Our Hopeful Home
Thank you Eilis. I love them both.
Really cute, Carol! I haven’t tried A Maker’s Studio stencils yet but it would be fun to have all those heart for future projects. <3 Thank you for hosting the party! Happy to be an alternate with you all.
Hugs,
Barb 🙂
Thanks so much Barbara. I really encourage to try the stencils. The designs are awesome and they are so easy to use. Thanks for hanging in there on the blog hop.
We need to visit Target to get our new pup a jacket, sweater or little coat.Don’t remember where same are for only other smaller dog we ever had. we had a black mini cocker spaniel in M/t which we dressed her in red sweater and little red coat with fur collar and red booties which she’d go out in yard (part of 20 acres) to remove every time, Spent lots of time looking for those booties as they were expensive in 2000. She was so cute in her red sweater and coat. Liked to be told she was cute in them. Was so cold she needed her booties for her little tootsies.
We had to put our black lab/border collie to sleep on Sunday before Christmas, he was so sick. Was so hard to hold him while he died.He was 10, had him for 9 years, such a wonderful dog, like our child, miss him so much. One of our vets clients had full blooded border collie pup at almost 4 months old they gave us on Monday. Not too sure I was ready yet, feel so guilty having another dog already. Can’t think about him without crying. The pup is a handful, doesn’t like being in crate at night, carries on for while. He was never in their house stayed, outside in a barn. He is a real sweetie and so darned cute and smart. Maybe he is best thing to help me get over our dog. How do you heal a broken heart? Christmas wasn’t so great for us this year. I can’t even talk about him without crying.
Your project is so doggoned adorable, I usually make things doer Valentines to give not sure this year.Great ideas for decorating the mugs and wrapping. Am sure the receivers of mugs will enjoy them. Glad $tree still had mugs to decorate. What would we do without $tree?
Happy Valentines Day
Jane Ellen, thank you for visiting and your comment. So sorry to hear about your sweet collie. It’s so hard to lose a beloved pet ~ I’ve been through that too. Our black lab Layla is almost 15 and I’m grateful every day that she is still relatively healthy. Good luck with the new pup.
Carol this is a great project. I love those stencils and the cups you made. The wrapping takes it over the top! Love this and it makes a great gift!
Thanks so much, Susan. It was fun.
So cute! I liked your different presentations; using what you already have in a new way is real creativity in my book! I could almost taste those M&Ms! I have 1 Christmas bag–still unopened!!!
Thank you Kathy A. I appreciate your compliment. Thank you for visiting and commenting.
Carol, you are so creative! I love the mug idea and those stencils look so easy to use. I think I might have give them a try. Off to pin the pretty! Thanks for sharing!
Hi Kim, and thanks for the comment. YOu definitely need to try the stencils. The designs are wonderful, the adhesive backing makes them so easy to use, and the ChalkArt is such a game changer.
Hi Carol,
I love all three versions of your Valentine mug project. I like making things for Valentine’s Day – less stressful that Christmas. Thanks for sharing this idea! ~Cheryl
Chery, Valentine’s is less stressful than Christmas! Thanks for dropping by and reading. Would love to see what you make.
Well who doesn’t love M&M’s?! And each gift wrap idea looks so adorable. Thanks for taking us on. This will be fun.
Thanks Cindy. It was great to have you and see you stretch your DIY wings.
Your mugs are darling, Carol, and I’m SURE you needed 3 varieties of M&M’s! LOL
P.S. I’m left-handed, too!
Ann, thank you so much. Great to be on the blog hop with you. Can’t have too many M & M’s. Love being a lefty.
Carol those are beautiful and I especially love the way you wrapped them. That chalk art is amazing stuff, it’s so versatile!
Susan, thank so for your comment and feedback. Yes, the ChalkArt is a wonderful product to use. Really changes the way we use stencils and the stencils back DIY so much easier. You should try them!!
Carol, this is absolutely adorable! I love it! You have some great stenciling skills. I cannot stencil…I’ve tried many times and it is always a hot mess…lots of bleeding underneath the stencil and movement. I gave up on it…LOL So glad to be a part of this great group of bloggers !! Hugs!
Very cute. The napkins as wrapping are a darling touch.
Katie, thank you. Last minute ideas are sometimes the best.
Such a cute and clever craft! I absolutely adore the darling napkins too.
Laura, as a steamress too, I knew you would like them.
What a cute little gift. The napkins you made are so cute, especially with the cute little pom poms!!
Thanks Patti, I’m kind of smitten with Pom-poms.
Carol so cute! I don’t know anyone who wouldn’t love to get one of those darling mugs!