How to Make an Anniversary Sign with Metal and Wood
I have a secret to share. If you’ve been reading my Facebook posts over the past 2 weeks, you already are in on the secret. For almost 2 weeks, Sweet Shark and I were on vacation in Hawaii, celebrating our 20th anniversary. It was a fantastic trip to Oahu, Maui and Kauai, really a trip of a lifetime. We returned on Saturday, but actually, Wednesday was our anniversary. Even before we left, in fact, weeks before, I knew what I wanted to give him for our anniversary. I couldn’t post this on our anniversary, because like a sweet, supportive husband, he reads my posts. So today you get to see my present and I can show you how to make an anniversary sign with metal and wood.
Another confession, this present was not really my idea. About 18 months ago, I helped my daughter made a similar sign for her 10th anniversary. She found the resource for the metal sign and we assembled it at our home while she and my granddaughters were here for their annual summer vacation in Dallas. I knew then that I would make one like it for our 20th anniversary. You can see how we made her sign.
I’m so glad that I had a trial run of helping Jenn make her sign. I knew there were a few things I would do differently. So my approach how to make an anniversary sign with metal and wood is a bit different, but I think easier.

How to Make an Anniversary Sign with Metal and Wood
The Metal Sign
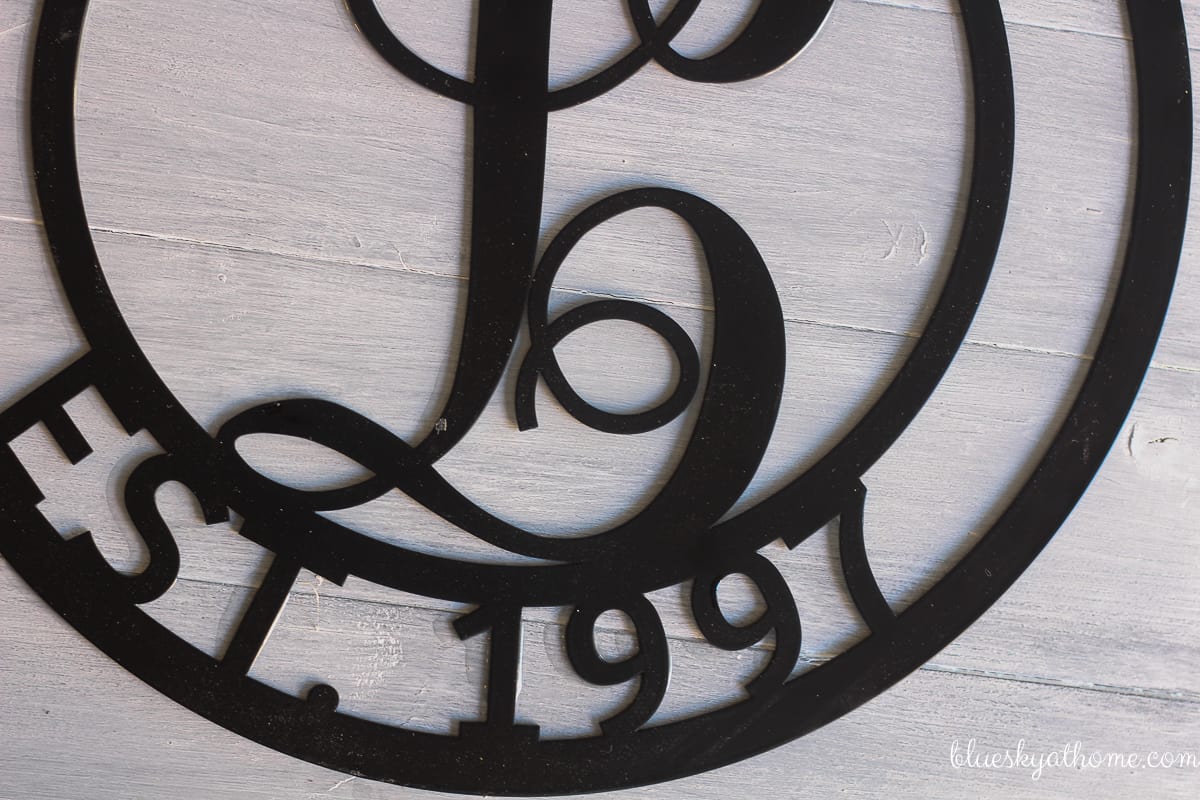
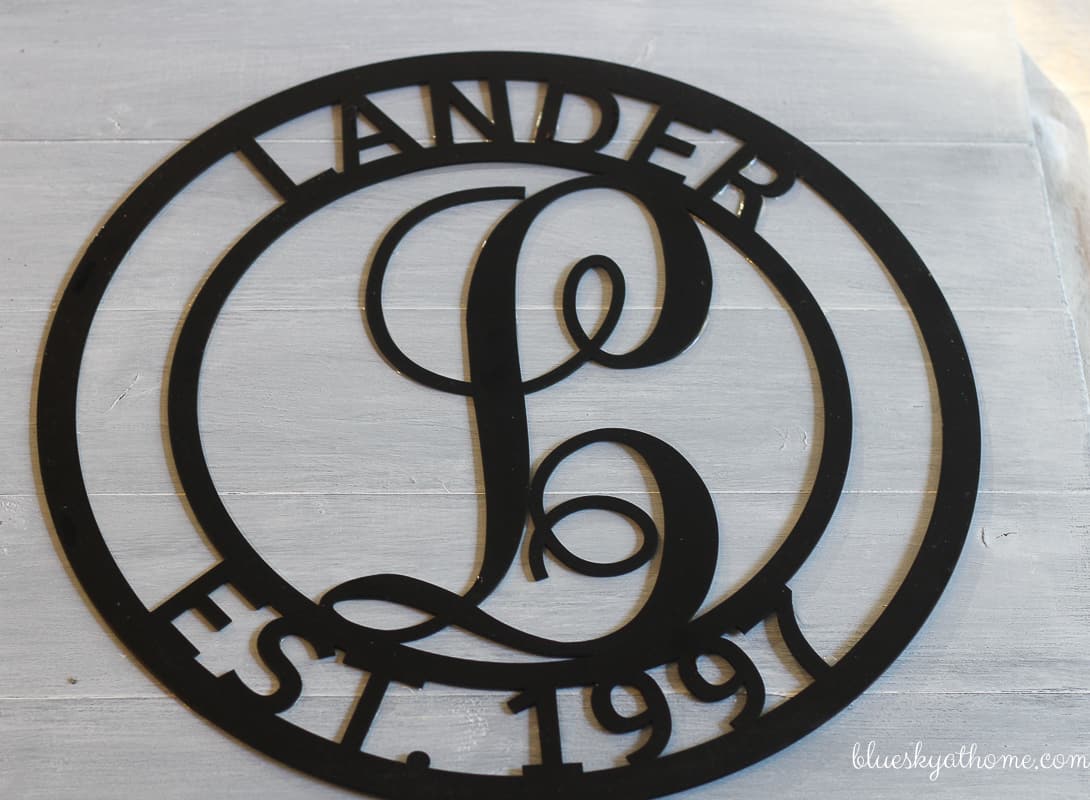
So here is how you get started with this project. I ordered my metal sign through Metal Unlimited.(This is not a sponsored post.) They have wide range of styles, fonts, shapes, colors and sizes of metal signs. You pick your sign style, font, size, letters or words you want and order. I ordered the style Metal Family Name. My sign took 2 1/2 weeks to arrive and cost about $39.00. The sign arrived on the Saturday we arrived home from Hawaii. Fortunately, Sweet Shark was out running errands.
The Wood Board
In addition to the metal sign, you will need wood and brackets. The actual diameter of my sign was 14.5 inches. I wanted to mount my metal sign on a wood “backboard” so I wanted the total sign to be about 18 inches square. At Lowe’s I bought a 8 foot piece of white pine 4 x 1. If you’ve ever bought wood, you may know that it really isn’t 1 inch thick; it’s more like 1/2 ~ 3/4 inches thick (Who else thinks that only a man could think up such a screwy way to measure?). I had the nice man at Lowe’s cut my board into 5 17.5~inch pieces.

The wood was a bit rough on one side and smooth on the other. You could use either side you wanted, depending on how rustic you wanted your sign to look. Since I wasn’t sure where we would hang the sign, I decided to use the smoother side.
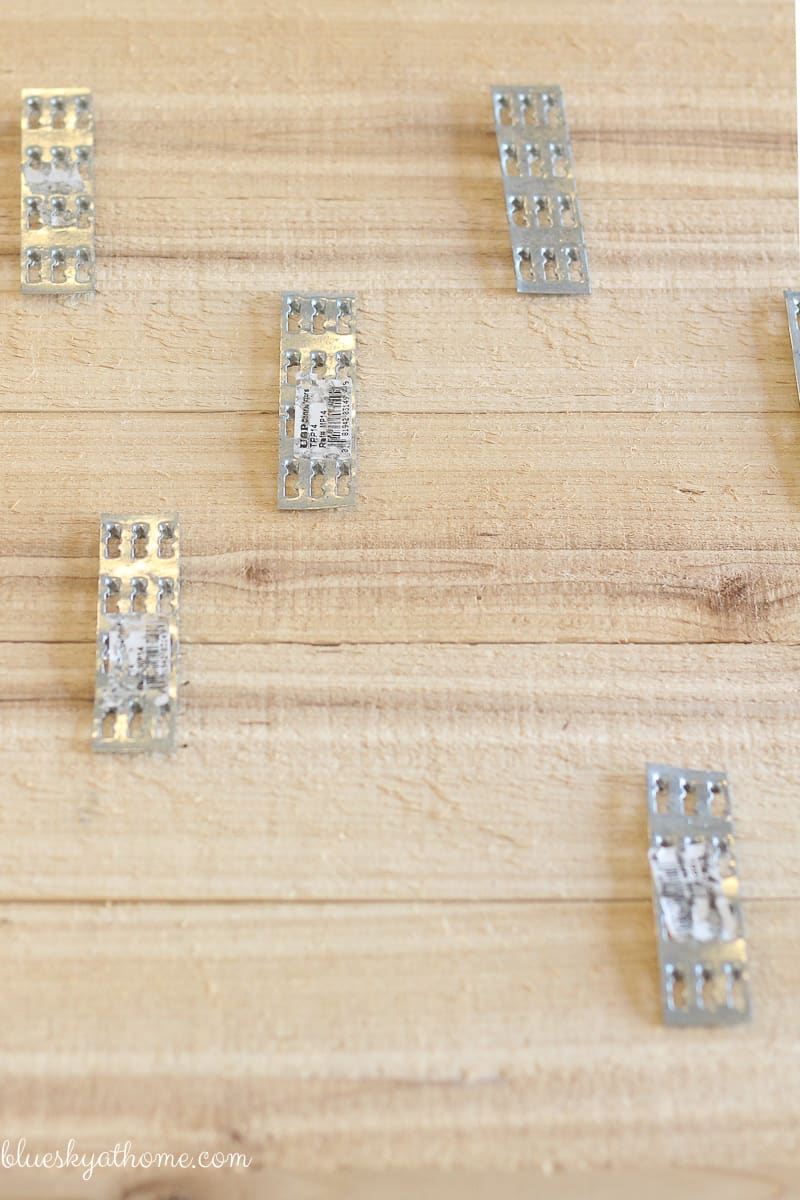
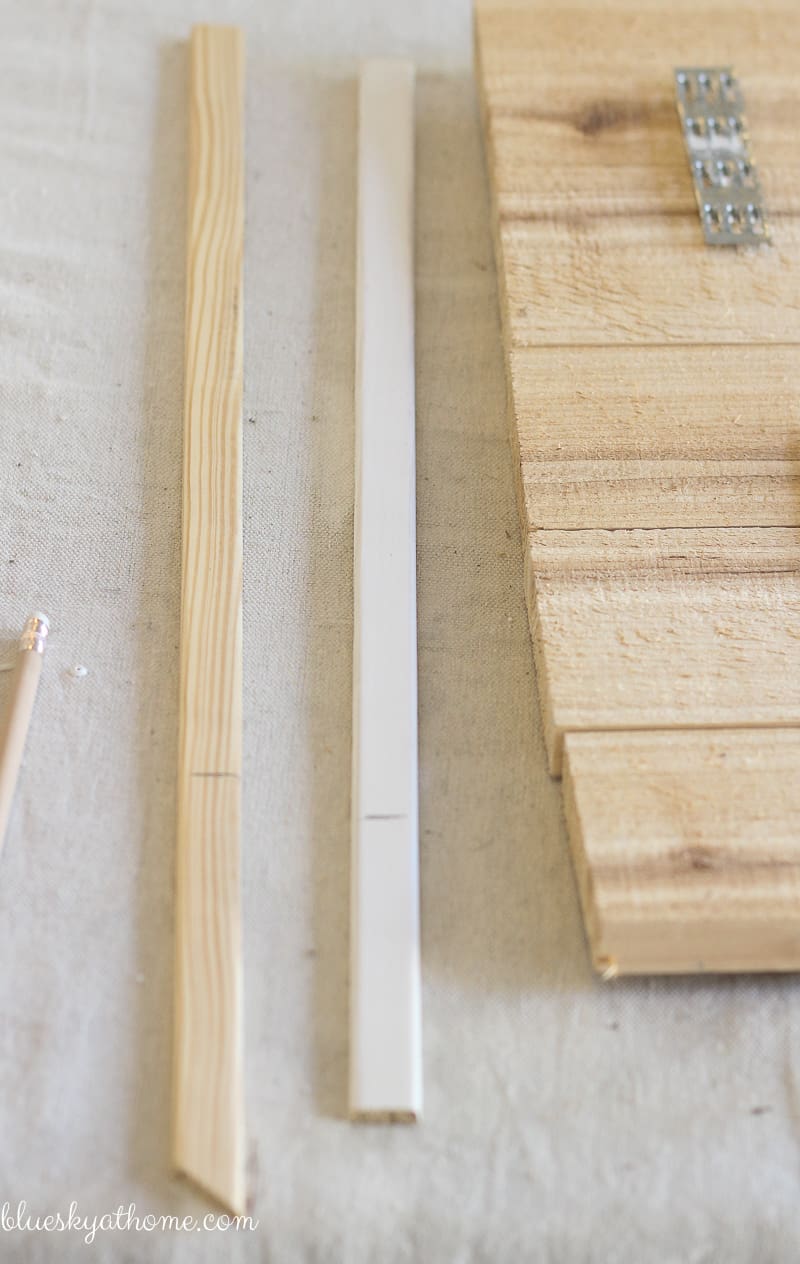
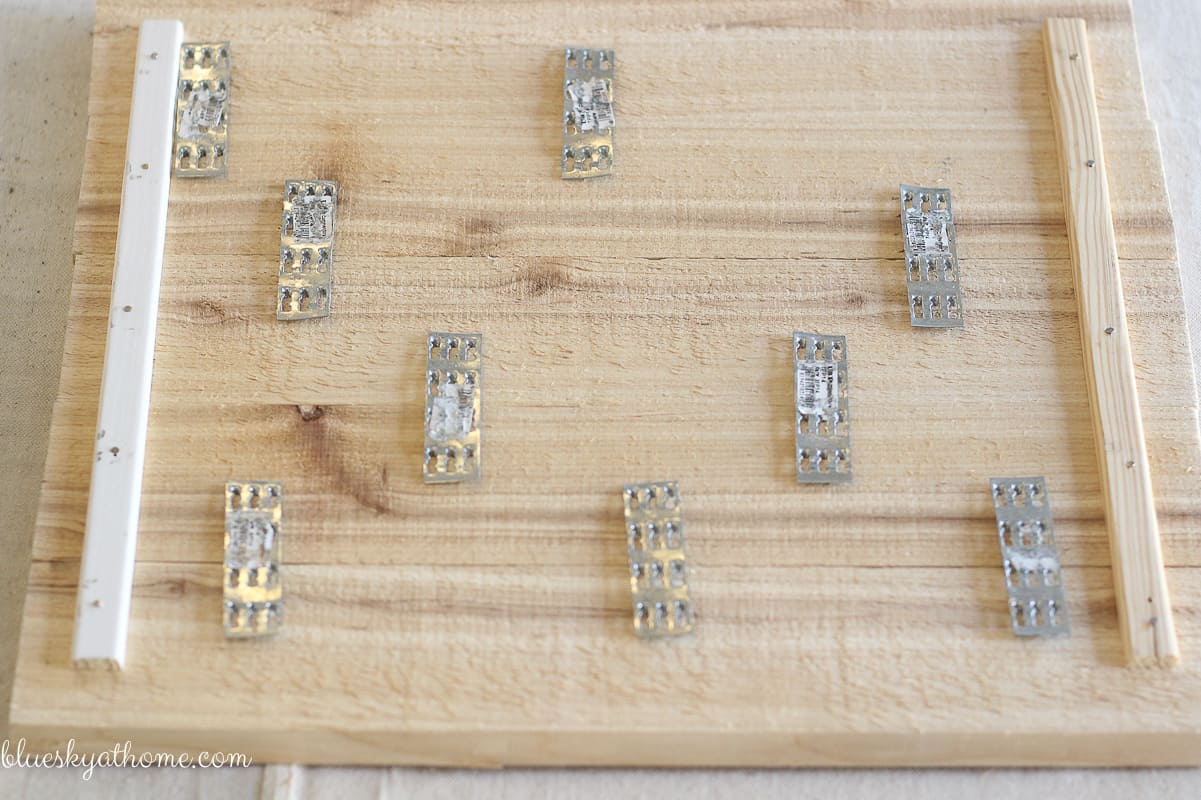
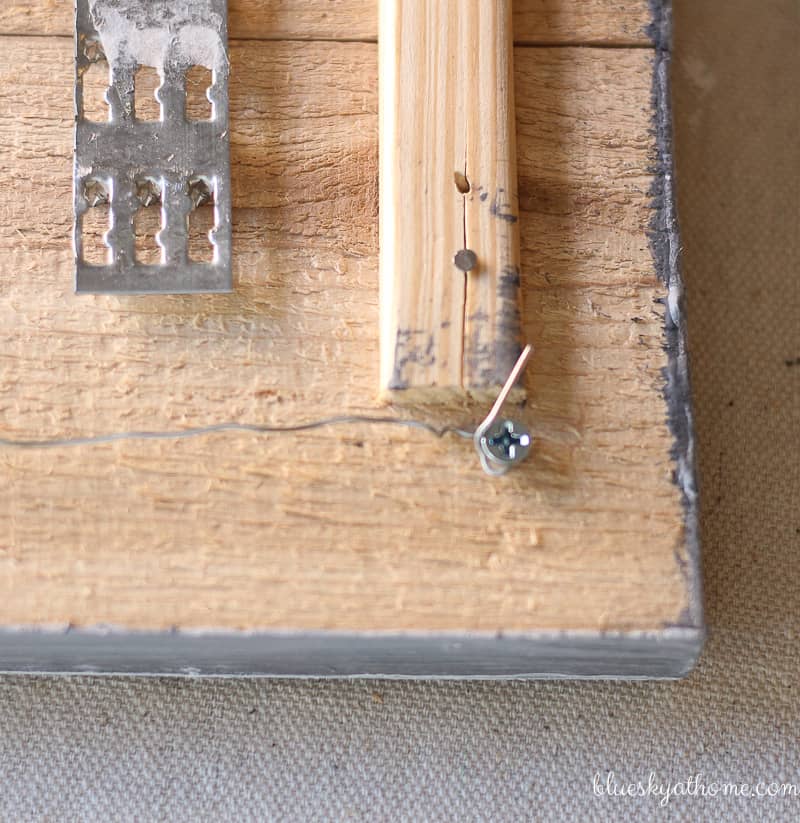
Now I needed brackets of some sort to attach my boards together. I intended to use flat pieces of metal ~ the kind with holes for screws ~ like we did for my daughter’s sign. Unfortunately, they only come in 12~inch lengths and my 5 boards stacked were 17.5 inches (The finished size of my board would be 17. 5 X 17.5.) The Lowe’s man suggested that instead I use roofing brackets: little, light~weight pieces of aluminium with teeth on one side. He said you just nail them into the wood and they will hold tight. Plus they are cheap ~ 58¢ a piece. I bought 9, thinking I would stagger them.
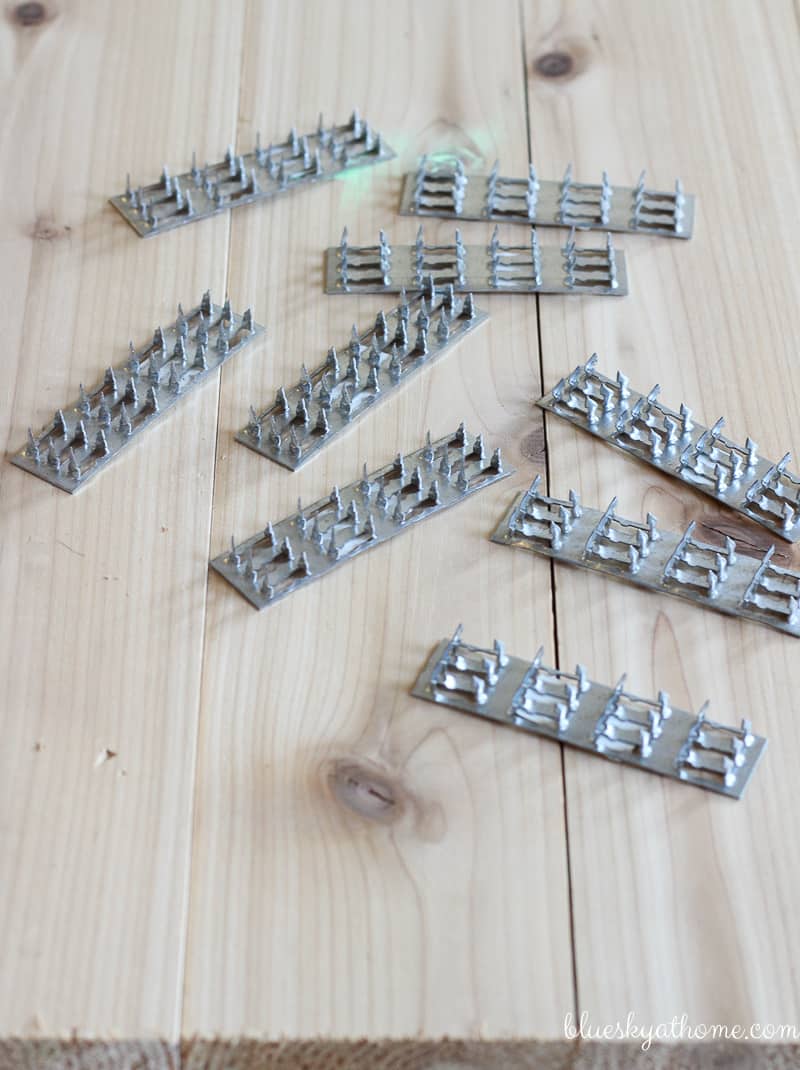
I turned the boards over so the rough side was showing, layed out the brackets so that all the boards would be attached and nailed the brackets in. I got a good workout doing this and used Sweet Shark’s heavy hammer.
Everything seemed to be going well, until I noticed that the boards were slightly bowed. That would not do. Although the boards were firmly attached, I thought they needed more stability.
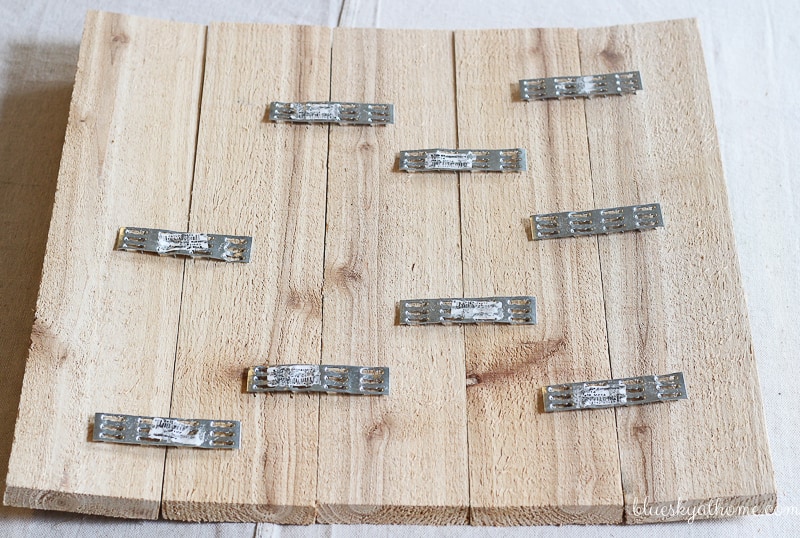
Looking around the garage, I found 2 pieces of molding left over from our laundry room makeover. I cut them to size (about 2 inches shorter than the height of the attached boards.) and nailed them to the back of the boards.
This step straightened out the board and gave it more stability.
Painting the Wood Sign
This post contains an affiliate link for your convenience.

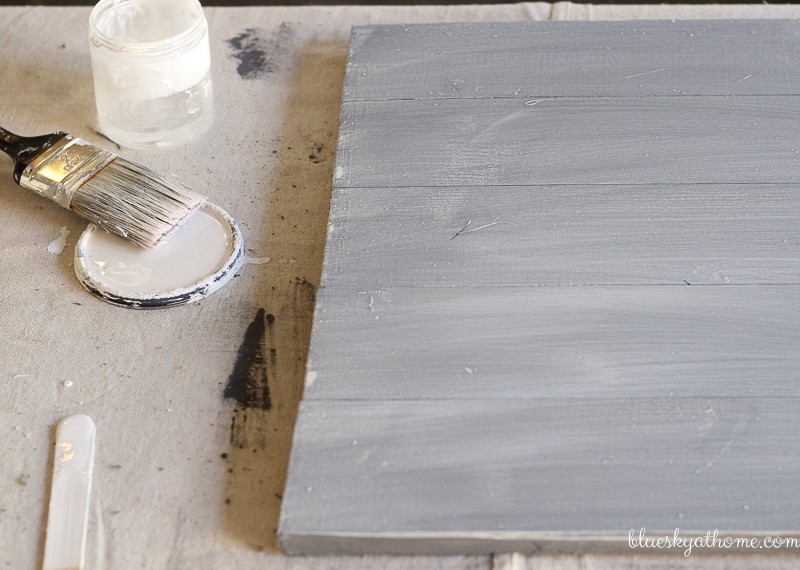
Now the fun part. Before painting the board, I sanded the cut sides and the top and bottom. I used one of my favorite greys, A Good Man is Hard to Find, a One Step Paint from Amy Howard. It took just one coat to cover the wood, but allowed for some of the grain and knot holes to show through. Here’s what it looks like wet.
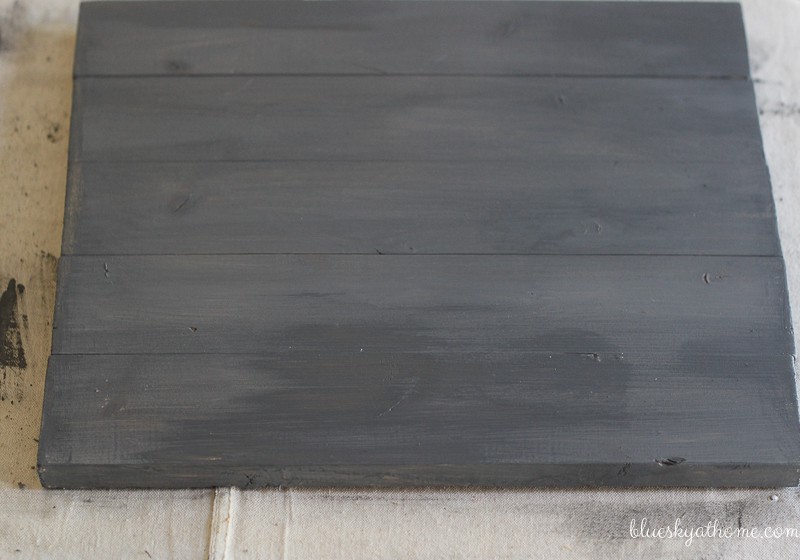
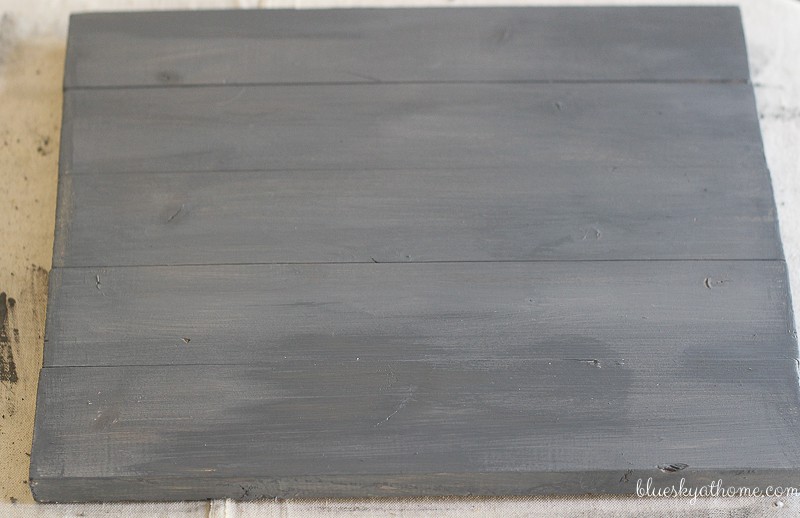
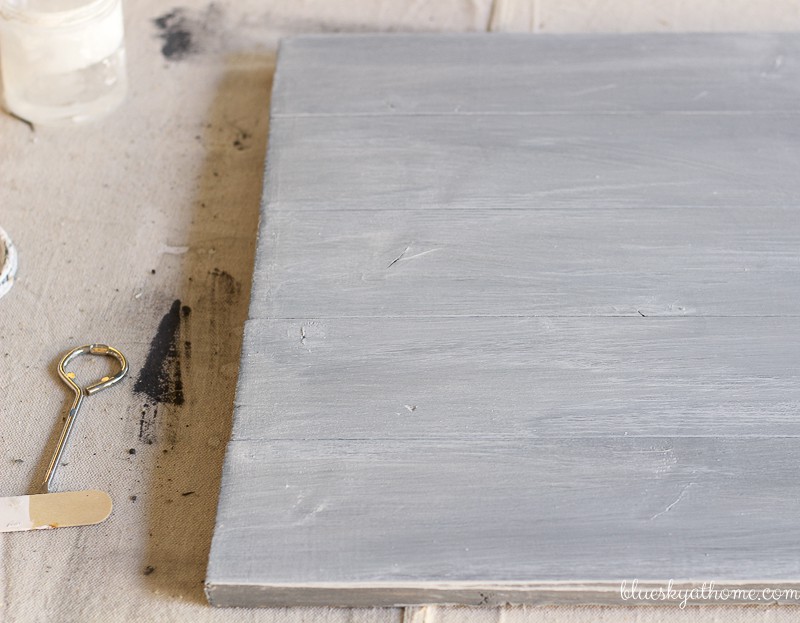
And 10 minutes later, it’s dry.
I wanted the sign to have a lighter, washed out look so I used another of my favorite whites, Bauhaus Buff (this is the same color I used in our laundry room makeover and my bookcase makeover.), also a One Step Paint from Amy Howard. I filled a jar with water and dipped my brush in, then swiped the brush across the paint that was on the inside of the lid. I then brushed this watered down paint on the board, following the grain of the wood.
Then I went over the “paint wash” with a dry lint~free rag. If you wanted an even whiter wash you could go over the board again.
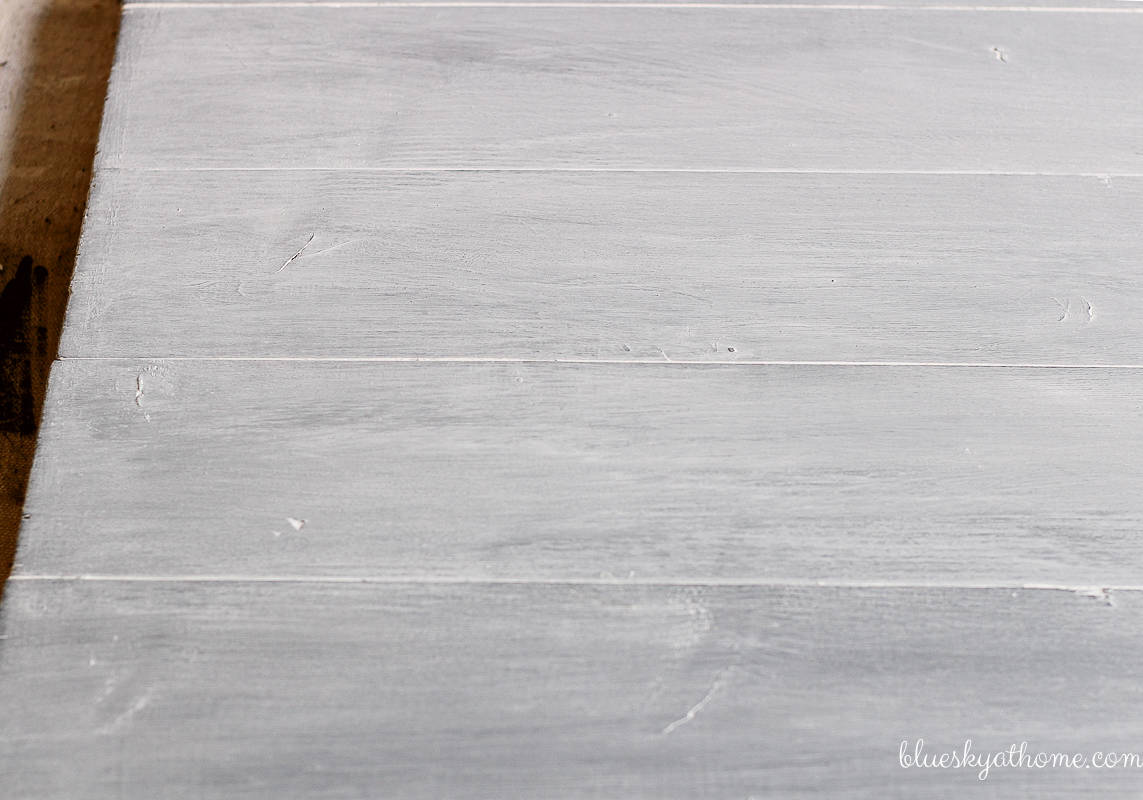
Now is when this metal and wood sign project got really fun. I wanted to bring out the grain of the wood and fill in the spaces between the boards. One of the best products I’ve found for this look is Cerusing Wax. I used it for our laundry room backsplash. It’s an easy product to use. It has the consistency of soft toothpaste.

Again I used a lint~free rag to rub it all over the painted board, especially into the groove between the individual boards. I did add a little more wax into the grooves to make sure all the space was filled. I loved how this step brought out the grain in the wood and created a thin white line between the boards. The Cerusing Wax also lightens the paint a bit which I liked. After letting the wax set for about 10 minutes, I buffed it with a dry cloth. This step seals the wax and also creates a bit of a shine and patina.
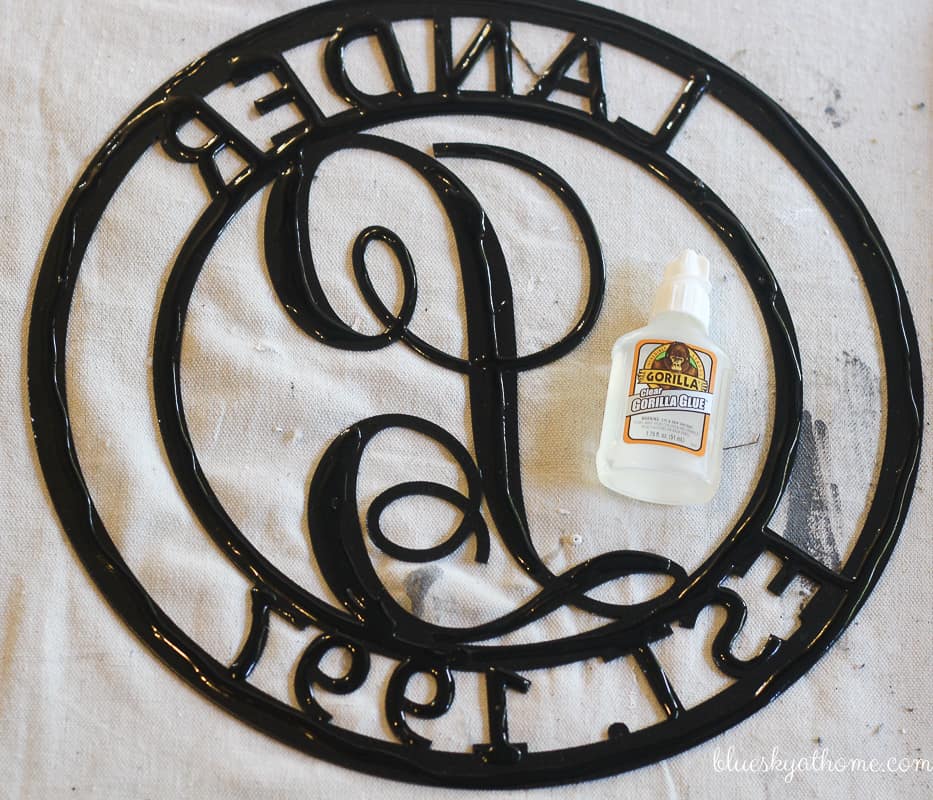
Attaching the Metal and Wood
How to attach the metal to the wood board? I knew it needed a strong bond. For Jenn’s board, we used Super Glue, but those little tubes are hard to use (We went through 5 of them.) and let’s face it, if you’re not careful, you can stick your fingers together. At Haven last summer, we received samples of Gorrilla Glue. I decided to give it a try. So much better and easier to use. The bottle is easier to handle and the glue is easier to apply. I just squeezed a bead of glue to the entire back side of the sign.
Then I turned the metal over and placed it in the center of the board. I also found that you have time to move your object (in this case, my metal sign) around before it starts to bond. Once I had it exactly where I wanted it, I pressed down firmly all over the sign.
I needed to get the sign out of sight, so I placed it on a shelf in our garage and set 2 toolboxes on top. I wanted the weight of the toolboxes to help the glue completely bond the metal to the wood. I don’t know if this step was necessary, but I didn’t think it would hurt.
A Hanger for the Sign
I don’t know yet where we are going to hang the sign, but I knew it needed a hanger. I figured wire and screws (which I found in one of the tool boxes) would work.
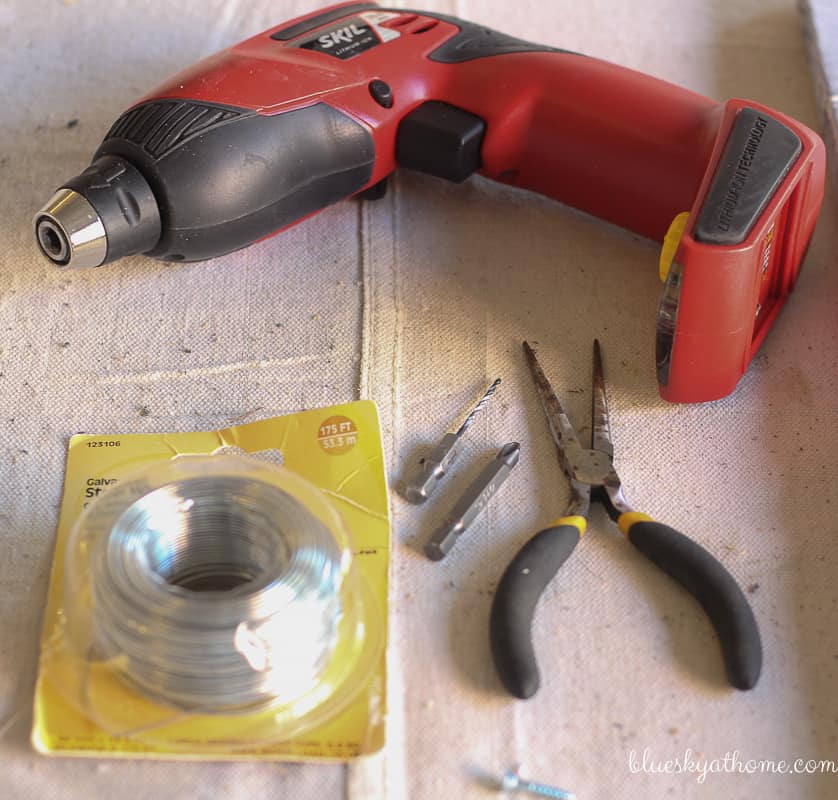
On the back of the sign I measured in 1 inch from both sides and one inch from the top. Then I used a pilot to make a hole and then a bit to screw in the screws, leaving a little space between the board and the screw. Then I wound one end of 20 gage wire around one screw, pulled the wire taunt to the other screw and wound the wire around it, snipped the ends of the wire and tucked both ends under the screws.
And I was done. This project turned out better than I expected. I found painting the boards after they are attached is much easier and using the Gorrilla Glue was much better than Super Glue.
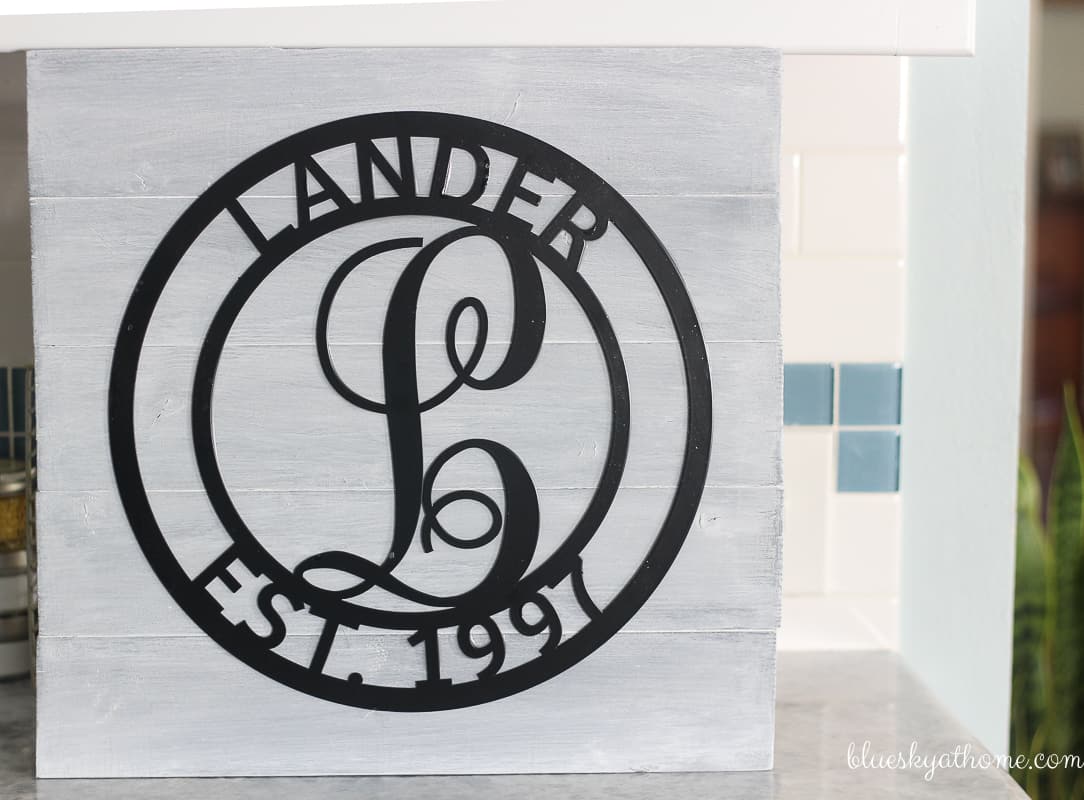
I wrapped the sign and put it on his bar. And Sweet Shark was really surprised.
Yesterday we decided to hang the sign in his bar. It became evident that my 20 gage wire would not hold. So Sweet Shark replaced it with a heavier gage wire. Now it has a place of honor next to our Willi’s Wine Bar poster that we bought in Paris almost 21 years ago (when Sweet Shark asked me to marry him.) Willie’s really is a great bistro and last time I looked, it’s still there. Check it out if you go to Paris.

Did you like how to make an anniversary sign with metal and wood? You can any order any kind of metal sign you want and enhance it with different paint colors or paint techniques or none at all. The possibilities are endless. With Christmas not too far off, this type of sign would make a great gift. Here are some ideas:
- kids’ rooms
- kids’ playroom
- nursery
- gameroon
- office
- college dormroom
- entry hall
- front porch
- lake house
- cabin
- wedding present
- retirement party
- high school or college graduation
- favorite quote
- new baby
- new home
- first Christmas
- any holiday
- special birthday
- school logo
Let me know what you think and if you have an idea for another room or event. There definitely may be another metal sign in my future.

P.S. I am still transitioning Bluesky at Home to the Captivating theme from Restored 316. Hopefully in a few days, that process will be completed.


I love the simplicity. Our anniversary is coming up – I may need to give this DIY sign a go. Thank for sharing. Pinned!
Monica, Don’t order a metal sign yet. Giveaway is coming!
What a great idea! And such a loving present. Congratulations on reaching 20 years. Wishing you both many more years of good health and fun.
Diane, thank you so much. I was really excited about giving it to him. This is a second marriage and we are happy that we are getting a second chance. YOu might check out my post on An Amazing Love Story for more background. Hope to see you again.
I bet sweet shark was thrilled! Great tutorial and your blog transformations looks amazing.
Diane, he was! Thank you sweet friend for the encouragement and support. Loved your PB table post and pinned it.
That is really cool and relatively simple, just some uninterrupted time to do this without the other person knowing about it, right? Will see if I can incorporate similar for my grandkids’ rooms.
Maria, thanks so much for visiting and commenting. I actually made the sign in 3 sessions: attaching the wood, painting the wood and the hanger. It could easily have been done in 1 day, but you know how life gets in the way of DIY fun!