How to Turn a Console Table into a Kitchen Island
This story is about how to turn a console table into a kitchen island. But this story is just at the beginning.
Right now, this table story doesn’t have a middle. It doesn’t have a happy ending yet. It needs some plot and characters and set designs. But mostly, it needs you.
I need some help deciding how this console table should look when it becomes a kitchen island and the curtain falls and THE END is written.
Maybe this story should be called As The Console Table Turns or All My Kitchen Islands.
Our kitchen doesn’t have an island. Actually, it did have an island when we bought the house, but it was way too big and I took it out. In fact, we used the granite top as the top for Sweet Shark’s bar.

First, I thought you might want to see the original kitchen island ~ the one that got booted out on demo day ~ so that you can see how a kitchen island might work in our space.
Our kitchen is large but it’s like a long rectangle. The original island was 27 inches wide by 6 feet long and the standard 36 inches high. Here you can see the original remodel of our kitchen. This picture was taken with my iPhone the day we took possession of the house November 1, 2012.
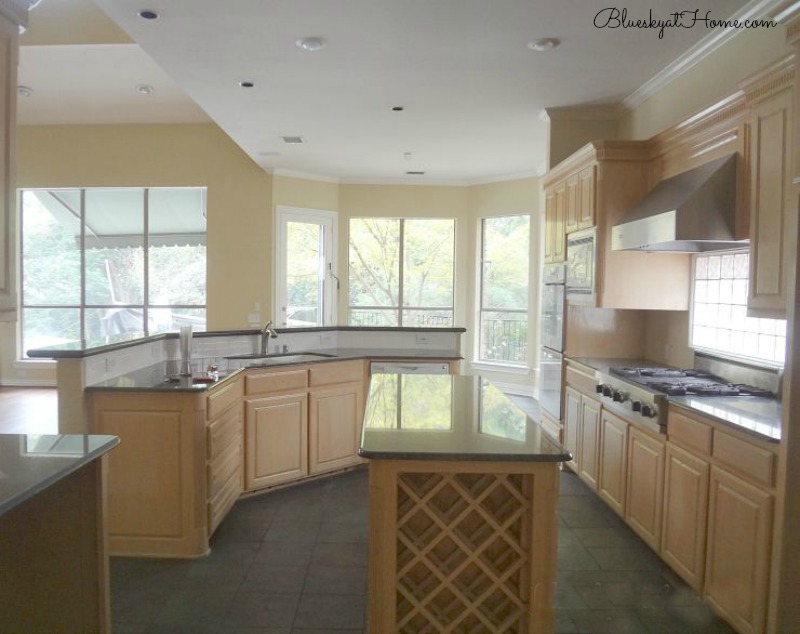
And here is what our kitchen looked like after we finished the remodel and moved in.
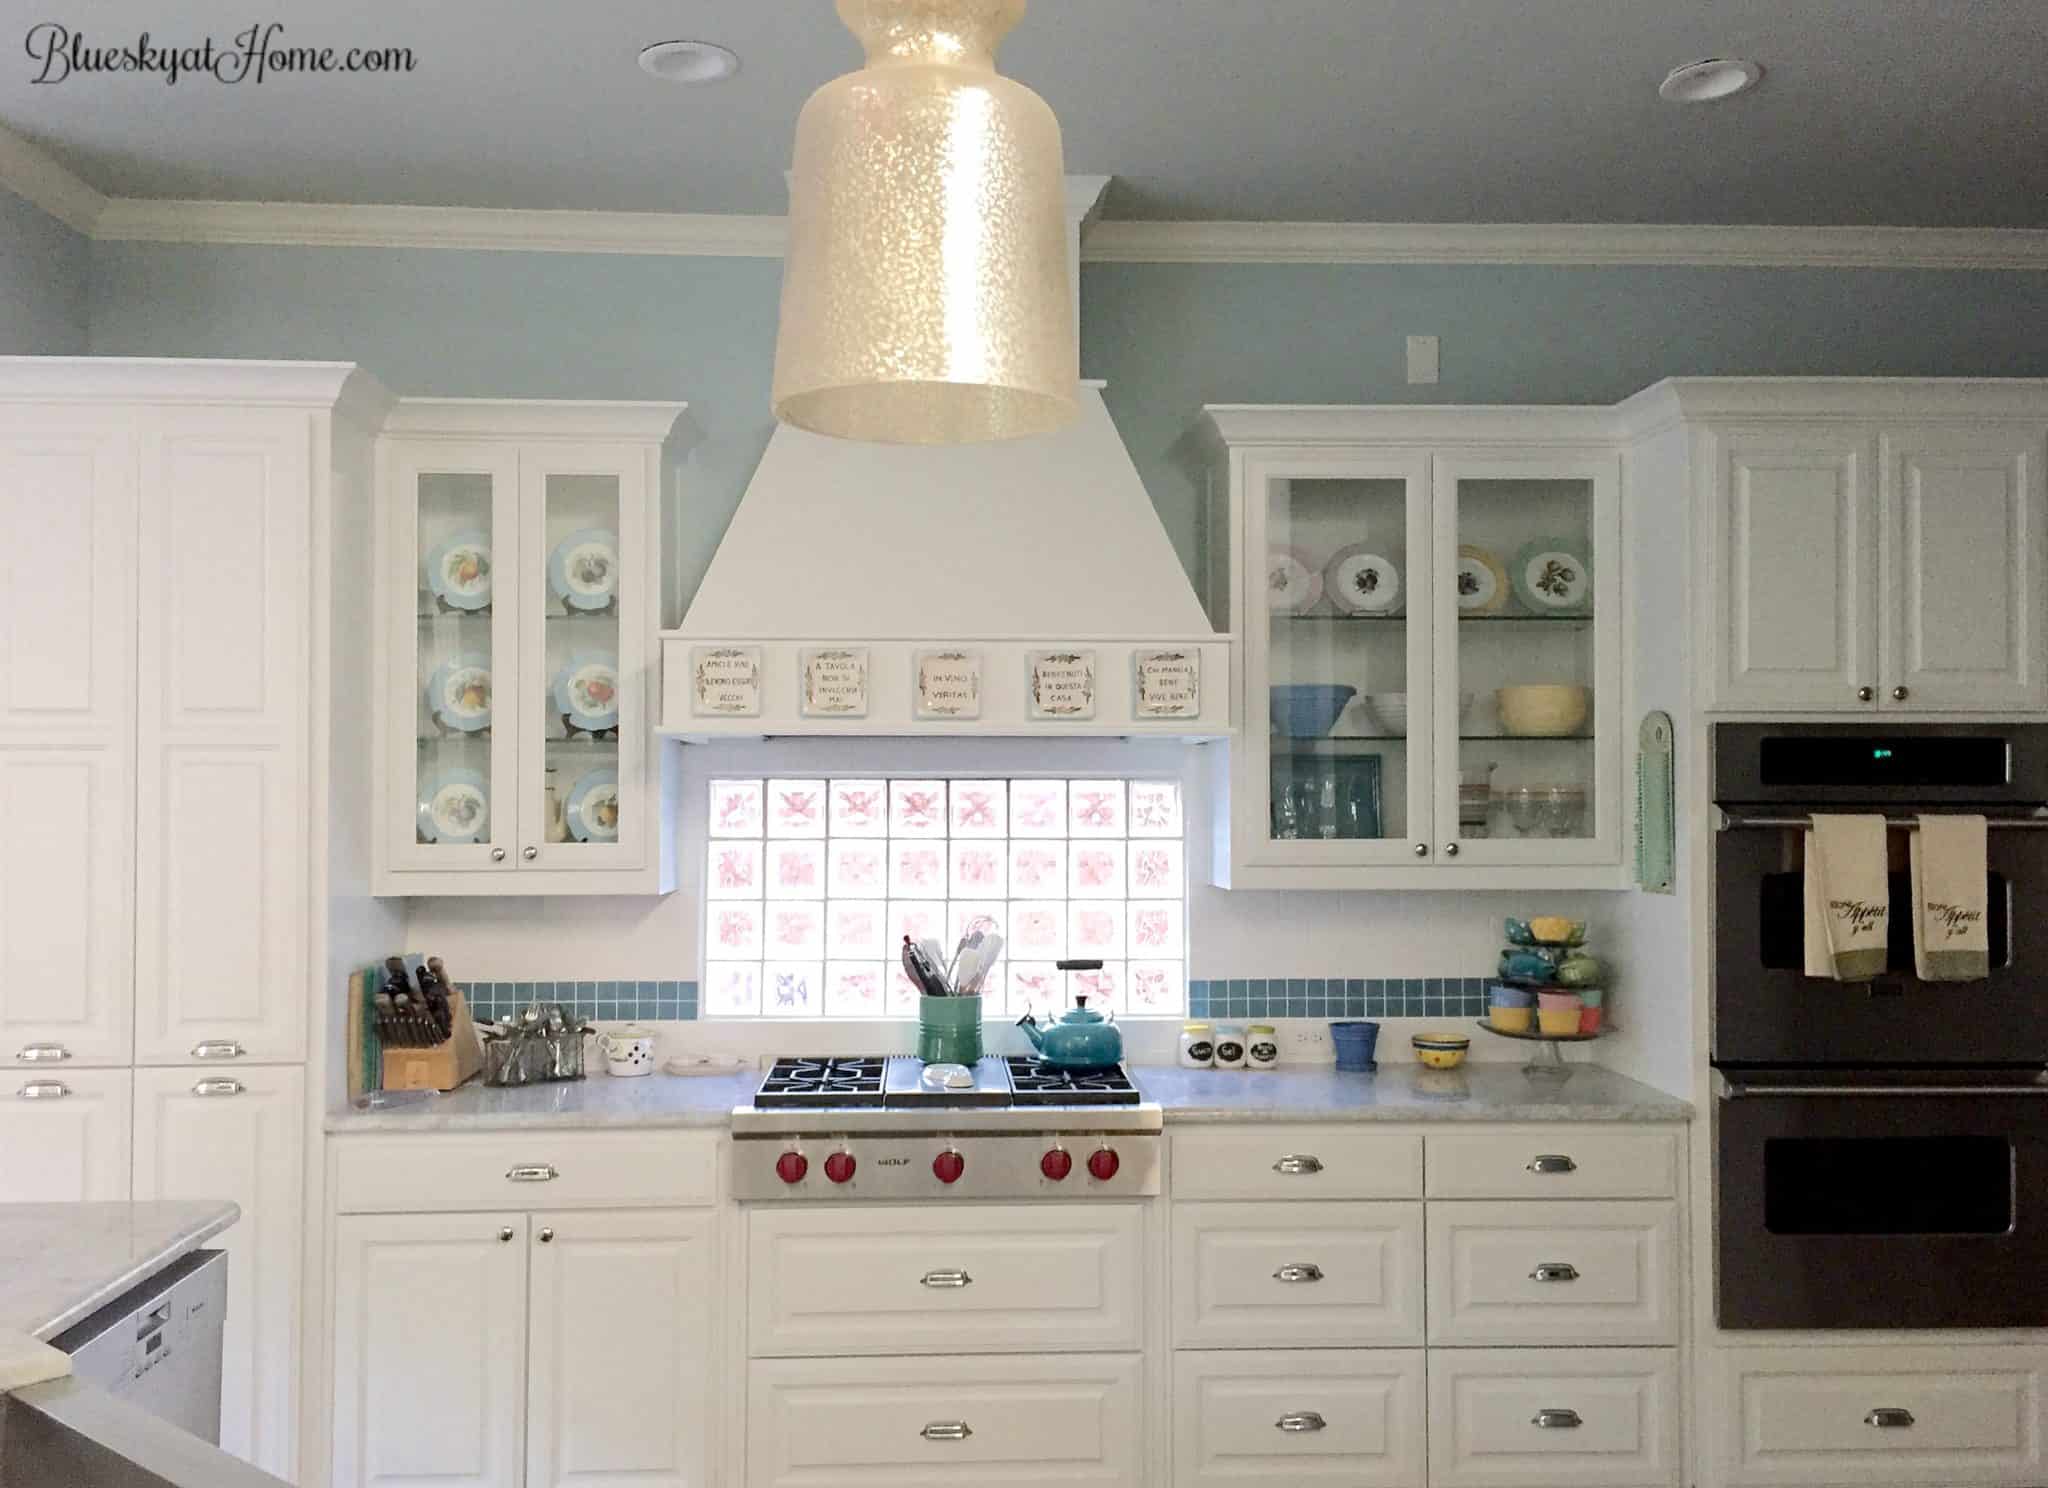
Now after almost 5 years in our remodeled kitchen, I’ve decided that our large kitchen could use an island ~ just one that is not so big.
HOW TO TURN A CONSOLE TABLE INTO A KITCHEN ISLAND
Ready for the story?
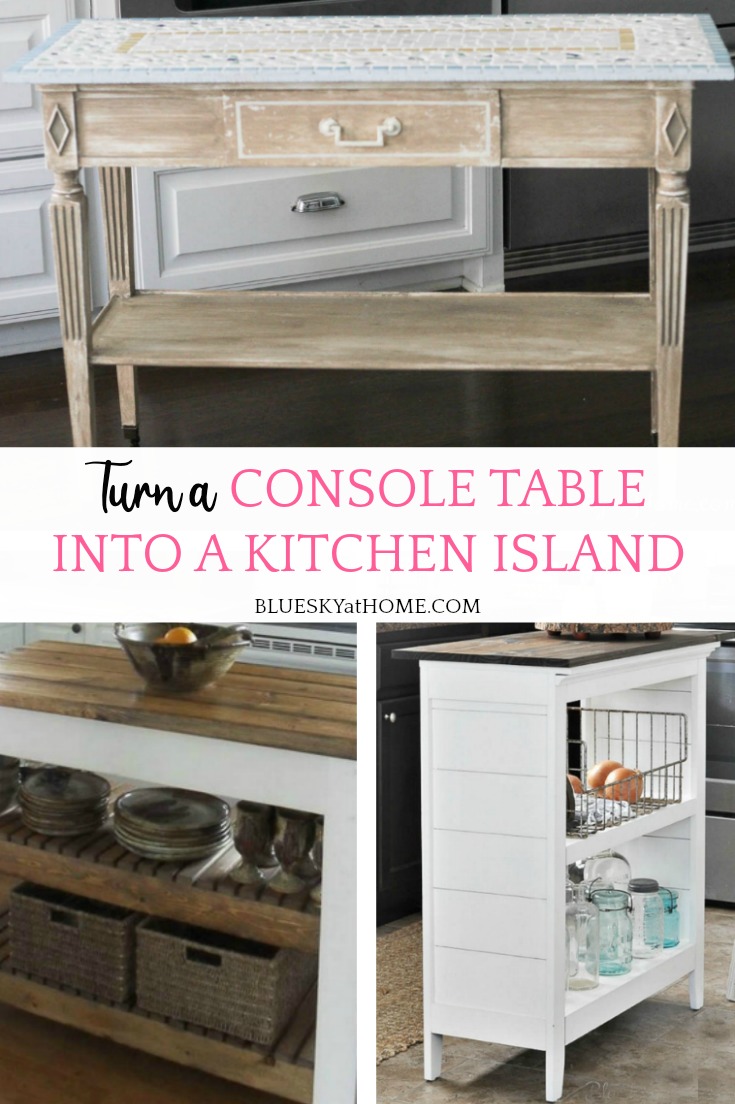
A long, long time ago in a living room not so far away, this console table sat in my mother~in~law’s living room. When she moved from her home of 43 years to an apartment, Sweet Shark and I claimed the console table.
At the time, Sweet Shark and I were living in an apartment between houses so the table was delegated to a corner of a guest bedroom. I had no idea what I would do with it, but I thought it had nice legs, a bottom shelf, a drawer, was a good size, and had great potential.
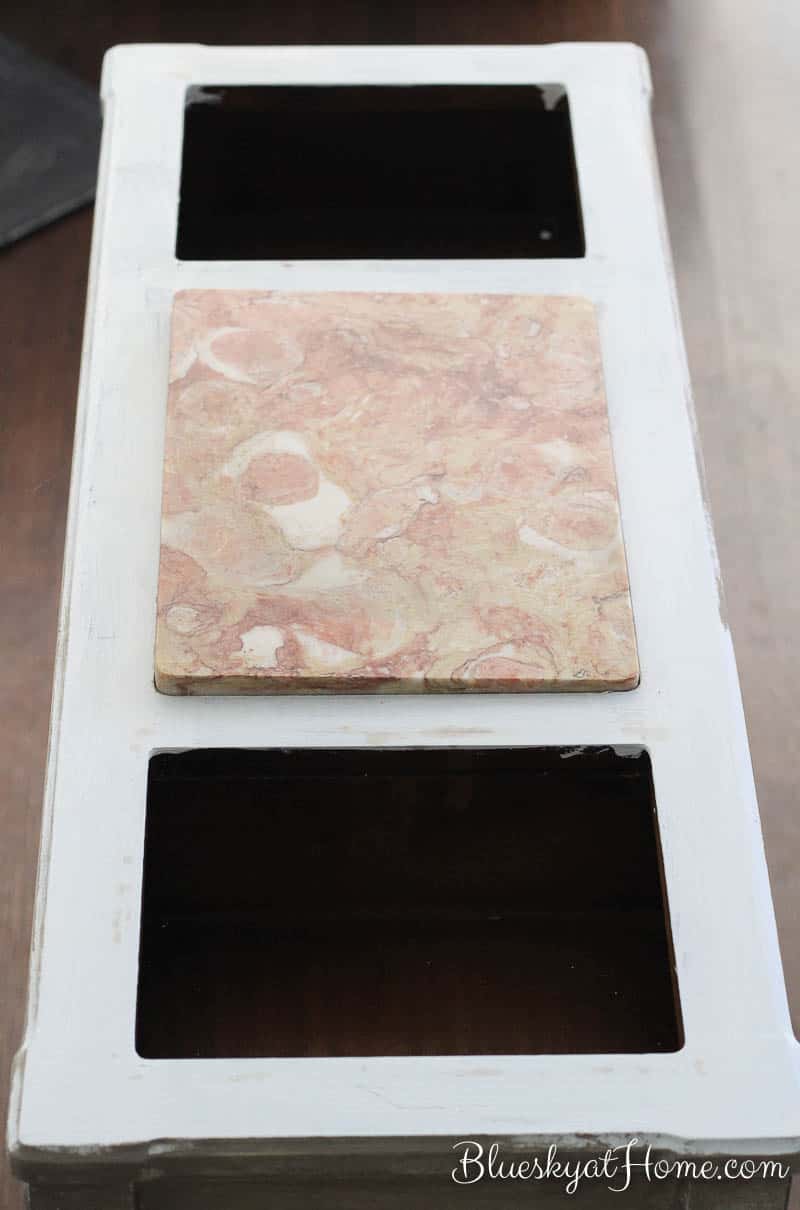
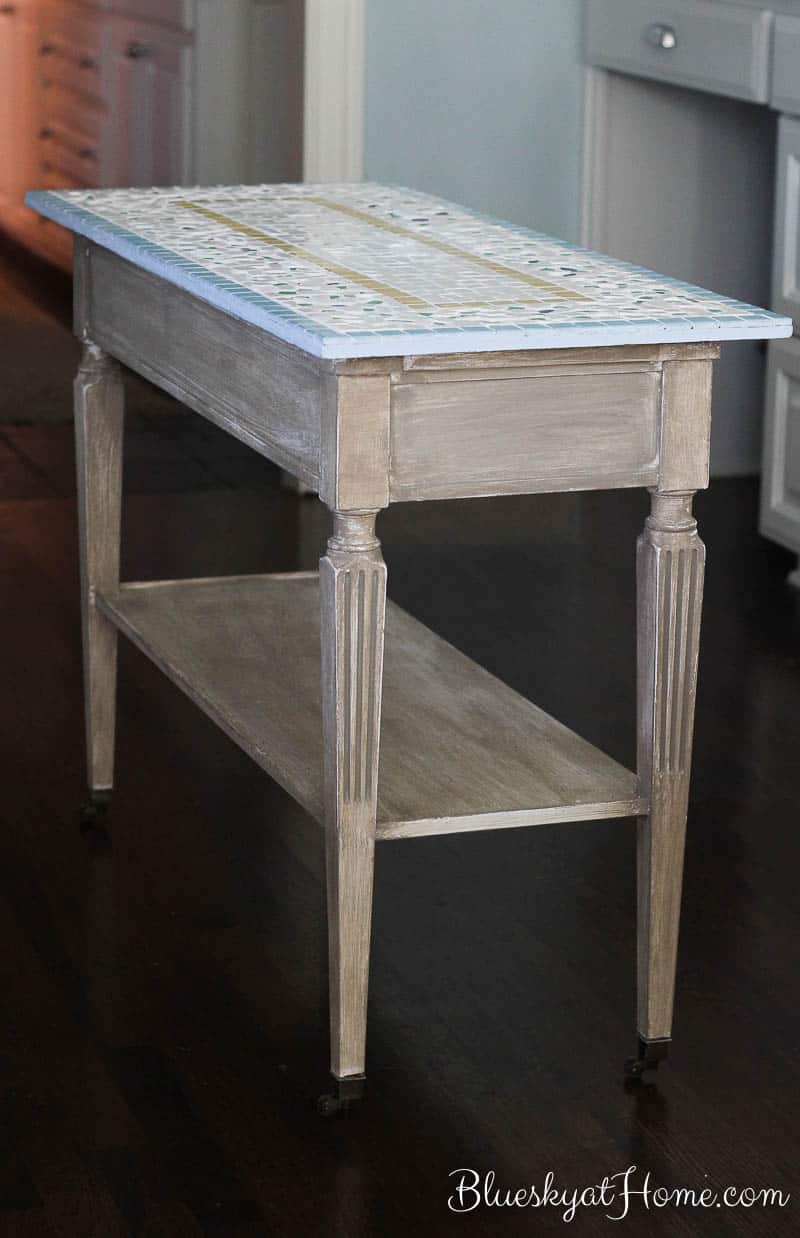
It had the typical walnut stain of pieces made in the 1940s and ’50s. (I didn’t think to take a picture of the table back then.) The console table originally had 2 metal “planters” in the cut~outs (I think there were faux flowers in it.) and a piece of marble covering the center section where the drawer is. I have no idea what happened to the metal inserts, but I still have the piece of marble.
When we moved into our home in March of 2013, I decided that the table would make a nice table in the breakfast room in front of one of our big picture windows. The console table is 36 1/2 inches long X 13 1/2 inches wide and 28 inches high. It would need some paint and a new top.
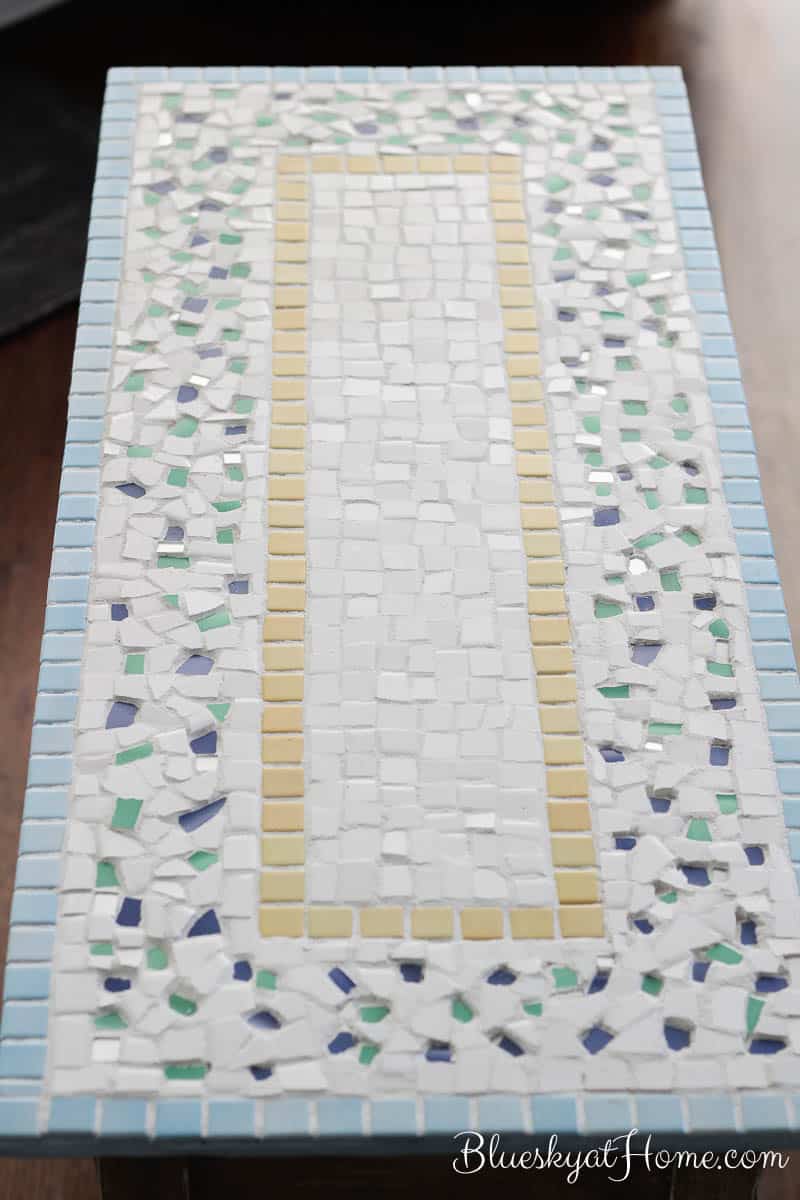
I first painted it using Annie Sloan Old White Chalk Paint. In those days I was really into mosaics and I made a new top with white, blue, green and yellow tiles. At the time, I thought it was so cool. But for a long time, I’ve thought it was just too country for our home. The top just sat on top of the console table ~ mosaics are heavy. I made it 40 inches long and 17 inches wide.
At some point, I painted it again, using Annie Sloan Coco. It was functional but never looked right in front of the 8 foot tall and 6~foot wide picture window.
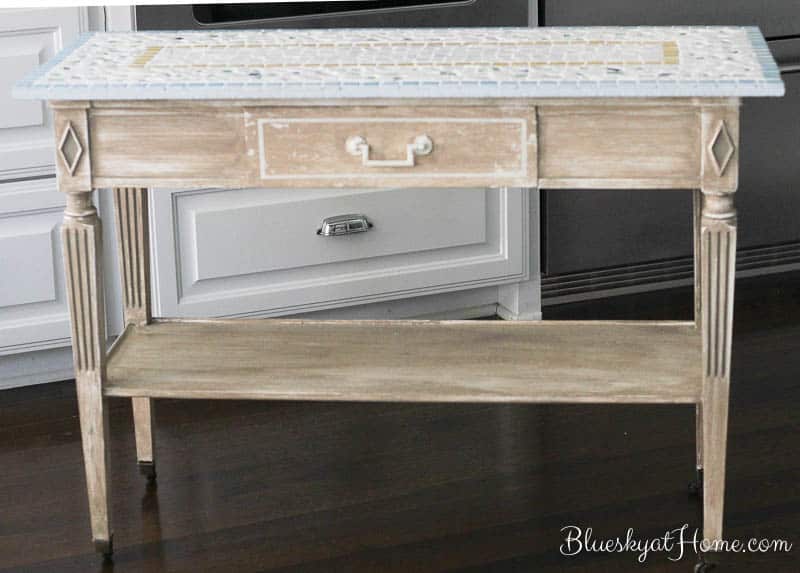
While we were decorating for Christmas, I thought it was a good time to move it away from the picture window and into the kitchen. We got used to having this piece of furniture in the middle of the kitchen (I only bumped into it once.) and decided to go forth with making it into a functional and more esthetically fitting piece.
THE DILEMMA OF TURNING A CONSOLE TABLE INTO AN ISLAND
The console table is the right size 36 1/2 x 13 1/2, but at 28 inches high, it’s way too short from a practical and esthetic point of view. Now I don’t intend to use the new island as a place to prep food. I want it
- for storage on the bottom shelf
- a landing spot for items from the fridge or oven
- a place for a pretty bowl or tray
Standard countertops are 36 inches high. To make the console table higher, I had 2 choices:
- raise it from the bottom by adding another shelf and extending the legs
- raise it from the top by building a higher top
After looking at our options and the fact that I wanted to do the project myself, I decided that adding several inches to the top was the best choice.
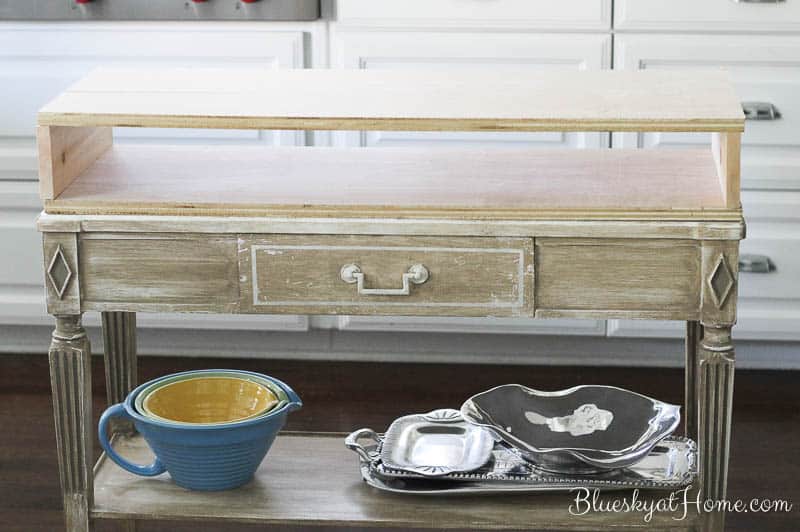
So how am I going to do that? My plan was to create a “box” to sit on top of the console table with a top and bottom and 2 end sides on the short ends. This would give me an open space in the center for trays or cutting boards. I still have plenty of finished 3/4 inch pine plywood left from our laundry room project (That is the gift that keeps on giving.), but no way to cut it. Fortunately, I have a brother~in~law who is a master handy man and after measuring the size we needed, he took the wood to his house, cut it and brought it back. Now all I have to do is assemble it.
Here’s a DIY diagram to show you what I have to build: it’s basically a rectangle box with a top and bottom and sides on the short ends and an open space between the top and bottom.
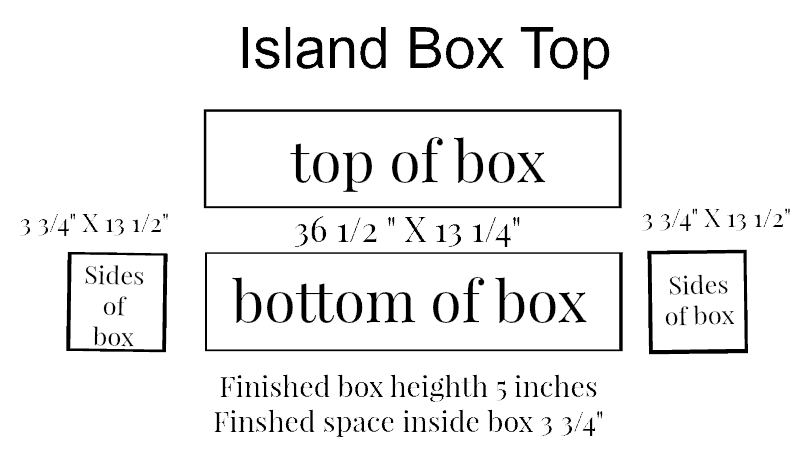
After I assemble the box and set it on top of the console table, I will have gained an extra 5 inches, making the kitchen island 33 inches tall. Then I have to decide the materials for the actual top what will now be a kitchen island. The top will be about 42 inches long and 18 ~ 20 inches wide. Once I add the finished top to the new base and table, I could have a kitchen island about 34 1/2 inches tall which will be much a better height for the kitchen island.
Here I set the 4 cut boards on top of the console table so you could have a better idea of the added height and the space for trays or cutting boards.
Now I have to decide how I want the finished piece to look. That’s where you come in.
DESIGNING THE LOOK OF THE KITCHEN ISLAND
I’ve been gathering some pictures of islands that I like. (Thank you, Pinterest.) The problem is I like them all. I’ve narrowed it down to 5 choices. So I need your help. Here are the choices and I’d like your input on which one I should choose.
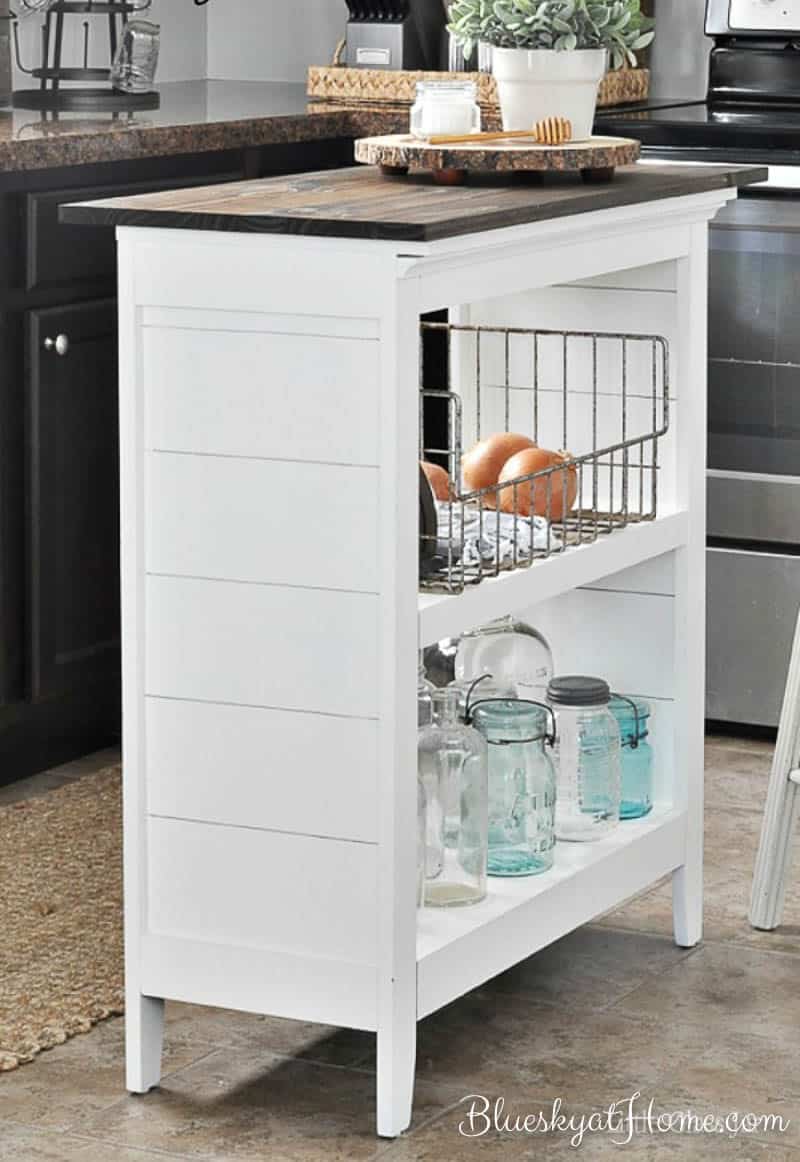
Choice #1
I love the white-painted base with the stained top. Just like this picture, the white would match our cabinets and the stained top would complement our hardwood floors and add warmth to the island. I like the soft edges of this island top and it looks like 4 pieces of wood have been joined together for a smooth finish. I also like the thickness of the top.

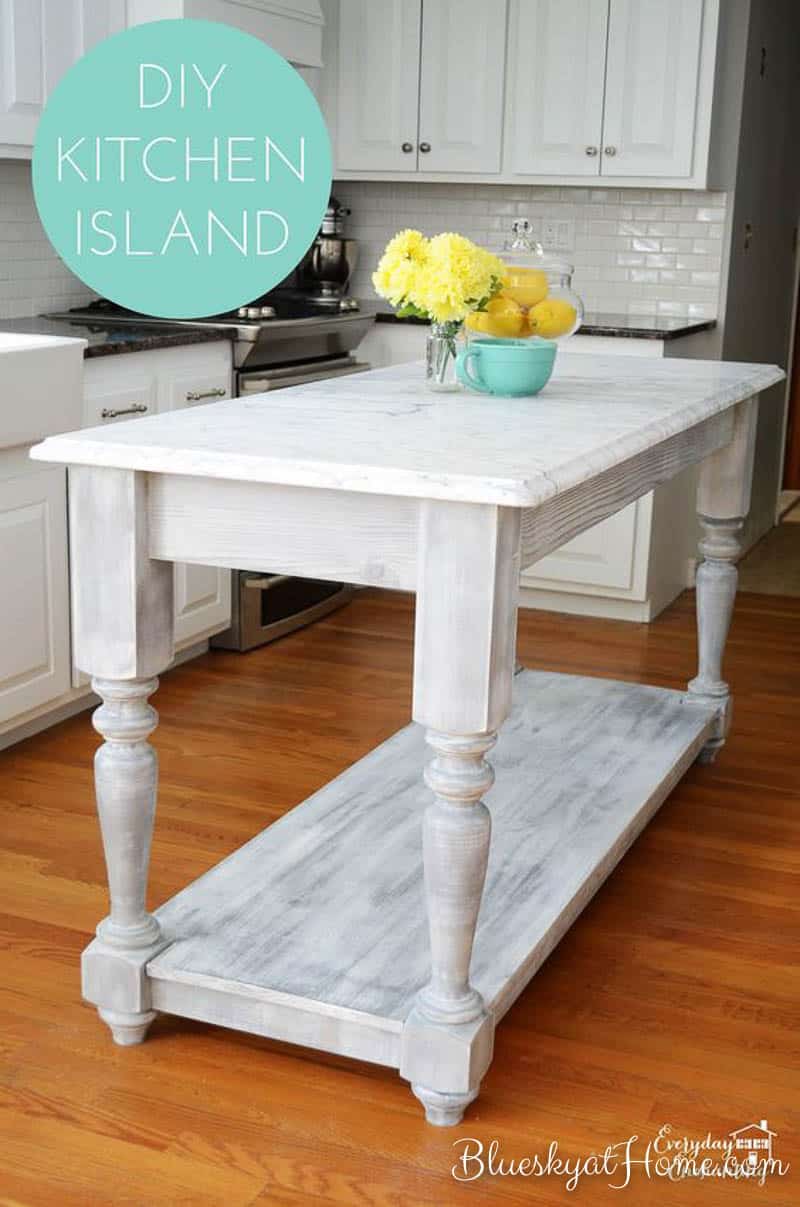
Choice #2
This option is very similar to the first, but the top is much darker. The edges are sharper and it is not as thick. This one is similar.
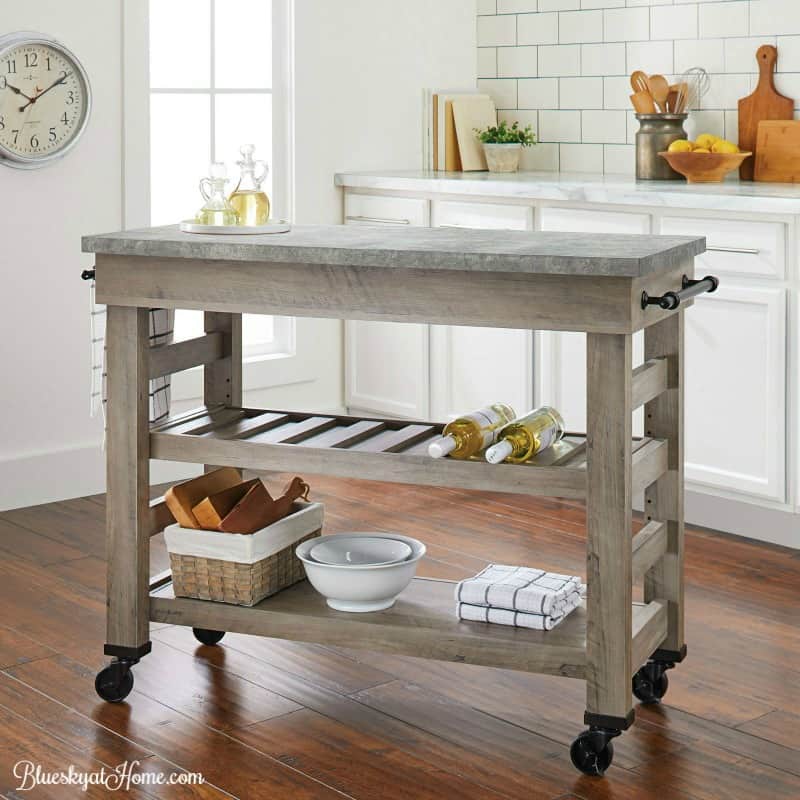
Choice #3
I absolutely love the light weathered grey finish of this island. A lot of grain shows through which my island wouldn’t have. I think the top is granite or marble, which would be too heavy for our island since it is on wheels. What would this grey base look with a stained top? Or a white-painted top?
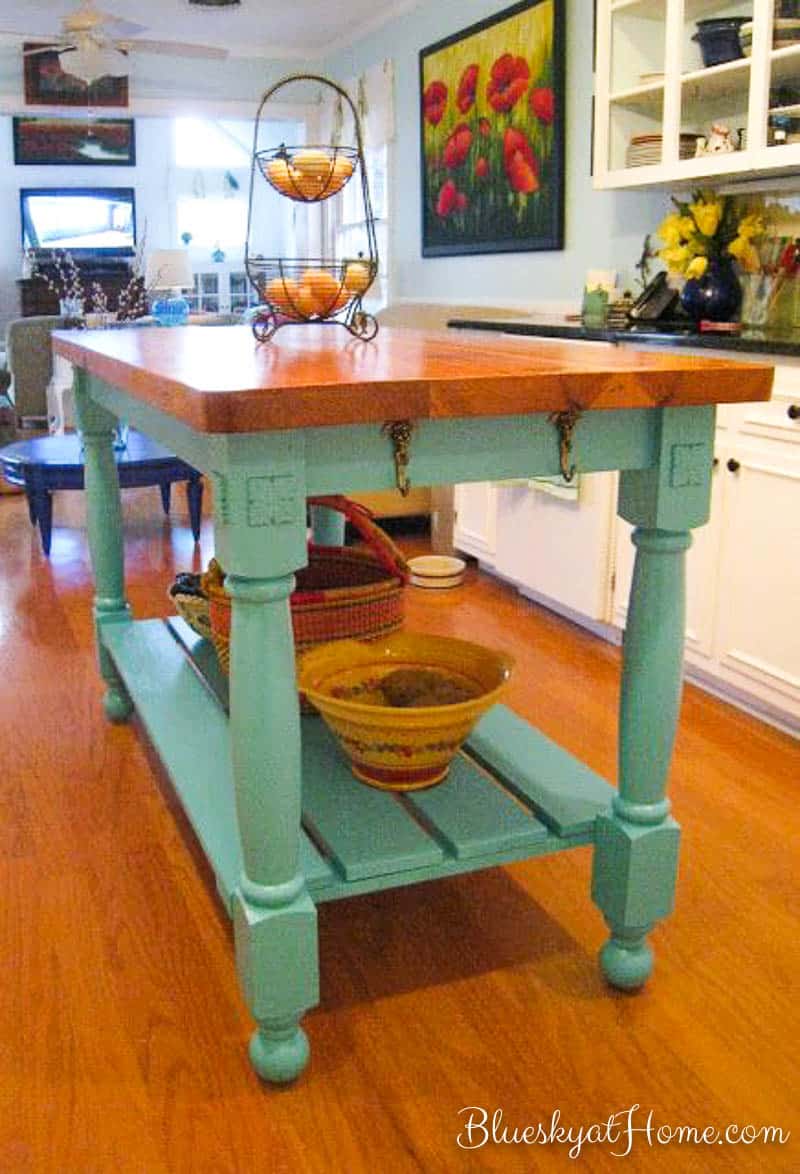
Choice #4
What if I went in a totally different direction and painted the kitchen island a color? Probably a blue similar to the tiles on our backsplash. Something like this one in aqua or this beauty in grey. And then either stain the top or paint it white.
Choice #5
What if I went totally rustic and did the weathered look on the whole island, both the table and the top? It seems to look good with the white cabinets and the hardwood floors. This one is actually from Walmart at a great price.
So what do you think? Will you leave me a comment with your opinion? I’m open to mixing a base finish with a different finish on the top. Just put your numbered choice (1 ~ 5) in the comments and tell me why you think that one would work best. Let’s be a design team. Collaborators. Design by committee.
Want to keep these ideas for your own kitchen island? PIN it for Later.


I love the idea of contrast, either with the paint or the Restoration Hardware type of finish. I would love to take out our island but we’d have to redo the floor.
Your kitchen is gorgeous. Thanks for sharing at Keep In Touch.
Katie @ Let’s Add Sprinkles
Thank you so much Katie. I appreciate your input I’ll be back for another party.
Hello Carol, this is my first visit, I love your idea of repurposing this lovely piece of furniture as an island bench. Having said that, the choices you offer appear to do away with the original legs, which I think would be a pity. Using the original legs will make your bench truly unique so, whatever you finally choose please keep the legs. Your kitchen looks fabulous. p.s. personally I would go for contrast rather than white. Regards, Pauline
Pauline, thanks so much for visiting Bluesky at Home. I hope that you’ll be a regular visitor. We are not removing the legs. We will be adding to the top of the console tabl to add about 5 inches. Check back in a few weeks for the finished project.
Oh girl, you have some great ideas and inspirations to choose from. Of course, I would choose the blue one but any of them will be gorgeous and very functional. Can’t wait to see what you decide.
I’m putting you down for blue.
So hard to choose! But I’m going with #2 which seems less rustic.
🙂 gwingal
Thanks Nikki.
I love choice 3. Good luck because they are all beautiful.
Thanks Clearissa.
I definitely think a warm wood top would add a little depth and texture to your lovely kitchen. I look forward to seeing this makeover.
Lisa
Wow. What a great choice for an island. Seems to match the look of your kitchen quite well. I like the idea of choice #4 and painting it a totally different color. I’m sure whatever you decide will be gorgeous – it always is!