How to Make a DIY Pumpkin Wreath
Have you ever made a wreath? Have you made a pumpkin wreath? Let me show you how to make a DIY pumpkin wreath you will love to display for fall.
Wreaths are the most common ~ and effective ~ way to dress up your front door. They are such a welcoming statement for guests and neighbors. Want to have a DIY fall pumpkin wreath for your front door?
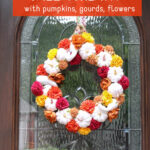
What says fall more than pumpkins? Adding some gourds and florals will also give your DIY fall pumpkin wreath a stunning look.
It’s not hard to make your own wreath with the right materials, the right tools, a vision, and a little know~how.
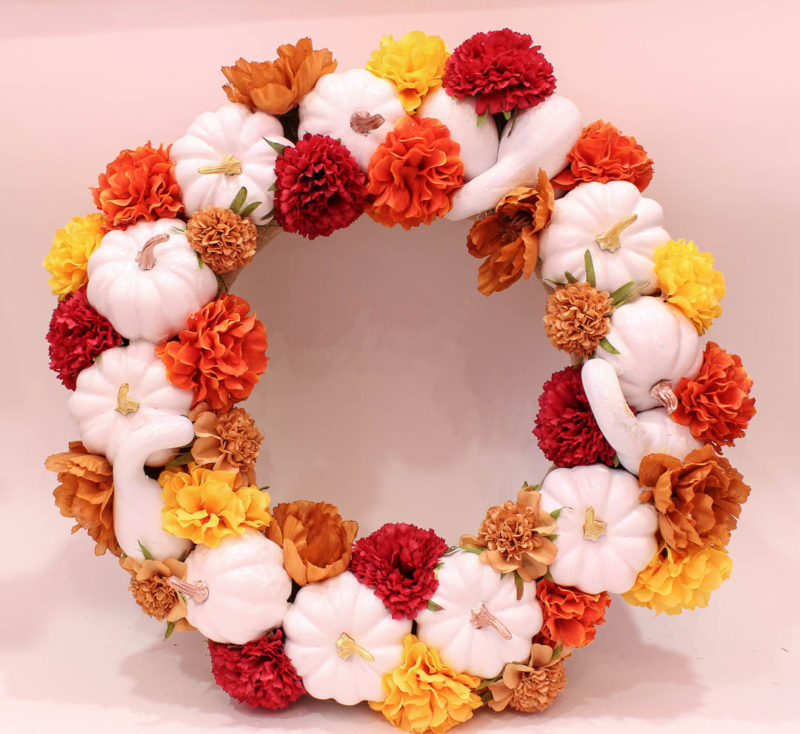
This is one of my very favorite wreaths that I’ve ever made. I love the colors, the texture, and the design. I hope that you will love it, too.

Did I mention that this DIY pumpkin wreath will have a little bling? Yes, ma’am.
Wreaths are limited only by your vision. I wanted white, a little metallic, and some color in the florals. Think of this tutorial as a pumpkin wreath suggestion.
A DIY Fall Pumpkin Wreath
Are you ready to start making a fall pumpkin wreath? Follow along. When you are finished reading about this DIY fall wreath, check out and save these 15 Easy Fall DIY Wreaths – they are great, too.
Supplies For This DIY Pumpkin Wreath
This post contains affiliate links to products used to create this project. If you should order any item from this site, I may receive compensation, but you do not pay a penny more. Your purchase is greatly appreciated as it helps support the continued publication of this site.
Some of these supplies apply regardless of the style of your pumpkin.
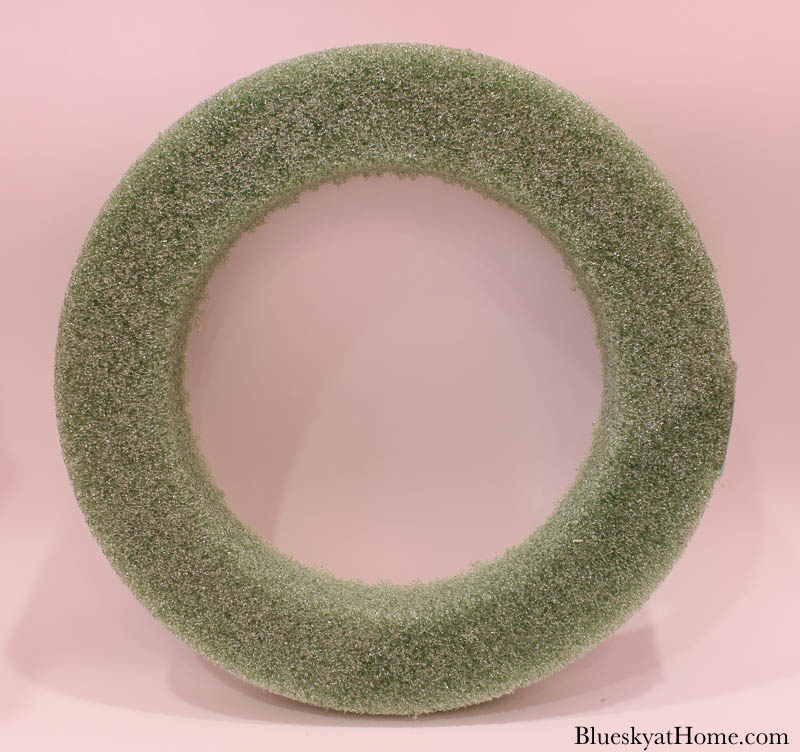
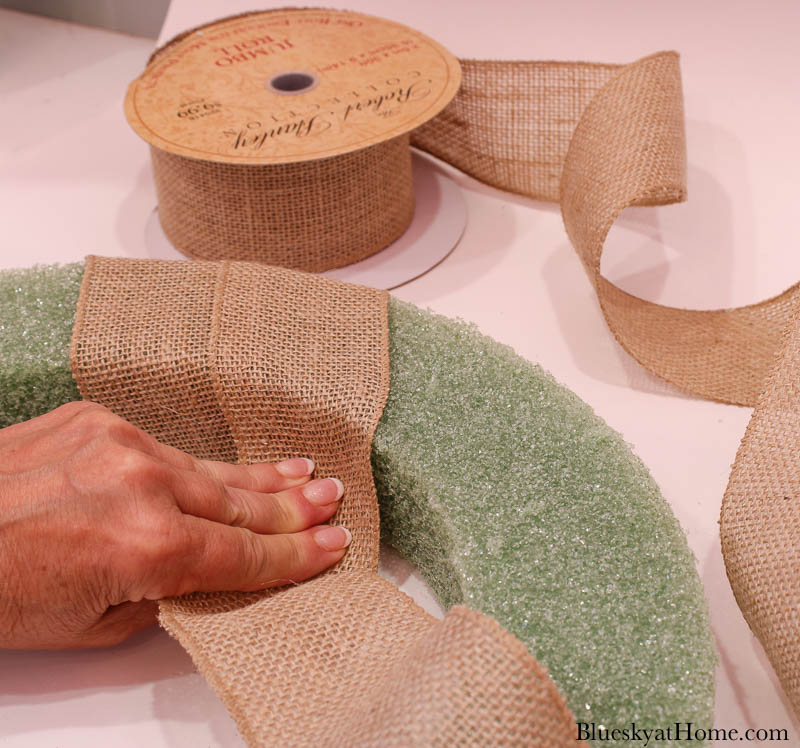
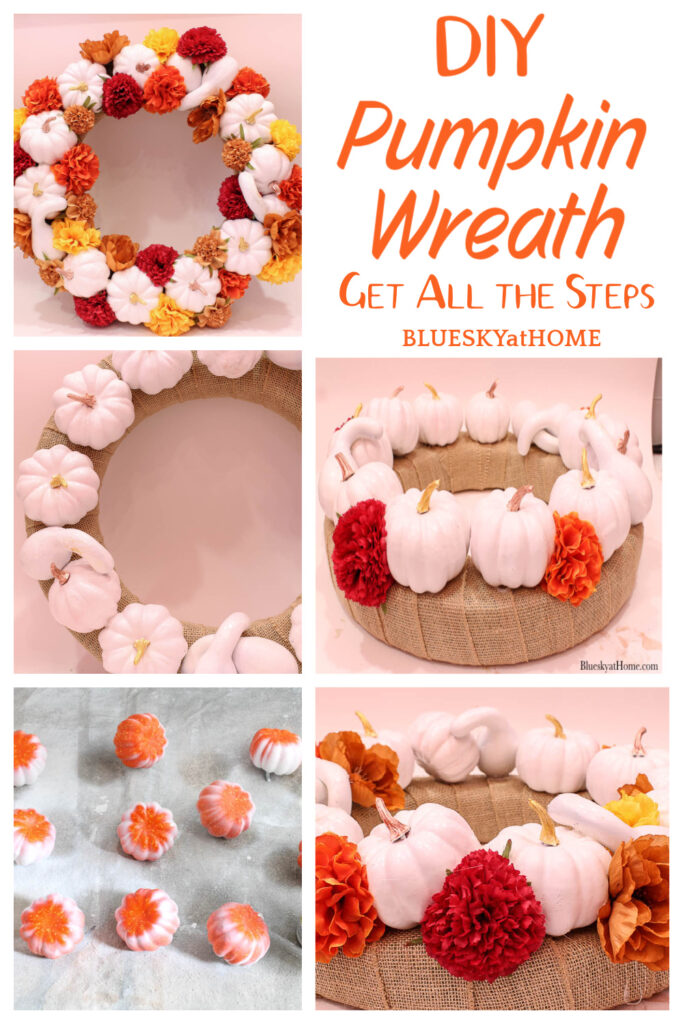
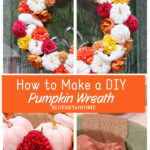
- styrofoam wreath ~ at least 14 inches ~ with flat sides; this one is 15.6 inches and 2 inches deep which gives you depth for adding the pumpkins.
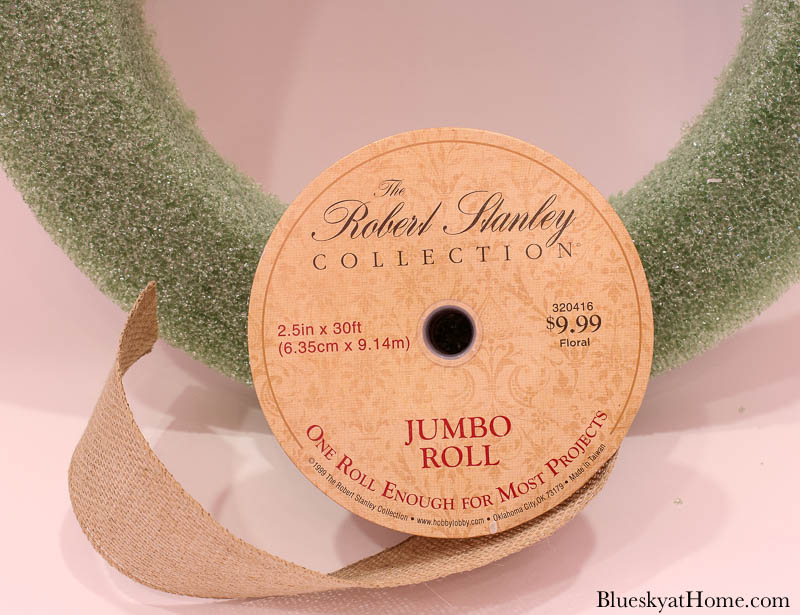
- wide burlap ribbon to wrap the wreath; fortunately, I already had burlap ribbon on hand.
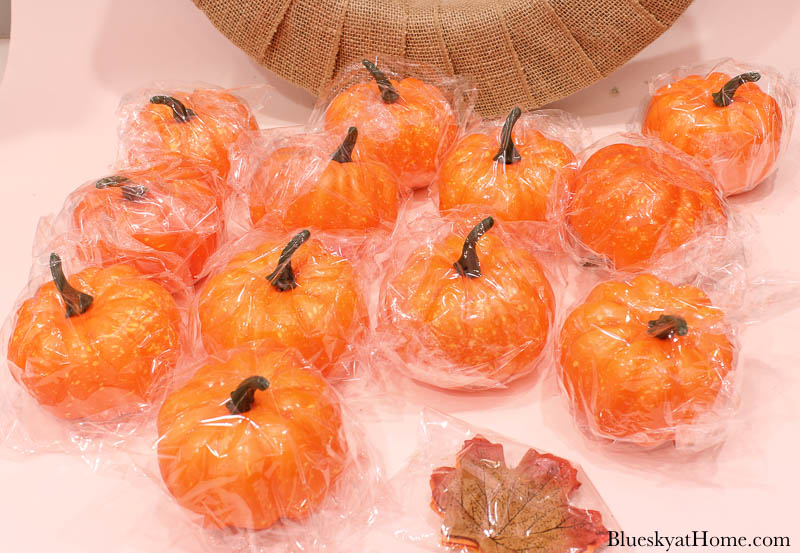
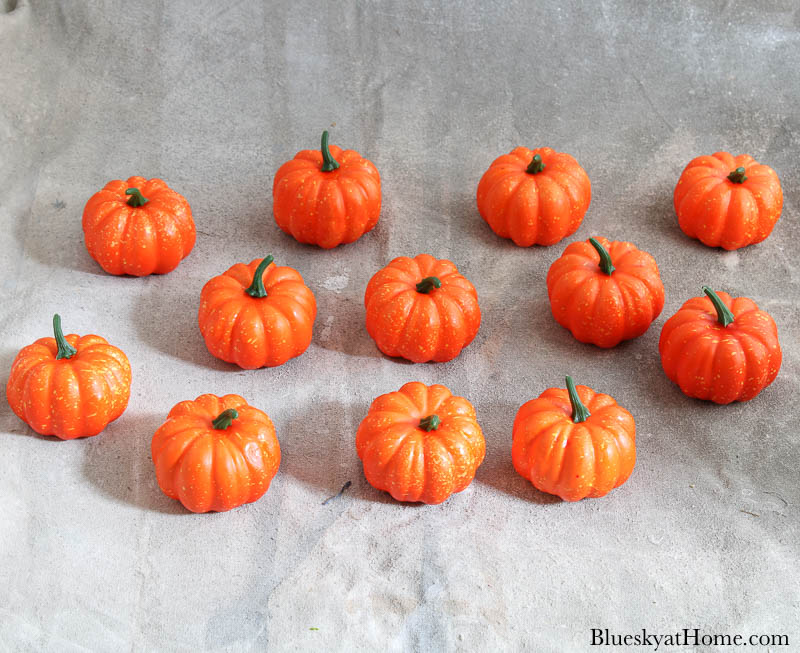
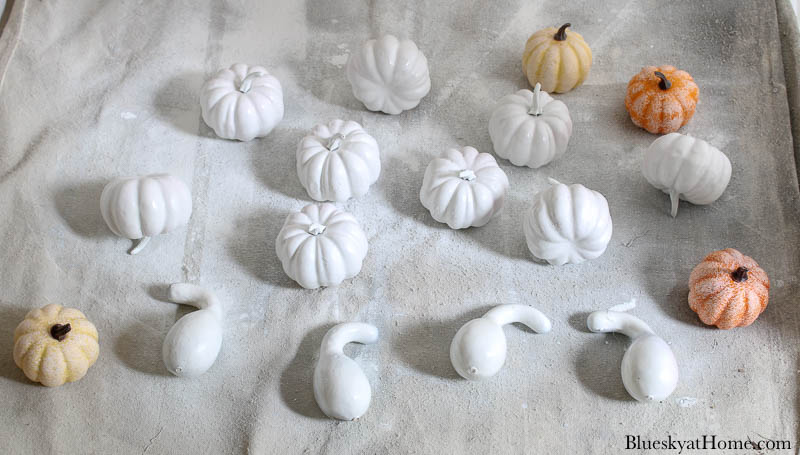
- plastic or foam mini-pumpkins – I used this package of 12, which were wrapped individually.
I really like the real-life look of the stems.
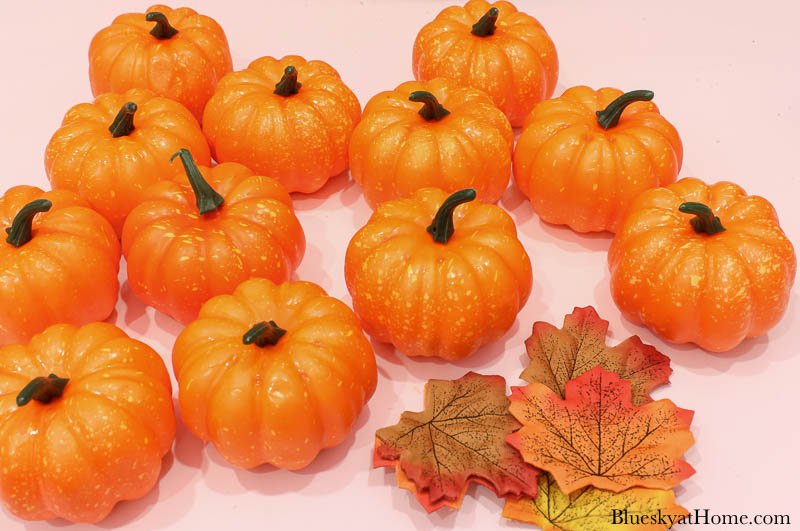
- some mini~gourds; this package had gourds and a few smaller pumpkins.
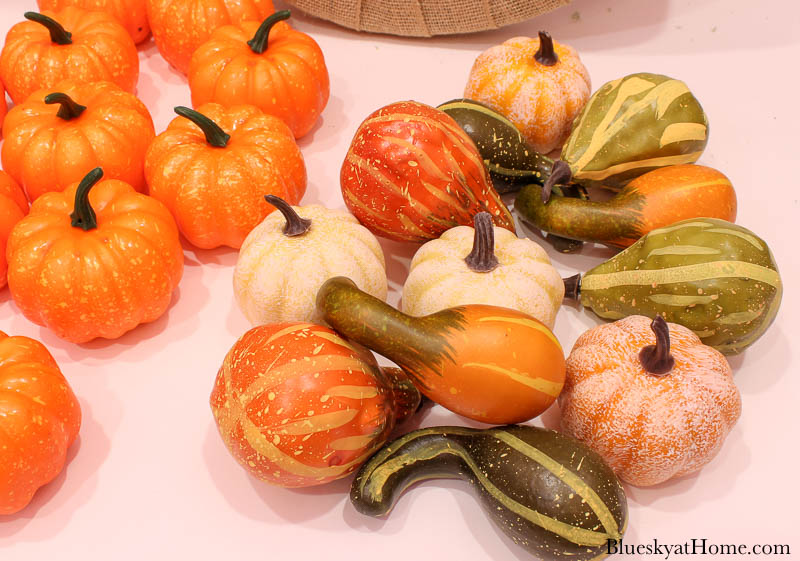
- spray paint; I used Rust-o-leum in Blossom White
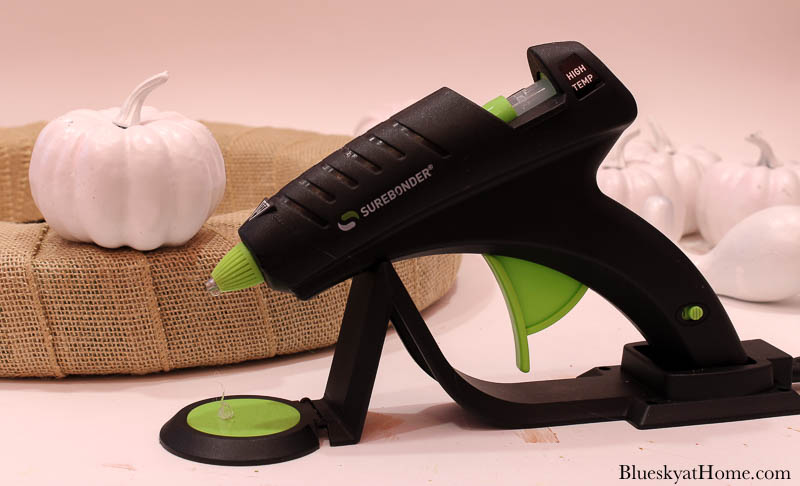
- glue gun
- faux flowers in autumn colors
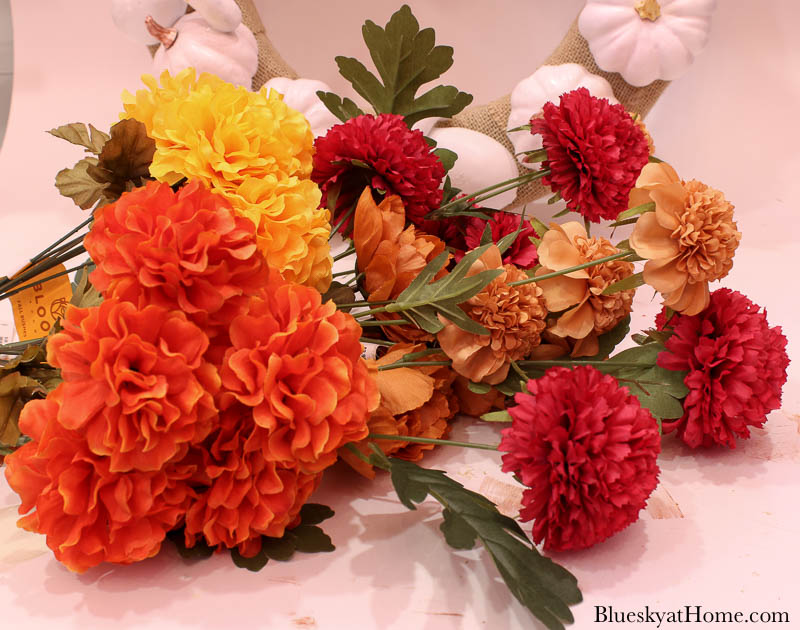
- clippers to cut the faux flowers
- door hanger for the wreath
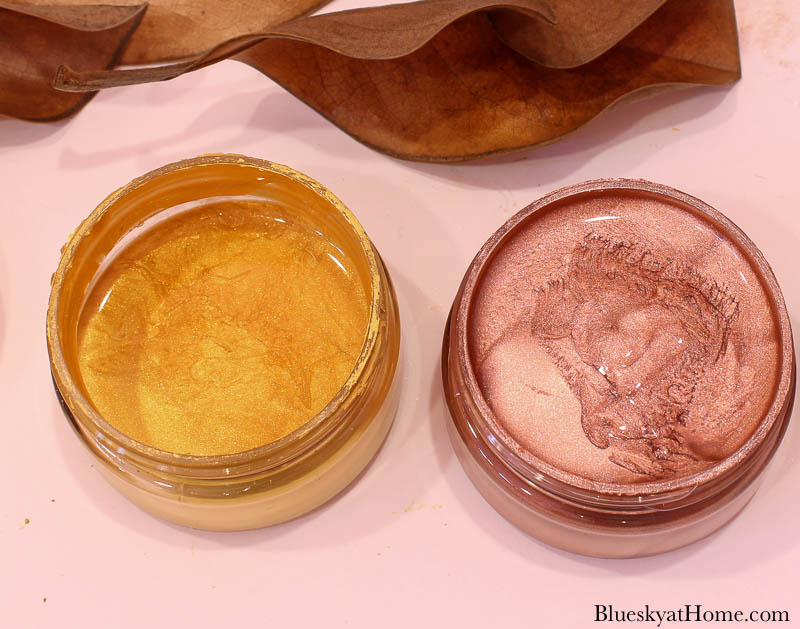
- metallic paint in gold and copper; I used Metallic Gold and Metallic Copper from A Makers’ Studio


Steps To Preparing And Painting The Pumpkin Wreath
This is an easy DIY wreath, but it does take time ~ mostly waiting for your pumpkins to dry after painting.
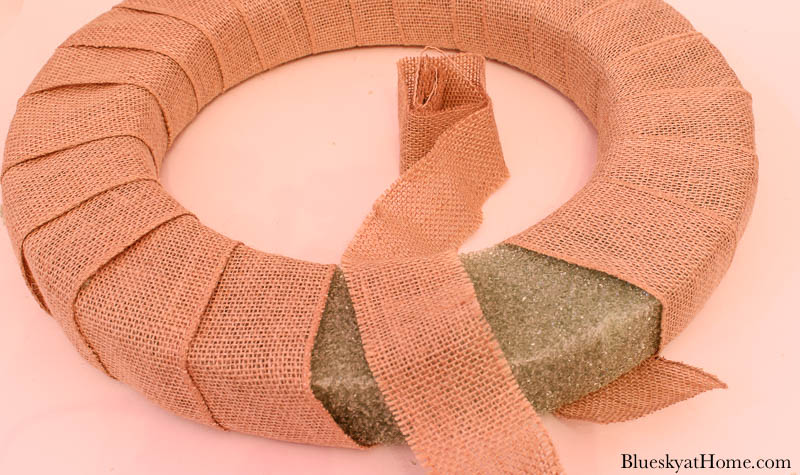
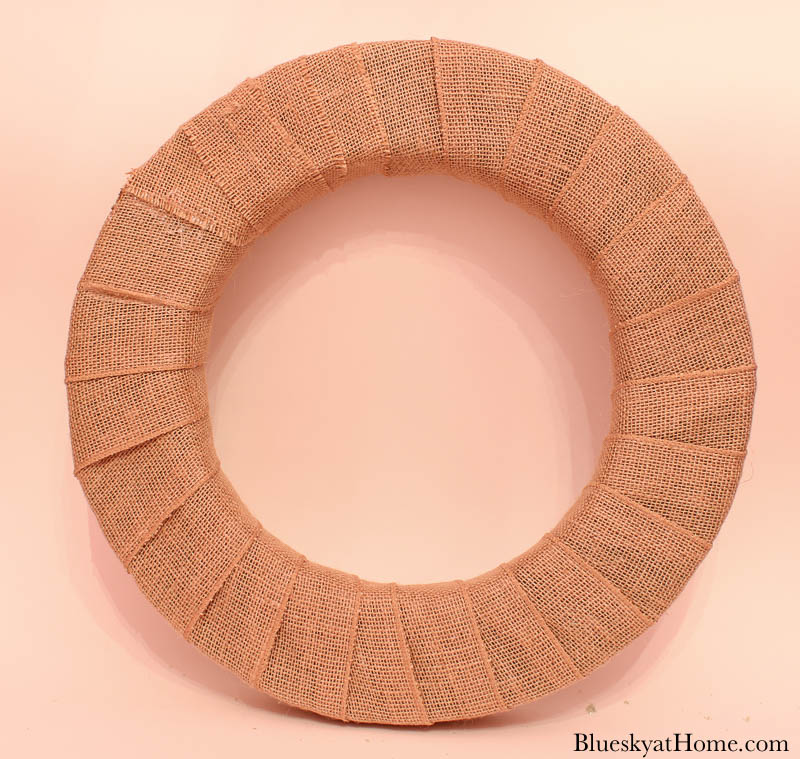
- Wrap the wreath with your ribbon of choice.
Use your glue gun every 4th “wrap” around the wreath to glue the ribbon. Pull the ribbon tightly, overlapping the ribbon just a bit to cover the wreath.

- Continue wrapping your wreath until it is completely covered.

- Set your wrapped wreath aside while you paint your pumpkins.

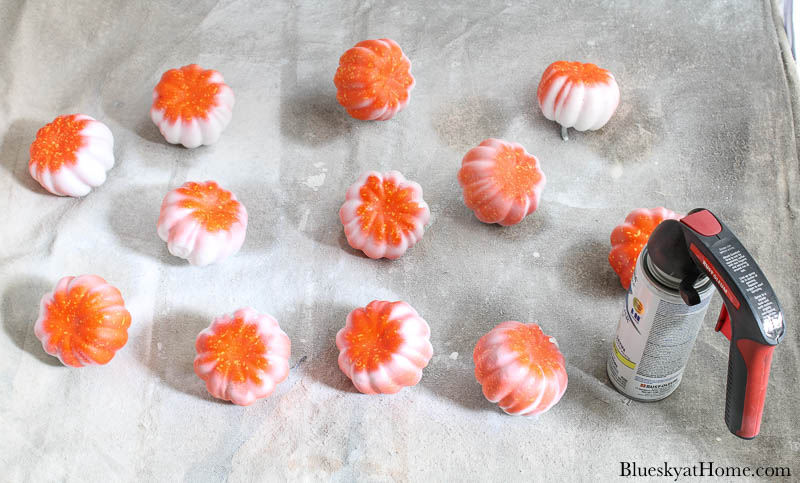
- Painting Your Pumpkins – Set up a spray paint area for your pumpkins outside.

- Spray the first side of your pumpkins.

- Paint one side of your pumpkins and gourds, let them dry, and then turn the pumpkins over.

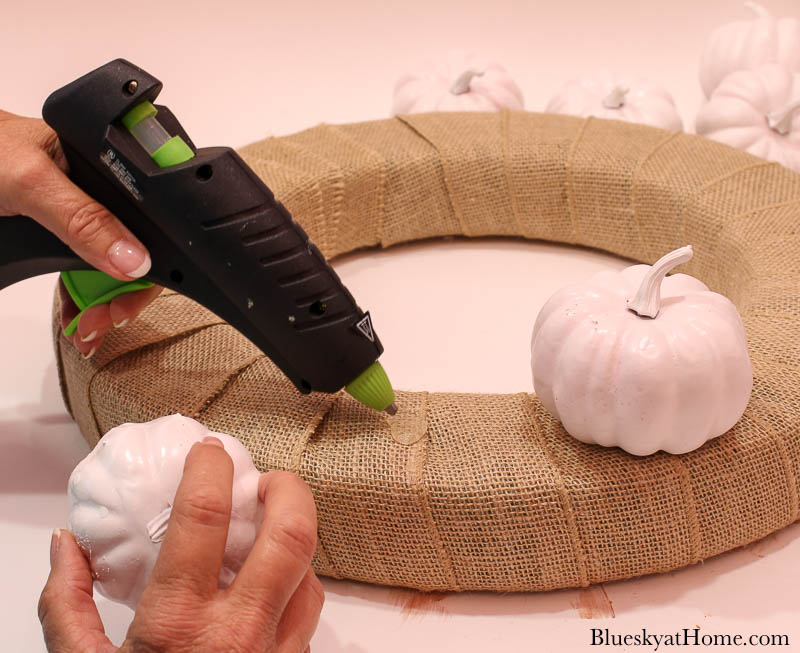
- Heat up your glue gun.

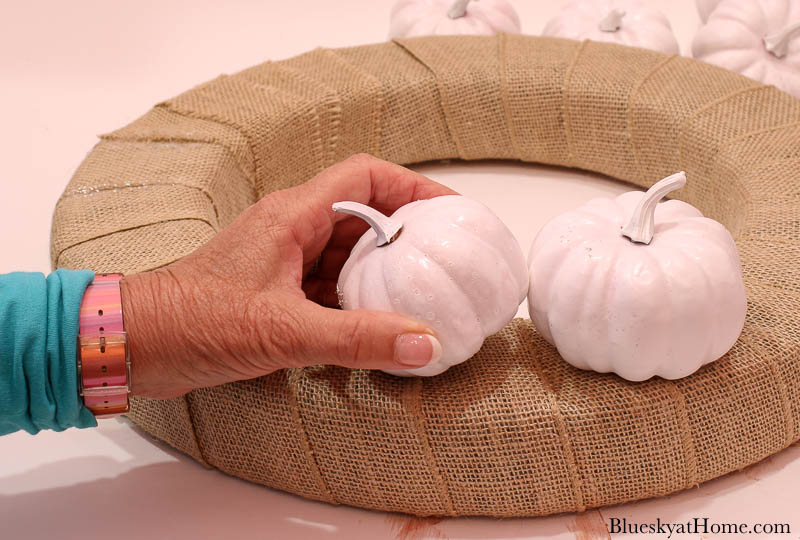
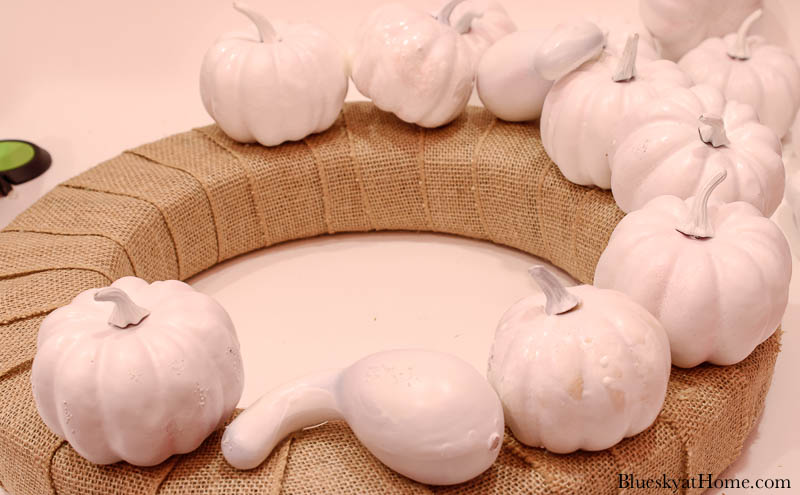
- To see the placement and number of pumpkins, arrange your pumpkins and gourds around the top of the wreath.

- Begin gluing your pumpkins to the wreath. You can tilt or space your pumpkins to your liking.
- Continue adding and gluing the pumpkins around the wreath. I tilted the pumpkins and gourds for more interest.

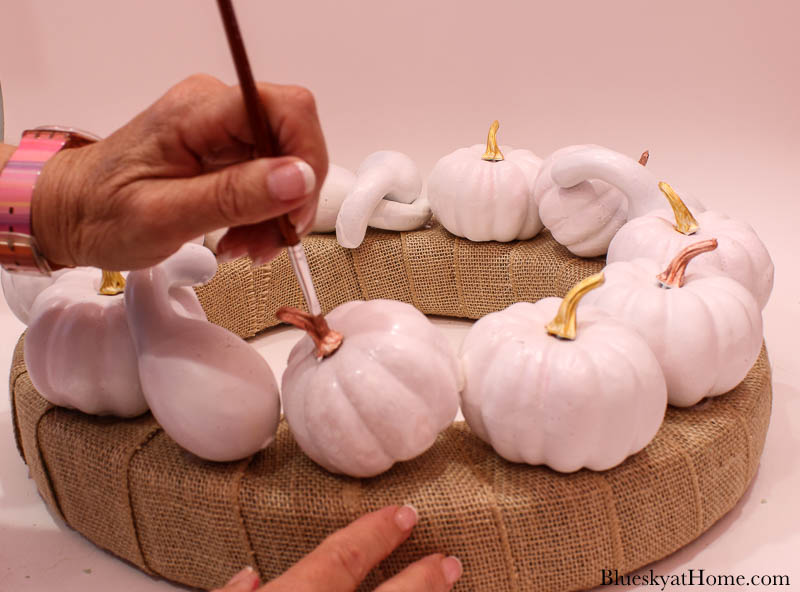
- Paint your pumpkin stems. Use a small brush to apply 2 coats of your metallic paint to the stems. I alternated the copper and gold paint.

- Make sure that all your pumpkins and gourds are firmly glued. Add extra glue if needed.


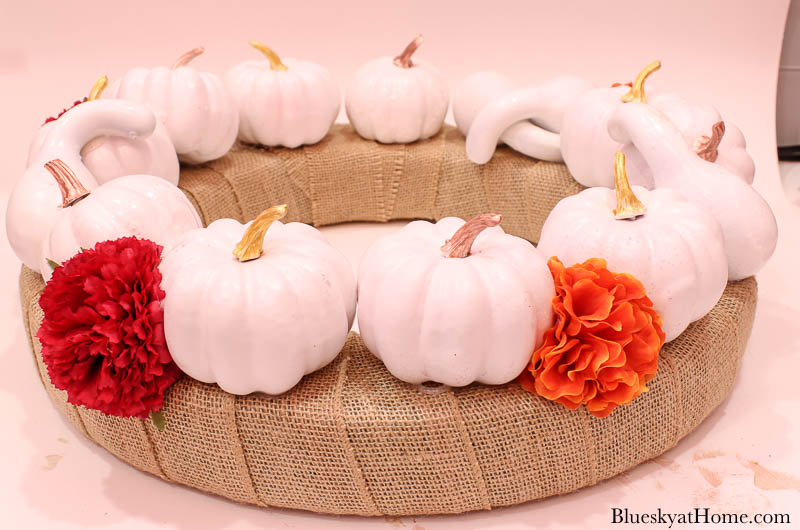
Adding the Faux Flowers
Use your flower clippers to cut your faux flowers off the stems. Attach the flowers in a random color scheme with your glue gun in between the painted pumpkins and gourds.
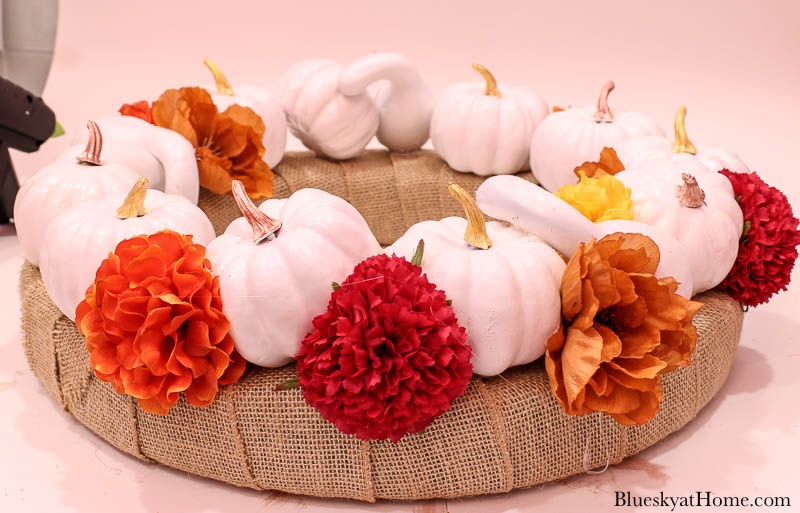
I will probably buy a few more faux flowers to fill in a few places on my pumpkin wreath.
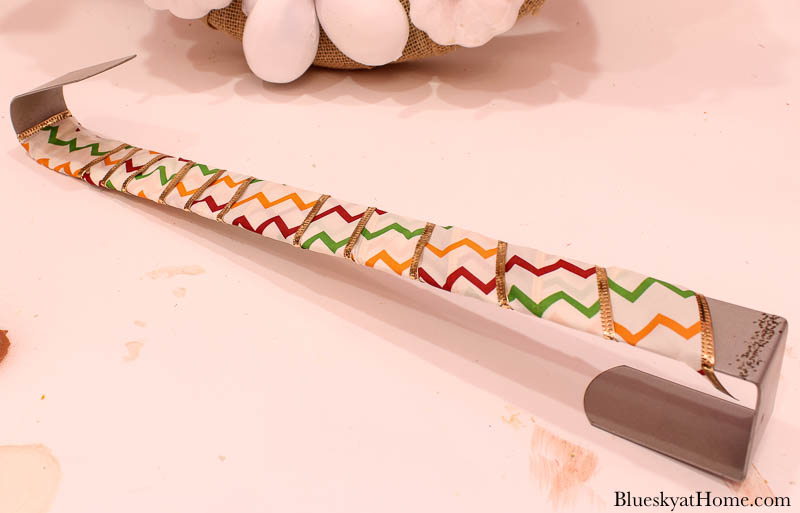
Hanging the DIY Pumpkin Wreath
Wrap your hanger with your ribbon of choice. I used ribbon in fall colors that I bought at Dollar Tree. I used it briefly for my wood slice wreath.
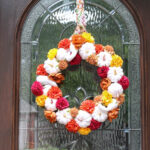
My finished pumpkin wreath would go on our front door. I used a piece of the same ribbon to loop through the wreath on the hanger. (You can see me in the reflection of the glass.)
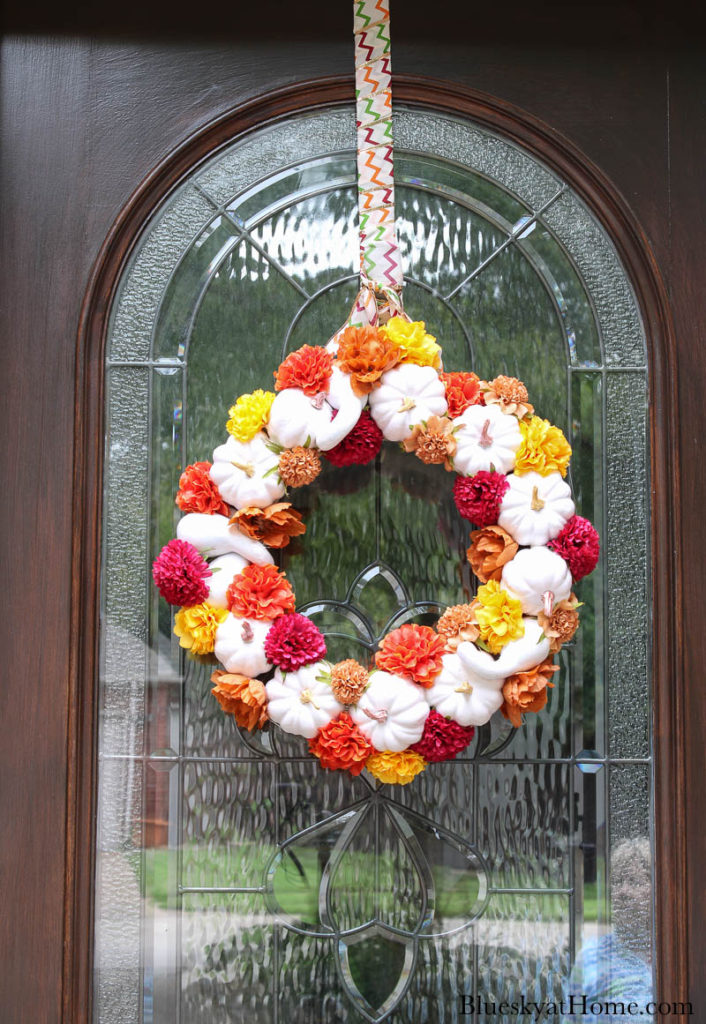
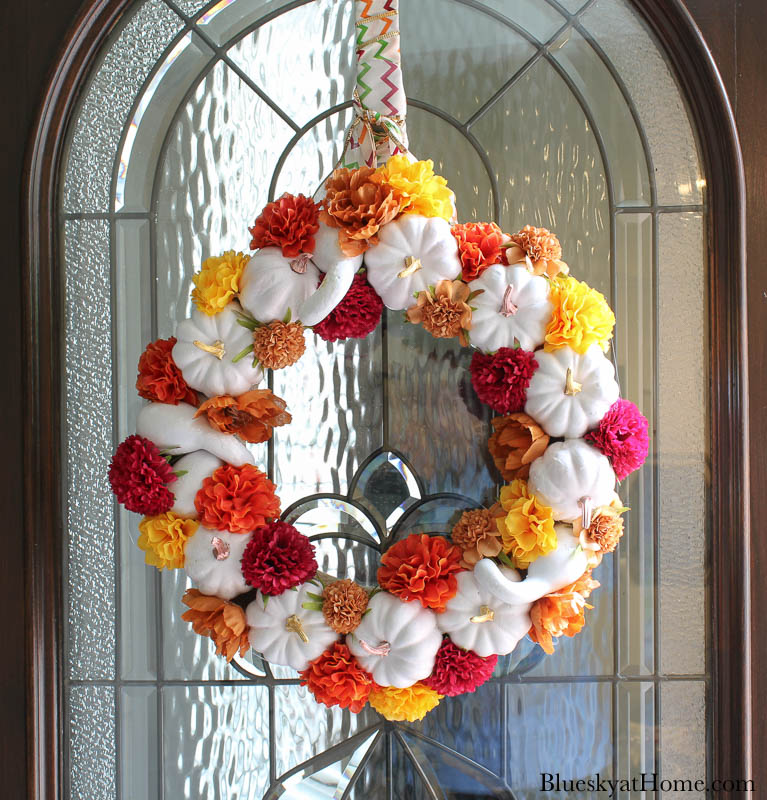
Although I hung this pumpkin and flower fall wreath on my front door, you could also hang it above your mantel, on a mirror, or on a wall in your home.
This DIY pumpkin wreath is definitely my very favorite. The bright fall colors in the flowers contrast nicely with the white pumpkins and gourds. The pop of copper and gold metallic is a nice addition.
I hope you like this project and would consider making this DIY pumpkin wreath for yourself. Please PIN so you have the instructions.
Thank you so much for visiting Bluesky at Home. I’m so glad you are here.
I hope that you will PIN this fall pumpkin wreath project. Please see the fall ideas my friends are showing below. Start by visiting Kim of Shiplap & Shells and all her DIY ideas.


How cute is this? I love how the color really pops. Thanks for sharing at Vintage Charm. xo Kathleen
Such a beautiful wreath Carol. Pumpkins are one of the things I look forward to every fall. Wonderful hopping with you.
Thank you, Chas.
Such a cute idea, Carol! I love the metallic stems on the pumpkins… such a great way to add a little glam and sparkle without going overboard. It looks so easy too! I love projects that anyone can tackle, thanks for sharing!
Always have a place to add some bling! Glad you liked the wreath.
Carol, I love the bright colors of the blooms contrasted with the white pumpkins and gourds! What a fun wreath and great contrast! This will certainly catch the eye of those passing by!
Thank you, Chloe. That contrast was the best part.
Carol, This is such a great tutorial. I love the fact that you painted your pumpkins AND painted the stem. Such a great way to personalize it just for your door. I like the burlap ribbon to cover the styrofoam wreath. I am definitely going to try my hand at making a new front door wreath this year and you have provided so many helpful hints.
Hi, Mary, and thank you for the great feedback. Hope you make a new wreath and share it.
Carol, your pumpkin wreath with those beautiful faux flowers is so pretty! Thanks for the tutorial! I am going to make some! Have a great week!
Thank you, Mary~Ann. As usual, I love your feedback.
This is such a fun and unique wreath for fall Carol. I just love all the bright and beautiful colors. Thanks for sharing the tutorial with us.
Thank you, Kim. I’m not surprised you like the bright colors. Right up your alley.
What a great tutorial. It looks so different with white pumpkins. That’s the one thing I don’t love about pumpkins is the orange. I love the new picture of you with your puppy. Is that new? Thanks for hopping with us today.
Glad you like the white pumpkins, Andrea. They do provide a bright pop to the wreath.
I love how this turned out, Carol! The white pumpkins were a super great choice. They really pop against the colored fall flowers. This a a super easy project…Pinned!!
Happy you liked the white pumpkins, Rachel. I appreciate your feedback.
What a lovely wreath Carol – the little white pumpkins are my favorite, and you’re right, it’s such a pretty contrast with the bright flowers. Love how you wrapped the hanger too! Always so fun hopping with you!
I love your wreath. Carol. It made me smile on a dreary morning. Laura
Beautiful! I love the gold & copper on the pumpkins! Thanks for sharing on Traffic Jam Weekend at LifeasaLEOWife.com!
Thank you for inviting me, Niki.
I love how the colors of the flowers make the white pumpkins and gourds pop! Your wreath is SO cheery!!
Carol, I am not sure if I love your “picked” flowers or the adorable little pumpkins more!
Your wreath is so beautiful, and the tutorial is so easy to follow.
Thank you for joining the hop this week and sharing this beautiful wreath.
Your Fall wreath is so pretty, Carol! Love the pops of color.
Oh what a darling idea and thank you for the detailed tutorial! The wreath did turn out so pretty.
Be a sweetie,
Shelia 😉
Thank you so much, Shelia. I’m so glad you liked this project. I appreciate that you took the time to comment.
So cute Carol. Love the idea of covering the wreath hanger.
Love so many things in how you created this one—covering that wreath was one I’ll take with me. Happy hopping!
Thank you Leslie, It is one of my very favorite wreaths. Have a great day.
Great colors Carol! So bright and cheery!
Beautiful wreath! I like the tip about wrapping the wreath hanger in ribbon to give it a festive look too. Great idea. Thanks so much for sharing this week.
Thank you so much, Donna. Glad you liked it.
This is so pretty, I love how sophisticated the pumpkins turned out. What a shame they were individually wrapped in plastic, you’d think manufacturers would have stopped that by now! At least you have made something beautiful with them that will last for year.
Hi, Julie. I’m not sure why they thought to necessary to wrap each pumpkin separately. Just more to unwrap and put in the trash.
Carol, Your pumpkin wreath is so colorful and such a happy and bright departure from the typical fall wreath! Love your addition of the bright flowers! Happy to be hopping with you again, Happy Fall ♥
Mary, thank you for the sweet compliment. So nice to see you. Happy Fall back to you.
Carol, you’ve designed a beautiful fall wreath! I can see why it’s your favorite. I love the colorful florals paired with the white pumpkins. The metallic stems add just the right amount of bling. It looks lovely against your front door. It was fun crafting with you again, my friend!
Your wreath turned out so colorful and original. I’m so glad you joined the hop. You always have such elegant ideas.
Thank you, Andrea, and thank you for hostessing.
Carol, I love your combination of white pumpkins and colorful florals in your gorgeous wreath! Pinned & tweeted! Blessings, Cecilia @My Thrift Store Addiction
Thank you, Cecilia, that’s the look I was going for.
Very cute for fall Carol! A Styrofoam ring base, wrapped in burlap ribbon was the base of my recent DIY Wine Cork Wreath. It’s fun to see all the different projects and ideas shared in the craft hop.
Debbee, we collect wine corks (too much wine during Covid.) I will have to check it out.
This is so cute Carol! Fall and Halloween are my favorite, and I love everything with pumpkins! Wonderful crafting with you and thanks for sharing!
Carol, your diy wreath pops with fall color! The final touch of wrapping the door hanger was such a good idea. You could use a wrapped wreath hanger anytime you want that extra bit of visual color and texture. I’m going to remember this tip. Pinned!
I’m loving the bright fall colors in your wreath, Carol! Fall is all about colors and the white adds a bit of calm and chicness to your wreath design! It looks lovely on your door!
This is gorgeous Carol! I love that you switched this around and brought the bright colours in the florals vs. pumpkins. So fun!