How to Easily Spray Paint a Glass Lamp for a Fresh New Look
Glass lamps are timeless accessories, but their style can sometimes feel outdated or mismatched with your current style or color preferences. Here is how to easily spray paint a glass lamp for a fresh new look that is easy on your budget.
As I recently found out, with just a can of spray paint and a bit of creativity, you can transform any old glass lamp into a stunning statement piece that perfectly complements your space.
Spray painting a glass lamp is not only budget-friendly but also incredibly satisfying and surprisingly easy, even for beginners. Whether you want to add a pop of color, change the finish of the lamp, or mimic the look of high-end ceramics, this project offers endless possibilities.
You’ll love the sense of accomplishment whenever you flip the switch and see your handiwork light up the room.
Lamps are one of the best accessories to upstyle to a new color or pattern. Here is one of my favorites: How to Make a Chinoiserie Lamp (I had to paint it first.)
In this step-by-step guide, I’ll show you exactly how to easily spray paint a glass lamp for a fresh new look, including all the tips and tricks – and the mistakes not to make.

Ready to give your old lamp a vibrant makeover? Let’s get started!
Time to Get Creative with this Eye-Catching DIY
Today is Creative Craft Blog Hop Day. Once again several bloggers are sharing some great DIY crafty projects.
What’s great about this collaboration is the variety of projects. There’s something for every taste, level, and budget. Sara of Birdz of a Feather is our hostess. I’m excited to share my DIY craft. It’s been a while in the making.
Are you coming over to visit from Gail of Purple Hues and Me? Welcome to this paint party.
The Story Behind This Lamp Makeover
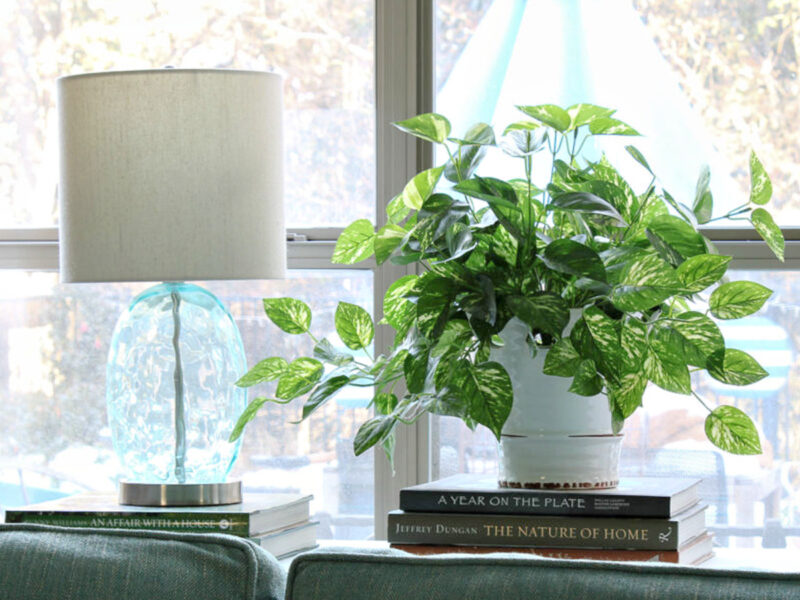
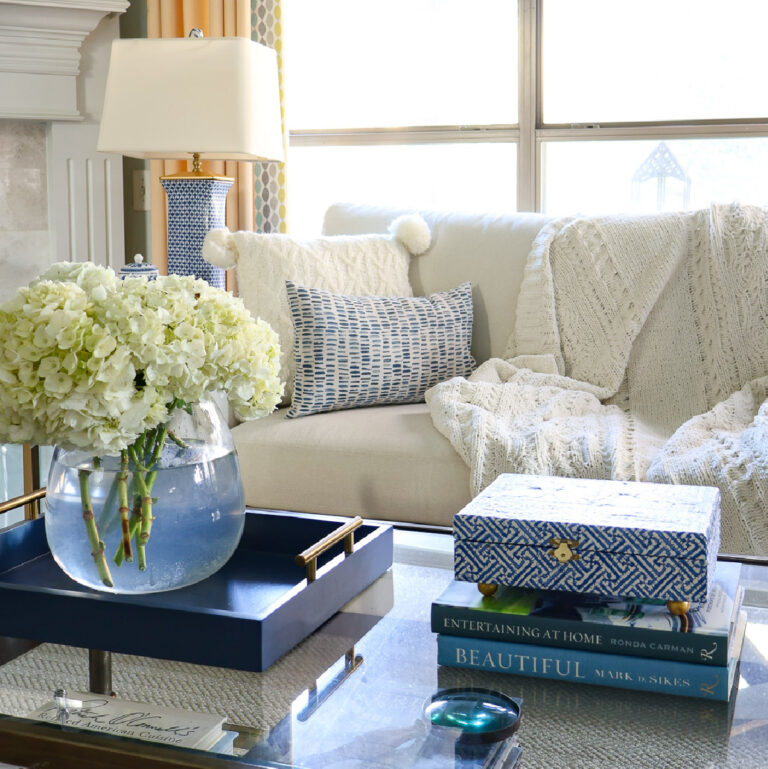
I bought these two lamps at At Home (or it might have been Target) several years ago. At the time, I was still in my aqua, coastal stage.
The watery aqua shade of the glass would be a nice addition to our living room sofa table. They would pair nicely with our aqua sofa.

Fast forward a few years, and I was over aqua and coastal style. We bought a new white sofa and chairs for the living room and removed the sofa table.
My new favorite shades of blue range from light blue (table from Wayfair that we partially painted) to French blue (duvet in the bedroom) to deep blue (newly reupholstered Bergere chair and ottoman in the living room), all the way to navy pillows on the sofa.
And the most beautiful new lamps for the living room.
I no longer liked or needed the wavy aqua glass lamps in the living room. I still liked the shape of the lamps, so I tried them in our bedroom. They were too small, the aqua didn’t work with our French Blue duvet cover, and they didn’t have a three-way blub option. (Too dark to read by and not bright enough for pre-bedtime.)
I hated to get rid of them as they are a nice accent lamp. Could I salvage them?
- First, the aqua wouldn’t work anywhere in our house.
- Second, I was tired of the glass see-through look.
- Third, I couldn’t think of a place to put them – until I did.
I love to have a lamp or two in the entry for soft lighting and ambiance. I currently didn’t have lamps for our entry. Could I somehow make the glass lamps work? Then the proverbial light bulb went off (sorry, couldn’t resist that pun). I thought, “Why don’t I paint them?” So I did.
Supplies for the Lamp Spray Paint Project
This post contains affiliate links to products used to create this project. If you should order any item from this site, I may receive compensation, but you do not pay a penny more. Your purchase is greatly appreciated as it helps support the continued publication of this site.
I didn’t buy a single thing for this project, but here is what you need:
- painters’ tape
- zip-lock or plastic bags
- large cardboard box or spray paint tent
- alcohol and paper towels – for cleaning the glass
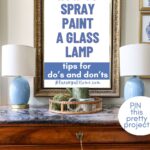
- spray paint for the glass in your chosen color: Some people might suggest that you use glass paint. I wanted an opaque finish to cover the glass. I already had two cans of Rust-Oleum Ultra Cover Paint and Primer in French Blue. This paint has a Satin finish and can be used on wood, metal, plastic or glass. It is good for indoor and outdoor projects. And, it’s a beautiful blue color.

- spray paint for the metal base, lamp support, harp and finial: again, I already had Krylon Metallic Spray Paint in Brass. It is actually more gold than brass, which suited me just fine. This paint is only suitable for indoor use.
- spray paint gripper – this nifty gadget is a lifesaver for your hands and fingers. I have several – it was a yearly gift at Haven in our swag bags from Rust-Oleum.
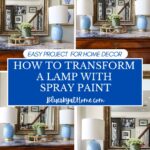
Step-by-Step Guide to Spray Painting a Glass Lamp
I’ve read several tutorials about painting glass (or ceramic) lamps. Several advise using a primer or sanding the surface. I have painted ceramic lamps, but never used a primer or sanded it. I’ve never had a problem with the paint sticking or the wearability of the paint.
So, here is my project, the good, the bad, the ugly and the beautiful.
Step 1 – Protecting and Covering Surfaces
The first step is to cover the parts of the lamp that you do not want to paint, such as the base, the lamp bulb support, the lamp harp, and the light bulb.
TIP: leave the harp in place while you are painting the glass.
I attached zip-lock bags tightly around the brushed chrome light bulb support with painters’ tape. That method worked great.
NOTE: For the first lamp, I left the harp on, which worked very well – it gave me an easy place to grab and turn the lamp as I painted it.

Then I covered the brushed chrome base with painters’ tape.
Step 2 – Set Up the Lamp in a Painting Box
You can use a spray tent. I was a little lazy and used a large Amazon box which worked really well. I set it on the stone wall between our house and our next door neighbor’s side yard.
TIP – Be sure to spray paint outside in a well-ventilated area. My favorite place is the garage, with the door open to keep wind to a minimum and out of any blowing debris.
TIP – Either park your cars away from where you are spray painting for use a spray tent or paint box.
The location was good because it was in the shade. I started in the morning when it was nice and cool.

Step 3 – Clean the Glass
Remove any dust, grease or oil. You could use glass cleaner or alcohol. I used alcohol on a paper towel. Wipe until you do not see any residue. Alcohol will dry almost immediately.
Step 4 – Apply Two Coats of Your Spray Paint
Shake your can of paint for a few minutes. You will hear the ball inside rattling. Remove the cap on the can.
Attach the spray paint gripper around the top of the paint nozzle.
In a horizontal motion, spray your glass lamp from top to bottom. Turn the lamp 1/4 turn and spray again from side to side. Continue until the entire glass is covered. Allow to dry for a minimum of 10 -20 minutes.

TIP: You can use the top of the light harp to turn the lamp.
What Not to Do When You are Spray Painting
While waiting for the first coat to dry, I went into the house to work on other projects. I didn’t go back outside for a couple of hours. When I went outside, I realized that I had left the can of blue spray paint (the can was hot to the touch) and the temperature had risen to almost 85˚.
I was a little concerned, but proceeded with the second lamp in the same way as the first. It wasn’t until I finished the second lamp that I realized the difference between the two lamps.
You can easily see that one lamp is smooth and glossy, exactly the look that I wanted. The other lamp has a rough texture and matte finish.
Same lamp. Same paint. Different color. Different finish.

What was the difference in how the two lamps came out?
The temperature of the spray paint and the temperature outside.
I was so disappointed in the result (and my own inattention). The next day I did spray paint the base, the lamp support, the harp and both finials with the brass/gold spray paint.
Then I let the lamp thoroughly dry before removing all the painters’ tape. I assembled the lamp and the shade.
The lamp looked really good. I loved the solid blue color and the gold accents.
I placed the good lamp on our entry commode for Easter decor.

How to Fix the Spray Paint Problem
Now I had one pretty new lamp transformation and one bad one.
After a trip to New Orleans where I broke my foot, Easter, and some chilly days, it was time to address the problem of the bad lamp.
First, what to do about the rough texture? I decided to sand it off. I tried to use a sanding block but that wasn’t effective enough.
Would my electric sander work? I decided to give it a try. Thankfully, it worked like a charm. It took about thirty minutes to remove most of the original coat of paint.


After I removed most of the paint, I cleaned it with alcohol and a paper towel.
On a cool day (I learned my lesson!), I set up my painting “station” in the garage. using a new Amazon cardboard box.

I followed the same process as the first lamp.


After two coats and a full day drying, the lamp looked just like the first one – smooth and glossy!

Next, I removed all the painters’ tape and covered the painted glass with a plastic bag. Now I could paint the base and the harp. I had already painted the finial


Displaying the Two Spray-Painted Lamps
Finally, both lamps matched in finish and color. The pair would look great in our entry as accent lamps.

I made this simple vignette with touches of green in natural materials. It will work for now until I transition to a summer style. The lamps will stay through summer and maybe to Christmas.

I love the set of chinoiserie ginger jar prints on the wall, but I plan to find some new ones with a lighter blue and more summery design.

Spray Painting Lessons Learned from This Project
What are the biggest lessons to be learned from this tutorial on how to easily spray paint glass lamps?
- Never leave your can of spray paint outside in the heat.
- Never spray paint when the temperature is above 70˚F.
What are the best methods to use when spray painting?
- Thoroughly shake your can of spray paint.
- Spray paint when the temperature is around 70˚F. outside.
- Use light coats of spray paint.
- Paint in a horizontal motion.
- Use a spray paint gripper for ease of application.
- Allow the spray paint to dry completely between coats.
- Wait at least overnight to 24 hours before using the spray-painted piece.
If you follow these tips and suggestions, you will have a successful spray painting experience no matter whether you are transforming a glass lamp, glass flea market finds, glass bottles, jars, or platters.
Don’t forget that you can paint glass with other types of paint.
Want to keep this post on how to easily spray paint glass lamps? Save it to your favorite DIY projects, crafts or paint projects Pinterest Boards. Check out my Pinterest Boards for more ideas: Paint Projects , DIY Accessories for the Home, and DIY Projects.
Now take a look at the fun crafts my friends are sharing. Start with Cecilia of My Thrift Store Addiction.


Purple Hugs and Me – Beaded Wire Floral Candleholder
Bluesky at Home – How to Easily Spray Paint a Glass Lamp for a Fresh New Look
My Thrift Store Addiction – DIY Salvaged Outdoor Cushions (No Sewing!)
Birdz of a Feather – Celtic Knot Necklace
Decorate and More with Tip – DIY Wavy Air Clay Candle Holder
Patina and Paint – Pool Noodle Garland


Hi Carol
This is gorgeous. Pinning and Sharing on the Weekend Edit soon!
I love it and the finials what a great idea!! I never would have thought to paint the finial! I think that is what they are called! love this!
Thanks a bunch. Painting the lamps made such a difference. And that little finial did need to match the lamp base.
Carol! This is gorgeous! Pinning and sharing on a future Weekend Edit.
OMG and the painted finial is amazing!!!!! I paint a lot of stuff but I love your lamps and the choice of color!!!! great job girl!
xo laura
Everyday edits
Thanks for the shout out!
Carol, a can of spray paint works wonders, doesn’t it? It covered the transparent glass beautifully and your lamps look great! Blessings, Cecilia @ My Thrift Store Addiction
Yes, spray paint is a miracle product. Right up there with glue guns and Mod Podge!! Thank you.
Great tips about spray painting Carol! So glad they finally look the same; they look great in your entry1!
Thanks Sara, Definitely a positive change.
This information was very helpful. Thank you 🙂
I’m so glad. Thank you for letting me know. Come back for more DIY projects.
You did a great job painting the lamps. They look amazing on your table.
Your updated lamps look fantastic, Carol! I love your tutorials and the fact that you always give us easy to follow techniques! Thanks so much!
Carol thanks for the spray paint reminders of the do’s and don’ts. I’ve had that happen too. So frustrating, but you saved the lamp and it is beautiful. Great job. Both lamps look perfect!