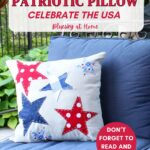
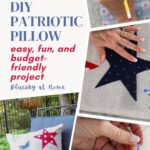
How to Make Patriotic Pillows: A Simple DIY Star Pillow Tutorial
Our patriotic holidays are about to begin. Do you want to show your patriotism while adding a homey touch to your living space? You can learn how to make patriotic pillows that will add the perfect amount of patriotic flair to any room.
Nothing says red, white, and blue quite like a throw pillow – and when you make it yourself, it’s even more special. These patriotic star pillows are one of the easiest DIY projects you’ll find for seasonal decorating, whether you’re sprucing up for Memorial Day, the 4th of July, or any summer celebration.
The best part? No sewing machine is required. A little hand stitching is all it takes to add star-spangled style to a plain pillow – and the results look like you worked much harder than you did.
In this step-by-step tutorial, you’ll learn exactly how to make patriotic pillows that bring a festive, handmade touch to your home decor. Let’s get started!
This post contains affiliate links to products used to create this project. If you should order any item from this site, I may receive compensation, but you do not pay a penny more. Your purchase is greatly appreciated as it helps support the continued publication of this site.
Where to Use These Pillows for the Patriotic Holidays?
These patriotic decorations can be used in so many places:
- create a patriotic front porch by placing the pillows on a front porch bench
- on a patio chair or loveseat
- in the house on the sofa
- have an old quilt in the guest bedroom? Use them there.
Mix them with throws, quilts or existing pillows for patriotic home decor.
What Makes this Pillow Project So Easy
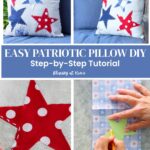
I said there was no sewing required for this fun patriotic pillow. That’s because we use a pre-made pillow. These are easy to find, come in multiple colors and sizes, and are inexpensive. I used an off-white (the actual color is called natural white) pillow made of cotton-type fabric. I chose an 18-inch square with a zipper. Don’t forget the zipper!
For this project, you could use the natural white or the medium blue.
Decide on a Patriotic Theme
The first step is choosing your design. For my patriotic pillows, I went with stars – I considered adding stripes too, but decided that would make the pillow feel too busy. You could also do a flag design or mix shapes, but stars are classic and versatile.
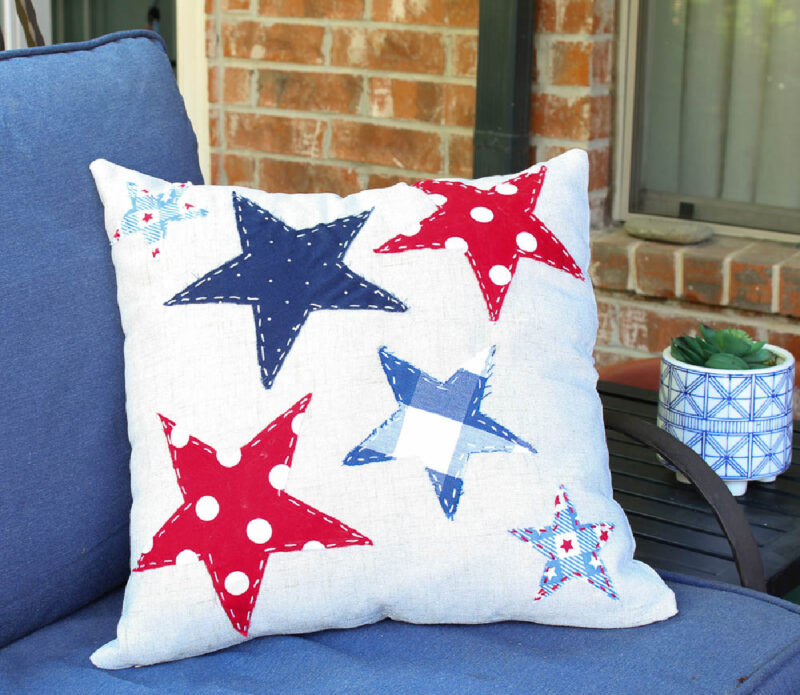
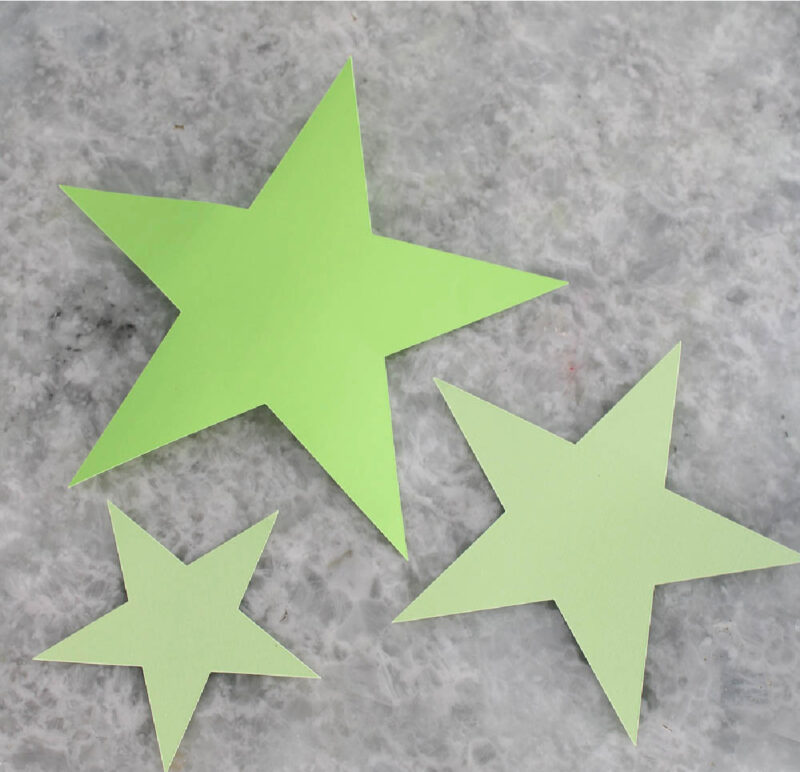
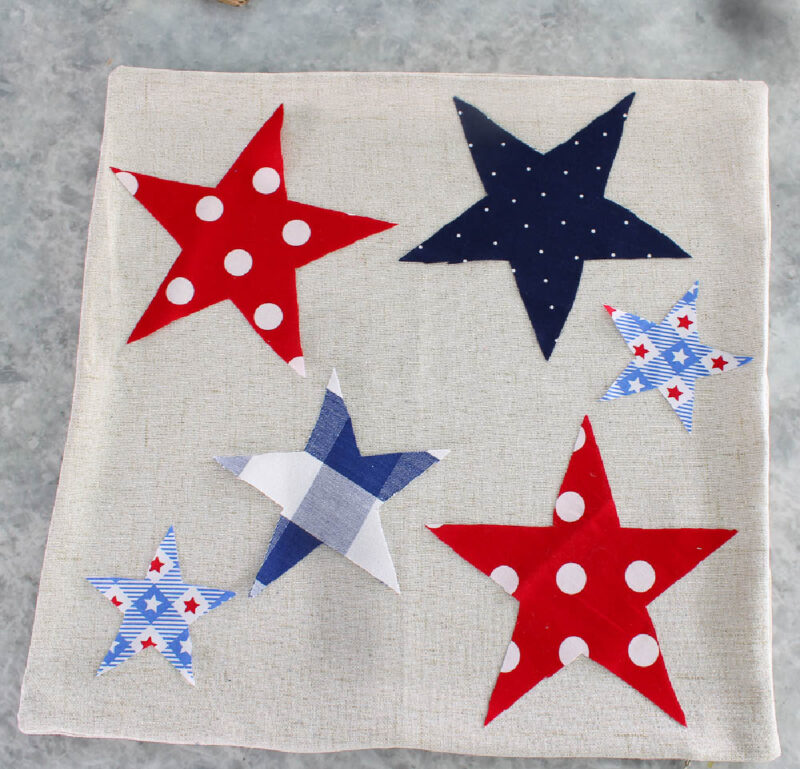
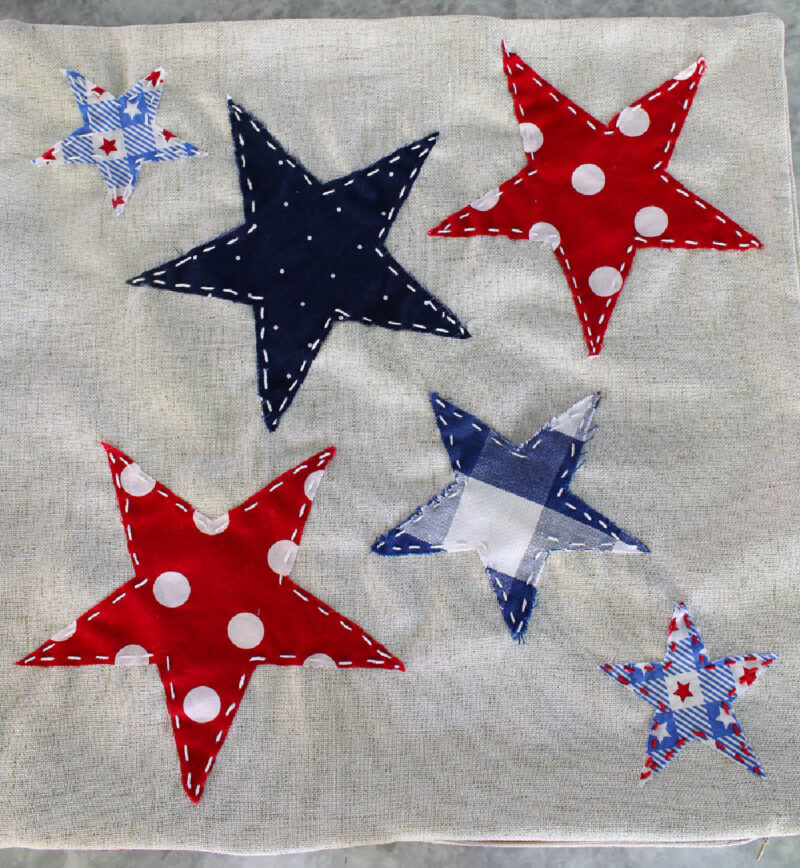
Once you have a theme, decide on the size and number of your pieces, since that will determine how much fabric you need. For each of my pillows, I used six stars: three 8-inch stars, one 6-inch star, and two 4-inch stars.
What makes your pillow uniquely yours is the combination of star sizes, the number you use, the fabric colors and patterns you choose, and how you arrange them on the pillow. Have fun with it!
Supplies for Your Patriotic Pillows
You’ll love that you may have some of these supplies on hand for this DIY project. If not, they are fairly inexpensive to find.
- pre-made zippered pillow covers in your choice of size. I ordered a package of 4 off-white pillow covers months ago in 18-inch squares. You can’t beat the price on these pillows.

- pillow insert in the same size. I used 18-inch pillow inserts. I took them out of existing pillows. You could use a 20-inch pillow insert also. if you want your pillows firmer. You may want to order outdoor pillow inserts if your pillows will be more exposed.
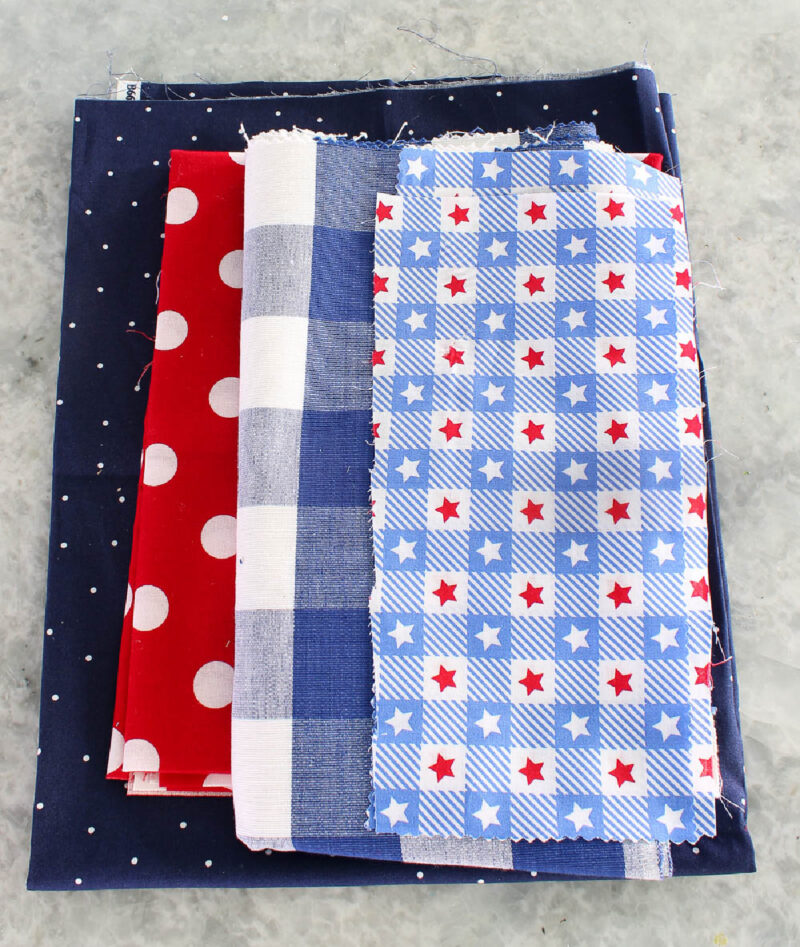
- cotton fabric in your choice of colors and patterns. (This set of 8 red, white, and blue fabrics in different colors and fabrics is perfect for this project.) I already had all the fabric in my fabric boxes. You don’t need large pieces and can definitely use scraps, if you can. I used four different fabrics, but all were red and white, blue and white or a combination. For the most interest, I picked patterned fabrics. You need less than a fourth of a yard for each star.
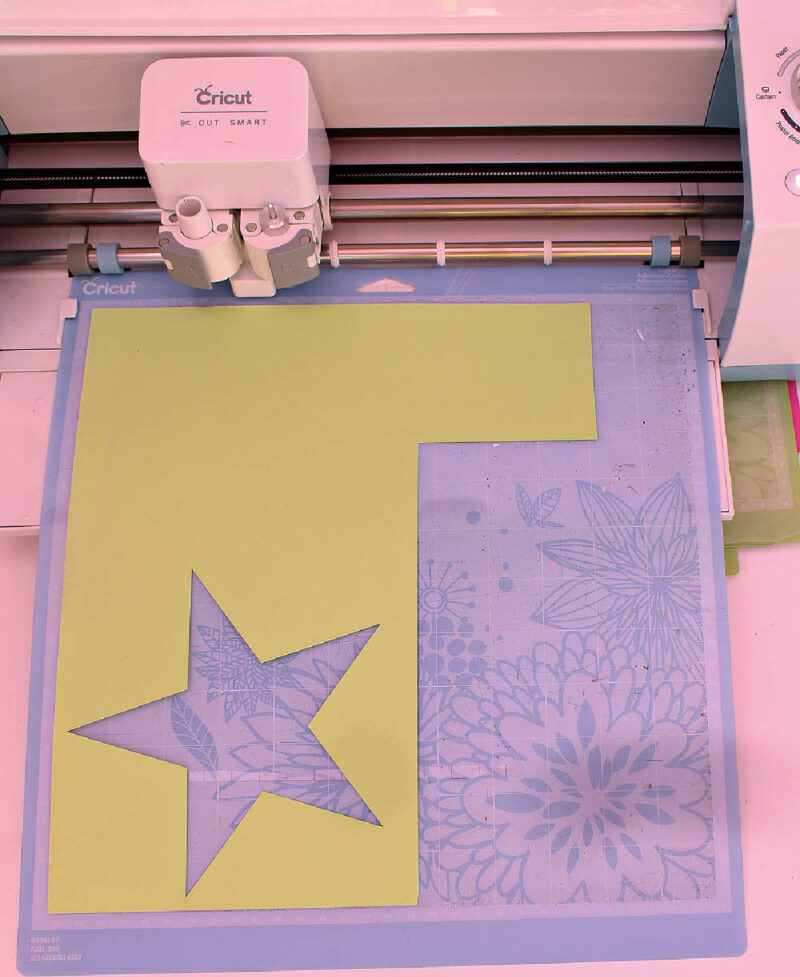
- cardstock or heavy paper to make a star pattern. It doesn’t matter the color and scrape pieces will work great. I used my Cricut Machine to make the stars. I determined that I needed three sizes: 8 inches, 6 inches and 4 inches.
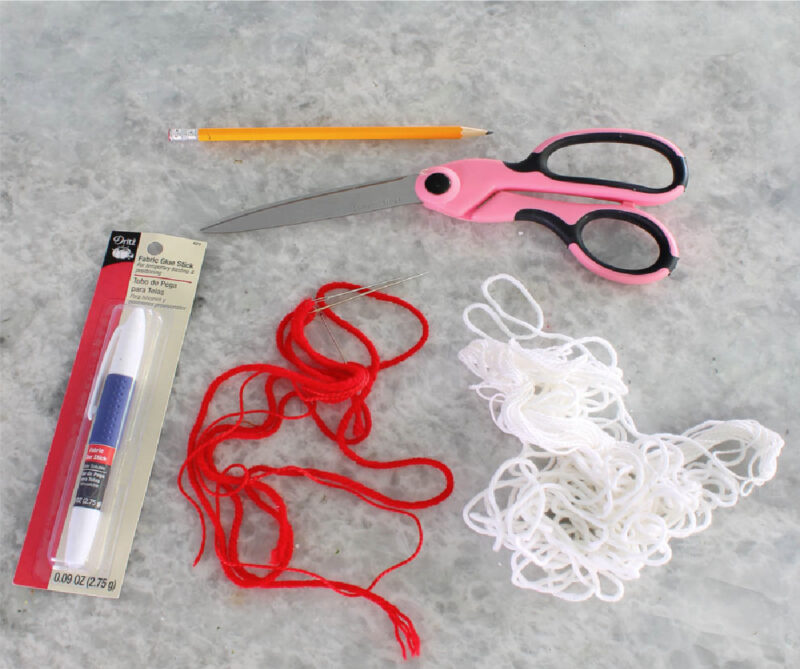
- very sharp scissors for cutting the fabric. I started with my sewing scissors, but switched to my favorite little sharp Fiskars scissors. These were easier to cut the corners and the angles of the stars.
- pencil or fabric markers
- fabric glue – This is one of my favorite brands.
- a large piece of cardboard, optional, for placing inside the pillow insert when you are gluing.
- embroidery thread or thin yarn for embellishing the stars on the pillow. Red, white or blue are the colors you need.
NOTE: If you don’t have a Cricut, you can hand-draw the stars with a pencil and a ruler on plain paper, cardstock, or cardboard, and then cut them out with sharp scissors.
Steps to Making Your Patriotic Pillows
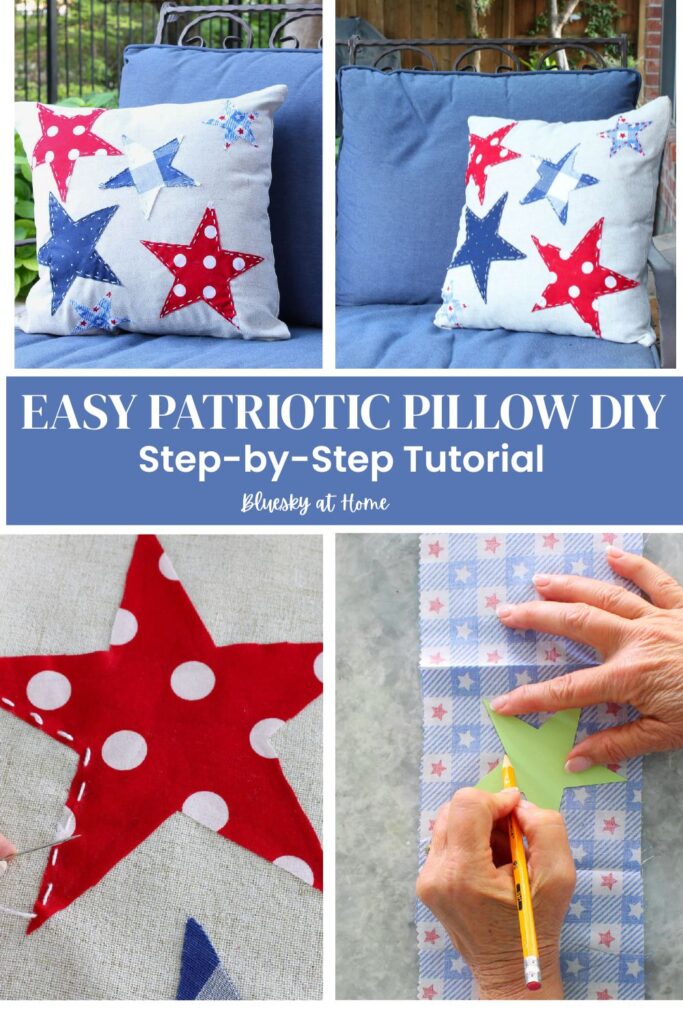
Step 1 – Iron your fabric and pillow covers if necessary.
Step 2 – Make your star pattern. As I said, I used my Cricut Machine to cut out three sizes of stars. In Cricut Design Space, I chose a star shape and cut out a large star in 8 inches. Then I duplicated the star and resized it to 6 inches, and then to 4 inches.
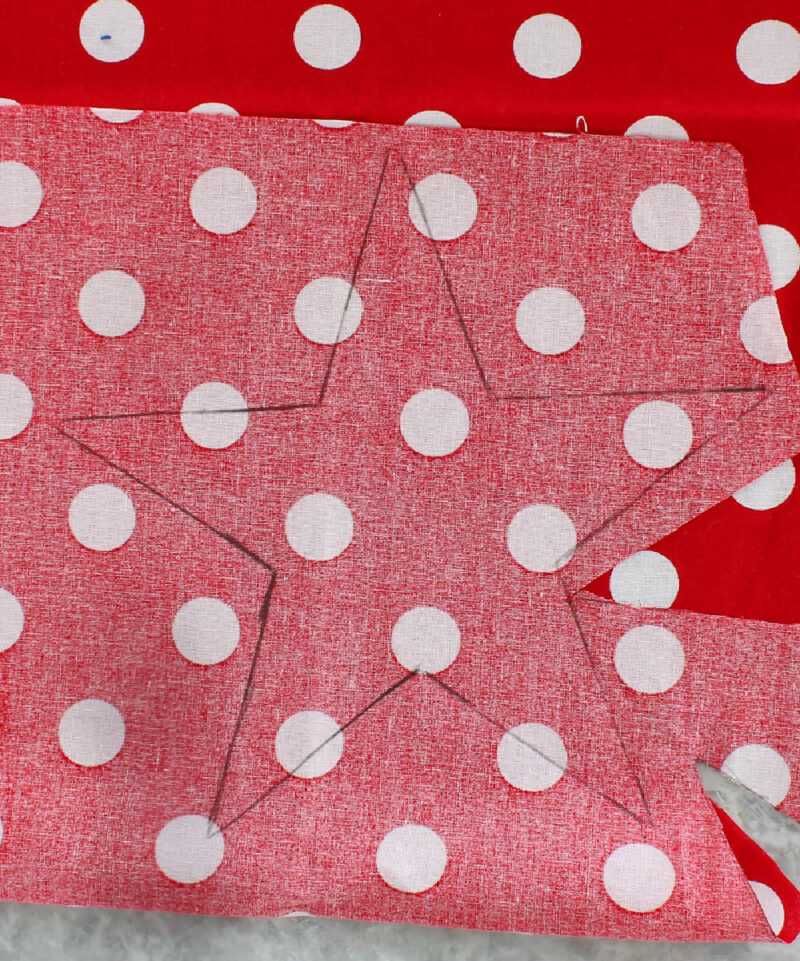
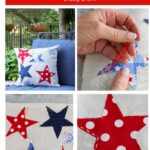
Step 3 – Place your cardstock pattern on the wrong side of the fabric. Trace around the star pattern with your pencil or fabric marker. Hold it firmly so the paper doesn’t slip.
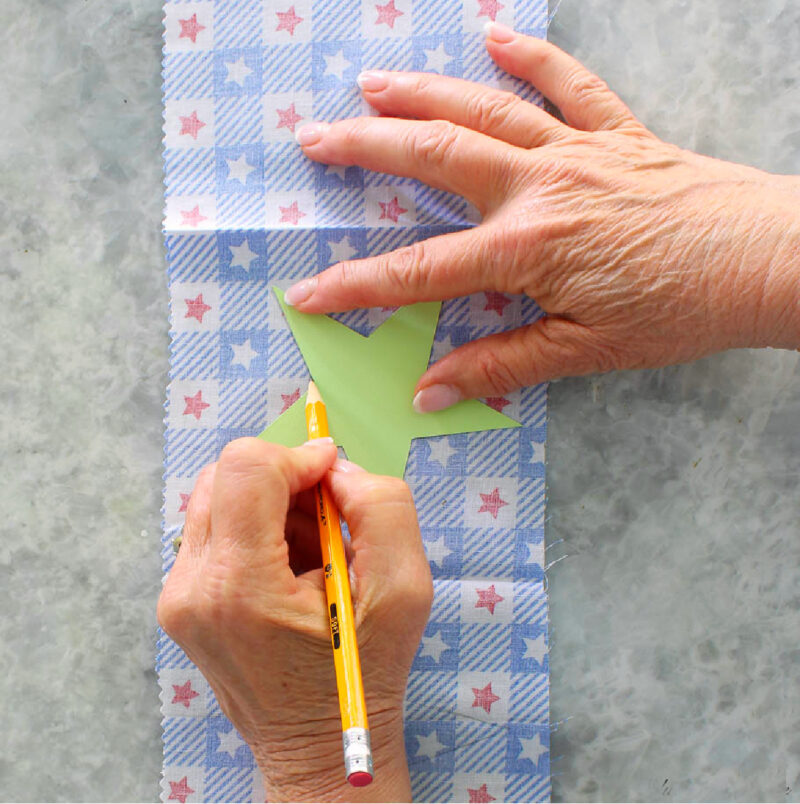
Step 4 – Repeat with your other star patterns and fabrics.
NOTE: I didn’t worry about raw edges on the fabric. Any slight raveling would give some character to the DIY pillows.
NOTE: I realized after I made my first 4-inch stars that I could fold the fabric, right sides together and draw and cut two stars at once.
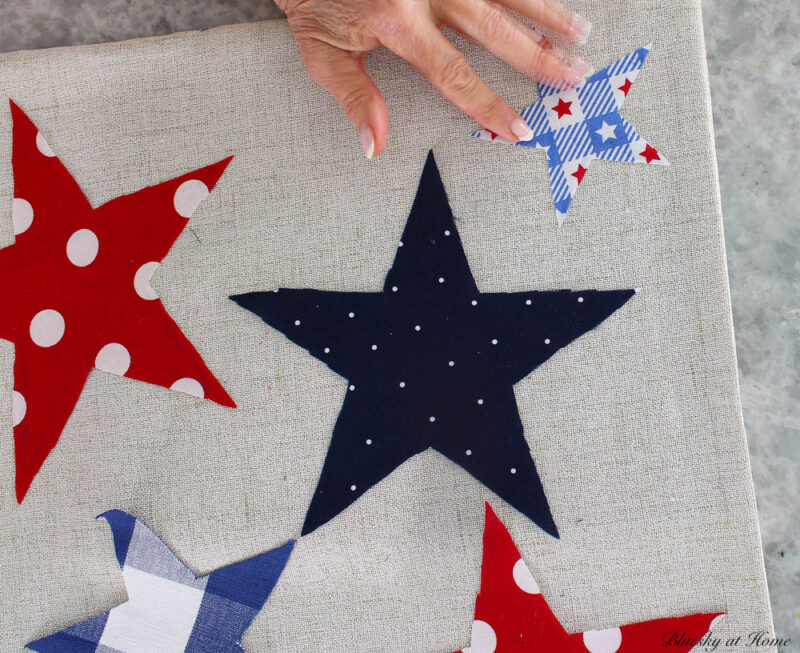
Step 5 – Once you have all your stars cut out, lay them on the pillow cover. Move them around until you get a placement you like.
Step 6 – Squeeze your fabric glue in a thin line all around the star about 1/8 inch from the edge of your star. Then add a dot of glue in the center and “spokes” of the star.
At this time, insert your piece of cardboard into the pillow cover. This makes sure that the glue doesn’t seep through the pillow fabric.
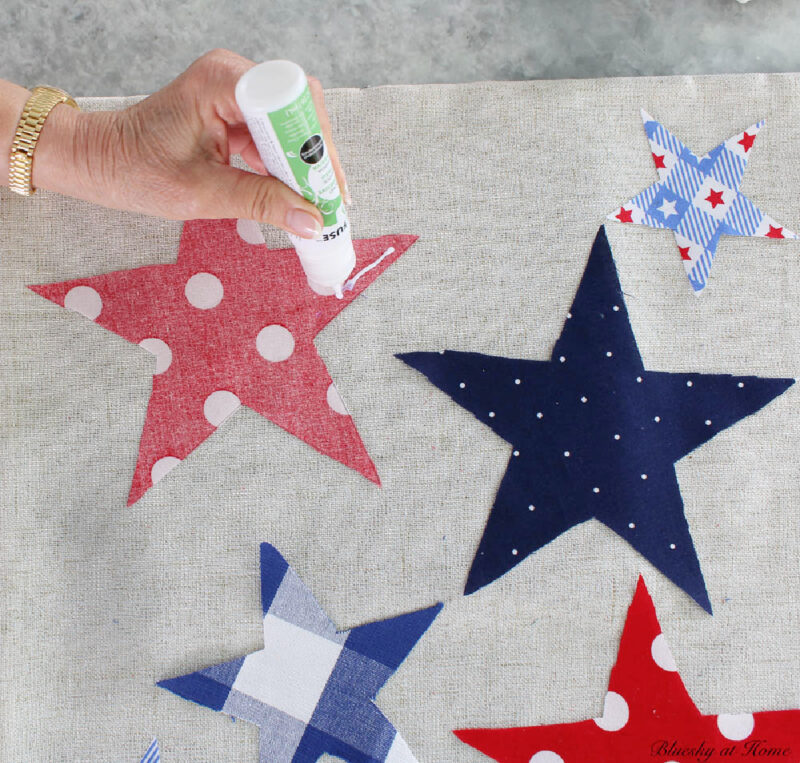

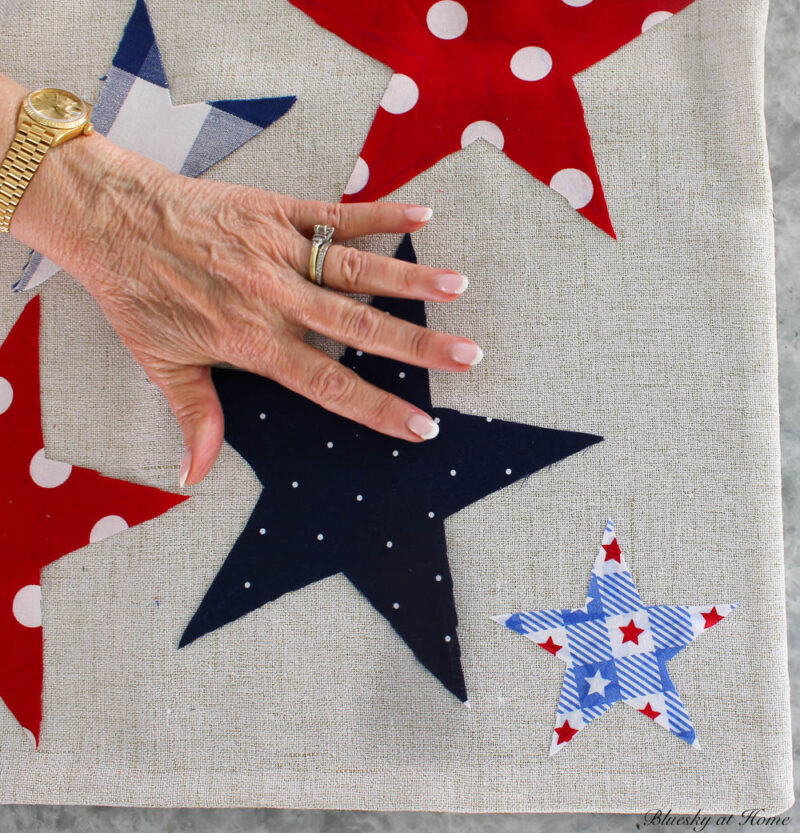
Step 7 – Carefully turn over the star and place it on the pillow. Smooth down the fabric on the pillow cover. Repeat until all your stars have been placed and glued on the pillow cover.
This glue goes on white but dries clear. This glue advises to let it sit 4 – 6 hours. I just let it sit overnight.
NOTE: Revision – later, I discovered that the glue would work better if it were placed about 1/4 inch from the edge of the fabric. I’ll explain below.
The pillows are basically finished at this point. But I wanted a bit more color and style.
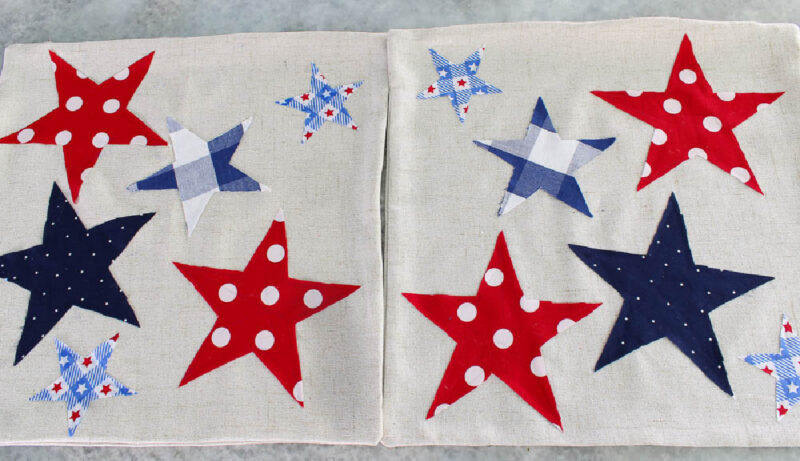
At this point, I had spent less than one hour on the pillow project. Making these patriotic pillows was such an easy DIY project.
Embellish the Stars
This is where the embroidery thread comes in. I had plenty of white embroidery thread and a little bit of red in my sewing stash. I decided to add it to the stars for two reasons:
- extra reinforcement for the stars
- more contrast and color on the pillows
Using a large embroidery needle with a sharp point, sew about 1/8 inch from the edge of the star in a running straight stitch. I made my stitches about 1/8 – 1/4 inches long.
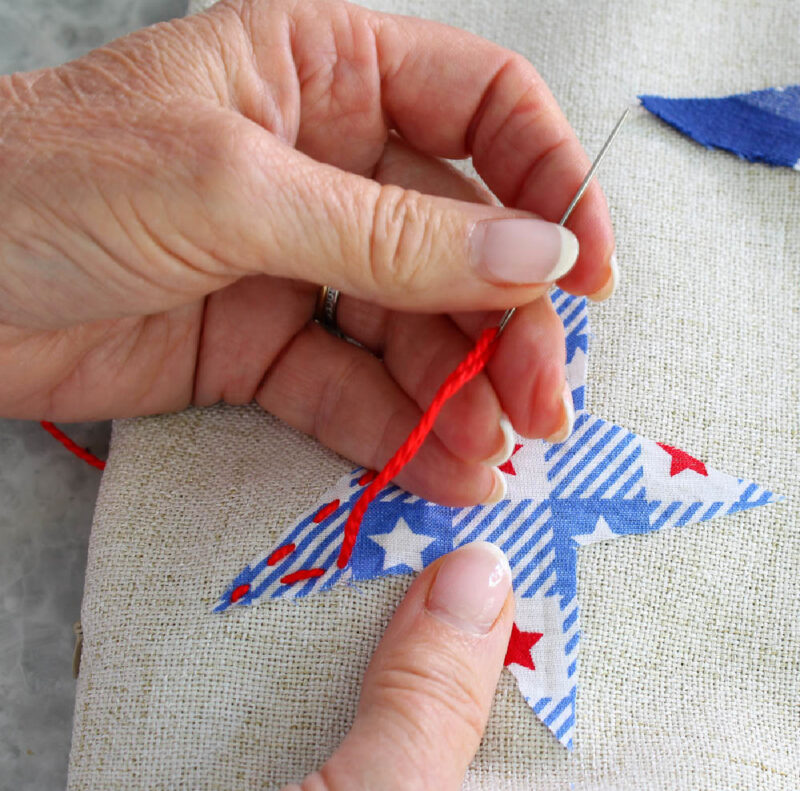
For the smallest stars in the red, white, and blue color pattern, I used red embroidery thread. Then I discovered that was all I had, so I switched to white for all the other stars.
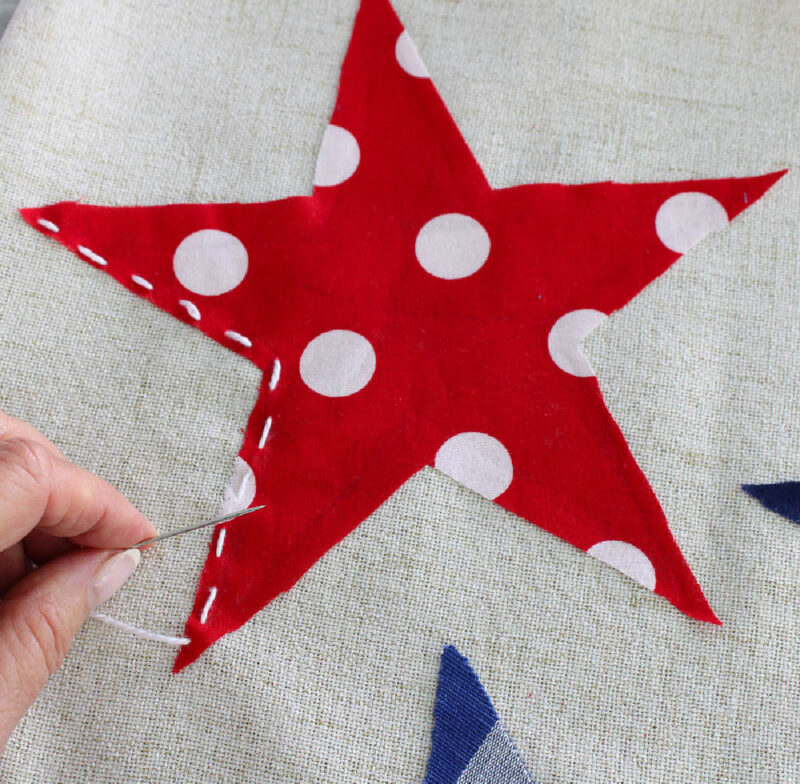
NOTE: Here is where the revision that I mentioned above comes in. When I began to sew the embroidery thread around the edge of the star, there was glue in several places right where I wanted my needle to go through the fabric. It was doable, but it made it harder to get the needle through. Just be aware that there could be some resistance, and place the glue just a little farther from the edge of the fabric.
Just FYI, sewing the embroidery thread onto the stars took the longest time of the whole project – about 2 hours. I watched two episodes of Call the Midwife, Season 14. Not a bad way to spend an afternoon.
Final Step for the Patriotic Pillows
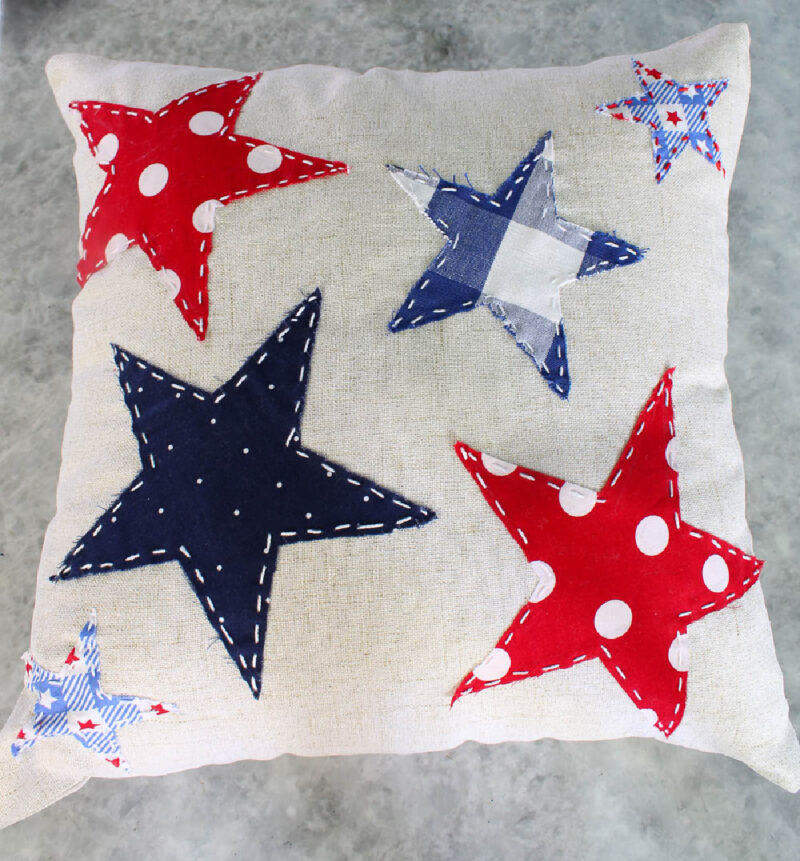
Now all you have to do is insert the pillow forms into your pillows. Make sure that the pillow inserts are evenly distributed inside the pillow and pushed into the four corners. Give them a few good whacks, if need be.
Where to Use Your Patriotic Pillows
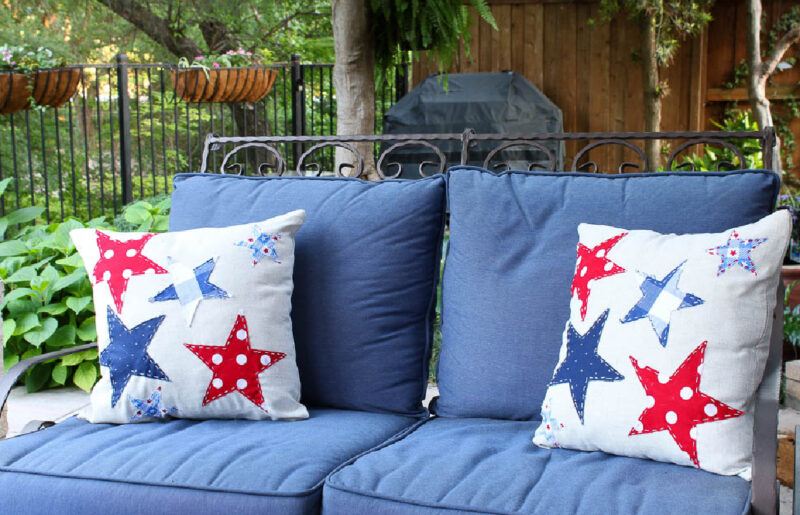
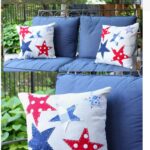
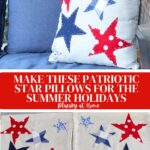
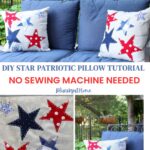
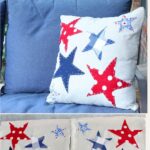
I knew before I started this project that my patriotic pillows would look great on the blue loveseat on our patio. I was not disappointed.
The white background of the pillow pops against the blue loveseat.
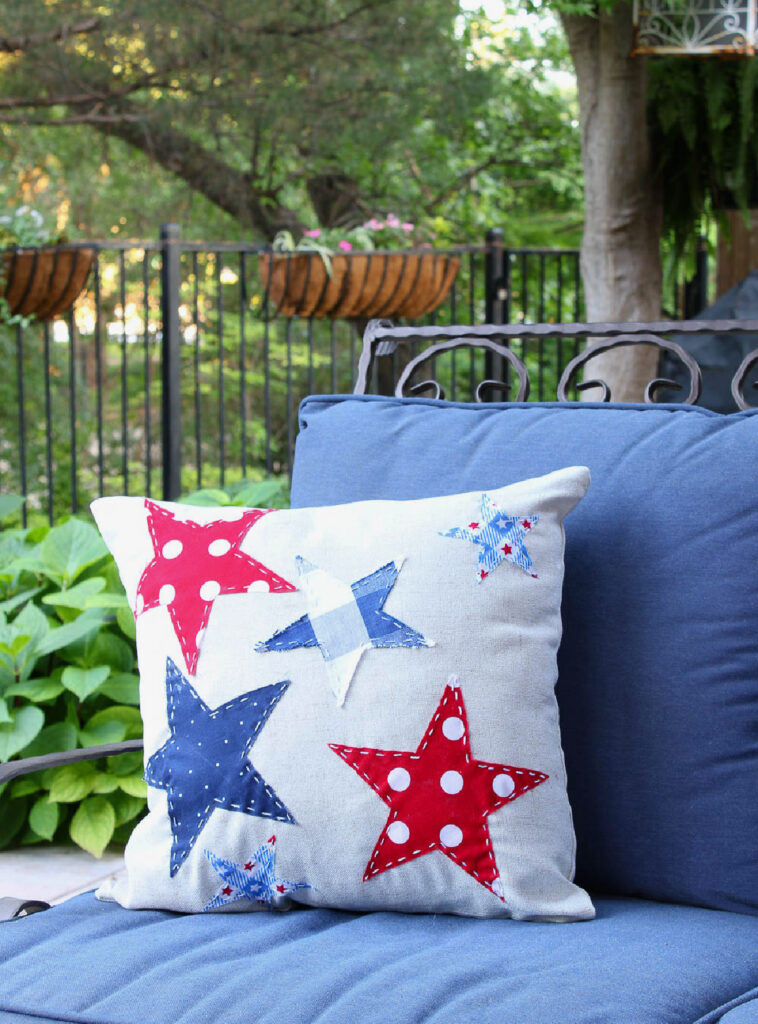
I love the bright, happy vibe of the red fabric with the white polka dots. The blue fabric with the small dots is cute, and the blue gingham fabric adds a traditional pattern. The light blue and white fabric with little red stars is a nice contrast to the more solid patterns.
What do you think?

Answers to Your Questions
To make patriotic star pillows, you will need a plain pillow cover, fabric in your choice of red, white, and blue colors and patterns, star templates in your desired sizes, fabric scissors, straight pins, and a needle and thread for hand stitching. A fabric marker or chalk pencil for tracing your star shapes is also helpful.
No sewing machine is needed! These patriotic star pillows require only a little hand stitching, making them a great project for beginners or anyone who doesn’t own a sewing machine.
That’s entirely up to you! For my pillows, I used six stars per pillow – three 8-inch stars, one 6-inch star, and two 4-inch stars. Varying the sizes creates visual interest and a more dynamic design. You can use more or fewer stars depending on the size of your pillow and the look you want to achieve.
Cotton quilting fabric is an excellent choice because it’s easy to cut, holds its shape well, and comes in a wide variety of patriotic prints and solids. Fat quarters from your local craft or fabric store are a budget-friendly way to get several coordinating fabrics without buying a full yard of each.
A mix of sizes works best for a visually appealing design. Using a combination of large, medium, and small stars creates depth and keeps the pillow from looking flat or repetitive. Start with your largest star as the anchor and build your arrangement around it.
You have a couple of options. You can cut your stars with pinking shears to minimize fraying, apply a thin line of fabric glue or fray-prevention product around the edges before stitching, or fold and press a small seam allowance under before hand stitching the star to the pillow cover.
Absolutely! Because the design is based on stars rather than specific holiday imagery, these patriotic pillows work beautifully for Memorial Day, the 4th of July, Flag Day, or any summer occasion where you want to celebrate the USA.
Here are some other DIY pillow projects I know you’ll like.
- No-Sew Pillows with Dishtowels
- How to Make a Monogram Pillow from a Dishtowel
- Christmas Pillow from a Dishtowel
If you want to make patriotic pillows for Memorial Day or Fourth of July decor, please PIN this little pillow project.
See this Pinterest Board, Patriotic Holiday Ideas, for more ideas. Please follow me on Pinterest, too, for lots of great inspiration.


Carol, sometimes it is the simple projects that really stand out… this is so much fun!
Thank you for sharing your DIY project at Create, Bake, Grow & Gather this week. I’m delighted to be featuring your DIT Patriotic Pillow at the party today and pinning too.
That is so true! Thanks for your comment.
They are so sweet! Thanks for joining in on Home Matters Linky Party! I will be featuring your post this week! #HomeMattersParty xx
Carol,
I love your patriotic pillows. I pinned them to make. Your tablescapes are so lovely. Congratulations, you are being featured on TFT. I hope you stop by. https://www.eclecticredbarn.com/2024/05/memorial-day-ideas-on-tft.html
Hugs,
Bev
Really cute pillows!
Thank you, Sherry. It was a fun project and so easy.
Love that you used a stencil as your star template, Carol! We will be featuring you starting Wednesday at the Creative Crafts Linky Party! Pinned and shared!
Creatively, Beth
This patriotic pillow is adorable, Carol… and your tutorial is great! Thanks for sharing at Tuesday Turn About. I’m happy to be featuring your post at this week’s party! Pinned!
Very pretty pillows with a patriotic theme Carol. I love how easy they are to make. Thanks for sharing at Love Your Creativity. I am happy to feature your diy patriotic pillow s at Love Your Creativity. Happy Memorial Day.
Thanks for sharing with us at the Senior Salon Pit Stop link party – You’re being featured this week!
Maria @ kraftyplanner.com
I love how you hand stitched each star to the pillow case after gluing them on. The stitching gives the pillows such a lovely touch. Thanks for a great tutorial!
These pillows are adorable and so festive! Thank you for sharing them with us on Farmhouse Friday. I’m featuring them tomorrow! Happy Memorial Day! pinned
What darling pillows! I love the step-by-step instructions. And if you don’t have (or don’t want to purchase) the plain pillow covers, you can easily make your own from a canvas drop cloth.
Thanks so much for joining the Grace at Home party at Imparting Grace. I’m featuring you this week!
Beautiful pillow
I love how you created these pillows. I used to do stuff like that yonks ago, but now that we have downsized dramatically, I do not have space to add anything so will just admire your work.
Thank you from your SSPS Vroom Vroom Team for sharing your links with us. Please check back weekly to see if featured on the blog post or by any of the co-hosts.
To ensure that you are properly recognized in case your entry gets featured in our TOP 5, please provide your entry numbers in the blog comments along with your Facebook Page and Instagram handles.
This will make it easier for me to tag you.
Your patriotic pillows look wonderful! I like that they’re not perfect on the edges for extra personality. Love the pattern mixtures, too!
Carol these came out great! And such a great idea to use pillow covers!
What a cute and easy pillow! I love the embroidery thread addition. Pinned!
Your pillows turned out so cute, Carol!! What a fun and festive way to decorate for the Patriotic holidays. Pinned!
These are adorable, Carol, and I love that you used pillow covers – no worries about storing lots of pillows!
Carol I absolutely LOVE these. Definitely making a few for my porch. Pinned! Thanks so much for sharing!
Carol, this pillow is so cute! Thanks for sharing! I might just have to make a few of these! We are Texan’s at heart as we spend 6 months of winter on SPI and absolutely love it. We always have a 4th of July barbeque at our place with all our friends from here that winter in Texas. Over the years I have bought all the buntings, flags, table service, etc. We love celebrating this holiday with our American friends. It’s always a fun day!
Carol, your patriotic pillow turned out so cute and it looks fabulous on your patio furniture! Blessings, Cecilia @My Thrift Store Addiction
Carol, this is such a great way to get into the patriotic spirit! Your pillows look perfect on your loveseat! They certainly enhance your outdoor living space! It all looks quite lovely!
So cute Carol!! I love the different patterned stars and the way you stitched them ready added a special touch and makes them pop! I’ve never used fabric glue, sounds like great stuff, thank you~ this is a great Summer craft!
a super cute pillow Carol. I love it. Pinned to make one myself. Thanks for sharing.
Great idea to save time by using the pillow cases and also a great way to use scraps. Those handmade embroidery touches really make these pillows special! Great tip about the glue; that’s something I’ll definitely keep in mind.