How to Make a DIY Topiary for a Spring Vignette
Topiaries are where nature meets artistry to bring a touch of elegance and whimsy into your home decor. Can you make a topiary? Yes! Crafting DIY topiary trees breathes new life into living spaces for any season. Watch as I show you how to make a topiary for a spring vignette.
By opting for using faux greenery, this diy topiary is a much better than using real plants without spending much money.
Making this DIY topiary is a great way to introduce spring decor into your home without the high price tag or a professional green thumb, just a little bit of creativity and these easily sourced materials.

What are Topiaries?
Topiaries come from the Latin word “topiarius,” meaning gardener. Can you believe that they have a rich history dating back to ancient Rome?
Originally, these sculpted plants were a symbol of wealth and luxury, adorning the lavish gardens of emperors and nobles.
In our modern world, we don’t have to be a rich Roman emperor to have topiaries in our home decor!
Bottom line, a topiary is a living sculpture created by pruning and training plants into geometric or whimsical shapes. (Think Edward Scissorhands!)
We may no longer make classic spirals or playful animal forms for our topiaries. Today’s topiaries are more simple than in past years.
But we can still use the sense of topiary for endless creativity, adding a sense of charm and personality to any space.
Topiaries have transcended their aristocratic origins and have become a valued accessory in modern home decor.
Their versatility knows no bounds, offering many possibilities to enhance your interior design. Whether you’re aiming for a touch of sophistication or a dash of whimsy, there’s a topiary to suit every style and space.
Where to Use Topiaries?
Topiaries are so adaptable to any space in your home. They add color, a sense of organic style, and an interesting focal point.
Here are some inspiring places to use topiaries into your home decor:
- Entryway: Make a striking first impression by placing a pair of tall topiaries on your entry table. Their sculptural forms will welcome guests with elegance and grace.
- Living Room: Add a touch of greenery to your living space by placing a small topiary on a coffee table or bookshelf. This adds an elegant yet simple charm to your living room. It’ll infuse the room with life and charm, serving as a conversation starter and focal point. Placing a topiary at each end of a mantel balances the arrangement and adds a great focal point
- Dining Room: Create an enchanting tablescape by incorporating a topiary on either end of the table. Two topiaries set on a tray become a lovely centerpiece. If you have a buffet, topiaries will add height and a focal point.
- Bedroom: Bring a sense of tranquility to your bedroom oasis with a lush topiary placed on a bedside table or dresser. Its organic form will foster a serene ambiance, perfect for unwinding after a long day.
- Kitchen Table or Island: A topiary in this area can be more casual or seasonal I’m am I expected setting.
- Bathroom: A topiary can add a touch of greenery to your bathroom’s style.
- Outdoor Spaces: Extend your decor beyond the confines of your home by incorporating topiaries into your outdoor spaces. Line your patio or balcony with potted topiaries to create a verdant sanctuary.
Whether indoors or out, topiaries are sure to infuse your home with charm, character, and a touch of botanical beauty, whether fresh or faux. Let’s use these sculptures to breathe life into your decor this spring!
Why Make a DIY Topiary?
Traditionally, topiaries were made with fresh foliage. Today, it’s easier and more budget-friendly to make them yourself using faux greenery.
- Cost-Effectiveness: DIY topiaries are an inexpensive way to add seasonal decor.
- Create Your Own Style: Whether your style is dressy, casual, farmhouse or classic, a handmade topiary is adaptable to your personal preference. The first topiary I made was very traditional, colorful and formal. This new topiary project is much more casual and rustic.

- Simple Materials: Utilizing items like floral foam, faux greenery, and planters makes this an accessible project. The use of faux greenery stands central to this DIY project, ensuring both ease and longevity compared to real plants. This alternative keeps maintenance at bay and allows our creations to last through the coming months and years.
- Versatility: Homemade topiaries enhance any part of your home, from the dining room table to the kitchen island.
- Storage: Storing handmade topiaries is easy so that you can reuse them for years of enjoyment. I plan to place my topiaries in plastic bags when not in use.
These easy projects, involving different types of containers and a sprinkle of creativity, guarantee a fresh look for the upcoming spring season.
I was able to complete my own topiaries with several easy steps, relying on simple materials. Most of them I had on hand.
The entire process was an engaging fun project, culminating in decor that looked like the real deal.
Materials Needed for Your DIY Topiary
Begin your topiary project by gathering your materials. Like me, you may have many of these supplies on hand. If not, you will find them at your local dollar store, thrift store, or online. Many of the essential items are at a minimal cost.
I was lucky because the only supplies I had to buy were the faux boxwood balls and the dowel rod.
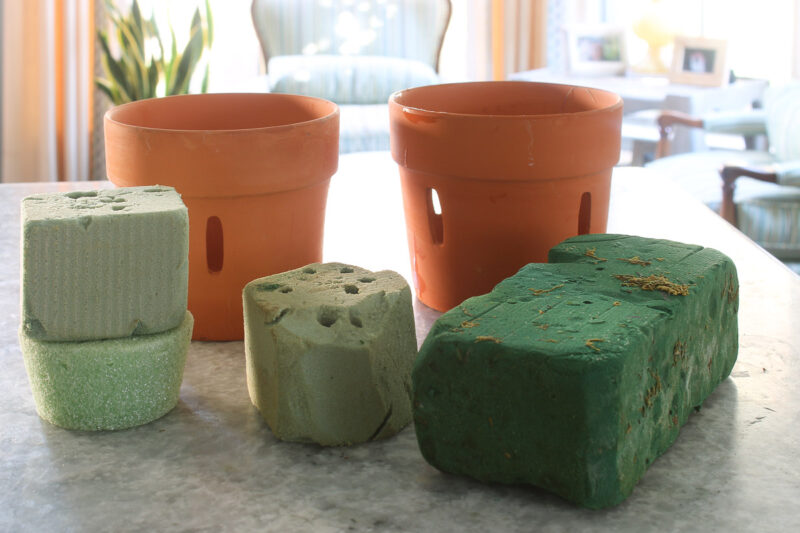
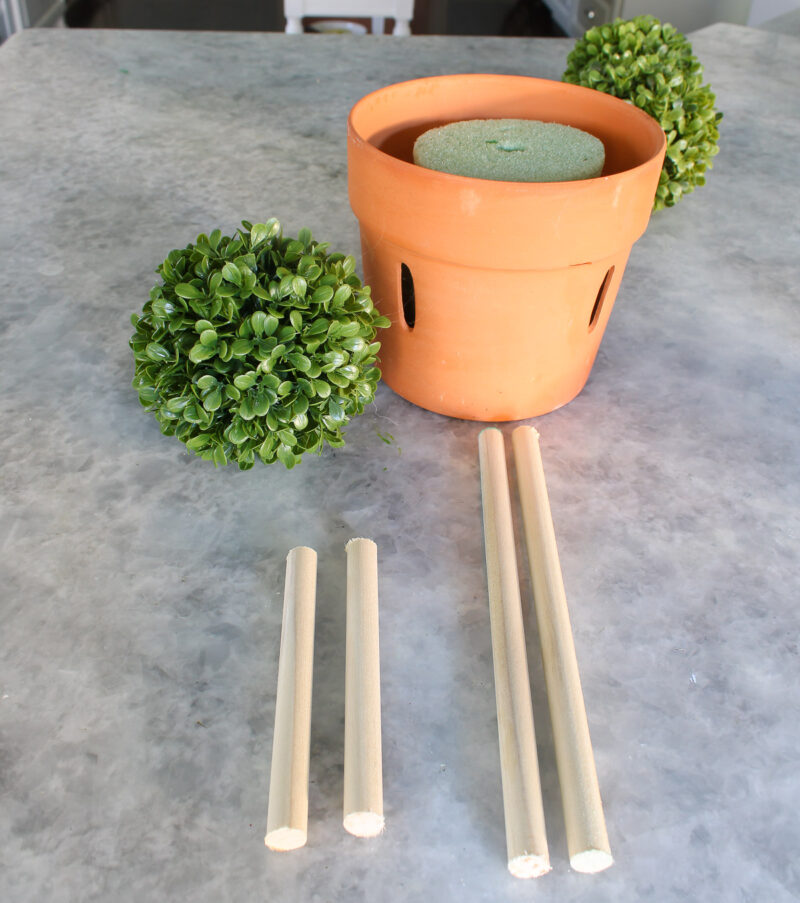
- Floral foam creates a stable base for the topiaries. I used leftover pieces of floral foam.
- A planter or container serves as the charming foundation. Any flower pot could suffice. I had several of these terra cotta pots in the garage.
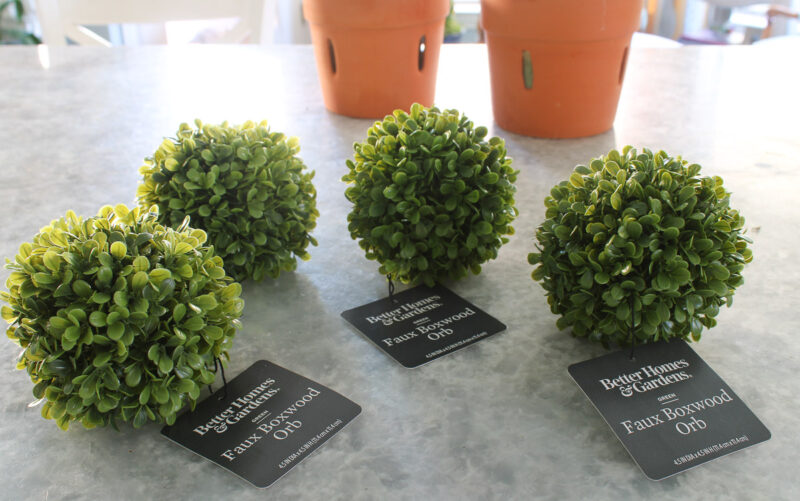
- Boxwood faux balls act as the inspiration for the topiary. I found these on the Walmart website for an unbelievable price of $3.49 each. They were about 4 inches in diameter. I had a specific style in mind so I ordered four boxwood balls. I actually picked them up that afternoon and saved the shipping price.
- A dowel rod becomes the stem of our faux topiary. I made a quick trip to Lowe’s after I picked up the boxwood balls. I bought two 4-foot long 1/2-inch dowels, but only needed 1/2 of one dowel.
- Hand saw and miter box to cut the dowel rod into four pieces.
- Hot glue gun ensures everything stays securely assembled.
- Super moss for covering the stem base.
Optional Additions:
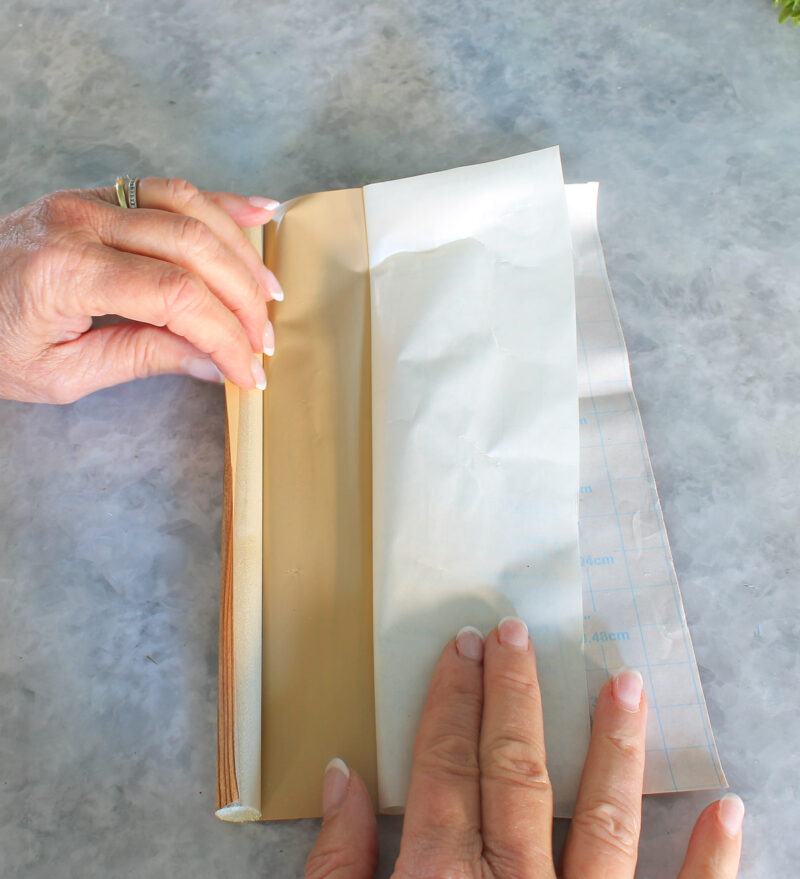
- In addition, I had a piece of vinyl in a wood pattern that I bought to use as a photo backdrop. It would be an easy way to cover the dowel rod and give it a natural finish. I thought that approach would be easier than painting the dowel.
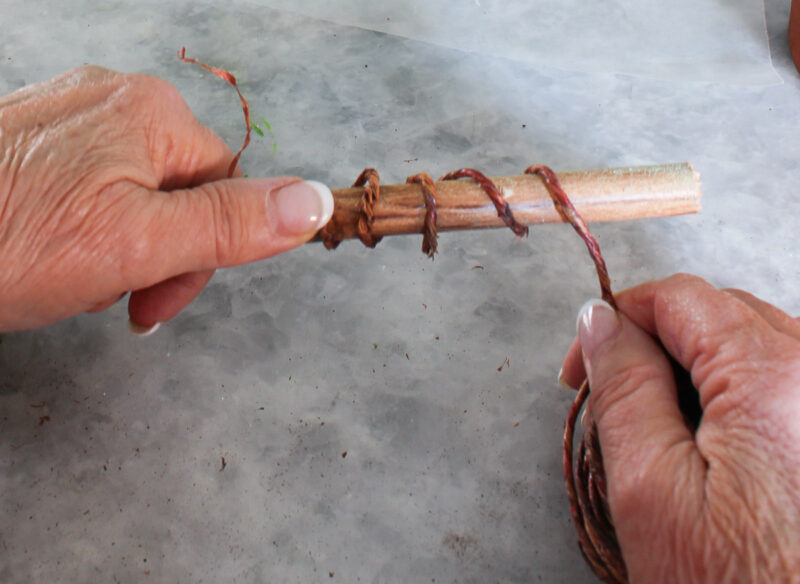
- Another option that I used was wrapping the vinyl-covered dowel rods in some wired jute twine – another supply I had on hand.
- Ribbon for tying around the stems.
- Items to add to the topiary spring vignette.
After I assembled all my supplies, I decided to look at other topiary projects. I couldn’t believe how many different ways people have found to make topiaries. My approach is different from any others I saw. The more the merrier!
Assembling the Topiary Structure
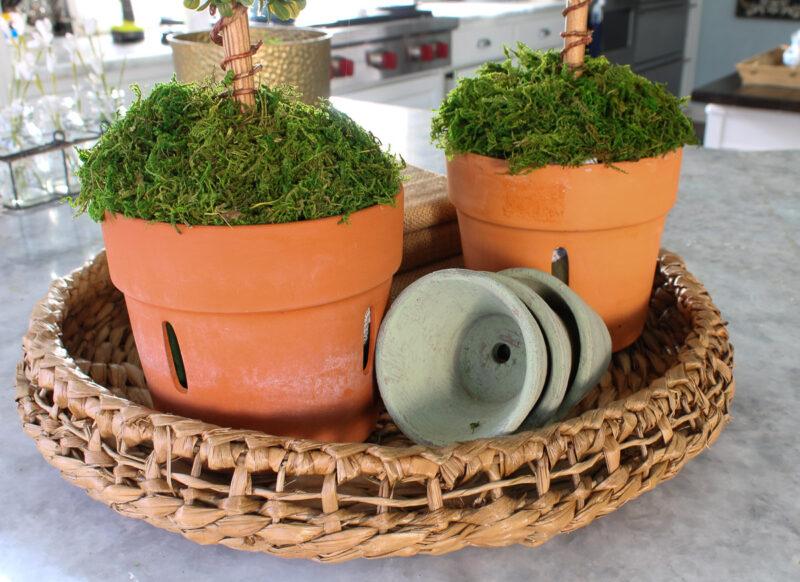
Step 1 – Select your planter. Fortunately, I have several terra cotta pots in the garage. All were in good shape, and a couple had never been used.
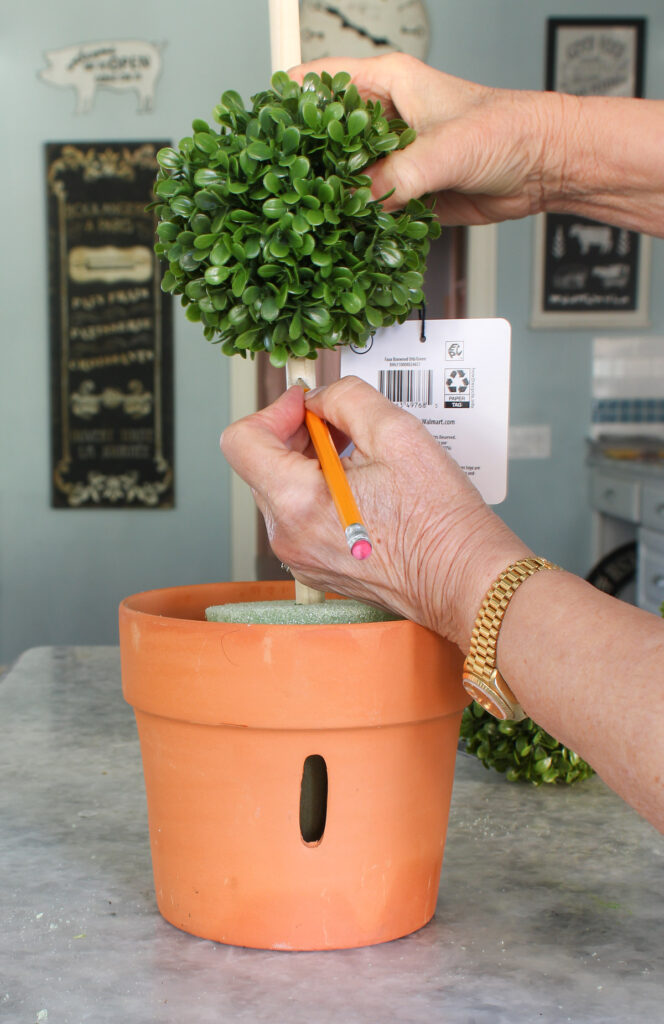
Step 2 – Place florist foam inside the clay. Fill it tightly and to the rim of the pot, if possible.

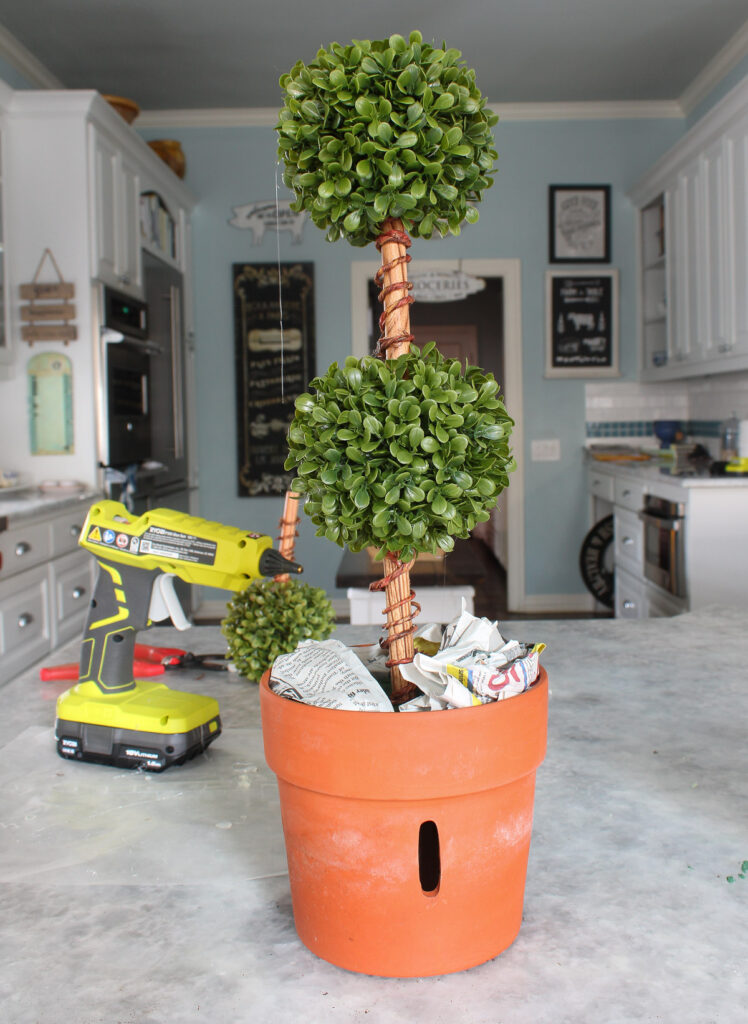
For this project, I would use two boxwood balls for each topiary. To do that, I would cut my dowel rod into four pieces.
Step 3 – Measure where you want the height of the bottom piece of the dowel rod to be. I placed the dowel rod in the florist foam, held a boxwood ball in place, and marked the spot with a pencil. This one was about 8 1/2 inches.
Step 4 – Using a hand saw and miter box, cut two pieces of dowel rod.
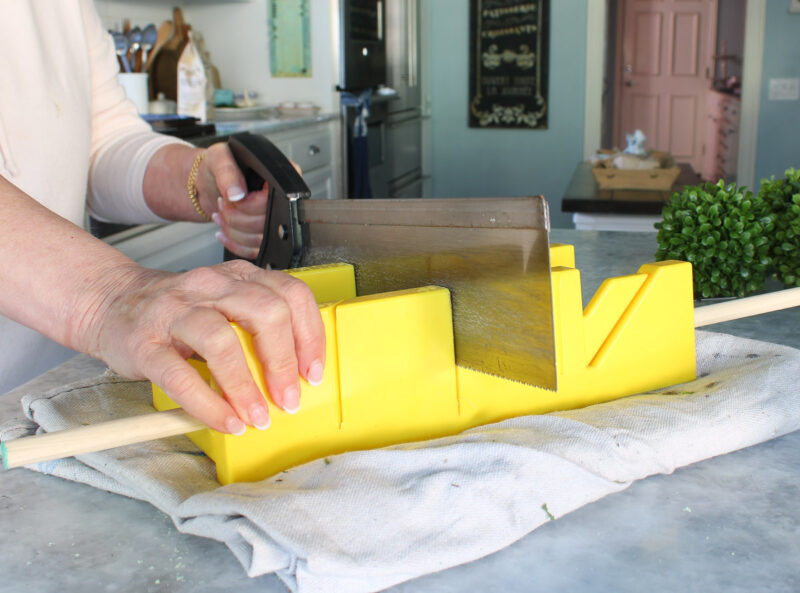
Step 5 – Determine how much space you want between the bottom and top boxwood balls. I wanted about 4 inches, but I added an inch to allow for the part that would be glued to the balls. I cut two pieces of dowels 5 inches long.
Step 6 – Cover the dowel rods. You can paint the dowel rods. I chose to wrap a piece of vinyl in a wood pattern around the dowel rods.


Step 7 – I added the embellishment of wired jute twine around each piece of dowel for an extra level of texture. At this point, you should stuff newspaper around the florist foam to make a tight fit.

Step 8 – Place the longer piece of dowel into the florist foam in the container.
Step 9 – Heat your glue gun. Add a generous dollop of hot glue to an opening in a boxwood ball. Add another dap of glue to the end of the dowel rod.
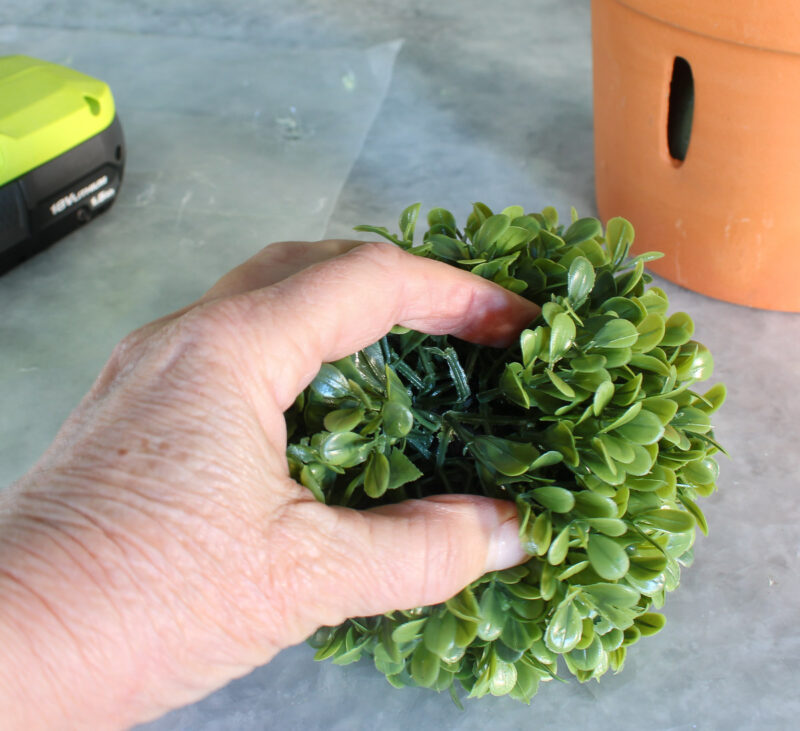

Step 10 – Place the boxwood ball on the dowel and press down firmly until the glue “sticks” and the ball is secure.

Step 11 – Glue the smaller piece of dowel to the bottom of the second boxwood ball in the same manner as the first boxwood ball. Hold the dowel rod until firmly secure. Repeat with the second topiary.
Step 12 – Glue the second dowel rod to the top of the first boxwood ball and hold firmly until secure.

Your topiaries are basically done.
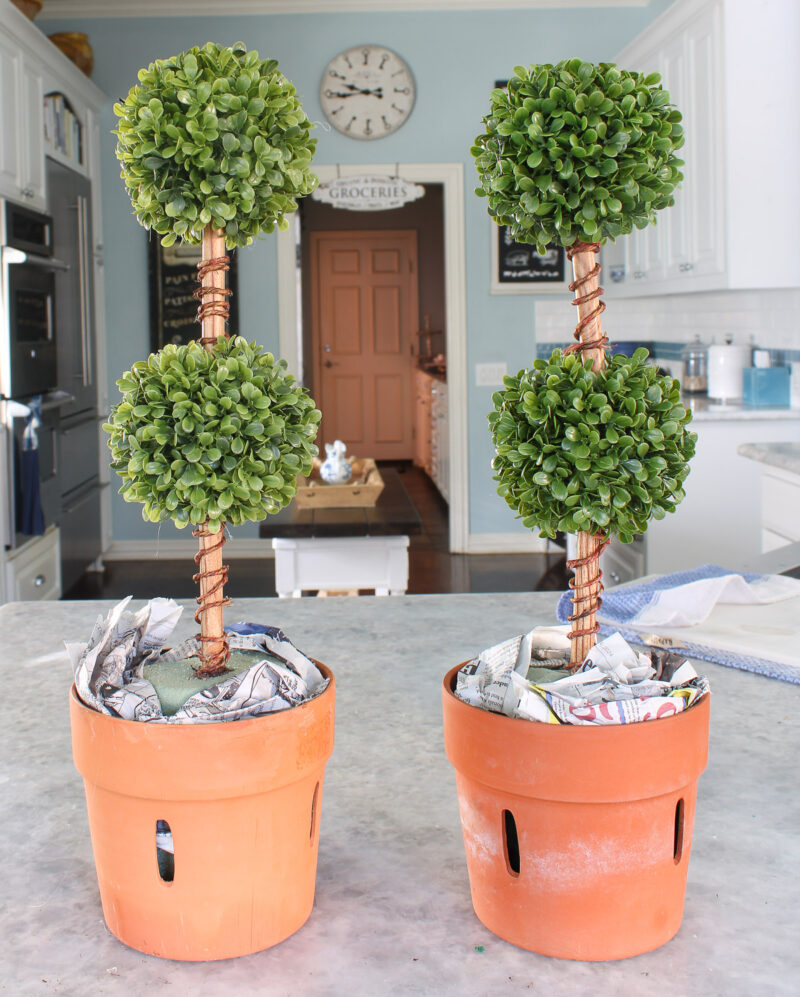
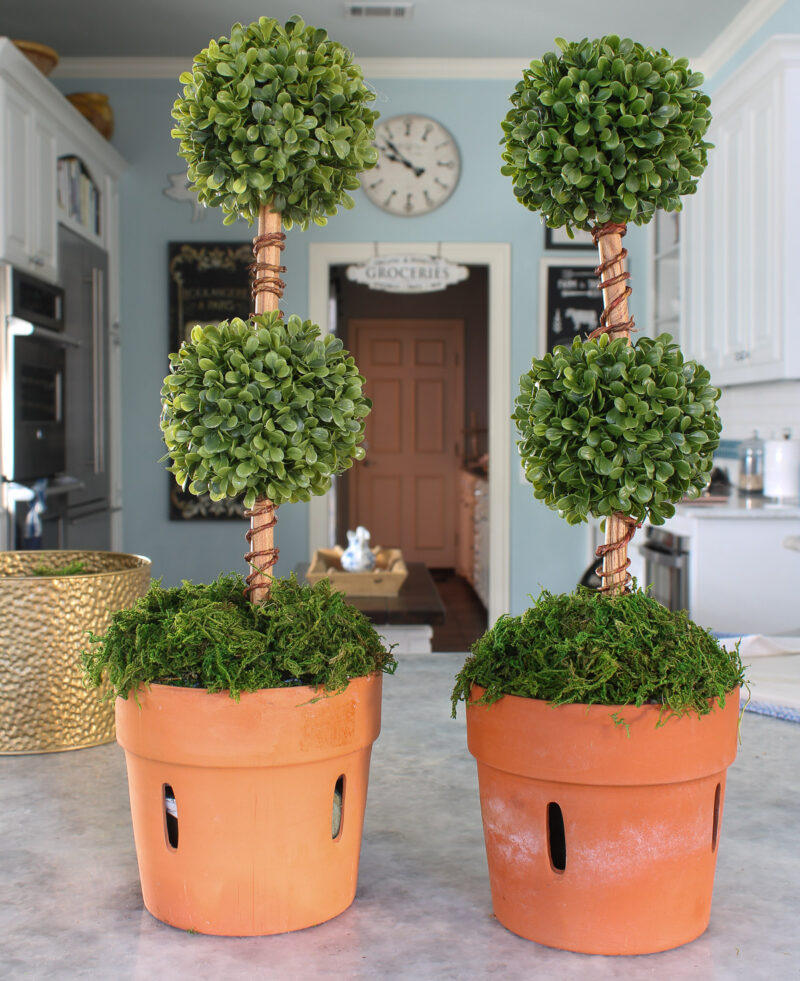
Step 13 – Use your Super Moss to cover the newspaper filler around the topiary.

You’ve completed making your DIY topiary. Now it’s time to style your spring vignette.
Designing Your Spring Vignette with a Topiary Focal Point.
There are numerous spots around the house to display these DIY topiaries that usher in the spring season.
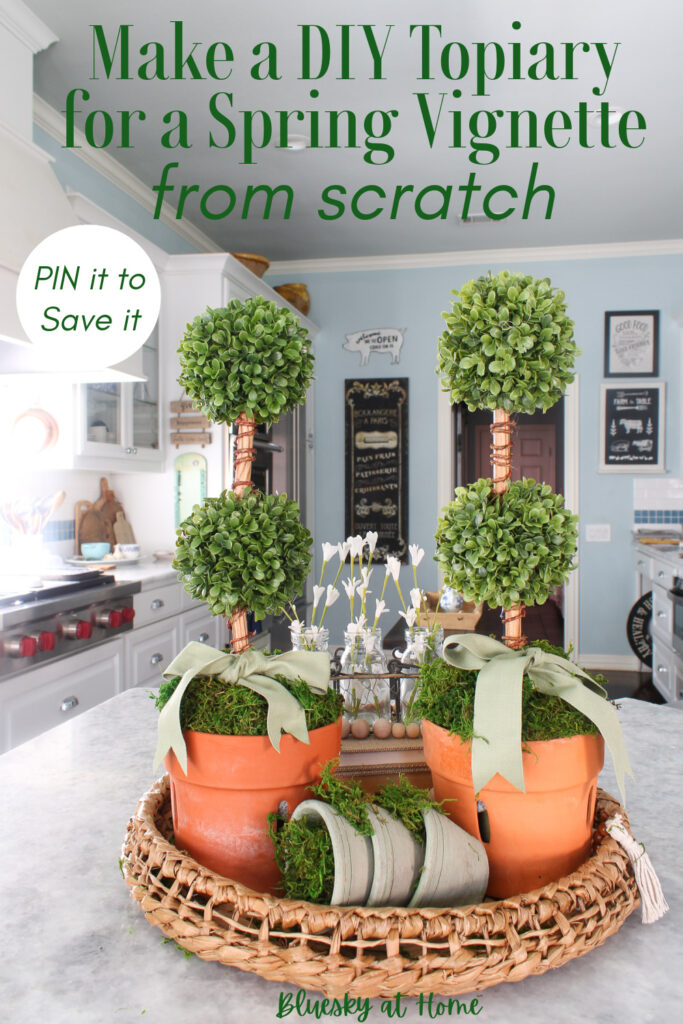
Because our kitchen, living room, and seating area are all one big room, I decided to place the spring vignette with the topiaries on the kitchen island. That way we can enjoy this eye-catching spring display from all our living spaces.
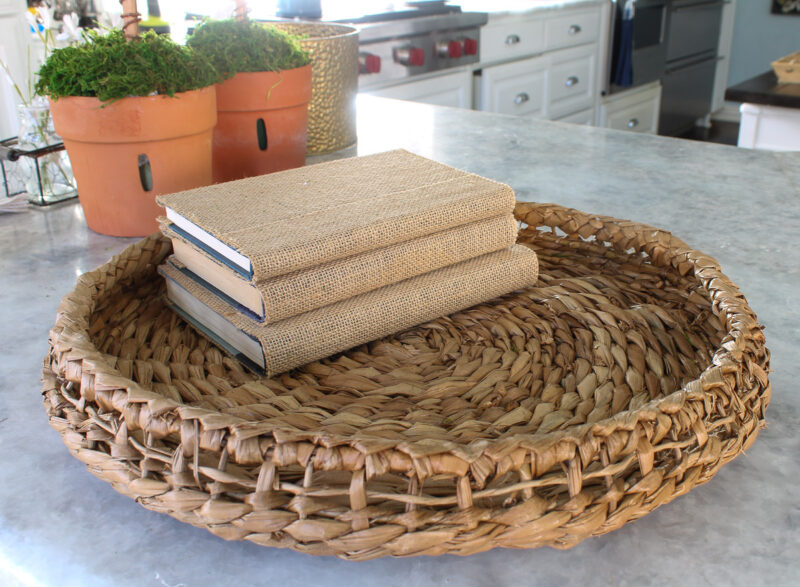
I began my spring vignette with a large round woven tray.

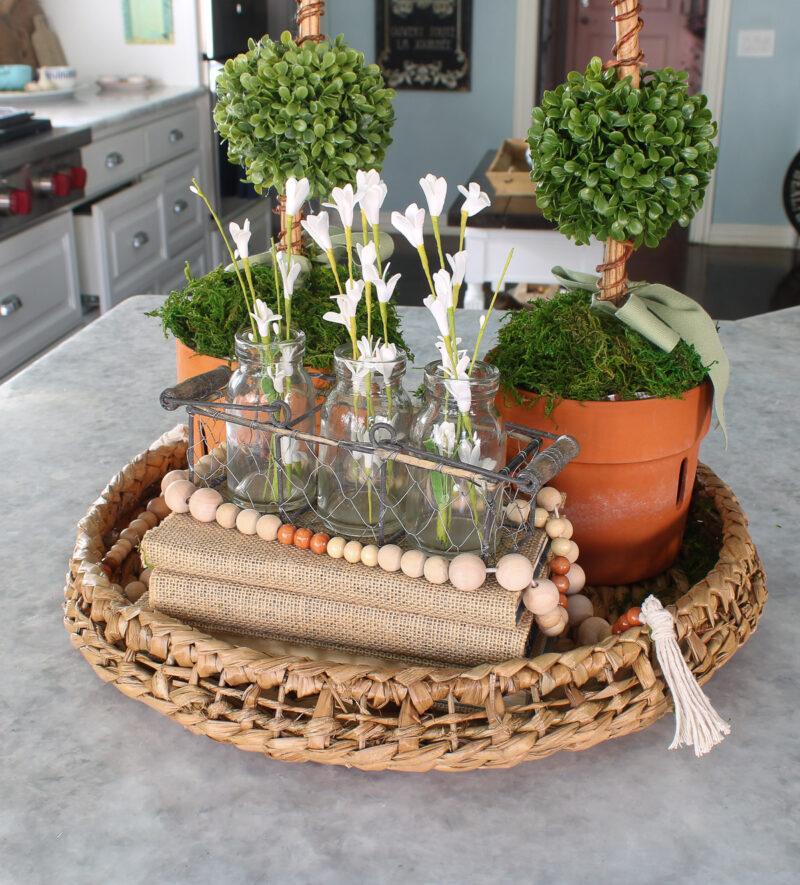
One of my favorite accessories I like to use for a casual, rustic look are the burlap-covered books that I made. The stack of three books also adds height.
Between the two topiaries, I added three small vintage clay pots from an antique mall set on their side.
On top of the book stack, I placed a cute little 3-vase set of glass and wire. I filled it with faux stems of white flowers.

I liked the simple, almost spring blooms for this time of year.
I also found in my decor stash, a beaded garland with tassels that I made a few years ago. I thought it would add a nice finishing touch to the vignette.

But wait, one more thing!
I thought a little softness was needed. How about a ribbon? I found this soft sage green cotton ribbon in my ribbon box. I have a lot of this ribbon from all the gifts when my older daughter got married. I kept every single bit of ribbon.
A little bit more Super Moss filled in the vintage clay pots with greenery.
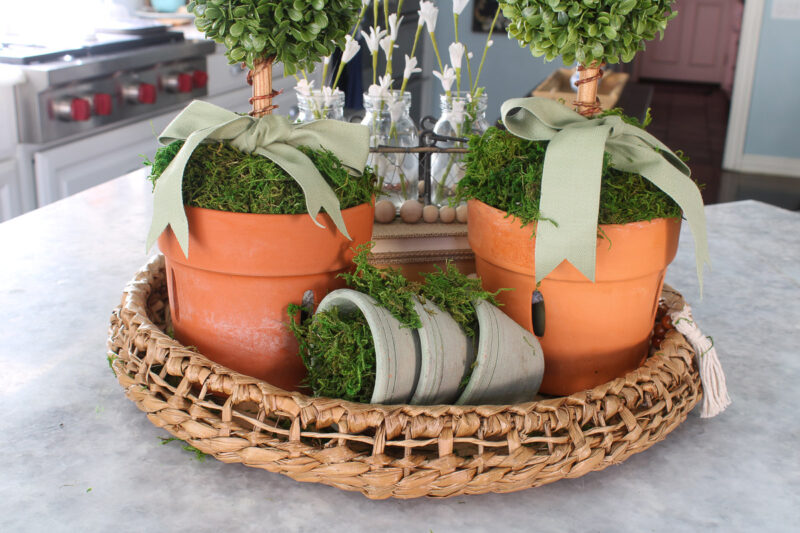
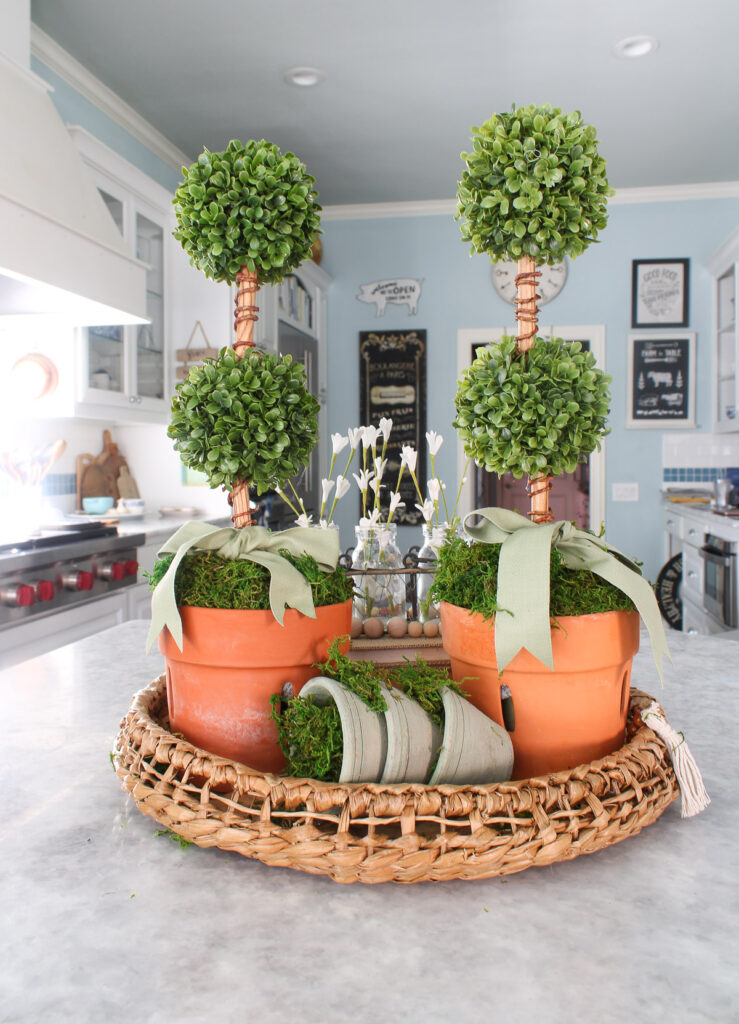
I like the “barely there” touch of spring that the bow brings to the vignette.
Those looking to add a personal touch can experiment with different ways to arrange these pretty pieces.
Whether choosing to let them stand alone or combining them with other spring decor, these topiaries will undoubtedly infuse your home with the season’s ambiance and freshness.

A Final Flourish of Spring
Creating my own topiaries added a vibrant, spring touch to my kitchen. This was a very satisfying DIY project.
This DIY topiary project attests to the fact that great ideas for home decor don’t always come with a high price tag. With these topiaries, the upcoming spring season feels closer, offering a fresh look that only spring can promise.
If you want a different type of topiary – one that it is very easy, try this pretty pink tulip topiary for Valentine’s.
Want to save this DIY topiary project? Want to use it in a spring vignette? PIN it to your favorite Pinterest Board. Check out my Spring DIY Projects Board and Spring Home Decor Ideas Board.


Super cute and easy craft for Spring! They look lovely styled onto that tray and love them with the ribbon!
Carol, I love these topiaries that you made! They look so nice. Your instructions are great! Thanks for the DIY. I am definitely going to make some.
Thanks, Mary-Ann. I love having the vignette on our kitchen island – still looks great, which is the beauty of using faux greenery!