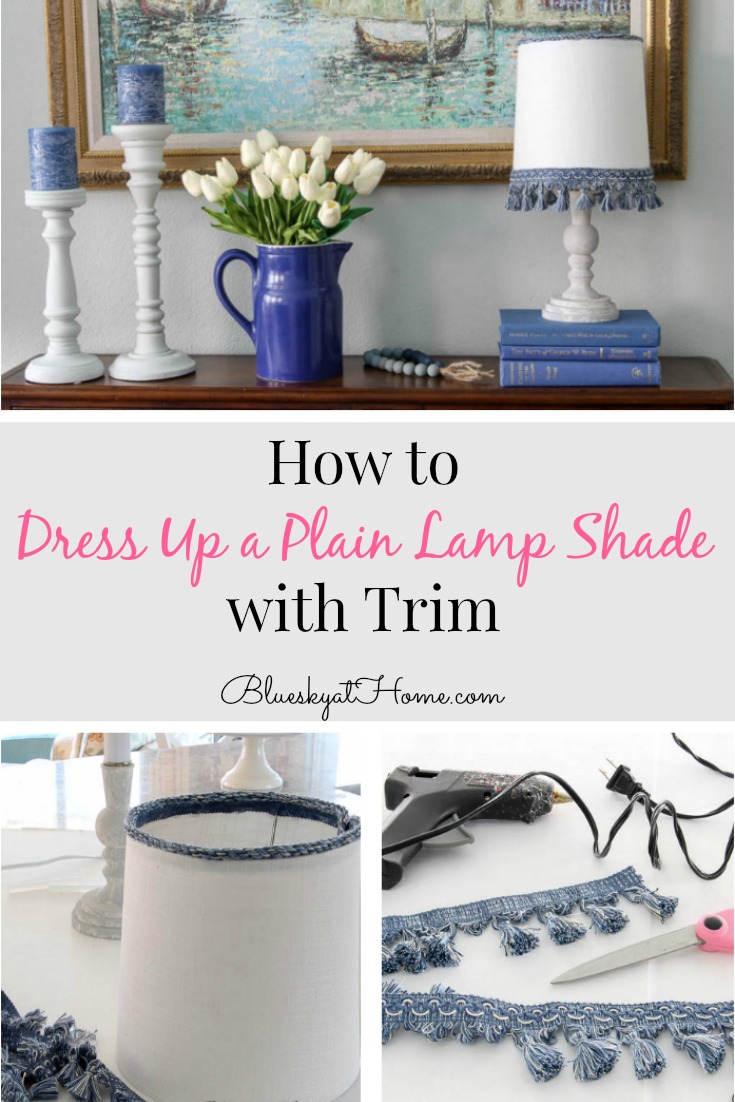
How to Dress Up a Plain Lamp Shade with Trim
I love lamps. The soft, warm glow they provide adds such wonderful ambiance to in any room. Lamps don’t just provide light, they are a design statement. One way to give a lamp extra pizazz is to dress up a plain lamp shade with trim or other embellishments. I wanted to show you a recent one I did for our blue and white winter master bedroom.
Turning on the lamps as the sun sets is a ritual I love. It signals the day is done and it’s time to wind down and relax. Walking from our entry through the living room and to our master bedroom, turning on the lamps and lighting candles is a soothing way to slow down ~ I even think it’s a stress reliever.
A lamp is definitely a major interior design accessory that is both practical and esthetic. The shape of a lamp, the material that it is made of (metal, glass, wood), the style, and the size ~ all contribute to the beauty that lamps give to a room. Just as the lamp body is important to the “fit” in a room, the lamp shade can add or distract from the overall “fit”. Lamp shades can be too big or too small or the wrong shape. They can also be just plain boring.
Once you have the right size and shape of lamp shade to fit your lamp, it’s easy to add embellishments, a garnish, if you will, to the lamp shade. It’s easy to dress up a plain lamp shade with trim to add color, pattern, texture, and interest. Here’s how you can do it with just a few supplies.

How to Dress Up a Plain Lamp Shade with Trim
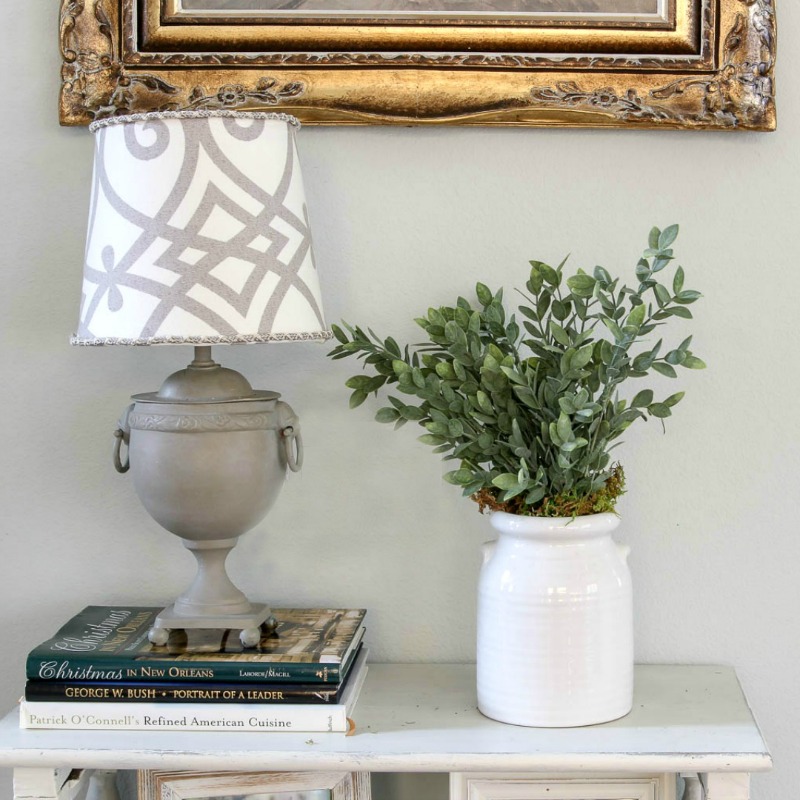
I have covered lamp shades with fabric and trim in the past, such as this accent lamp in our living room. This is a brass lamp that I had for years before painting it with a chalky grey paint. After a couple of years, I found the fabric and trim to compliment the grey color. The lamp is so much more interesting now. The fabric added pattern and design that was missing.
This lamp shade used to be on another DIY lamp that I made for our bookcase a few years ago. I have the tutorial to how I reinvented a lamp with fabric and paint at the end this post.
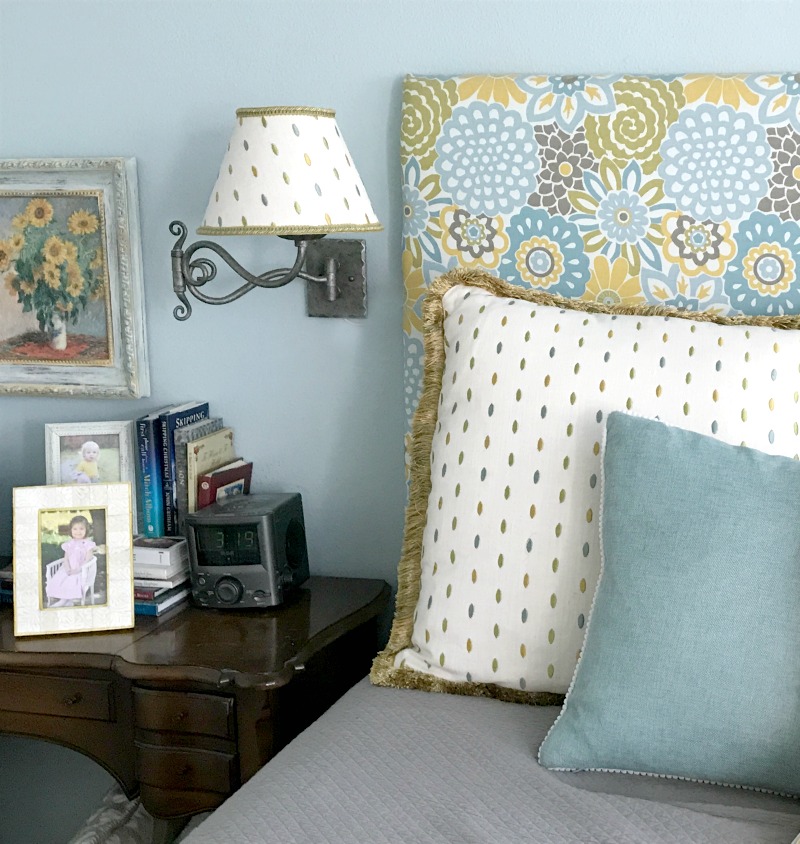
This pair of sconces were in the master bedroom of our previous home. When we moved, I decided to use them in our large guest room. The fabric was left over from the Euro pillows I made. For the lamp shades, I used ones that have an adhesive and a paper template for your fabric. I loved those lamp shades, which you could buy at Joann in several sizes and shapes. Unfortunately, they don’t carry them anymore. I’ve been looking for another resource, but haven’t found one. If you know of one, please let me know.
How to Add Trim to A Lamp Shade
For our blue and white winter master bedroom, I decided to add trim to a lamp shade that we already used in our bedroom.This is the lamp base that went with the fabric covered lamp that I just showed you. I wanted to move this particular lamp from our reading table to our console table. But I knew it needed an extra something. Trim was the answer.
Here is what it looked like before.
First, you have to have a lamp shade that balances the size and shape of the lamp base. You also want a shade that covers the “pole” and switches of your lamp. For this lamp, a simple round shade worked best. By the way, this lamp base was a garage sale purchase that I painted white and grey. I bought 2. The other one I painted and covered the shade with fabric and trim for my older granddaughter’s room. It’s really cute, but I don’t have a picture.
Supplies You Need to Embellish a Lamp Shade
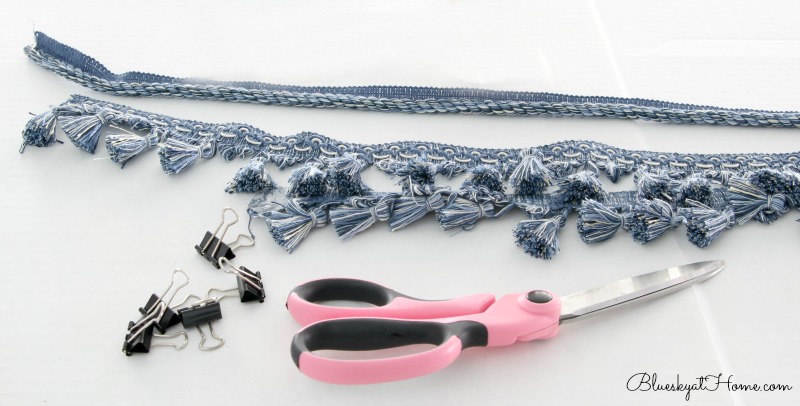
- rounded cord, flat braid, or trim with fringed tassels
- scissors
- adhesive
- clips, for holding trim, optional
Obviously, your trim should be in a color/pattern that compliments the other decor in your room. Fortunately, I found both cord and fringe in the perfect blue and white for our bedroom at Joann.
How to Determine How Much Trim you Need
Let’s go back to junior high math class. You will need the circumference of the lamp shade plus about 2 inches. To figure out the circumference, you need to know the diameter of the lamp shade, both top and bottom. My lamp shake was 7 1/2 inches on top and 8 1/2 inches on bottom.
Multiple the diameter by Pi ~ remember Pi? It’s 3.14. For the top of the shade, I multiplied 7.5 X 3.14 = 23.55 inches; that’s just about 2/3 of a yard. I bought 26 inches. For the bottom of the shade, I multiplied 8.5 X 3.14 = 26.69. I just went ahead and bought 1 yard.
The cord trim was $7.99 a yard and the tassel trim was $12.99 a yard. I had 40% off coupons, so the cord trim cost me $2.13 and the tassel trim was $5.20.
Trims can be beautiful works of design. I’ve seen trims that were $20 ~ $50+ a yard; it just depends on the quality and intricacy and where you are buying them. You have to use your judgment and your budget to help you chose.
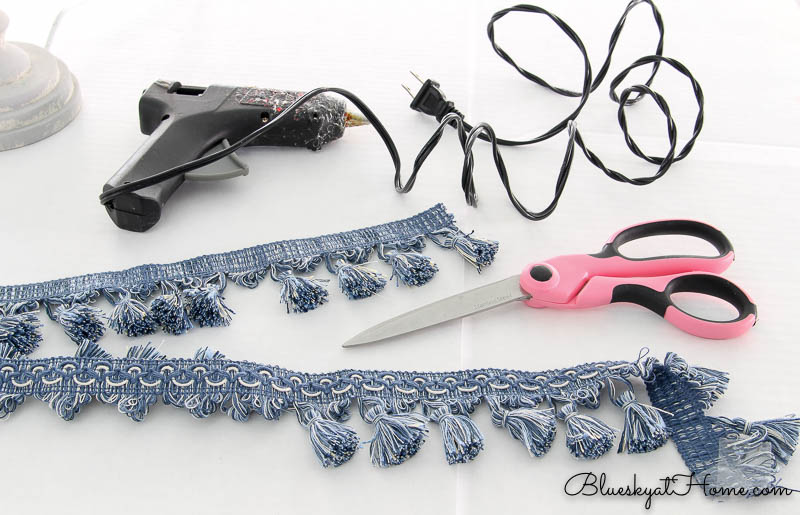
A word about adhesive. The best option I have found is fabric glue. When I left Joann, I was sure I had fabric glue at home. Well, I didn’t. I was totally out. Not wanting to return to the store (and I had to finish the post on our blue and white winter bedroom), I just used my hot glue gun. It works OK, but the fabric glue is a much better choice.
TIP: Always check your supplies before you leave home! If you’re not sure, go ahead and buy what you need.
So let’s assume that we are using fabric glue for this lamp shade project.
I always do the top of the shade first, so it can sit on the counter. Start at the back of the lamp shade where the seam is. I have found that it’s easiest to use your finger or a small sponge brush to place the glue on inside of the lamp shade in small amounts. In small sections, add the glue to the shade ~ less is best. Then press the trim to the shade. Turning the shade slowly, continuing to add a little fabric glue, then pressing the trim to the shade. When you are almost around the shade, cut off the excess, with an extra inch. Glue the end of the trim to the beginning of the trim with the edges pointing down. The shade will hide where the two ends come together.
TIP: You can use small clips (see picture above) to hold the trim to the shade, if you feel that is necessary.
Check around the rim of the shade to make sure that the trim is even and glued down. If necessary, you can add a drop or two of glue to the top outside of the shade and press the trim down to it.
Let the trim sit for at least 15 minutes to make sure the glue is dry.
Flat braid is even easier to apply because you attach it to the outside of the shade.
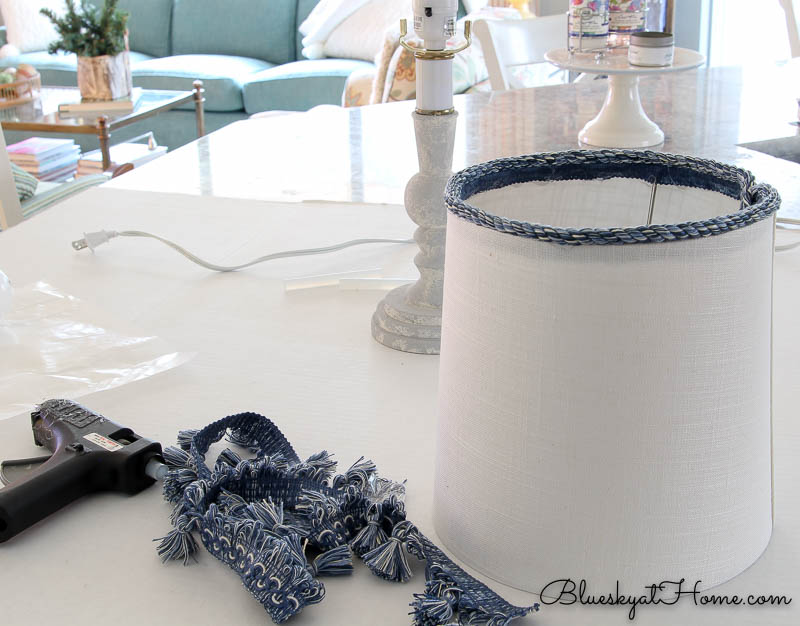
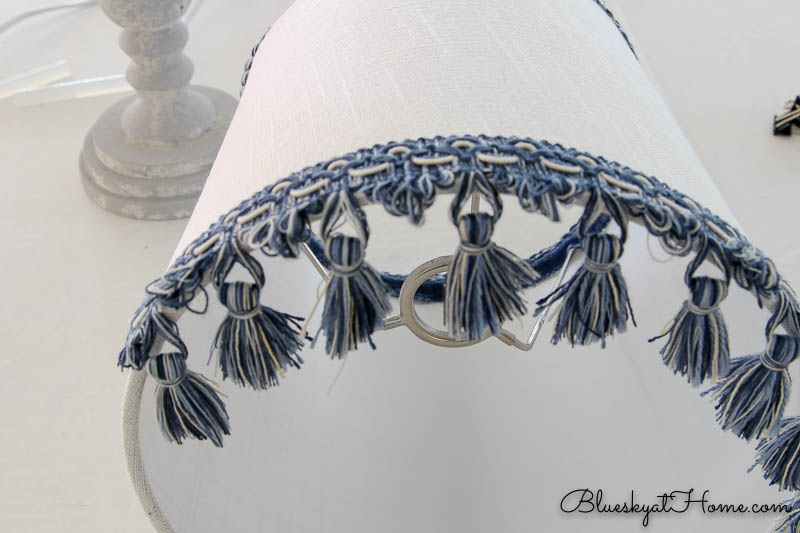
Once the trim on top is dry, you can start adding the fringe tassel at the bottom of the shade. Depending on how the trim is finished, you will either attach it on the inside or the outside of the shade. This trim had a beautiful design and was mean to show on the outside of the shade.
Again, start at the back of the shade at the seam. Add the glue to the shade in small sections, press down on the tassel trim, aligning it evenly with the bottom of the shade. Continue around the shade and cut off the excess to meet the other end of the tassel trim. Allow to dry.
Once your tassel trim is dry, attach the shade to your decor.
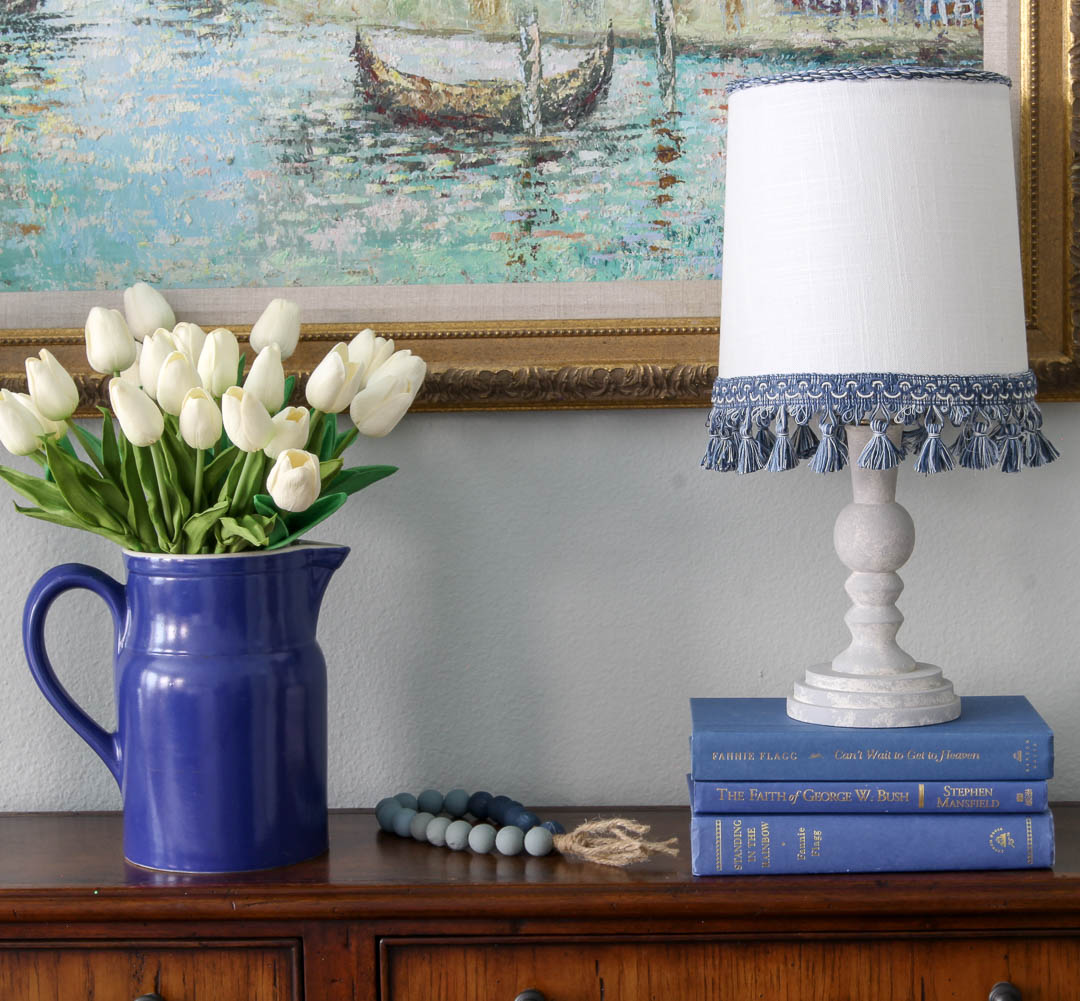
The embellished lamp shade is so much more attractive than a plain lamp shade. As much as I love lamp shades with trim, I don’t think you should over do it. Unless you have a matching pair, I think just one in a room is enough. You want your lamp shade to be special and stand out.
Here’s a more detailed tutorial (one of my very first that I have updated) about how to reinvent a lamp with paint and fabric.
So you don’t forget where you saw this idea and how to dress up a plain lamp shade, be sure to PIN it.

Hmmm…my lampshades are currently decorated with dust – trim is so much prettier! I do love beautiful trim and it really does add so much to whatever it goes on…window treatments, pillows, upholstery, or lampshades like yours!
Great tips, Carol, for adding personal touches to a lampshade! I have one in our Guest Bedroom that I am going to add some trim to.
Always enjoy your posts! Have a great week!
You are so sweet. Send me a picture when you get it done. I’d love to see it.