How to Create Whimsical Easter Centerpiece
How do you create a pretty table centerpiece that you can enjoy now until Easter? One that requires no special elements, but ones you already have on hand. Here is how to create a whimsical Easter centerpiece with a nostalgic touch.
The great think about a spring centerpiece is that it will last from now through Easter. And it takes so little time to style it – you can put it together in less than an hour.
This arrangement is also versatile. You can use this Easter centerpiece on your dining room table, kitchen table, coffee table, kitchen counter, or entry.
You can use a variety of items you already have – no need to go shopping – unless you want to. You can use things that you’ve made.
And when it comes to flowers, use faux flowers now and then switch to fresh flowers as we get closer to Easter.

Spring Pinterest Challenge – Our Inspiration
The fourth Tuesday of the month is a special gathering of home decor and DIY bloggers. It’s time for our Pinterest Challenge. A post found on Pinterest inspires bloggers – and you – to create a similar arrangement using your imagination, creativity, and resources.
Our hostess is Cindy of Country Road 407, who finds and chooses our inspiration.
Welcome to Bluesky at Home if you are coming over from Michelle of Thistle Key Lane.
The inspiration for this spring Pinterest Challenge is from Emily at Le Cultivateur. She has created a whimsical and, may I say, nostalgic Easter centerpiece.

This Easter centerpiece has a rustic, whimsical, romantic, and nostalgic feel. The colors are soft, neutral shades of whites, greys, soft pink and green, and metallic silver.
The centerpiece elements sit on a vintage-style white wood tray. Then the centerpiece is displayed on a lovely round rustic table. IT’s a beautiful way to set the tone for spring and Easter.

Let’s evaluate the elements that are in this centerpiece:
- rustic white tray
- metallic bunny
- nests with moss
- woven basket
- spring flowers
- Easter plates
- Easter eggs
- glass cloche
- vintage salt and pepper shakers
Fortunately, I had all these elements. They may not be exact replicas, but they will work just fine.
This post contains affiliate links to products used to create this project. If you should order any item from this site, I may receive compensation, but you do not pay a penny more. Your purchase is greatly appreciated as it helps support the continued publication of this site.
My Easter Centerpiece Elements
Before I share my ingredients for my centerpiece, let me make one change in the centerpiece. Emily’s centerpiece uses natural elements with a neutral color palette.
I love what Emilly created, but it’s not my style. I like to use more color in my centerpieces, vignettes, and accessories. I would also use natural elements, but my color palette would have a more colorful palette.
Also, Emily set her centerpiece on a bare table. My new pink check tablecloth was still on the table which would be a better foundation for my Easter centerpiece.
That’s the beauty of the Pinterest Challenge. Use the image as inspiration, but apply your own style that fits your home.
Here are my ingredients (When possible, I’ve included links to items that would be great substitutes for what I have.):
White Woven Tray – a flea market find years ago that I painted with a whitewash application. This is a generously sized tray, so I would have plenty of room to move objects around.

Round Woven Basket and Faux Flowers – I used the last of the faux pink tulips that I had on hand. This basket is from Target but I like this basket version too.

Concrete Bunny – he stays in our back flower bed with two more cement bunnies. His feet were dirty, so I gave him a bath before adding him to the Easter centerpiece. Here is another centerpiece where I used this bunny – he has come in for Easter!

Bird’s Nests – I have several bird’s nests, this larger grey nest filled with moss and a few smaller ones.

Bunny Plates – This set came from Home Goods several years ago.

Glass Cloche – Here’s my one glass cloche.

Clay Pots – I love these small vintage flea market clay pots. They are great for filling in small places. If you can’t find old clay pots, these are a great option that come in multiple colors or paint them to look old.
Salt and Pepper Shakers – My favorite element are these vintage salt and pepper shakers that my mom bought for me when I was in college. She came to campus for a day of shopping and we found these at an old general store. I treasure them. They were old when we found them and they are really old now!

Arranging the Elements of the Easter Centerpiece
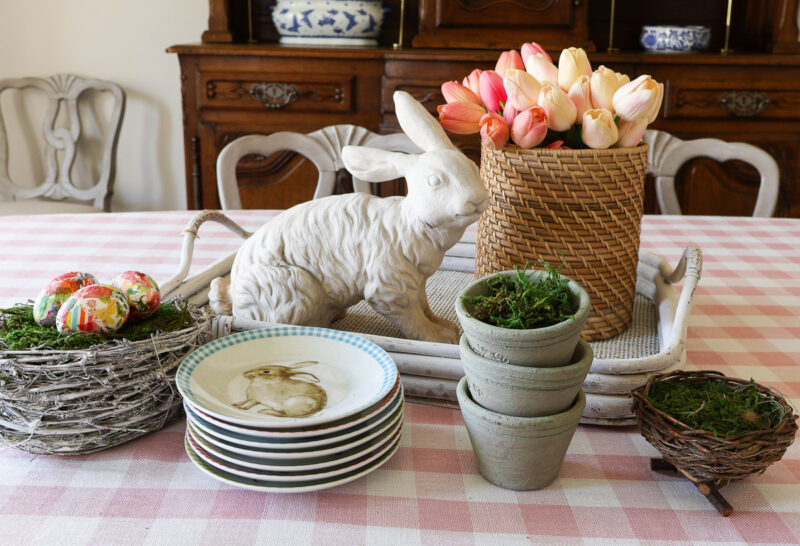
First, I arranged the faux pink tulips in the round basket and placed it on the right side of the tray.

Next came the cement bunny for balance.

I set the stack of bunny plates in the center front of the tray.

Next, I added the large bird’s nest with the DIY decoupage eggs on the left and the vintage clay pots on the right.

Then I set the smaller bird’s nest on the plates.

To elevate the salt and pepper shakers I set them in the small bird’s next.

Finally, I set the cloche over the salt and pepper shakers.

That finished my Easter centerpiece, but I noticed a few things I didn’t like. Can you guess?
I didn’t like that the cloche blocked the cement bunny. Too much glass showed. What to do? Start over.
Re-Doing the Easter Centerpiece
First, I switched the basket of flowers to the left and put the cloche on the plates on the right side. That look was just O.K. The cloche didn’t balance with the weight of the flowers.

I replaced the stack of plates with the large nest with the eggs in the back of the tray and added the cloche to it.. That was better for balance.
Then I added the cement bunny to the front of the tray. The smaller nest and the clay pots fill in the center of the tray. The bunny plates hold the salt and pepper shakers.
This is looking better, but . . . .

I liked the scene better except for the empty glass of the cloche. It definitely needed something more to fill the cloche.
Going through my Easter bags, I found these large faux carrots, which perfectly filled the cloche. They also add more color and depth.

As a final addition, I added a napkin tied with the air-dry clay Easter eggs that I made on both sides of the tray. That’s not part of Emily’s inspiration, but I feel like they put an exclamation point on the centerpiece.
This Easter centerpiece will grace our dining room table for the next few weeks. When we walk in the front door, there will be something pretty to look at.
If you would prefer a spring arrangement that will last and last, check out this Spring Faux Floral Centerpiece idea.
Combined with our Easter-decorated entryway, our home will be welcoming, colorful, and ready for visitors. Seethe rest of our Easter home tour in the living room.

I hope you enjoyed the process of styling this whimsical Easter centerpiece. It actually took me less than an hour to design it.
Here are a few of my favorite Easter centerpieces – this one in blues and bunnies and a Easter table with an Easter tree centerpiece.
Before you visit the next person on our list of bloggers, be sure to PIn this post. Also check out some of my Pinterest Boards: Easter Decorating Ideas and Spring Home Decor.
Now head over and see what Barb of French Ethereal has in store for you.