How to Make a DIY Garden-Style Spring Wreath
I’ve always found the transition from winter to spring to be nothing short of magical. Watching the world come back to life, with vibrant colors and fresh greenery, feels like a fresh start every year. What better way to welcome spring than by adorning our living spaces with a beautiful garden-style spring wreath that captures the essence of the season?
I love having a new wreath on the front door to shout out to the neighbors that spring has arrived at our home. Are you with me on this endeavor?
You can buy pre-made artificial spring wreaths for a pretty penny, but that is obviously not my cup of tea. I love the idea of creating my own style and keeping the budget reasonable.
The best part is that making your own front door wreath doesn’t require you to be a craft wizard. With a handful of craft supplies from the dollar store, a dash of creativity, and a bit of time, you can craft a floral wreath that stands out.
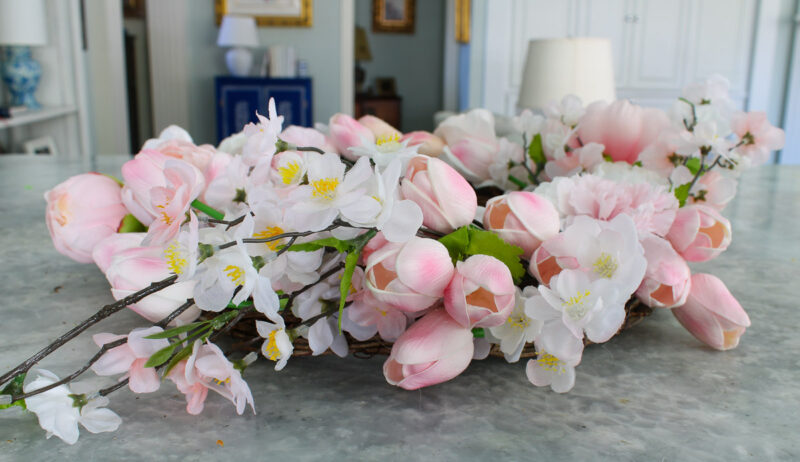
Imagine a lovely wreath made of artificial spring flowers like tulips, peonies, and ranunculus catching the eyes of your neighbors and guests.
And, since I had a semi-homemade wreath already on hand, I was halfway to making a unique wreath for our front door.
It’s all about adding that personalized touch that says ‘Welcome Spring’ in a unique way. Nothing says spring like a wreath full of flowers. A garden-style spring wreath with a mix of flowers would be perfect.

Tulip-Inspired Wreath
This wreath project was kicked off by my friend Cindy of County Road 407. Cindy hosts our monthly Pinterest Challenge on the 4th Tuesday of the month.
Did you just visit Kim of Cottage in the Mitten and her version of a tulip wreath? Then welcome to Bluesky at Home.
This month, on the cusp of spring, our inspiration was a gorgeous wreath made entirely of tulips by Kristi of Chatfield Court.
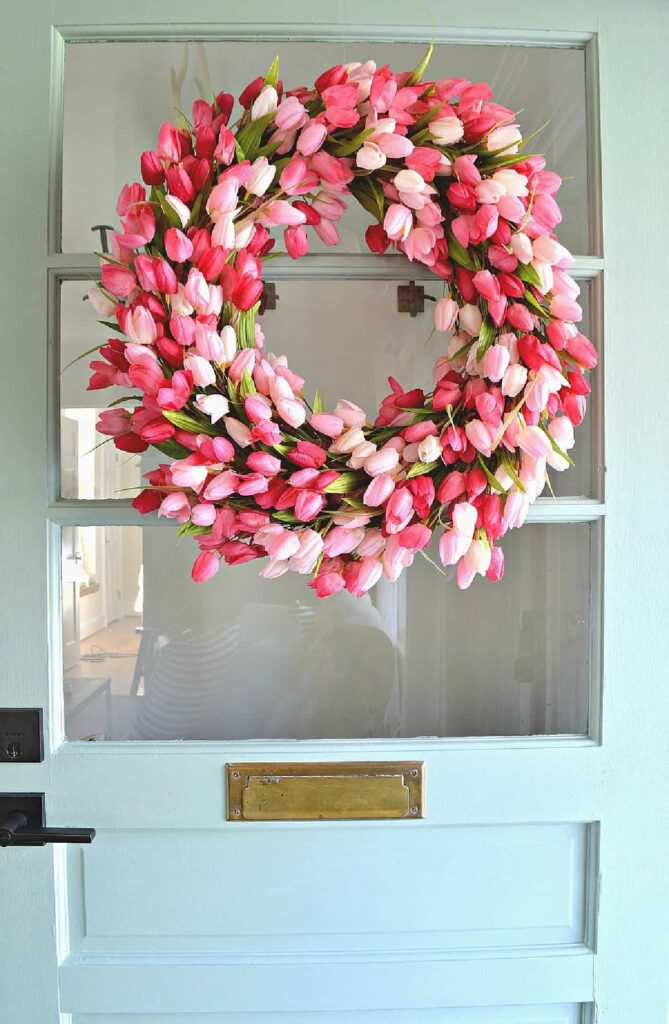
I loved the lush look and beautiful pink shades of Kristi’s tulip wreath. Since pink for spring is one of my favorites and I adore pink tulips, I was all in.
Until I figured out how much it would cost to order enough pink tulips to fill a wreath. I had a couple dozen pink tulips on hand, which wasn’t nearly enough to recreate Kristi’s wreath.
On to plan B.
Since the Pinterest Challenge is all about inspiration, I decided to pivot a bit to use the theme pink and flowers in general. That’s when the idea for my garden-style spring wreath was hatched.
Last week, I shared 15 DIY spring wreath ideas and the idea for a spring wreath with a variety of pink flowers solidified in my mind. I wanted a combination of flowers that looked like I went in my backyard and cut fresh flowers from the garden.
Spring Wreath Starting Point
First, this wreath would be on our front door – not the best place to use fresh flowers. Faux flowers are the best option in warmer weather because they are longer lasting than real flowers and no watering is required.
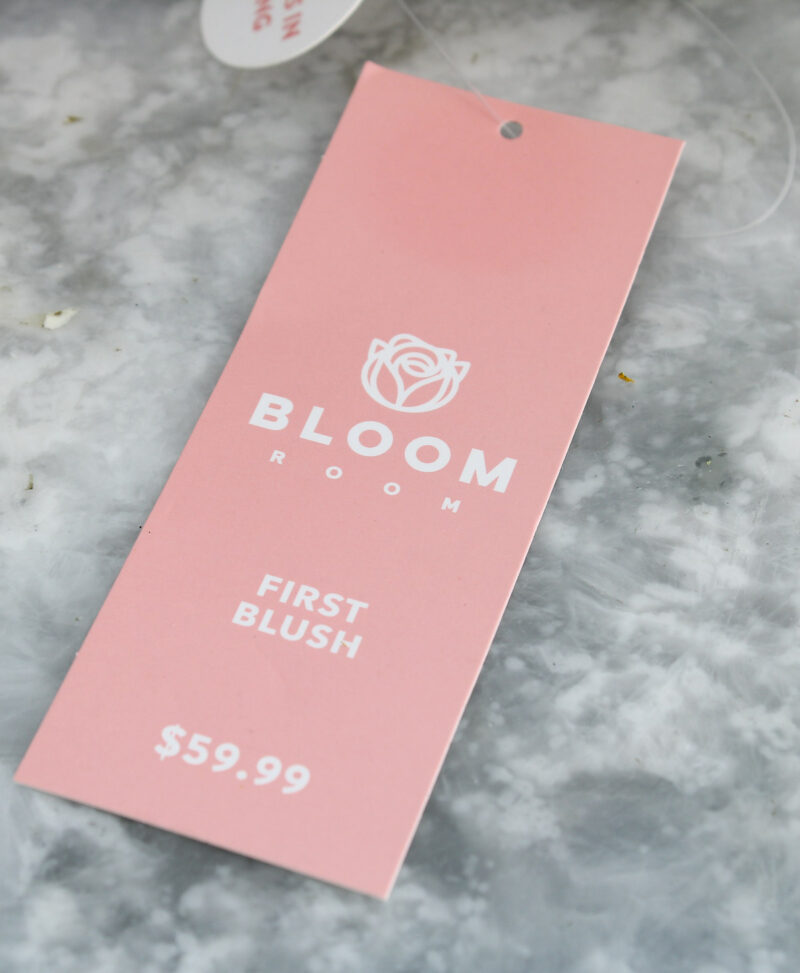
I had the perfect starting point for this spring wreath: perfect being free.
A few years ago, I walked into my Joann and a sign greeted me: Pick 6 items from aisle 4 for free! You didn’t misread that. Six items for free.
So, I walked as fast as I could to aisle four. (Actually, I don’t remember what aisle it was, but I did walk fast.) I picked out four vases, one raw wood welcome sign, and this grapevine wreath with pink and white flowers already attached.

To be honest, this wreath was marked at $59.99. I wouldn’t have bought it at 50% off. But free? In the cart lickity-split.
I’ve used the four vases, but the raw wood sign is still in the garage, untouched. The same for the flowered wreath. Until now.
This free wreath was about to get the royal garden treatment.
Gathering Your Supplies
This post contains affiliate links to products used in the creation of this project. If you should order any item from this site, I may receive compensation, but you do not pay a penny more. Your purchase is greatly appreciated as it helps support the continued publication of this site.
Let’s assume that you are starting completely from scratch making this front door wreath with spring blooms. Here is what you would need:
- a 16 -20 inch wreath base – I love a grapevine base for wreaths because they are so easy to work with and I love their natural look. The grapevine offered a classic base, well-suited for outdoor use, and durable under the direct sunlight that bathes my front porch. A boxwood wreath would work in the same way.
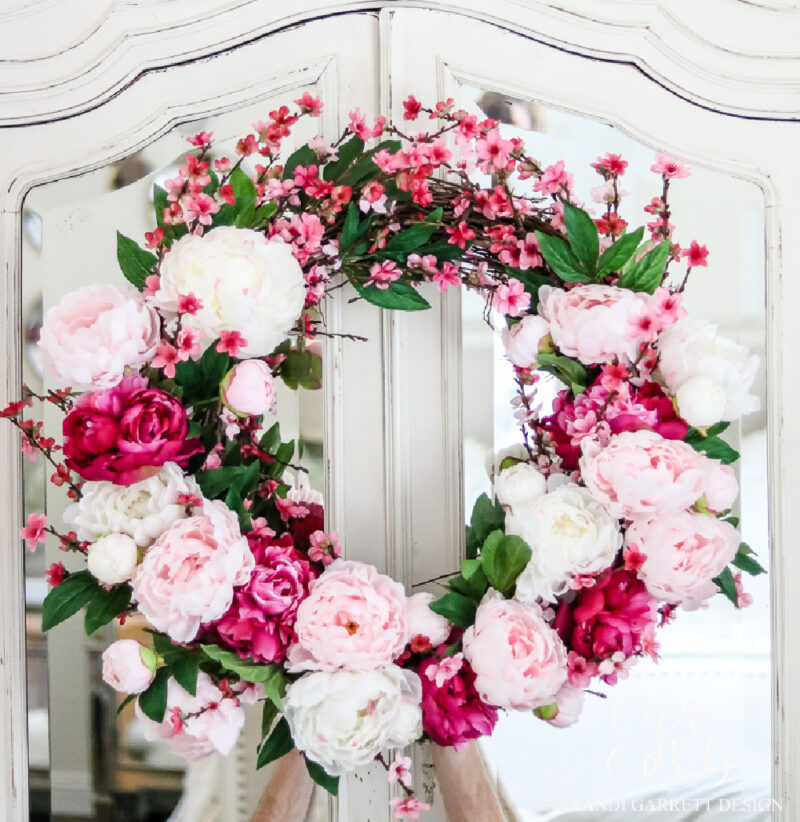
- a variety of faux flowers – I stared with the mostly white floral branches. I would use cherry blossoms, red buds or any other flower on a branch.
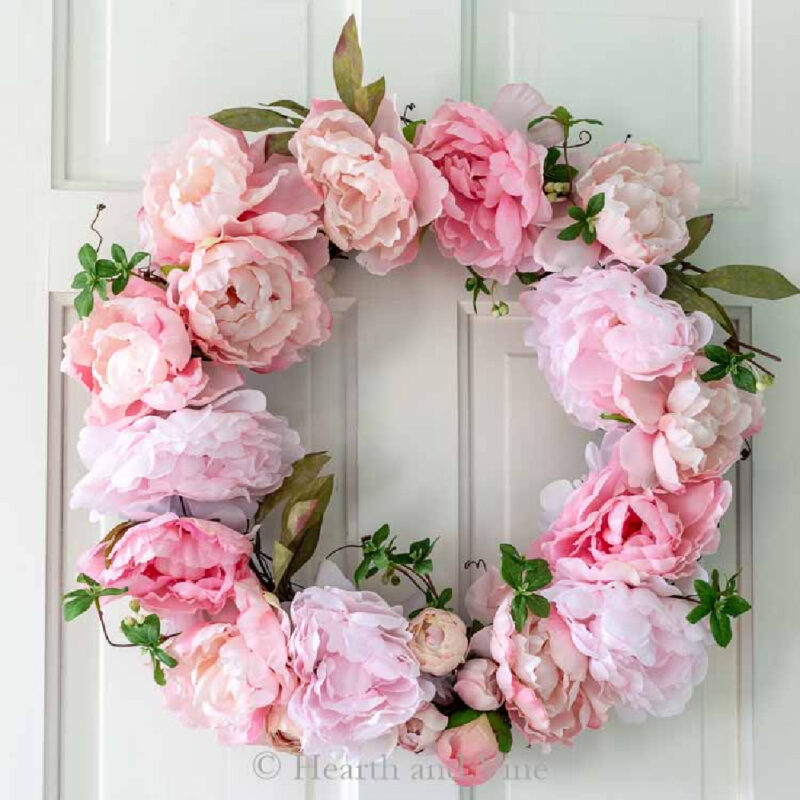
- pink peonies – my favorite, which, fortunately, I have a lot on hand.
- pink tulips – I had tulips on hand, too. I’ll share that story below.
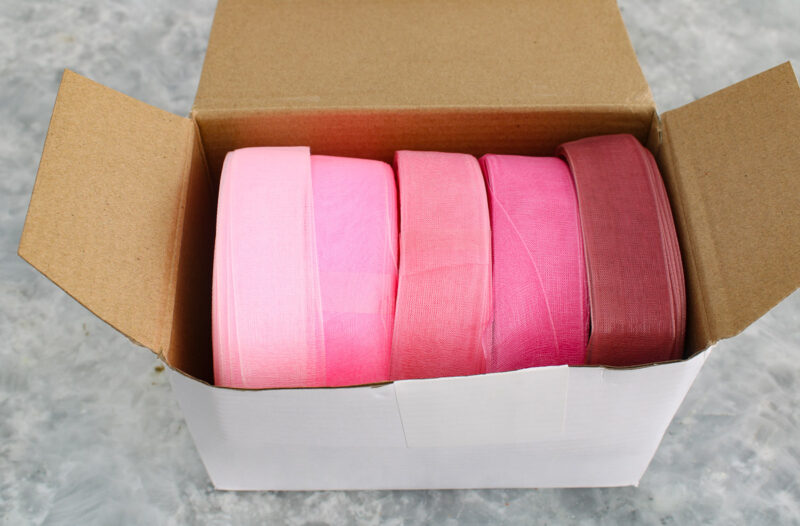
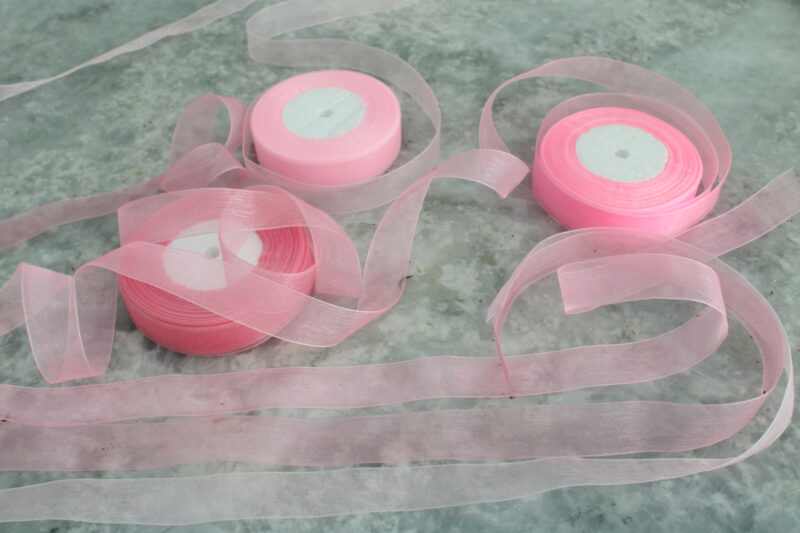
- ribbon for a bow – I had recently bought a box of 5 shades of sheer pink ribbon and wanted to use them in this project.
- garden clippers – to trim the faux flowers
Notice there is no hot glue, twine or any other adhesive. They are not necessary for making this garden-style spring wreath.
You can use any combination of faux flowers in any colors you want for your wreath. The types of flowers you choose is totally up to your taste.
Assembling Your Garden-Style Wreath
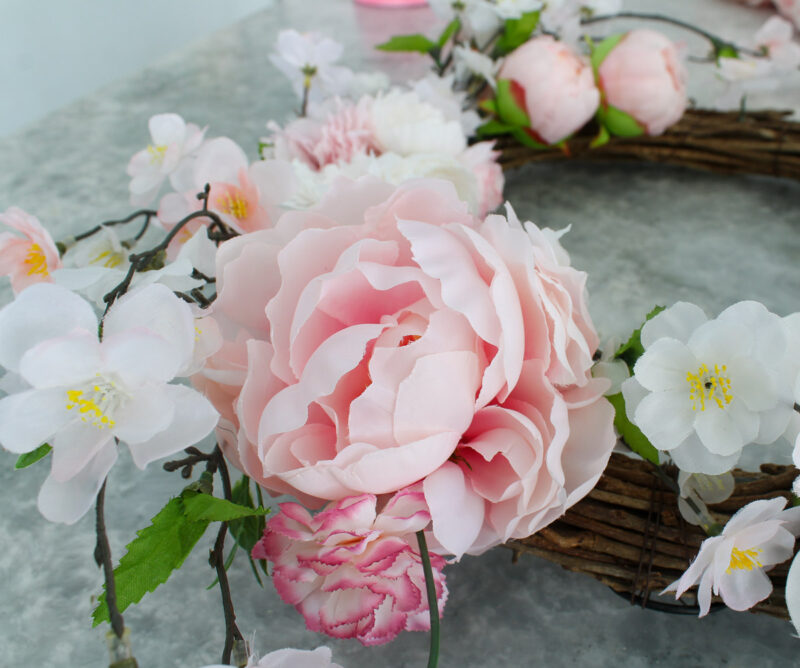
This wreath is so easy to assemble. All you have to do is stick the stems of your flowers in between the twigs of the grapevine wreath to secure them.
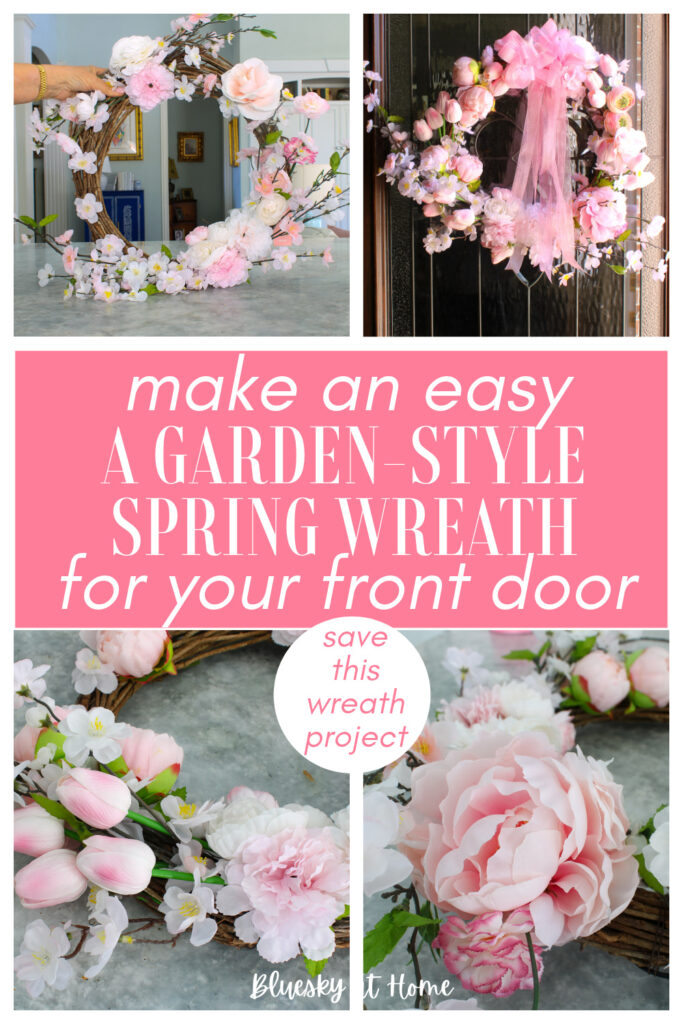
I began by gathering all my peony blooms, most of which are large, but I have several that are small. They look like peonies that haven’t fully opened up yet.
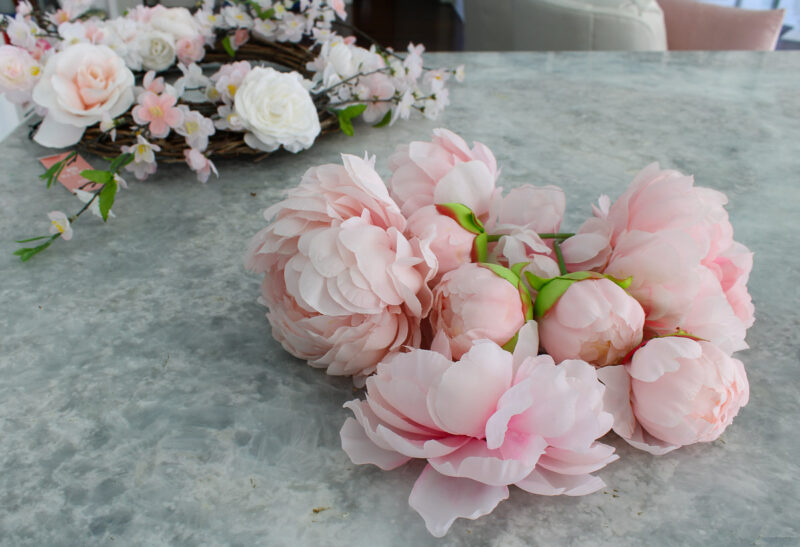
First, I placed a few of the larger peonies on the wreath. I soon realized all but one was too big, so I removed them.
I used all the smaller peonies and they looked perfect.
If a stem pokes out the back of the wreath, that’s O.K. It won’t show.
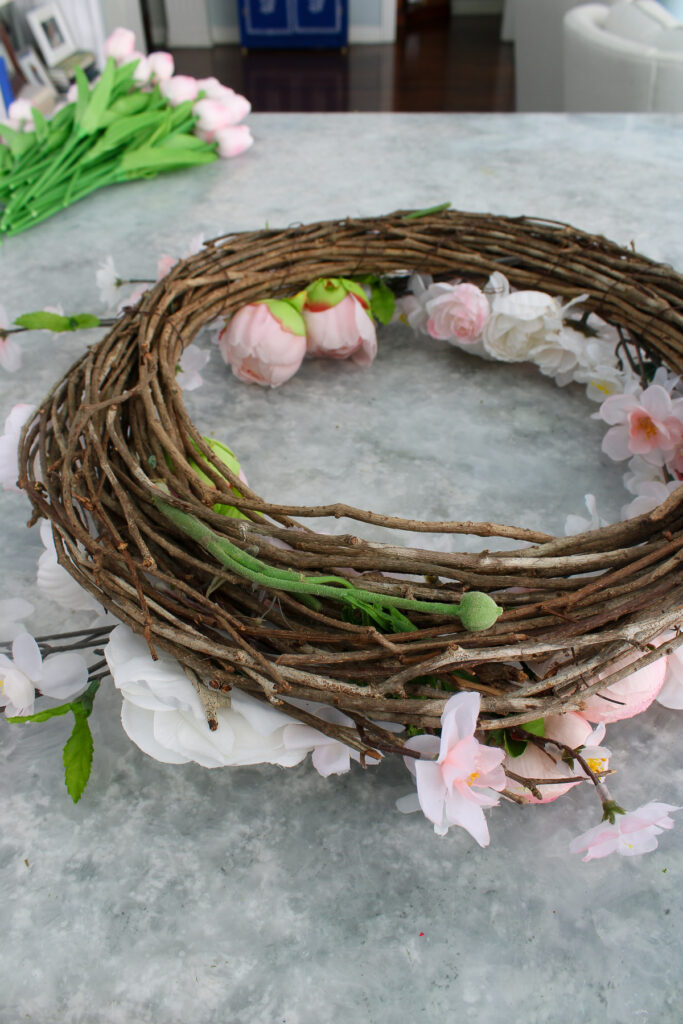
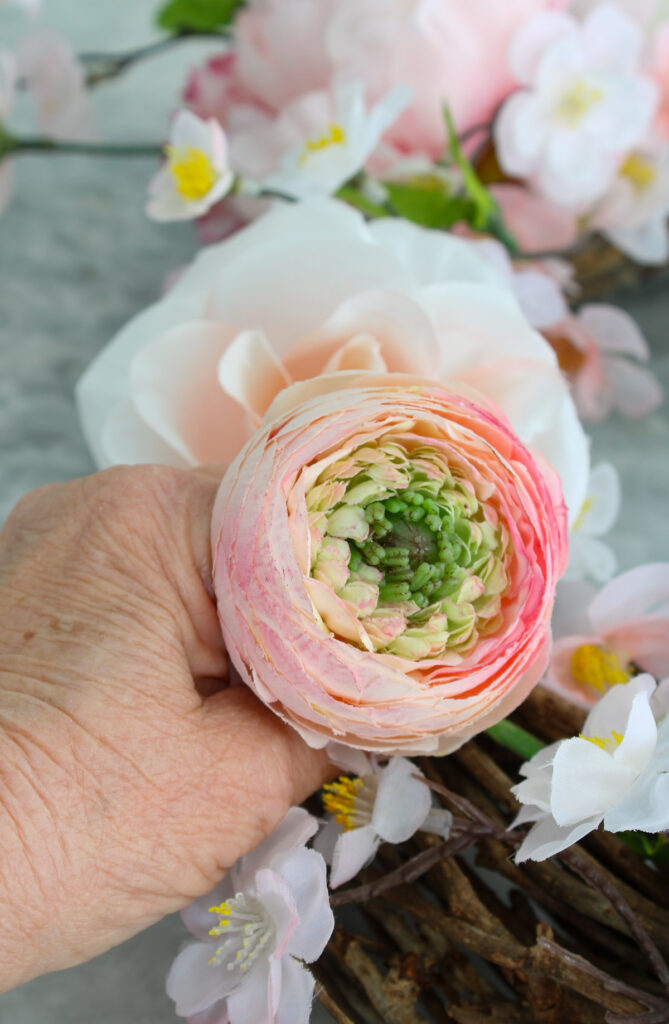
Next, I added the two ranunculus that I had. Their deeper pink color was a great contrast with the pale peonies. I wish I had more. These look so real.

So far, I’d spent about 10 minutes assembling my wreath. I was on a roll.
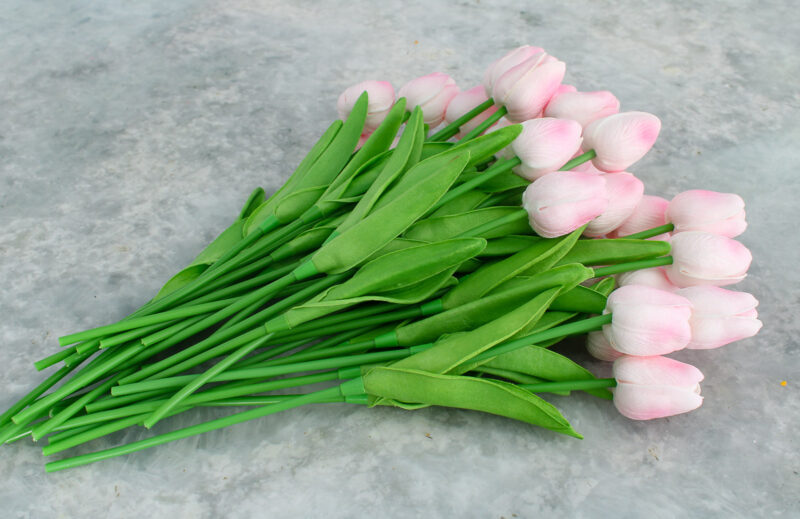
The final flower would be my tulips. This is when I hit a snag.
The pink shade of the tulips I had on hand was totally wrong for my wreath. And I didn’t have nearly enough to fill in the rest of the wreath.

I didn’t have time to run to the store, so I ordered a soft, pale shade of pink online, thinking my tulips would arrive the next day. (We are lucky to have a distribution center in our metroplex and things get here quickly.)
Alas, the tulips took three days to arrive. I could hear the clock ticking (or the Jeopardy theme song!). Not knowing how many tulips I would need, I ordered a package of 30.
Surely, it would take a few minutes to add the tulips to the wreath where the peonies, ranunculus, and flowering branches were waiting anxiously for their tardy teammates.
I quickly discovered that the long stems of the tulips would not slide easily between the twigs of the grapevine wreath. I also didn’t like the look of the leaves.
This is when the wire cutters came in handy, but this was the hard part.
I clipped the stems down to about 6 inches in batches of five since I didn’t know how many tulips I would need.
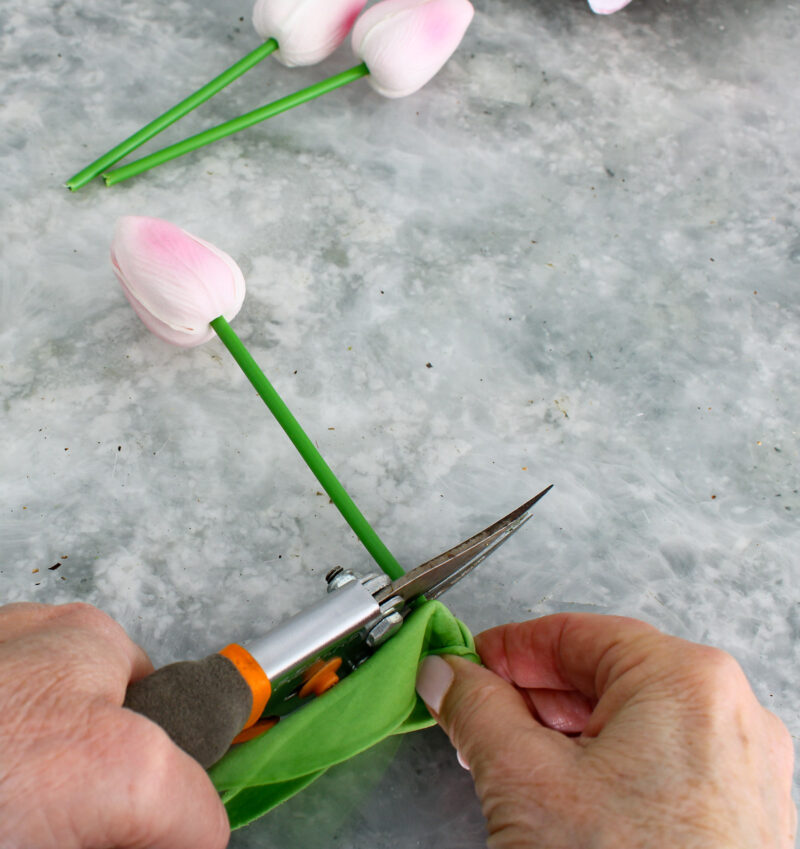
This part of the project took about 45 minutes to clip the tulips. Sweet Shark was working in the backyard or I would have asked him to help. The project would have taken less than an hour without this little hiccup.
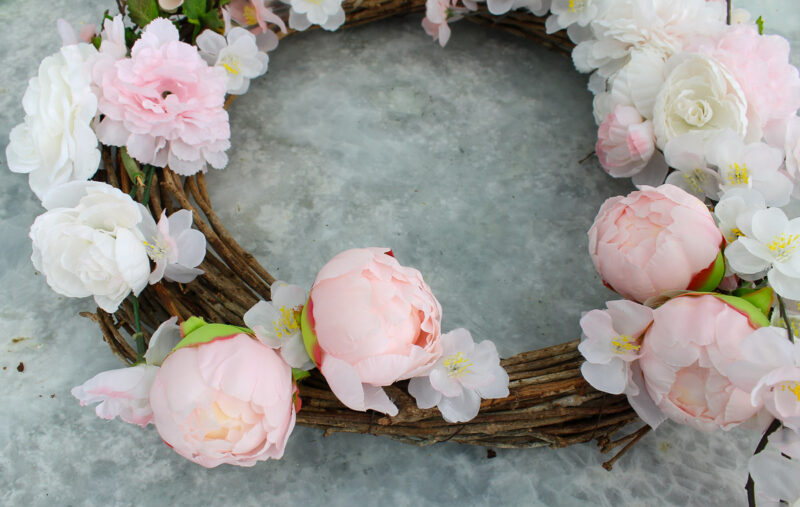
I placed the tulips in groups of three and six to fill in on the wreath.
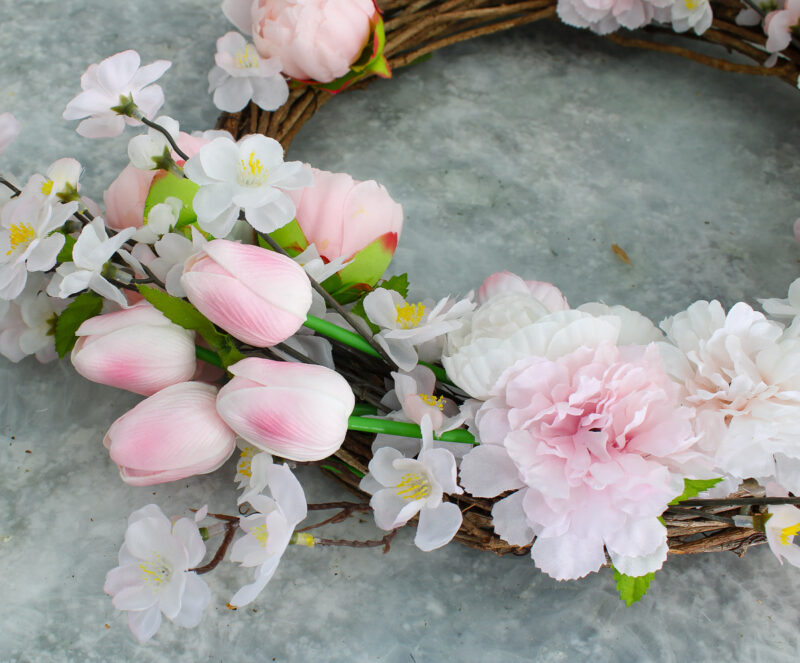
I used 25 of my 30 tulips.
On another search, I found a brighter color of pink tulips that I ordered for other projects.
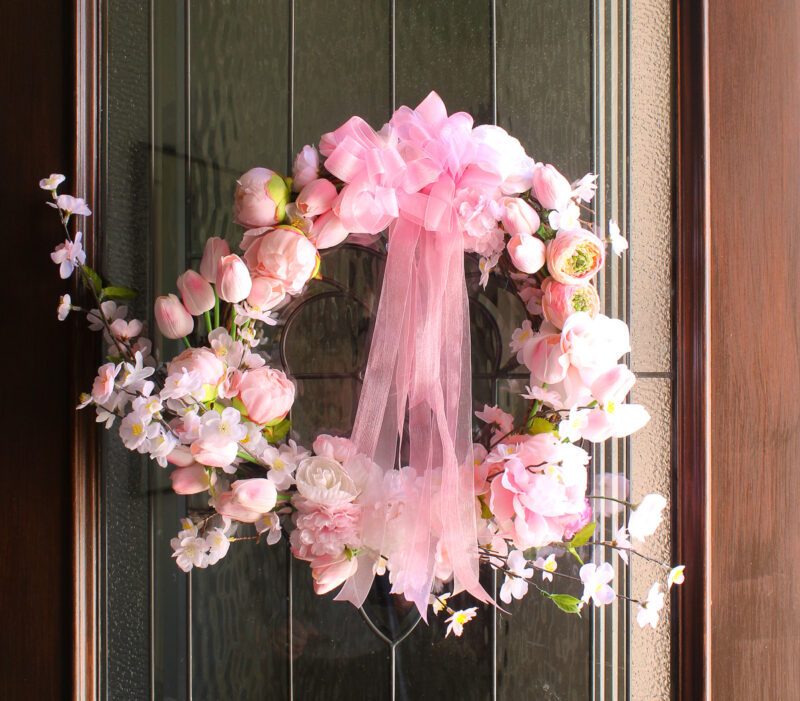
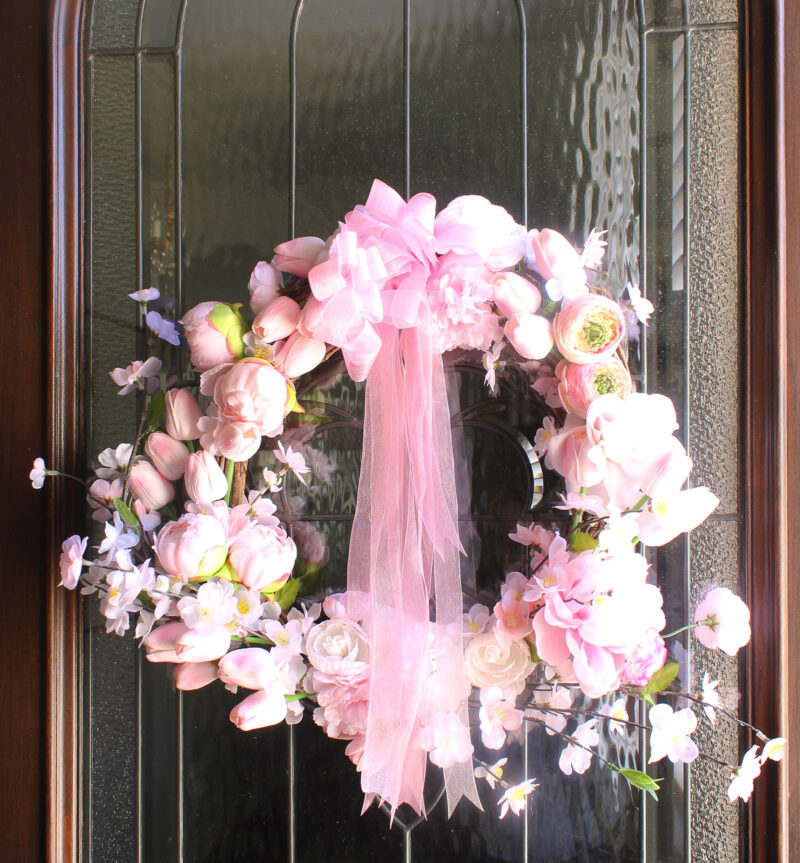
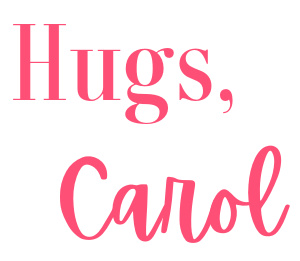
The Final Flourish: Pretty Pink Bow
The final step was making a bow for the top of the wreath. To make a little more space, I removed (as in pulled off) a glued branch.

From the box of sheer pink ribbon, I picked three colors that would work best with the floral colors of the wreath.
The colors are much more intense when the ribbon is on the bolt.
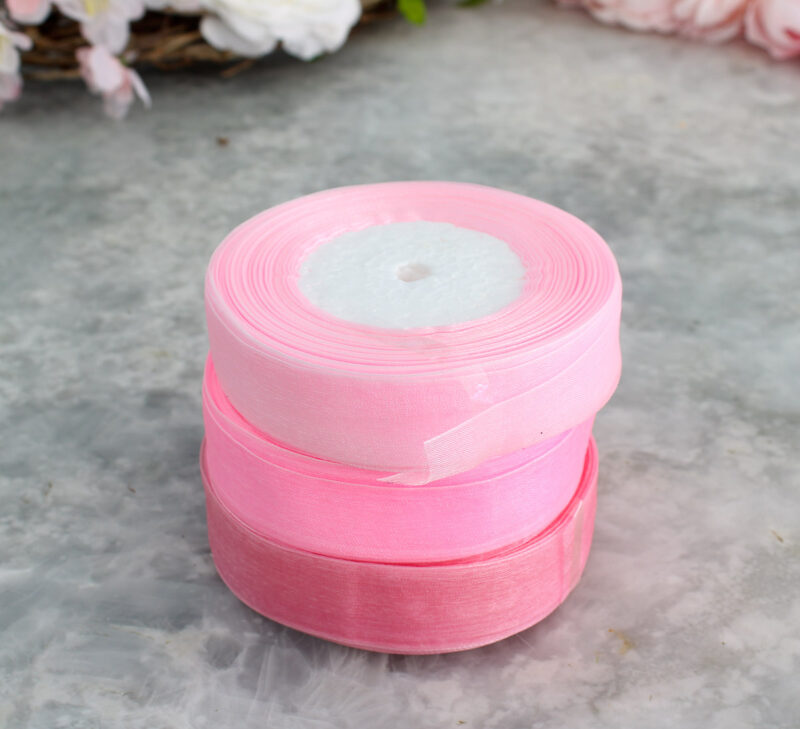
I “stacked” the three colors and made a bow with long notched tails.

The last step was to attach the bow to the wreath with a length of ribbon. The bow was the perfect addition to the spring wreath.
Displaying my Garden-Style Wreath
Last year I placed a Command hanger on our front door, which is leaded glass in the center. All I had to do was place the wreath on the hanger and I was done.
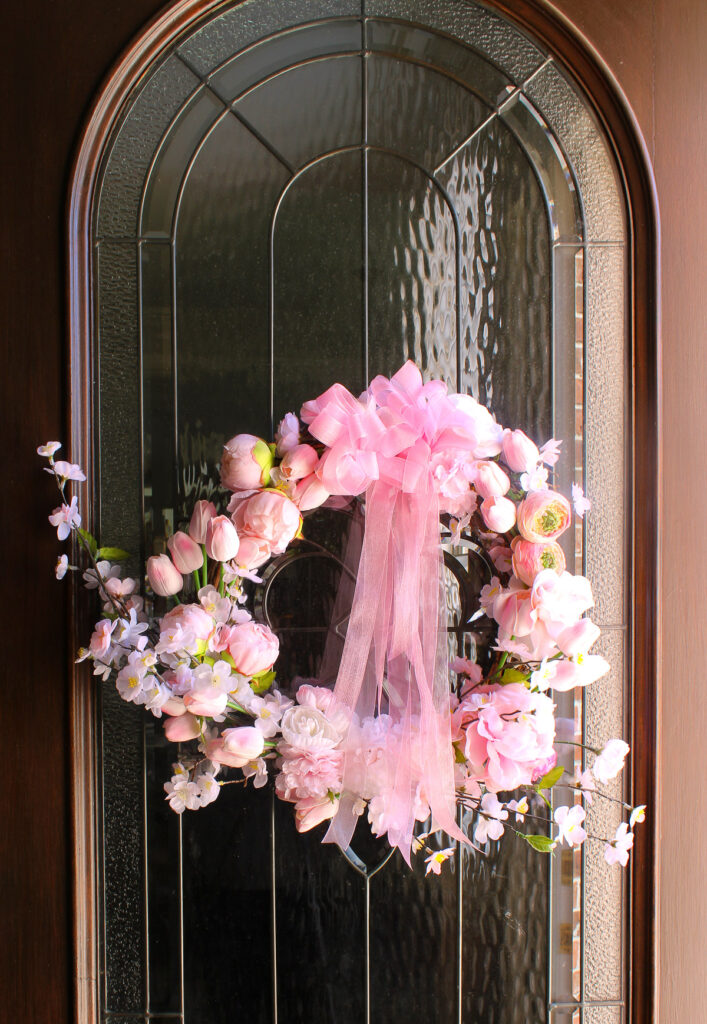
You can tell how bright the sun is on our front door. Since our house faces west, as soon as the trees bud out in the front yard, it won’t be quite as bright in the afternoon.
DON’T MISS THIS gorgeous new spring wreath made with spring flowers and bright color flowers.

Sharing and Inspiration
I had so much fun creating my garden-style spring wreath (except for the clipping of tulip stems) and I bet you will too. There’s no better way to welcome spring than by showcasing a beautiful wreath on your front door.
TIP: To adapt this wreath project for a summer flower wreath, just change out the seasonal artificial flowers.
Here are some more wreath ideas you may enjoy:
- How to Make a Spring Floral Wreath
- Cotton-Stem Spring Wreath
- Celebrate Spring with a Blue and White Entry
Let this be the beginning of a season filled with handmade projects that celebrate the joy of spring. Whether you are creating an outdoor spring wreath or one for indoors, let the inspiration of these Pinterest Challenge wreaths and your imagination guide you to beautiful spring wreaths.
The entire list of participants is below, starting with our hostess Cindy of CountyRoad407.
Be sure to PIN this garden-style spring wreath for your inspiration.


Carol, This is such a gorgeous, lush spring wreath. Peonies are one of my favorite flowers and these are so lifelike! Just beautiful for spring!
Thank you, Christy, peonies are my favorites, too. We just can’t get them to grow very well here.
The transformation is amazing Carol… love it!
Thank you for sharing your spring wreath at the Create, Bake, Grow and Gather party this week. I’m delighted to be featuring it at Friday’s party and pinning too.
Hugs ~ Kerryanne
Gorgeous and so perfect to welcome Spring. Featuring when my link party opens tomorrow!
Your ‘fresh garden look’ wreath is beautiful, Carol! Pink is my favorite and I love the variety of shades and flowers you used. Pinned xx
Wow! You took that free wreath and turned it into a stunner! Love all the pink!
What steal of a deal Carol! That sort of sign never pops up in front of me. Love the wreath and the added Bluesky at Home touch. Those ranunculus look amazing. The colors are fantastic. Thanks for joining in and sharing your beautiful inspiration.
Your wreath is stunning! Happy Spring!
I love the natural look of your wreath, Carol. The colors and textures are just perfect.
This turned out so pretty, Carol! Love the pink flowers en masse:)
I love the natural look and shape of your wreath Carol! It really looks like you went to the garden, and gathered up an arm load of blooms! Simply gorgeous!
Carol
Your wreath is stunning. I love the addition of the sheer ribbon.
Carol, your wreath is absolutely beautiful with all the lovely pink flowers you used! I just love “pink” for spring. The pink ribbons you used for your bow are so pretty and blend in perfectly with all those lovely flowers you selected.
We are having a blizzard here today so no spring wreath on the front door yet!
Have a wonderful week!
I’m all about upcycling, too! Your wreath turned out so pretty and it’s the perfect touch to welcome in spring!
What a fun way to upcyle an old wreath, Carol! I love all the different layers of flowers and shades of pink you used. They’re all really pretty and the bow you made is fabulous too. It’s the perfect compliment to your spring wreath! Hugs, CoCo
Oh, my…with Easter being so early, I guess we are having Spring in Chicagoland whether the weather is ready or not…LOL. You definitely have inspired me to do some Springing this week…so pretty! Hugs, Sandi
What a gorgeous array of spring blooms. Truly a pretty in pink wreath!