11 Easy Ways to Make Your URL Structure SEO-Friendly
Since returning from Haven Conference, I’ve become a little obsessed with SEO. Why? Because I’ve realized how important it is. So I’ve been learning about and trying to “master” (Well, O.K., that may be a bit strong ~ how about just trying to grasp, get my head around, be on friendly terms) SEO. Now I’m back to share 10 easy ways to make your URL structure SEO~friendly.
It’s not easy my friends, as I’m sure you know. But fortunately, there is a ton of information out there. Maybe too much. It can be overwhelming and do you have hours a week to decipher all the thousands of words written about SEO? Nope, I didn’t think so.
I started by purchasing, reading and studying Sabrina Snyder’s Sprinting the Blogging Marathon (She is no longer updating this course.). Over the past 6 weeks, I have read so much on SEO that my head is spinning. I decided that the best course was to focus on small things that I could fix or improve on my own, that weren’t rocket science ~ and didn’t require a rocket scientist.
I kept seeing articles about URLs and how improving them could improve your Google rankings and be more SEO compliant. After reading several loooong posts on the subject (I like to print articles, highlight and underline them.), I narrowed the suggestions down to just 11 easy ways to make your URL structure SEO~friendly.
I think I’ve tried really hard to explain these 11 easy ways to make your URL structure SEO~friendly clear enough that you’ll be able to change your URLs in pretty short order. The “rules” are fairly straightforward once you know what they are.
11 Easy Ways to Make Your URL Structure SEO-Friendly
Disclaimer: I am not by any stretch an SEO or Google or blog master. I’m just a girl trying to figure out ways to be better at what I love to do. What I really love to do is share awesome DIY projects, home decor, crafts, tablescapes, and recipes. Unfortunately, as bloggers, we have to pay attention to so much other behind~the~scenes stuff. I did compile a list of 10 Quick and Easy Tips to Improve Your SEO a few weeks ago.
This post is geared toward WordPress.org users.
Step 1 ~ Customize Your URL/Permalink
First, what is a URL? I won’t go into what it stands for. Just know that it’s your complete address on the web. Think of it as your home address with street number, city, state and zip code. For example, the URL for my blog is:
Then, what is a permalink? It’s the link to an individual blog post. The permalink for this post is:
EXCEPT. WordPress has a default setting for your posts’ permalinks. And it looks like this:
According to the experts, when Google is searching for your post, those numbers (the date of your post) really throw Google for a loop. The numbers make it harder for Google to find your post. You know why? The #1 thing Google cares about (why do we treat Google as if it were a person?) is content; good, wonderful user-friendly content. Its number 1 objective is to find the content that users are looking for. And those numbers don’t tell Google anything about your content.
Think of the postman who wants to deliver your mail, but you covered up your mailbox and the address is blurry. So uncover the mailbox, get rid of the date in your URL and create what is called a custom URL. Google likes it better and so do your readers.
How to Create a Post or Custom URL for Your Blog Posts
WordPress has 5 permalink options. If you don’t choose, then it defaults to one with numbers and symbols, a SEO no-no. It’s easy to choose an option that is both easier for users and Google to read. Ideally, you want to choose either Post or Custom for your Permalinks.
NOTE: I’ve used my own blog URLs as examples, but they are not actual links.
- On the left-hand side of your WordPress Dashboard, go to Settings
- Click on Permalinks
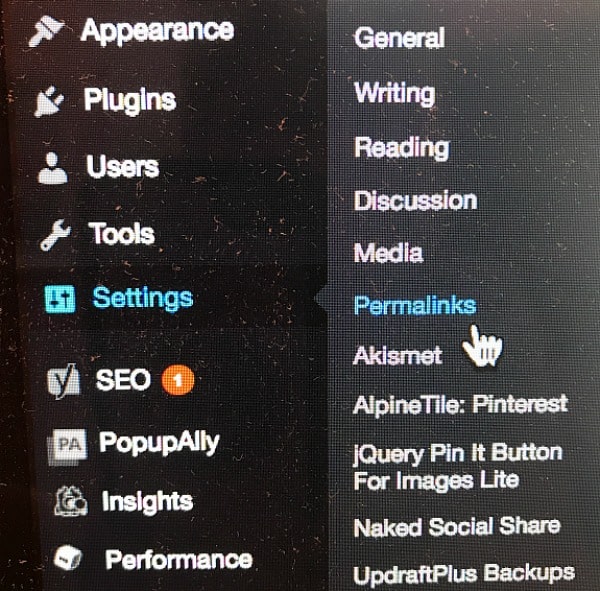
- You will see this list (NOTE: I took these screenshots before I changed the name of my blog, so it shows blueskykitchen.net.)
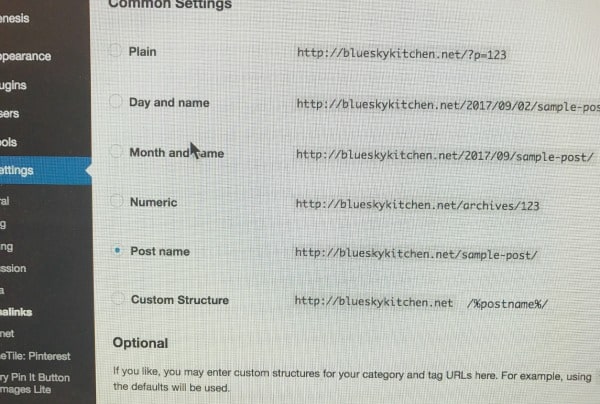
- Click on either Post or Custom ~ if you have both a Home Page and a Blog Page, then you will want to choose Custom. Google reads each page as a Folder, which should be separated from your blog name by a /. If you don’t have a separate Blog Page, then you select Post.
For example:
Custom URL: https://blueskyathome.com/blog/seo-tips
Post URL: https://blueskyathome.com/seo-tips
I currently do not have a separate Home Page, so I chose the Post option.
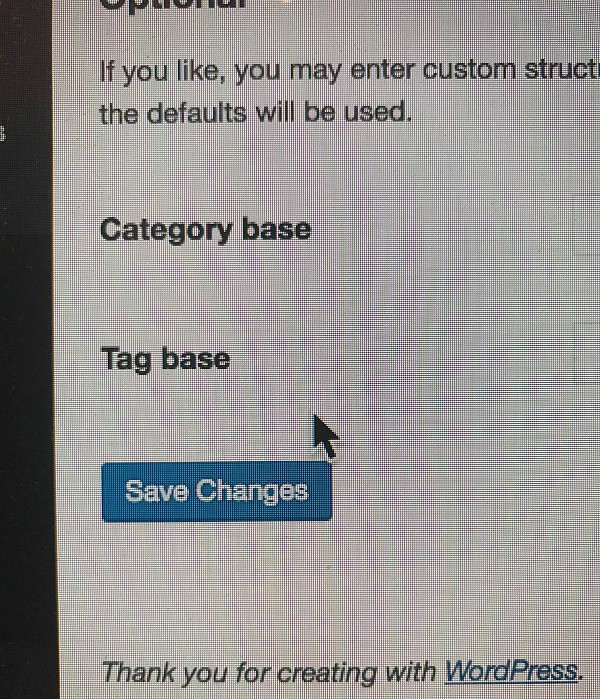
- Click on Save Changes
Step 2 ~ Keep it Organized and Consistent
If you have a homepage, your URL would be like this:
Homepage
Then, ideally, you’ll have your categories and subcategories organized neatly from there.
Here’s an example of the way this should work:
Category (DIY project)
Subcategory (paint)
Product (chalk paint)
This structure gives Google a path to follow, what each page is about, and it’s visually pleasing. It’s easy for users to know what the post is about.
Step 3 ~ Keep your URLs Simple and Consistent
Except for changing the name of your blog post, the rest of your URL should have the same structure.
Step 4 ~ Use the Right Keywords
Another important way to make your URL structure SEO-friendly is to remember keywords, the words that you use so Google and users can find your post. The words that go in the Focus Keyword and the Meta Description boxes when you are writing your post. Those are the same keywords that should appear in your post URL.
For example:
https://blueskyathome.com/seo-tips seo-tips is my Keyword
Just 1 or 2 keywords in your URL makes Google happy. If you put too many keywords in your URL, or repeat a keyword in a URL, Google sees it as keyword stuffing and that can count against you. Ideally, you want your keywords in your URL as close to the ones in the title of the post, but it’s not a negative if the keyword is toward the end.
For example, this URL would be fine:
But this one would not rank as high:
Step 5 ~ Keep It Short
Google likes easy-to-read URLs. The length of your Keyword is another important factor. Using short URLs will rank your post higher in SEO. They also make it easier for users to know what your post is about. Ideally, your entire URL should be between 50 ~ 60 characters. So aim for 3 ~ 5 words in your Keyword description.
Here’s a URL that is too long:
This would be shorter, but still convey the subject matter
NOTE: We’ll talk about the difference between http:// and https:// in a moment.
Step 6 ~ No Capital Letters
Uppercase letters can lead to redirects or 404 errors on some servers. It’s just better to stick with lowercase letters for a more consistent look for readers to make your URL structure SEO-friendly.
Not this:
https://blueskyathome.com/SEO-tips
https://blueskyathome.com/URL-tips
But this:
https://blueskyathome.com/seo-tips
https://blueskyathome.com/url-tips
Step 7 ~ Use Hyphens
Hyphens are the Google standard for separating words. Underscore or slashes (except for separating folders) give Google a headache. So no ?, >, &. . Use / for separating folders, categories and subcategories. And hyphens for separating words. That’s it.
Step 8 ~ Choose a top-level domain
What’s a top~level domain (TLD)? It’s .com rather than .biz, .pro, or even .net. Does not having a .com negatively affect your SEO? Not exactly, but studies show that people have a much higher trust level in .com than other domains. My first blog’s domain was a .net. Why? Because when I started blueskykitchen in 2015 .com was taken, so I had to take .net. If I had to do it over, I would have chosen a different blog name. And that’s one big reason I chose to change the blog name and the domain.
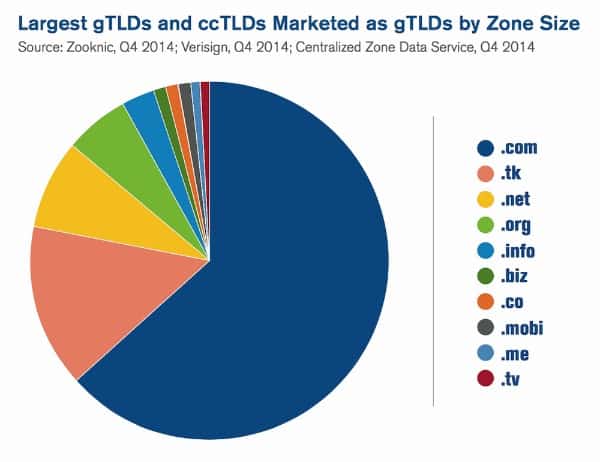
NOTE: Just after this post was written in September 2017, BlueskyKitchen.net became BlueskyatHome.com; the blog got a new name, a new logo, a new domain (.com), and a new theme.
When I made my list of possible new blog names, I searched Google, Pinterest, and Bluehost to see if my new blog names were available as .com. If they weren’t, I crossed them off the list. I always check to see if any other companies/blogs had similar names; if they did, I crossed them off the list, too. Fortunately one of my favorite possibilities was available as a .com and the name wasn’t used by anyone else.
Step 9 ~ Let’s Talk about HTTPS
Everyone is familiar with HTTP:// at the beginning of any website URL. What is https:// ? It’s the more secure version of the hypertext transfer protocol. I am not going to pretend that I understand exactly what that means. But I know that it’s important. The “s” in HTTPS stands for secure, and it means just that and that is really important. All communication between your browser and that specific website is encrypted and secure. Google wants to be sure that your site is secure for your users and it doesn’t want to send users to your site if it thinks it’s not safe.
These charts make all the differences clear. They’re from Neil Patel, one of the biggest SEO experts in the blogosphere. 10 easy Ways to Make Your URL Structure SEO-Friendly. These 10 steps help make your blog more attractive to SEO and readers by writing better URLs.
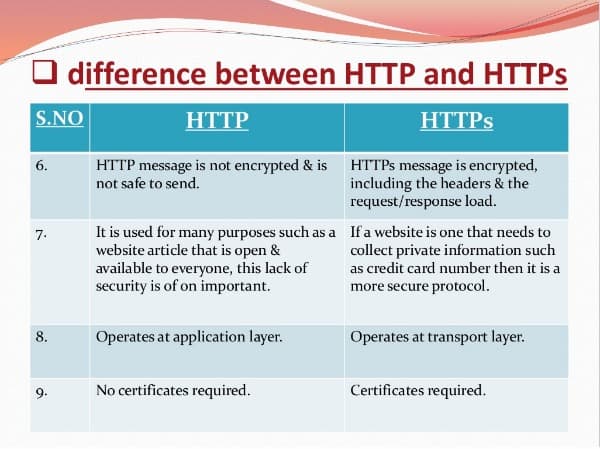
Does not having HTTPS mean that your blog is in danger of being hacked? Maybe or maybe not. It’s better to be safe than sorry. And you definitely want Google to trust sending users to your site.
When my domain name changed and everything was moved over to the new site, my graphic/web designer added an SSL certificate to my WordPress.org site and made the switch to HTTPS. You have to pay for a SSL certificate. Check with your blog host about the cost and the process.
In case you need an explanation of a SSL certificate, here’s one:
“SSL Certificates provide secure, encrypted communications between a website and an internet browser. SSL stands for Secure Sockets Layer, the protocol that provides the encryption. SSL Certificates are typically installed on pages that require end-users to submit sensitive information over the internet like credit card details or passwords. Example pages include payment pages, online forms and login pages.” (source: https://www.instantssl.com/ssl-certificate.html)
Here is an awesome article on SSL and how to get a free certificate written by Cristina of Elan Creative Co., my graphic/web designer.
Step 10 ~ Stop Words
If you have Yoast for SEO plugin on your WordPress site, you may notice when it tells you that you have stop words in your slug. Stop words are those little words, such as a, an, the, to, is, at, which, and on. While we read those words as part of the meaning of the sentence, Google reads them as filler.
For example:
“The” is a stop word and Yoast would tell you so. If you can remove it and your URL is still clear, then do so.
According to the research I did, some experts will tell you to remove them at all costs. Others will tell you that having stop words in your URL isn’t that critical, and that stop words are ignored by search engines because they are sophisticated enough to know what they are.
The recommendation of some experts is to remove them if the URL still makes sense without them. For one thing, removing them will make your URL shorter and that’s a good thing. If you think the stop word is need for the URL to make sense, then leave it in.
Step 11 ~ Check for Duplicate URLs
Every single post on your blog should have a different and distinct URL, even if the content is similar. Yoast will catch this for you as you write your headline, slug, and meta descriptions.
For example, if I’m writing a post on fall tablescapes (which I recently did), my URL might look like this:
Then a year later, or even a few months later, I might write another post about fall tablescapes. If I use the same URL as above, even though it’s a different post, Google and other search engines, will see it as duplicate content, which is another big no~no. To keep them separate, I may write them this way:
https://blueskyathome.com/fall-tablescape-august
https://blueskyathome.com/fall-tablescape-october
https://blueskyathome.com/turquoise-fall-tablescape
Even though all 3 posts have “fall-tablescape” in them, the third words “august, october, turquoise” deferentiate them as separate posts and URLs. Google won’t be confused now.
So many of us link our posts to link parties. All link parties have the same name, but what keeps them separate and not duplicate content is that each one has a separate number:
https://blueskyathome.com/happiness-is-homemade-link-party-186
https://blueskyathome.com/happiness-is-homemade-link-party-187
Resources for URL Structure
Here are just a few of the resources I’ve read that you might want to check out and read in more depth:
I sincerely hope that this information will help you make your URL structure more SEO~friendly. Just knowing about these 11 easy ways to make your URL structure SEO-friendly is half the battle. Using these recommendations does mean paying attention to every single post title, keyword and URL composition. But the more you do it, the easier it gets and if you use your Yoast for SEO plugin, half the work is done for you.
If you found this information, please save and PIN it. Good Luck.





Wow, so much useful information! I took notes and will implement some of the changes soon. (Some were already on my too-long to-do list!) Thanks for sharing at Vintage Charm:)
Kathleen|Our Hopeful Home
Glad to be of help, Kathleen. It takes a long time to figure out SEO and all its do’s and don’ts. Changing the URL seemed like an easy fix to me.