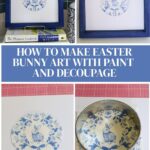
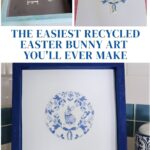
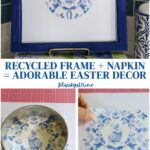
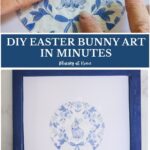
How to Make Easter Bunny Art with Decoupage and Paint
It all started with a package of napkins. While browsing at my favorite antique mall, I spotted the most adorable Easter bunny napkins and knew immediately I had to have them. The only question was – what would I do with them? That’s when the idea for this easy Easter bunny art project was born.
The napkin’s square shape dictated a square frame. DId I have a square frame on hand? Fortunately, yes. Back at home, I went looking for the perfect frame to recycle and found exactly what I needed.
An old wooden shadow box frame and that precious Easter bunny napkin were all it took to create a beautiful piece of seasonal art using the napkin decoupage technique. No artistic ability required!
The napkin decoupage method gives you picture-perfect results every time, and the whole project comes together in just a few easy steps with minimal supplies. It’s the kind of Easter bunny art that looks like it came from a boutique shop – but costs next to nothing.
Whether you display it on your mantel, a bookshelf, or style it on a stack of books on the kitchen counter, like I did, this charming little framed bunny art is guaranteed to bring a smile to anyone who sees it.

Join me as I take you through the steps as I turn a pretty blue bunny napkin and an old wooden frame into a sweet Easter decoration.
This post contains affiliate links to products used to create this project. If you should order any item from this site, I may receive compensation, but you do not pay a penny more. Your purchase is greatly appreciated as it helps support the continued publication of this site.
Supplies for this Easter Bunny Art Project
You’ll be happy to know that the supply list is very short. The only thing I bought were the napkins.
- Easter bunny cocktail-size paper napkins. The ones I used were 5 X 5-inches and cost $5.75. The brand is Heatherlee Chan, which I had not heard of. I did find her website, and she has beautiful art and products, which appear to be widely distributed in well-known retail stores. I would take a look at her website just to see her gorgeous work.

- Here are some other napkin options that could be used the same way I used mine: this muti-colored pastel bunny; this bunny surrounded by flowers; this set of 3 blue chinsoiserie bunnies; this natural bunny with flowers
- Square frame, either vintage, recycled or painted. I found mine in a stack of frames in my office. I painted and stenciled it about 6 years ago. This frame is 10 inches square and about 1 1/4 inches deep.

- Here are some other options: natural wood frame; shadow box resin frame in different finishes, white shadow box frame.
- white cardstock. I used 65 lb. weight.
- cutting mat
- rotary cutter
- pencil
- ruler
- craft scissors
- Mod Podge, either matte or gloss. I used gloss.
- arcylic paint. I used a deep blue paint to complement the blue of the bunny napkins. I’ve had this paint for years. I would use whatever color you have on hand that will work with the napkin you are using. If you are painting a wood frame to recycle it, that’s your best option.

- sponge brushes

Painting Your Frame
I began this project by repainting the frame. It only needed one coat.


Once I painted the top and sides, I set the frame aside to dry. You don’t need to paint the inside of the frame since it will be covered.
Preparing Your Cardstock Background
The cardstock serves two purposes:
- It covers the base of the frame.
- It serves as the backing for the bunny art.

The inside of the frame measured 8.5 X 8.5 inches – perfect for my cardstock. I used my ruler and pencil to measure a square.

Then I used the cutting mat and rotary cutter to cut the cardstock.

Set aside the cardstock.
Preparing the Napkin
Step 1 – Open your napkin.

NOTE: At this point, I could see several other projects to make with these four pieces from one napkin:
- coasters
- decorative tiles
- drinking glasses
- decorative plates
- greeting cards
- gift tags
Step 2 – Since the napkin had four identical sides, use your rotary cutter and mat to cut it into four pieces. I find that’s the easiest and fastest method.


Step 4 – Separate the plain backing from the decorative front layer. It should easily come apart.
My original thought was to use the entire fourth of a napkin as the art craft.

The design had several possibilities. I cut around the main central design, leaving the bow attached.

The back layer of the napkin easily came apart from the front design.

Then I decided to cut out the design in a circle. To do that, I used the largest round cooking cutter I had.

I did have to sacrifice some of the bow tails.

Which design to use in my painted frame? I placed the prepared cardstock in the frame.

One by one, I place the different napkins in the frame. I liked them all. Too bad I didn’t have three matching frames.
Which one do you like best?


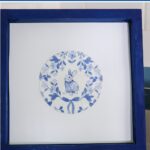
After studying the designs for a few minutes, I decided to use the circle. I liked the contrast between the square frame and the round design.
Decoupaging the Bunny Napkin
This was the easiest and fastest decoupage project I’ve ever done.
Step 1 – I measured to determine the center of the cardstock.

Step 2 – Then, I used the cookie cutter again to make an outline for the placement of the bunny design.

Step 3 – I used a sponge brush to apply the Mod Podge within the circle. I’ve never decoupaged on cardstock, so I used a light touch with the decoupage.

Step 4 – Next, I carefully laid the cut bunny napkin in the center of the circle and smoothed out the paper napkin.

Step 5 – As usual, I carefully brushed a layer of Mod Podge on top to seal and protect the napkin. Typically, the design will look wrinkled and white. Set the bunny art aside to dry.
TIP: I let mine dry for a couple of hours while I worked on something else.

NOTE: As the Mod Podge dries, the wrinkles will decrease and the Mod Podge will turn clear.

Displaying the Bunny Art
When the Mod Podge was dry to the touch. I added double-stick tape squares to the back corners of the cardstock to hold the bunny art in place.
NOTE: It was never my intention to adhere the bunny art permanently to the frame. I liked the idea of reusing it for other projects.

The bunny design fit perfectly in the frame and was the focal point.

My idea for the bunny art was to place it in a corner of our kitchen counter on a stack of cookbooks.

Not only did it fill the space nicely, but it also hides our internet extender behind it.
Not counting the drying time for the decoupage, this project took almost an hour. It was easy, fun and satisfying. And now we have a sweet little Easter bunny decoration in the kitchen to enjoy.
I have more ideas to use this same blue bunny design in the future. In the meantime, I’ll enjoy it in our kitchen.
If you have never made a decoupage project with Mod Podge, this would be a great one to start with. It’s about as easy as it gets.
Favorite Decoupage Projects:
- How to Decoupage Easter Eggs and Decorative Balls
- How to Easily Decoupage a Glass Platter
- 3 Ways to Decoupage Terra Cotta Pots for Spring
I hope you will use this decoupage bunny art as inspiration for your own version. Find a napkin with an Easter theme you like, add a ready-made frame or recycle one, and you are on your way to having a cute piece of budget-friendly art for the spring and Easter season.
Want to save this project? Pin it to your favorite Pinterest Board. And check out one of my Pinterest Boards: Easter DIY Projects, Spring DIY Projects, and Decoupage Projects.


Beautiful Carol! I haven’t tried to decoupage on cardstock, although it’s crossed my mind many times. It seems easier and less wrinkly than I thought it would be. Thanks for the step by step. I’m definitely going to give it a try.
I don’t think I’ve decoupaged on cardstock before, but it worked jsut find. I’ll definitely do it again.
Carol, I just love your DIY! The bunny is so cute and then to make it into a piece of art is beyond lovely! I am a blue and white gal! I like how you put this on some cookbooks on your kitchen counter. Thanks for sharing this cute idea with us.
I would have never thought to do that Carol! Maybe do the whole thing with a napkin but the way you did it is soooooo much better and cuter! Love it. Thanks for the great idea. pinned