How to DIY a Christmas Coffee Table
I love decorating my coffee table for holidays, seasons, and everyday decor. It’s the perfect place to add a festive touch during the Christmas season. Using your creativity, here is how to DIY a Christmas coffee table everyone will enjoy.
With a dash of DIY magic, you can create DIY Christmas coffee table decorations that will transform your living space into a winter scene with a touch of elegance.
This doesn’t always mean grand gestures of DIY creations. Sometimes, it’s the little details that make the merriest memories.
Today, I’m excited to share a few delightful DIY Christmas projects that you can use as Christmas coffee table arrangements.

Why is the Coffee Table an Important Piece of Furniture at Christmas?
A carefully decorated coffee table is usually a focal point in a room at any time of year. Beyond its functional purpose, a coffee table offers the perfect stage to showcase your festive spirit.
- A coffee table is more than just a practical piece of furniture. It is also often the heart of your living space, where friends and family come together. Elevating its decor enhances the overall festive ambiance, creating a welcoming atmosphere for all.
- Unlike larger spaces, a coffee table provides an intimate setting for subtle yet impactful decor. It allows you to infuse the magic of the season without overwhelming the room.
- Unique and handmade decor pieces spark conversations and add a personal touch to your home. Your DIY creations become the talk of the gathering, spreading smiles and holiday cheer. Decorative objects that you’ve created bring a little Christmas into your design elements.
Imagine the heartwarming glow of a Christmas coffee table centerpiece radiating the warmth of the season. It’s not just a table; it’s a canvas waiting to be painted with the colors of Christmas cheer.
I love our brass-toned and glass coffee table. It was the first brand-new purchase when we moved into our home.

It is the center of our living room and the perfect place to create a festive atmosphere with an elegant Christmas centerpiece or two.
Let me show you a simple way to create a festive look with some DIY supplies and your own personal touches.
Inspiration for this Holiday Coffee Table
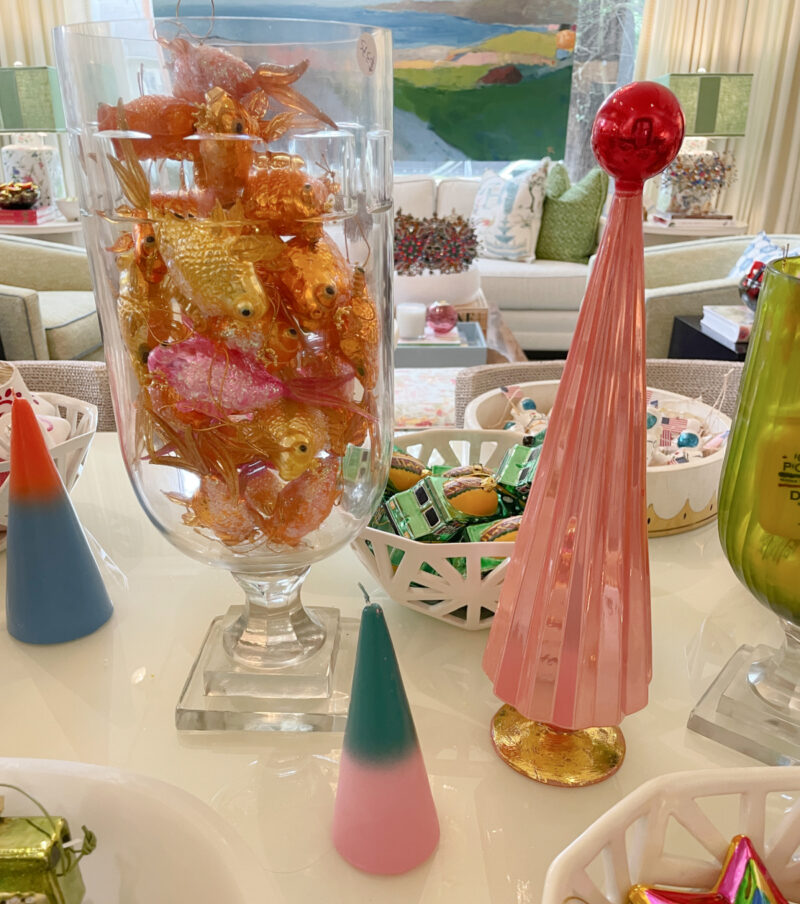
On a girls’ day out in the middle of November, one of the stores we visited was Talulah and Hess in Dallas. This store is truly one of the prettiest, brightest, and happiest shops you have ever been in.
I bought the prettiest pink gloves and spied a pair of lamps I would love for our bedroom.

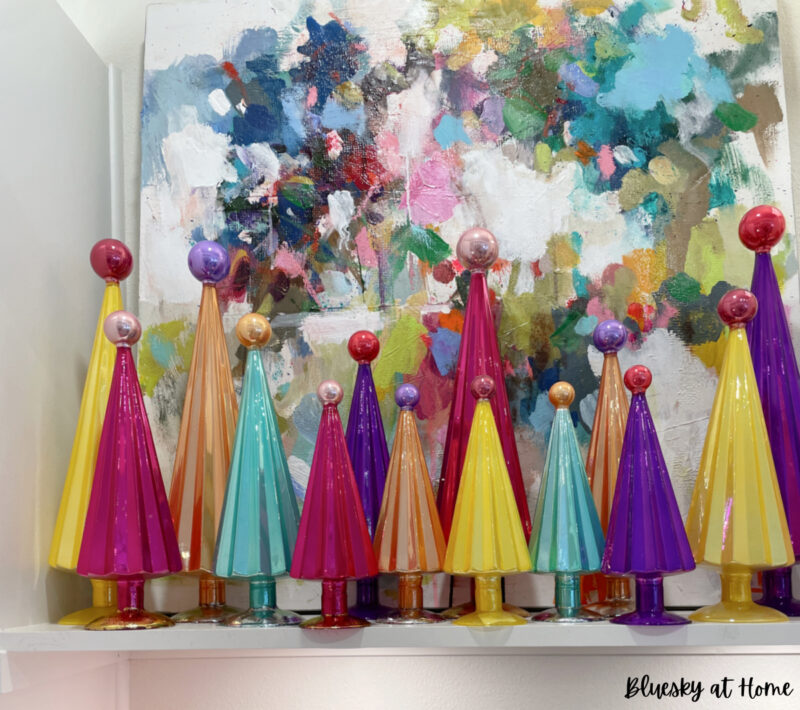
But the things that caught my eye were the glass Christmas trees in bright jewel tones.
I didn’t even look to see the price. I just knew that I could replicate them with the help of some simple DIY tricks for our Christmas decorations in our own home.
Except for the jewel sticker ornaments I made last year, I’ve never used jewel tones in our Christmas decor.
DIY Projects for Our Christmas Coffee Table
The Christmas coffee table called for two main DIY projects:
- painted Christmas trees in metallic jewel tones like the ones above
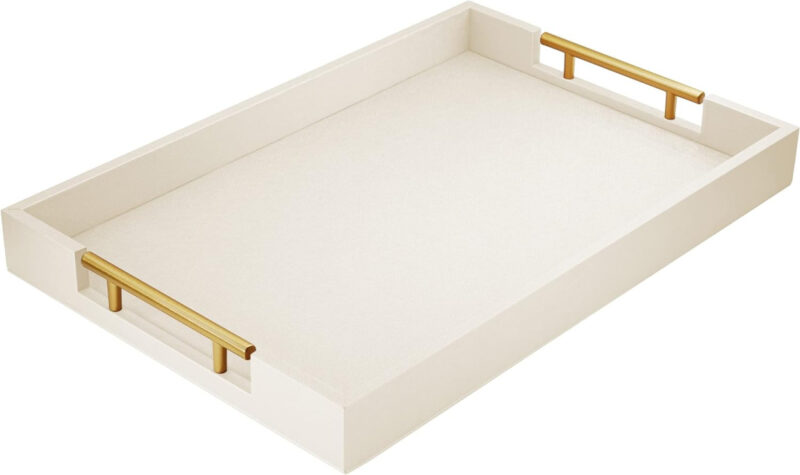
- a white and gold coffee table tray
I felt certain I could find a base for the Christmas trees. With the right paint, I could replicate the trees I saw for a fraction of the cost.
The other piece to my DIY coffee table Christmas decor was a white and gold tray. I had seen several online that I liked. I loved the elegance and the metallic style of this coffee table trays.
Supplies for the DIY Christmas Coffee Table Projects
I made a list of what I needed to make the trees and the tray. I also included items to enhance the design of the coffee table.
- paper mache/cardboard cones for the Christmas trees, ideally in various heights
- metallic paint – preferrable acrylic – in pretty jewel tones

- small metallic Christmas ornaments to attach to the top of the trees*

- glue gun*
- sponge brushes*
- fairie lights in white on a timer*
- faux snow*
- wood tray*
- gloss spray paint*
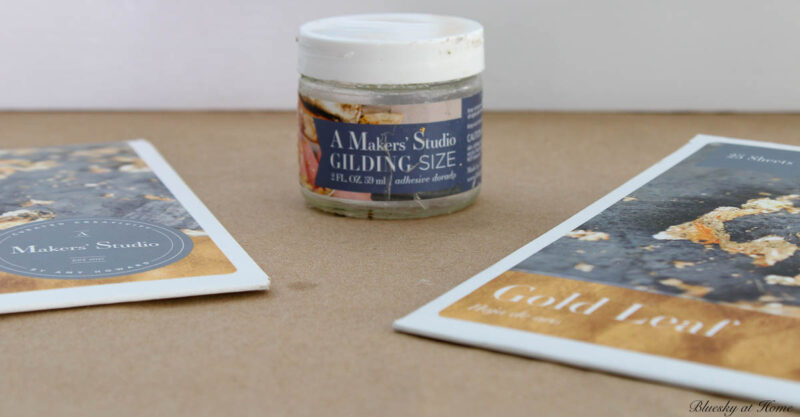
- gold leaf and gilding size*
*I already had these items in my supply stash.
Get your supply list here:
Gold Leaf Wood Tray DIY Project
As it turned out, I found a square wooden tray in my supply closet. I bought it several years ago and had never used it. I thought it would be the perfect start for this DIY project.
I could use this wooden tray and transform it into a statement tray. I used the magical touch of gold leaf and a glossy white palette.
The end result? A stunning base for the DIY-painted Christmas trees I had in mind.
Step 1 – Prepare for Painting
You could use a rectangular or a round tray if that fits your space better. I wanted to use what I had on hand.
Since our coffee table is rectangular, I like to add difference shapes for contrast.
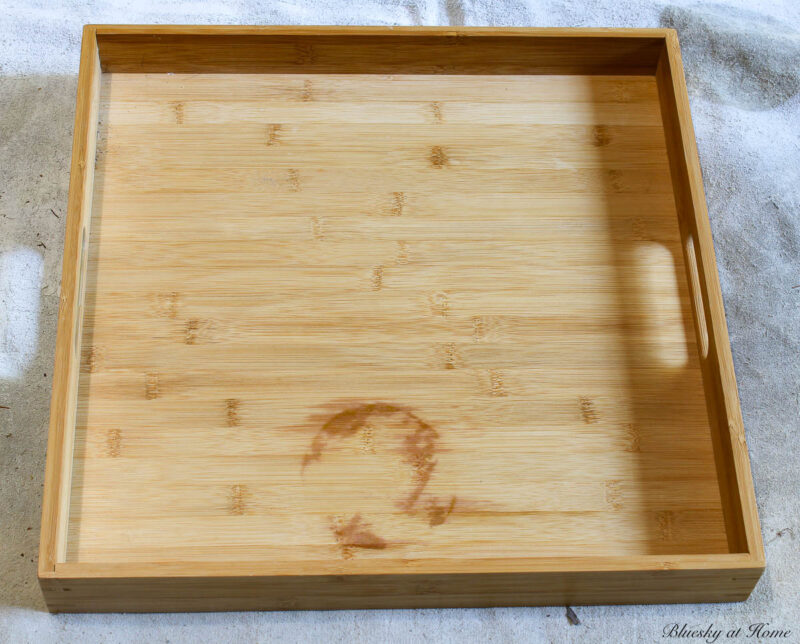
I’ve never used this tray so I don’t know why it had a slight round stain on it. Hopefully, the paint would cover it.
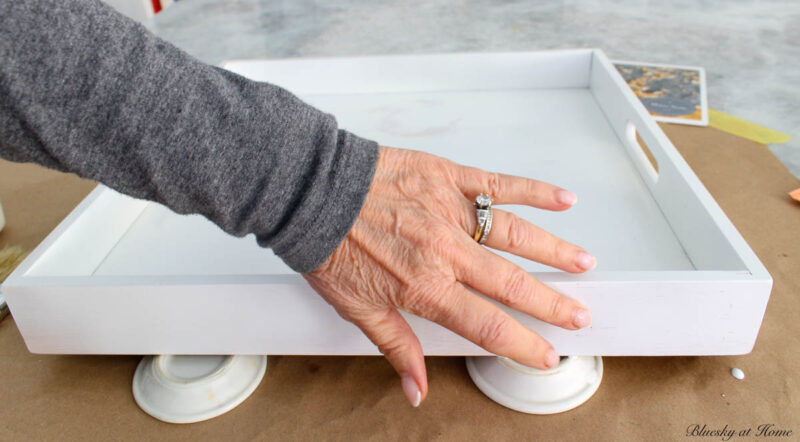
I set up a drop cloth outside in the garage (I first pulled out our cars!) for batch painting.
I had both white primer and glossy white paint on hand. As usual, I attached my Rustoleum Paint Gripper to the can to make painting easier.

The wood tray was smooth enough that it didn’t require any sanding.
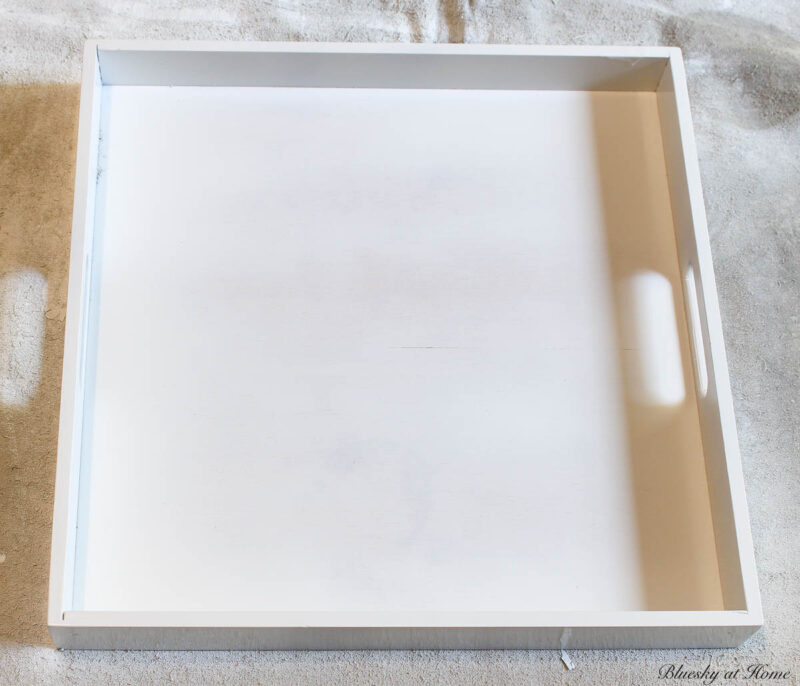
Step 2 – Paint the Tray White
I gave the tray three light coats of white spray paint, allowing each to dry thoroughly.
The paint gave the tray the glossy, smooth look I wanted.
Step 3 – Coat the Tray with Gilding Size
The only Gilding Size I use is from A Makers’ Studio. You do not have to dilute it with water, It goes on easily and only requires about five minutes to “come to tack”.

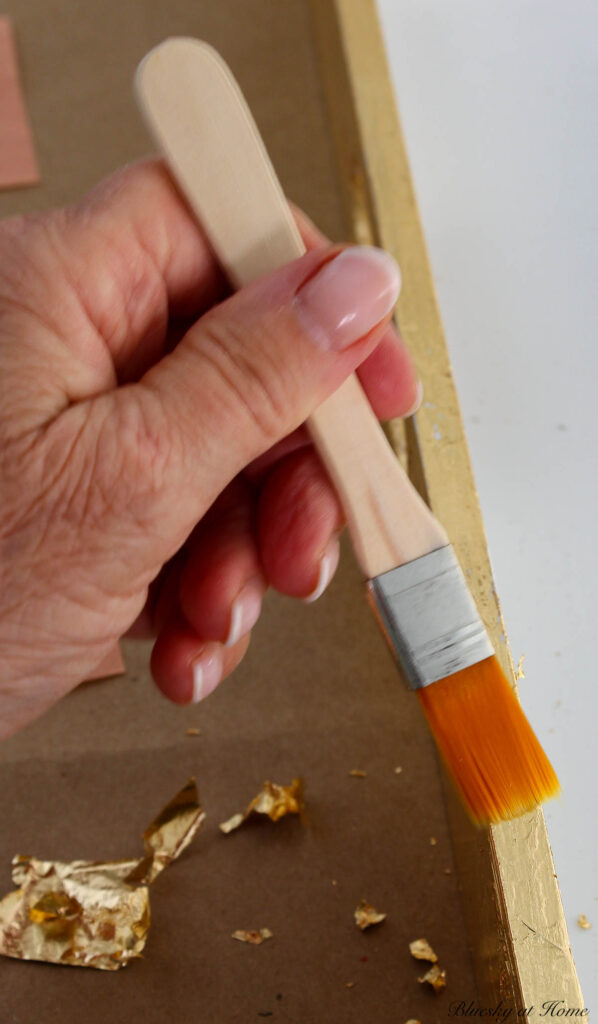
I used a sponge brush to apply the Gilding Size to one side of the tray at a time. When the Size feels slightly tacking to your finger, it is ready to add the Gold Leaf.
Step 4 – Apply the Gold Leaf
Open the Gold Leaf from A Makers’ Studio to the first sheet of Gold Leaf. Carefully press it against the side of the wood tray.


I recommend that you read this post on details of applying Gold Leaf.
In sections, add more sheets of Gold Leaf across the sides of the tray.
You can use a chip brush to gently brush off any excess Gold Leaf.

Use the orange pieces of tissue to rub across the Gold Leaf to “burnish it” to a smooth and shiny surface.

Repeat until you have covered all the sides of the tray.
Then go across the top edge of your tray in the same manner.
NOTE: If any areas are sticky, place small pieces of Gold Leaf over them and burnish them. If you have any areas where the Gold Leaf did not cover the painted tray, add a little more Gilding Size and then the Gold Leaf.
Don’t rush the Gold Leaf process and you will be rewarded with beautiful results.
Metallic Painted Jewel-Toned Christmas Trees
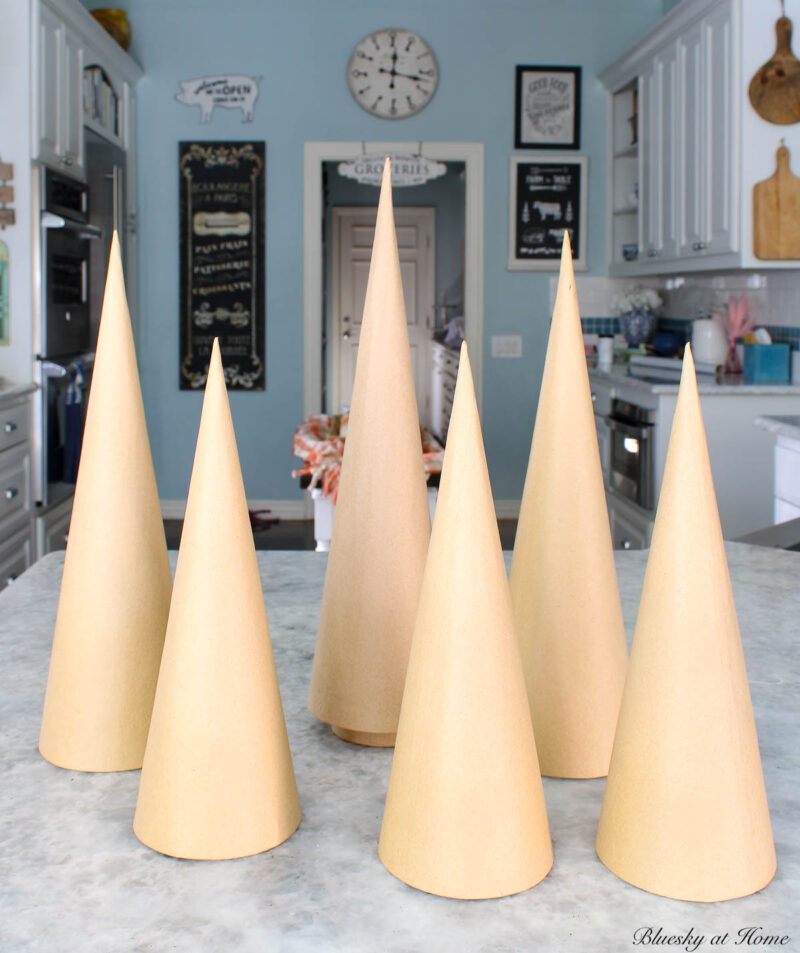
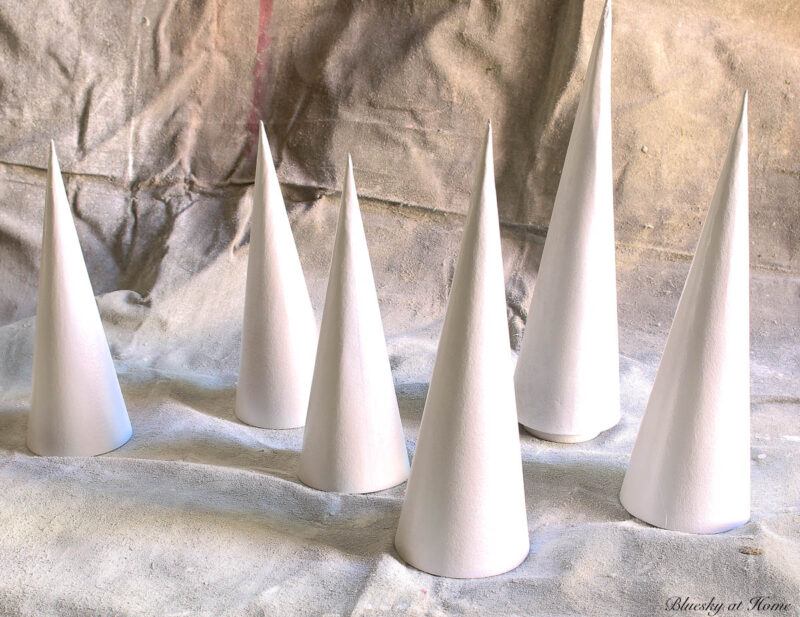
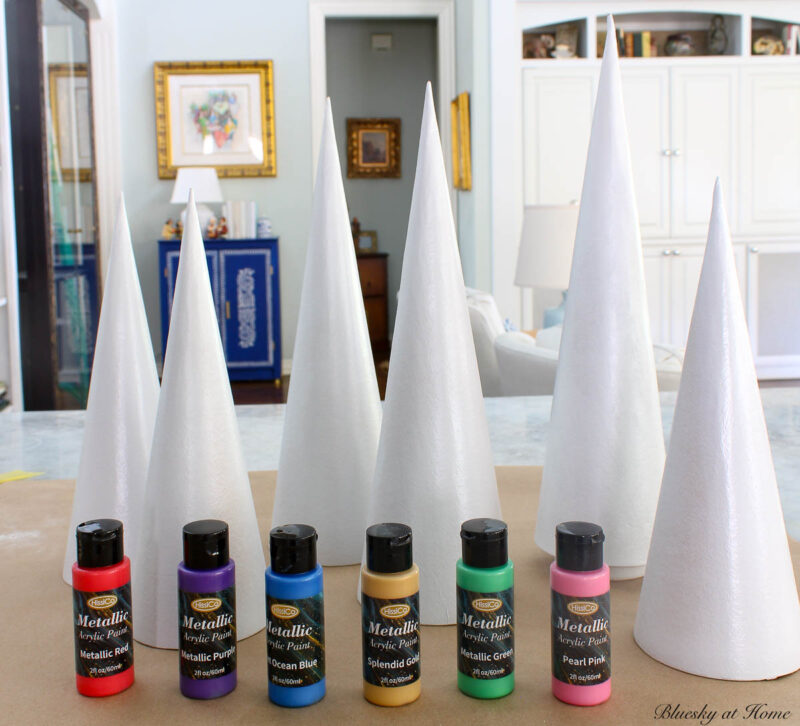
Once I found the paper mache cones for the Christmas trees at Hobby Lobby, I was ready to make the trees.
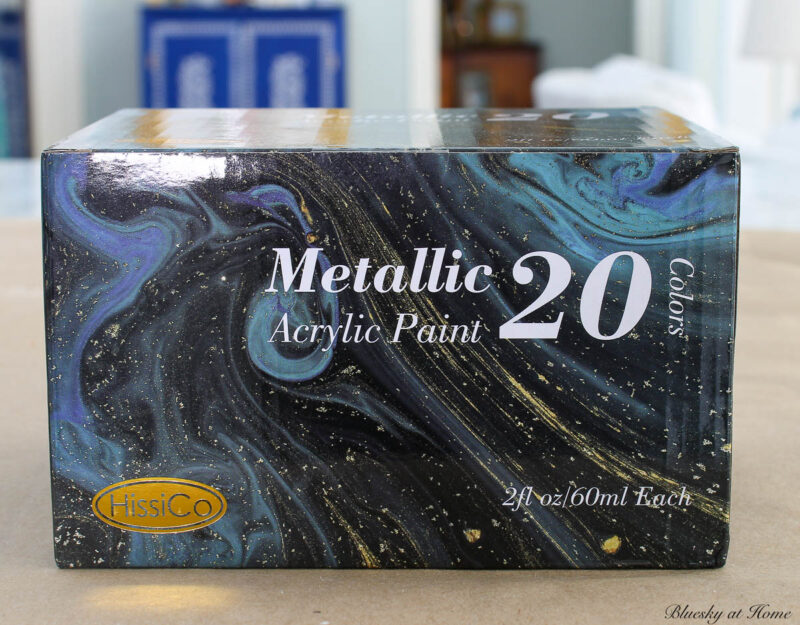
Next up was finding the metallic acrylic paint. A search on Amazon revealed several options. I selected this set of 20 beautiful jewel-colored paints.
The range of different colors was exactly what I wanted for my coffee table vignette.
Step 1 – Spray Paint the Trees White
I didn’t want the brown color of the paper mache trees to dull the color of the trees.
Since I had already set up my drop cloth in the garage to paint the tray, I also painted the trees. I applied two coats of the white gloss spray paint.
Step 2 – Paint the Trees with the Metallic Paint
I laid out craft paper to protect our kitchen counter.
I also used a small plastic container to squirt my paint in. My granddaughters gave me this paint container.
I chose six colors that fit the color scheme I wanted:
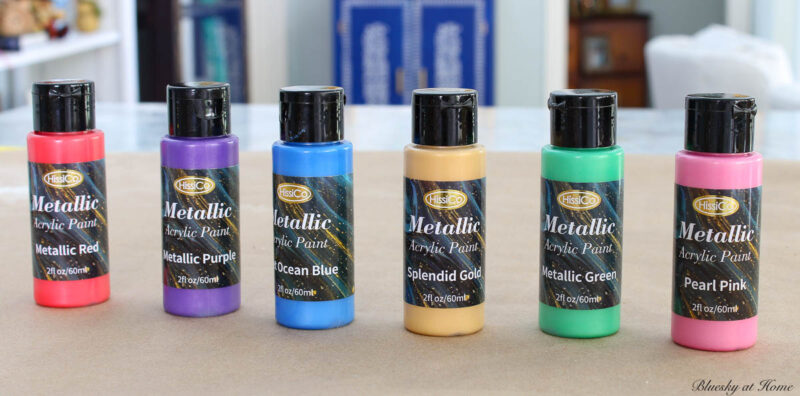
blue, bright green, red, purple, bright pink, gold
I squeezed a small of paint into small plastic paint container for easy application.

I found the easiest way to paint the trees was to hold them by the pointed top.

When I got close to the top of the tree, I set it on the craft paper and brushed the paint on to the top.
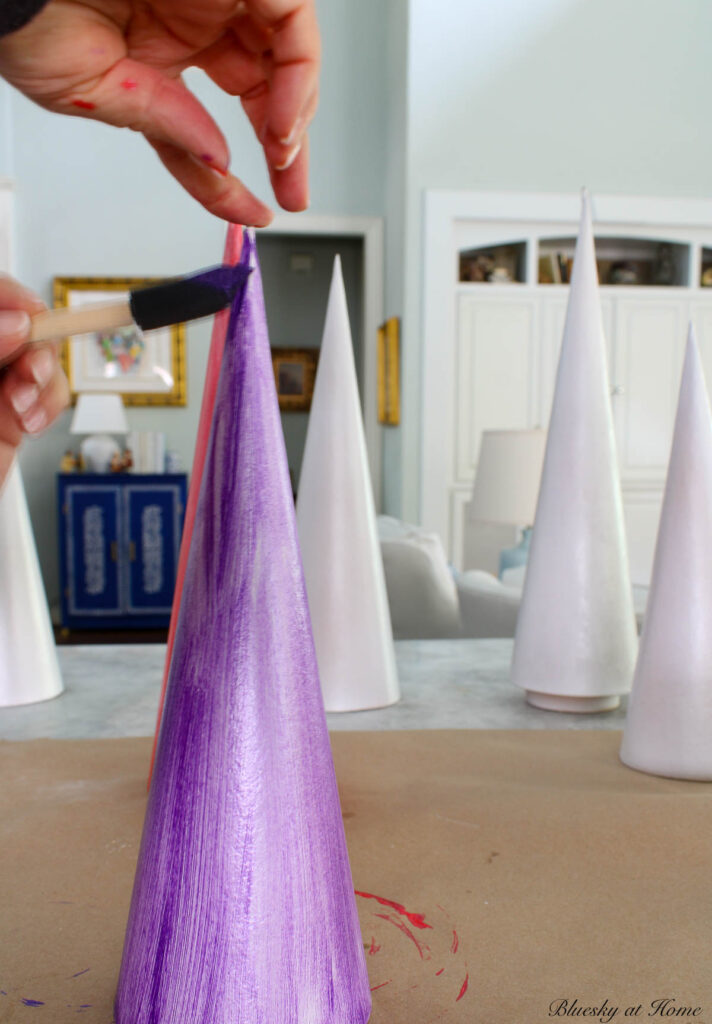
I let the first coat dry – about 15 minutes. The paint looked a little streaky, but like most paints, the second coat covered completely and resulted in a beautiful sheen.
Once the paint was completely dry, it was time for the second part of the project.
Step 3 – Add the Metallic Ornament Toppers
Another look at the inspiration image shows the balls at the top of the trees.
I found several small metallic Christmas balls in our ornament box.

Since the trees were pointed at the top, I had to create a place to glue the ornament. I cut off the tip of the Christmas trees.
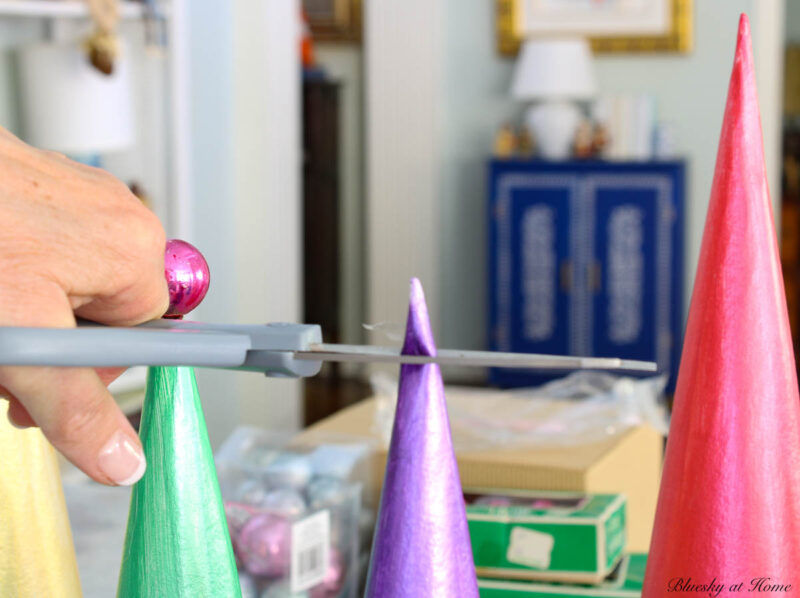
To open up the hole, I poked in my instant read thermometer.

I heated up my Ryobi glue gun and glued each ornament to a tree.
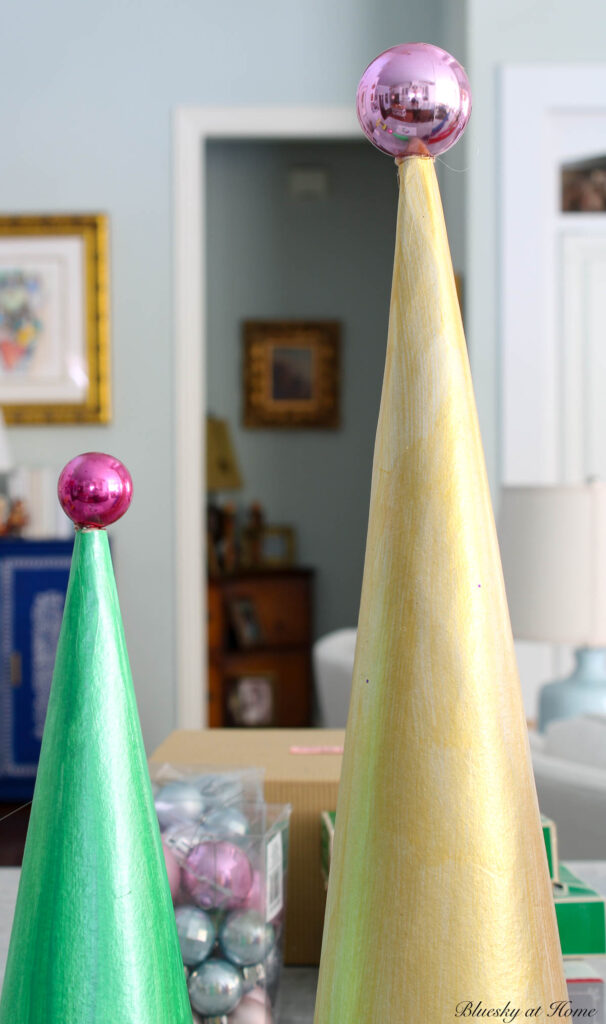
I chose the color of the ornament to contrast with the color of the tree. My trees with done.
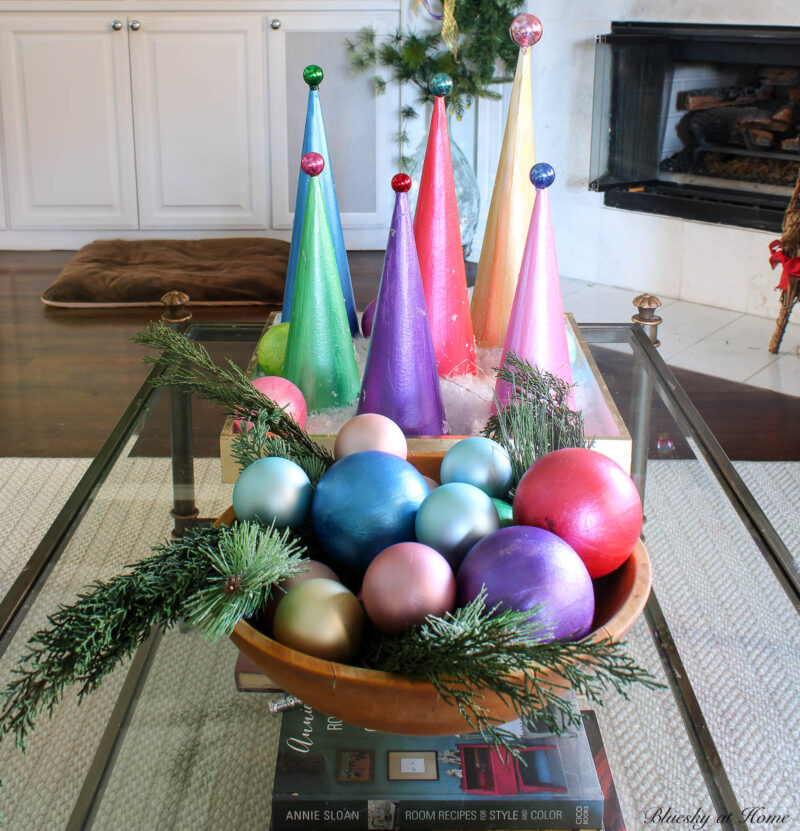
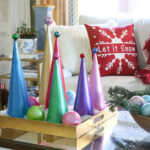
Step 4 – Styling the Metallic Christmas Trees
First I set the painted white tray on the coffee table.

Then I placed the painted Christmas trees on the tray.
I love the shiny finish of these Christmas trees.
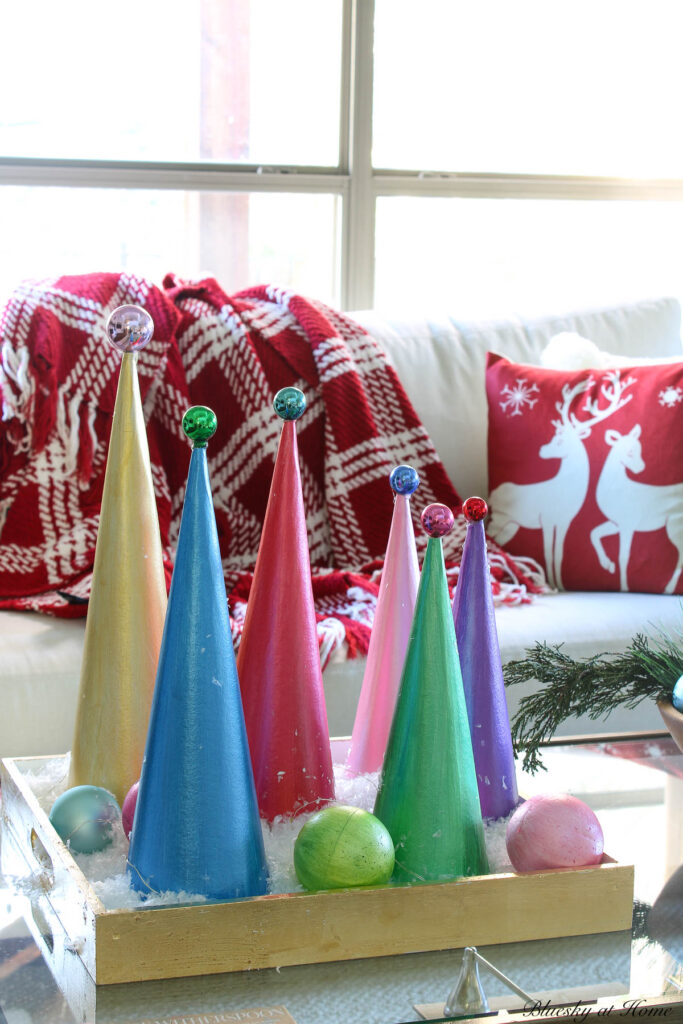
Next I added a string of white fairie lights around the trees.
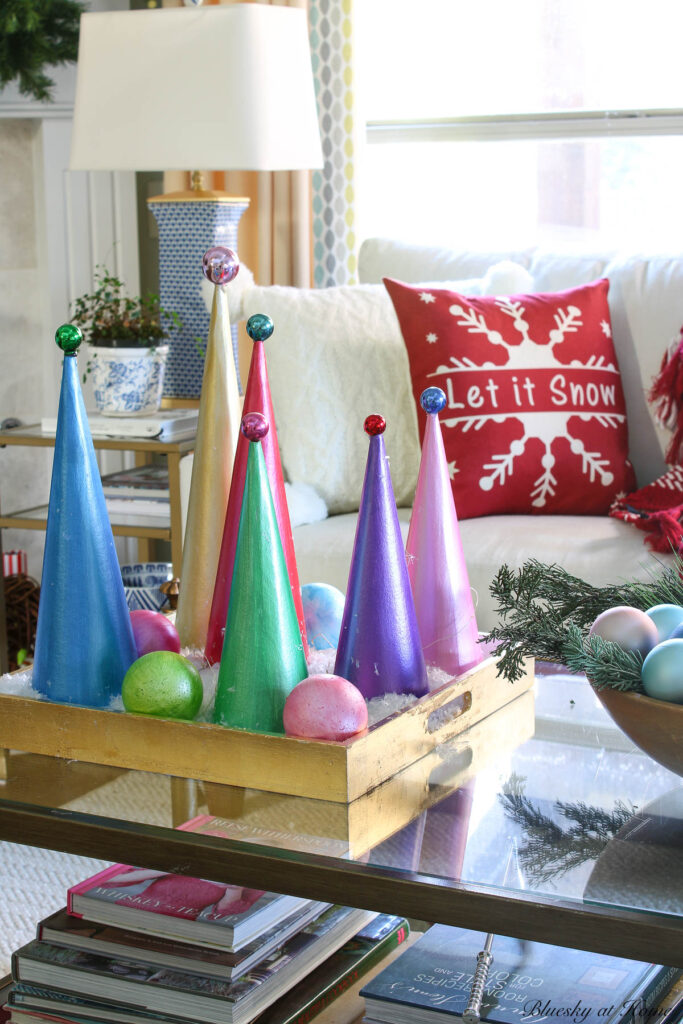
The last step was to add faux snow to cover the lights and the base of the tray.
I also added a few painted styrofoam balls for more color and contrast.
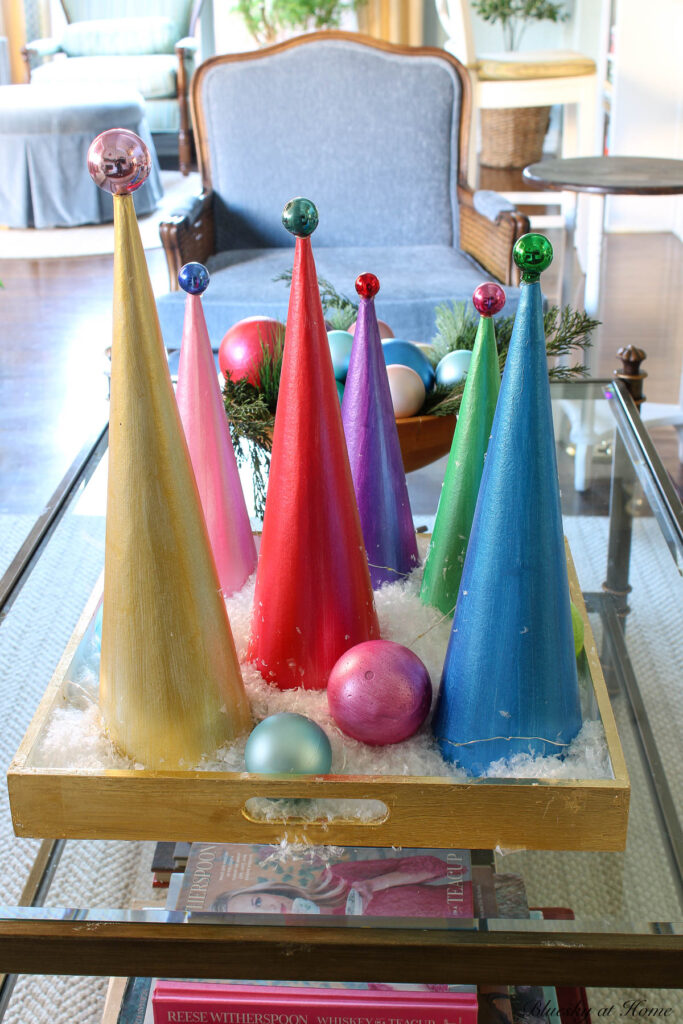
My Christmas tree coffee table vignette was almost finished.
Here’s another option for making small Christmas tree decorations: Christmas trees made with ribbon.
Painting Round Paper Mache Ornaments
As I was looking through my supply drawer, I found five large paper mache ornaments. I think I bought them two years ago. Why not paint them in the same metallic paint? They would complement the painted Christmas trees.
Since I had five round paper mache ornaments and metallic acrylic paint, I could use them to make Christmas tree ornaments. Except I would add them to my beautiful Christmas centerpiece of the coffee table.
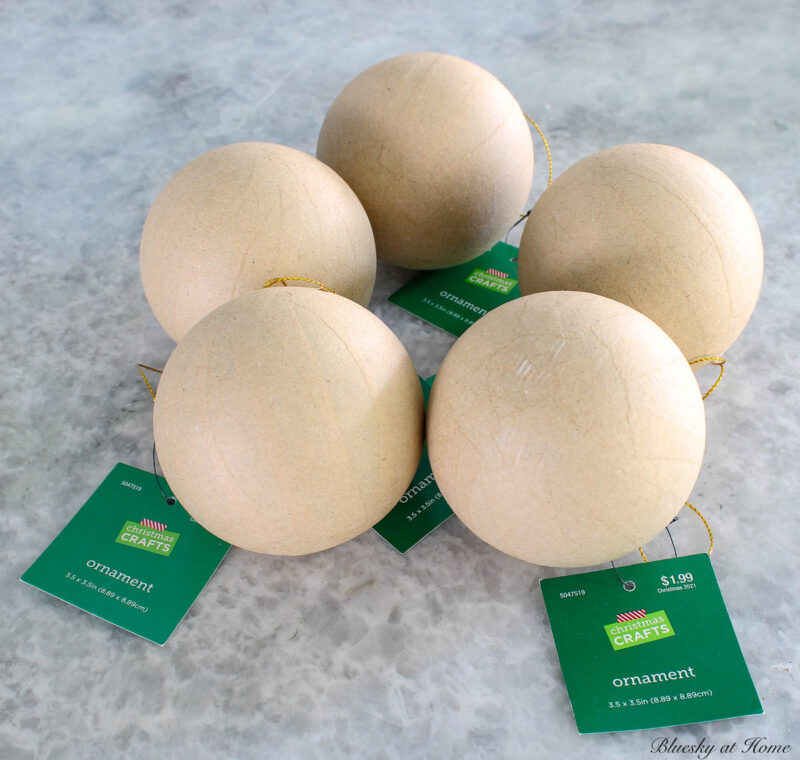
Using the same color palette as the Christmas trees, I painted the balls with metallic paint.


I used a DIY method to hang the balls to let them dry.
I did switch out the gold paint for a plum color.
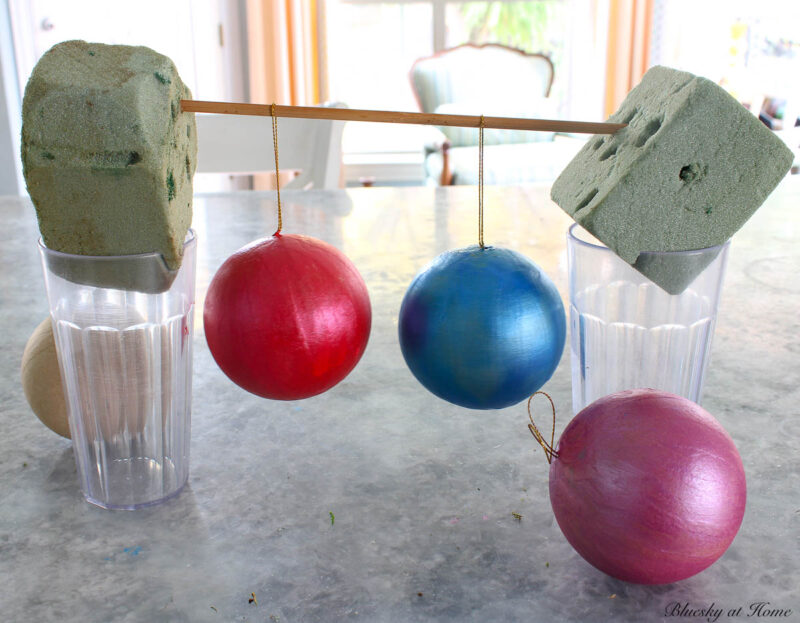
Then I used a natural wood bowl that I bought at a charity sale for $3.00. I first filled the bowl with the big five painted balls. Then I topped them with shiny Christmas ornaments in pinks, blues and golds.
Faux greenery gets tucked in around the balls to finish the decorative elements.
I set the bowl next to the painted tray with the painted Christmas trees.

This simple DIY Christmas coffee table was finished and complete.
It combined the bright jeweled colors that I was trying to replicate and the soft simple style I like for Christmas decorations.
I like the contrast in shapes on the coffee table.

My Christmas coffee table vision came together for the holiday season.
You could use a totally different color palette than I did to fit your Christmas color scheme.
The best part? I have a holiday decor coffee table that fits the holiday spirit, was easy to create, and very inexpensive.
I thought using these simple ingredients was a wonderful way to be creative and use items I had on hand mixed with a few new festive details to create a beautiful coffee table for the holidays.
Other ideas for these painted Christmas trees and balls?
- These centerpiece items would look lovely on a dining table runner.
- They could be used separately on a side table.
- The Christmas trees could be combined with fresh greenery on a mantel with candle holders for some festive cheer.
Want more Chirstmas DIY ideas? Check out my Christmas Inspiration Board, my Christmas DIY Ideas Board, and my Christmas Home Decor Board on Pinterest.
If you like this DIY Christmas coffee table project, then please PIN it for your Christmas inspiration for this year or the coming years.


Hi Carol – I love the jeweled tones you selected for your Christmas coffee table. The metallic acrylic paints created a lovely finish on your trees and ornaments. Thank you for linking up with the Home Imagined Link Party.
Amazing, love it, so cute and colorful and especially love the gold on the tray.
Thank you so much for visiting and sharing your links with us at SSPS #291. See you again on Monday. January 8th, 2024
Wowza, those turned out fun! Such beautiful colors. Love what you did to the tray as well. Everything looks so merry and bright! Happy Christmas.
I love how you saw something you loved in a store and, rather than deciding to spend all that money on it, decided to replicate it at home! Your bright trees and cheery and add such color to your coffee table.
Thanks so much for sharing at Home Imagined this week! Merry Christmas!
Carol. I like the festive look of your coffee table. We don’t have one; just a large foot stool in our family room. No LR press. But our other ‘flat’ surfaces are covered with merry and bright vignettes.