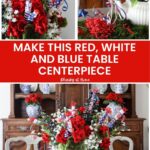
Patriotic Centerpiece with DIY Firecrackers
A beautiful patriotic centerpiece can set the tone for your entire 4th of July table, and this one proves that festive and elegant can absolutely go hand in hand. With a few simple supplies and some easy DIY elements, you can create a centerpiece that looks like it took all day but comes together in just an afternoon.
This is the kind of display that makes guests stop and smile the moment they walk into your home. Think classic container, faux florals in all the right colors, and a handmade touch that makes the whole arrangement uniquely yours. The key is combining classic elements with one unexpected handmade detail that gives the arrangement real personality.
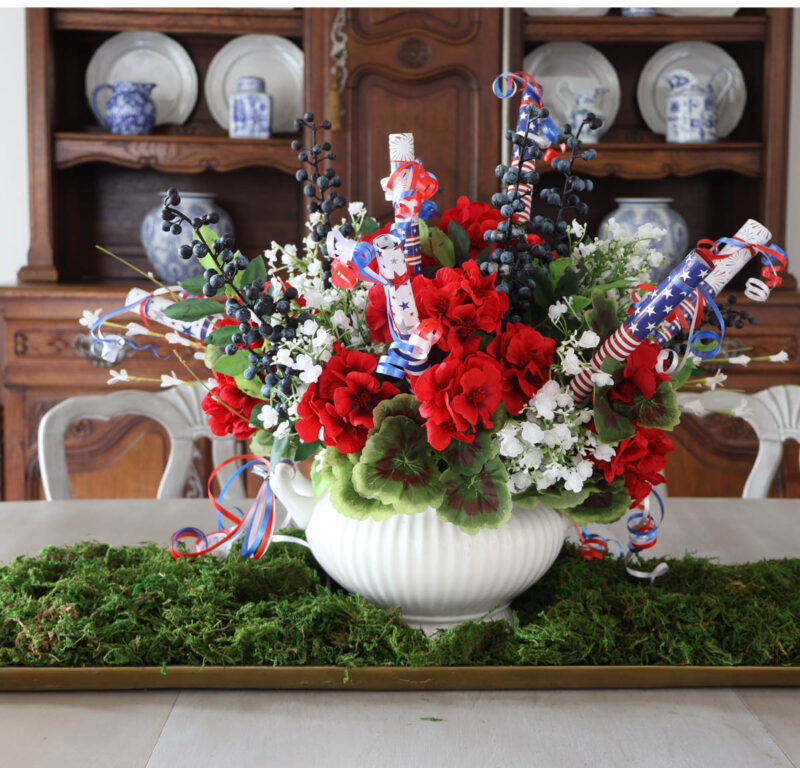
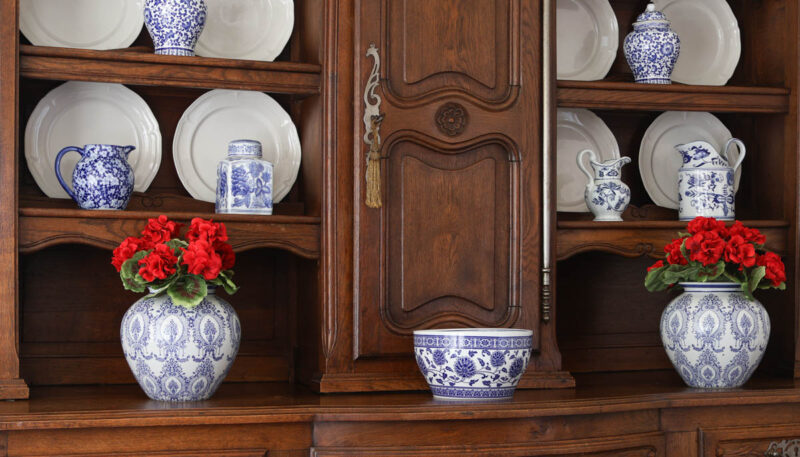
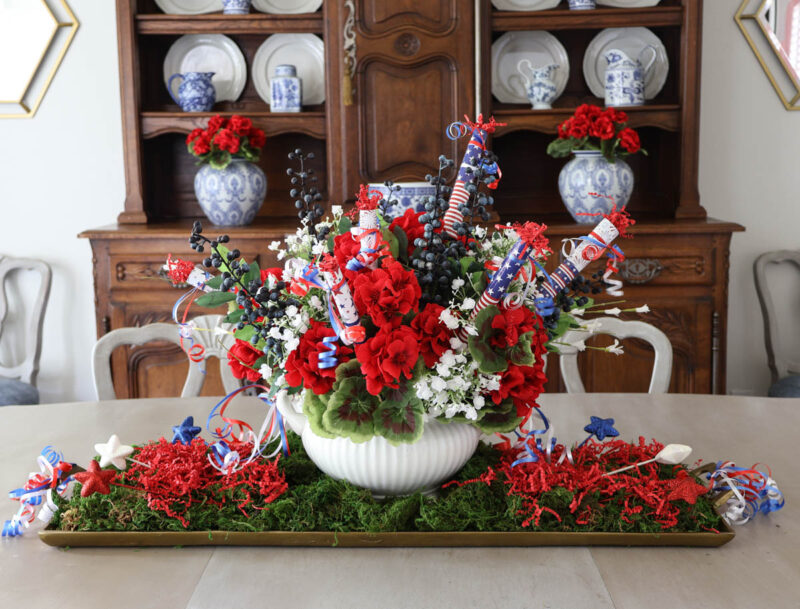
I started with a classic white soup tureen as my container. The handles gave it that formal touch I love, and the white porcelain was the perfect canvas for a red, white, and blue arrangement.
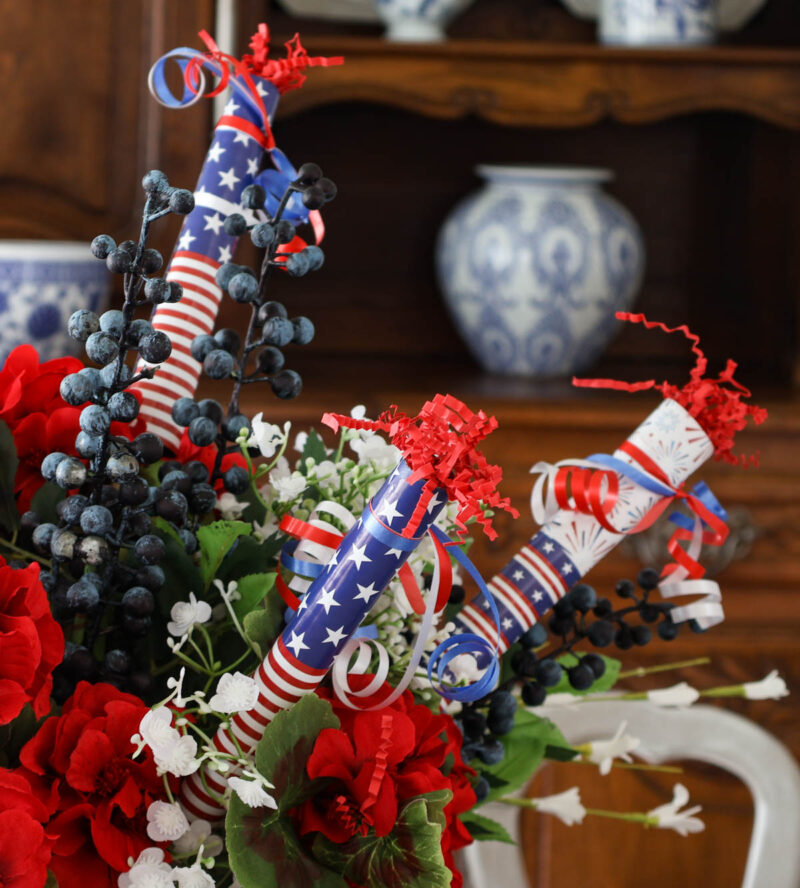
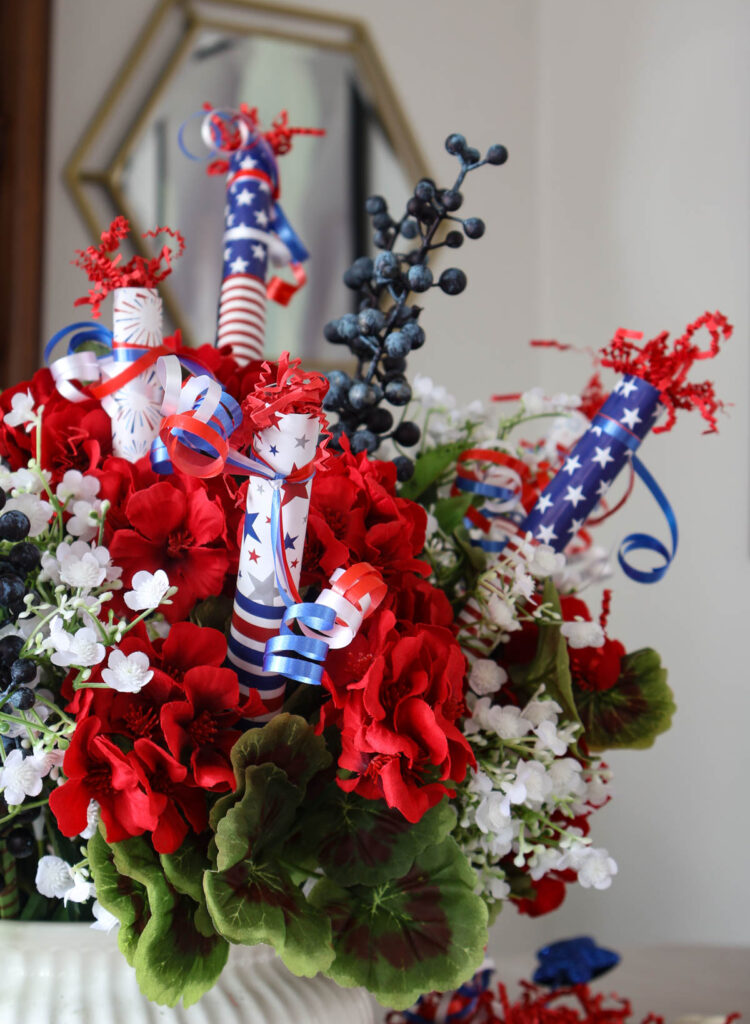
But the star of this centerpiece? I made six DIY firecrackers using red, white, and blue cardstock, a little glue, and curly ribbon in all three colors. They are surprisingly easy to make, and they add so much fun and personality to the arrangement. I’ll walk you through the full tutorial, including a supply list, so you can make your own.
Whether you are decorating for Memorial Day, the 4th of July, or any patriotic occasion, this is a centerpiece you will want to come back to year after year.

Adding the festivities is this month’s Design Challenge, hosted by my friend Cindy of 407 County Road. Unlike most months when Cindy gives us an inspirational image to interpret, our theme this month is “Anything Goes Patriotic Design Challenge”, so you are going to see all sorts of fun decorations and projects from our participants.
If you are joining me from my other Texas friend, Laura of Decor to Adore, then howdy and welcome to the party. I’m very happy you’re here. The complete list of ideas is at the end of the post.
For now, enjoy this 4th of July centerpiece and especially my DIY firecrackers.
This post contains affiliate links to products used to create this project. If you should order any item from this site, I may receive compensation, but you do not pay a penny more. Your purchase is greatly appreciated as it helps support the continued publication of this site.
Firecracker Inspiration
A couple of weeks ago, while I was spending the afternoon shopping at the antique malls, I saw this large bowl full of DIY paper firecrackers. They appeared to be made of patriotic wrapping paper and a stick.
I thought they were cute, but I didn’t even think about buying them because I knew I could do better.

Knowing I needed a centerpiece for our dining room table, I kept this idea in my mental file folder. When it came time to design a 4th of July centerpiece for the table, the first thing I did was to look through my existing supplies and figure out the best way to make firecrackers.
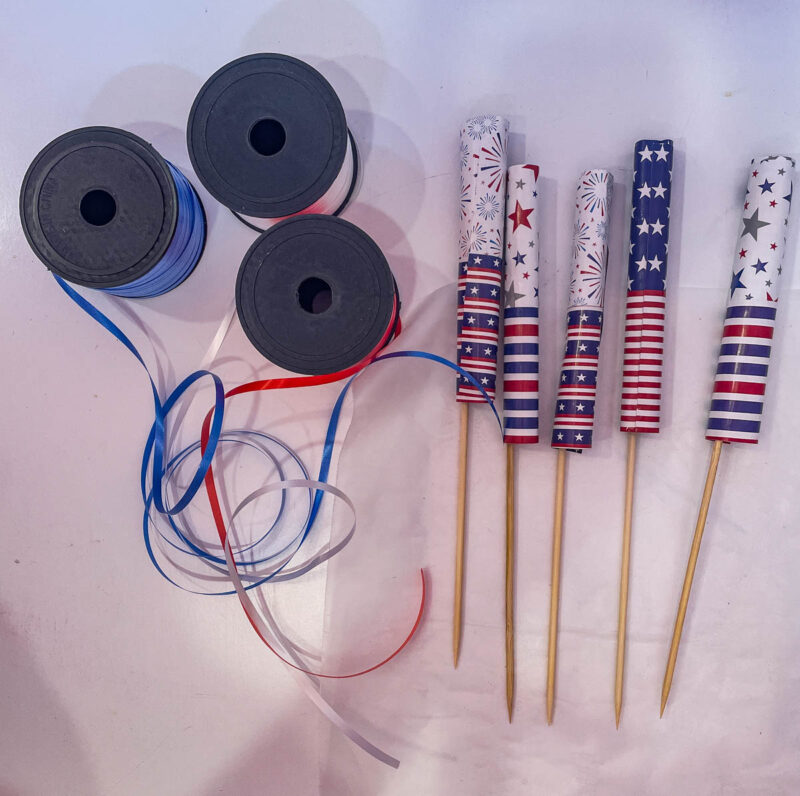
Supplies for the Firecrackers
Here were my ideas for making the firecracker base.
- My first idea was to cut a toilet paper roll as the base. I quickly crossed that idea as I only had one roll, and it wouldn’t be as long as I envisioned.
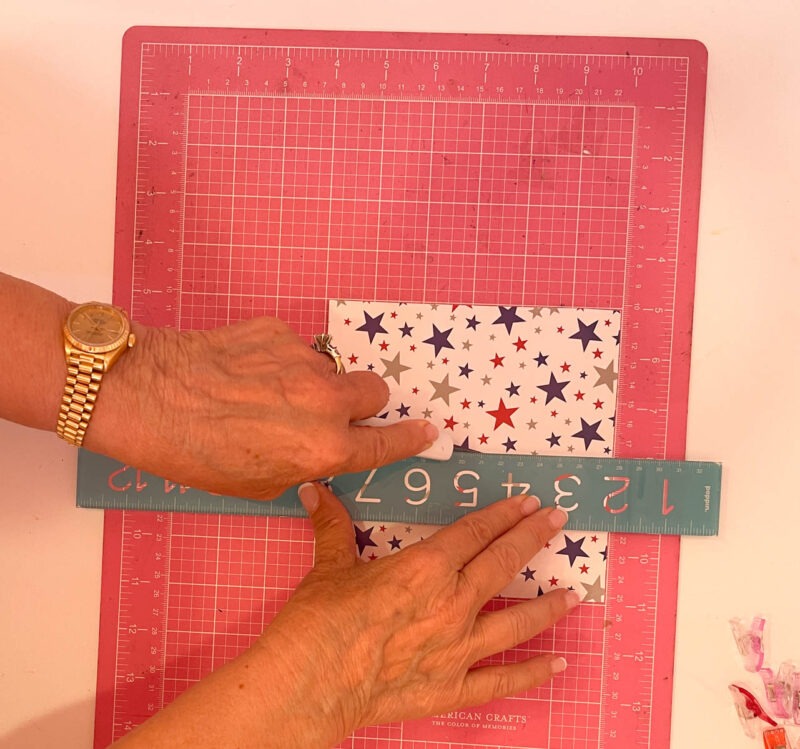
- I cut a piece of white 65-pound 8.5 x 11-inch paper in half horizontally, rolled it into a tube shape, and secured it with paper clips. I still needed patriotic paper to glue around it.
- I went through my cardstock but didn’t find any red, white, and blue patterns, BUT
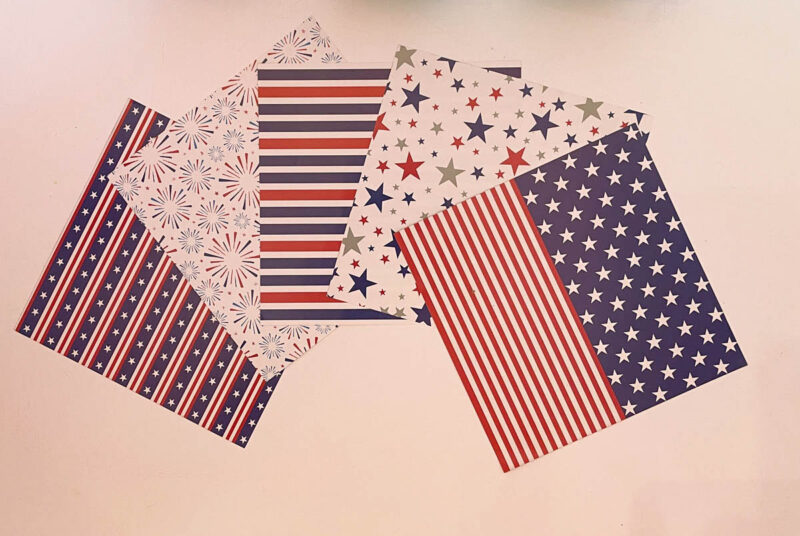
In that same bin, I found a package of 6 X 6-inch patriotic papers that I had bought a few years ago. These might be the perfect solution for my firecracker base. This paper was glossy and not as heavy as cardstock. It was also patterned on both sides.
- I found almost the same patterns in a 12 X12-inch pack of 24. Each page could be cut into four pieces.
- OR if you want a 6 X 6-inch pack, this collection would also work great.
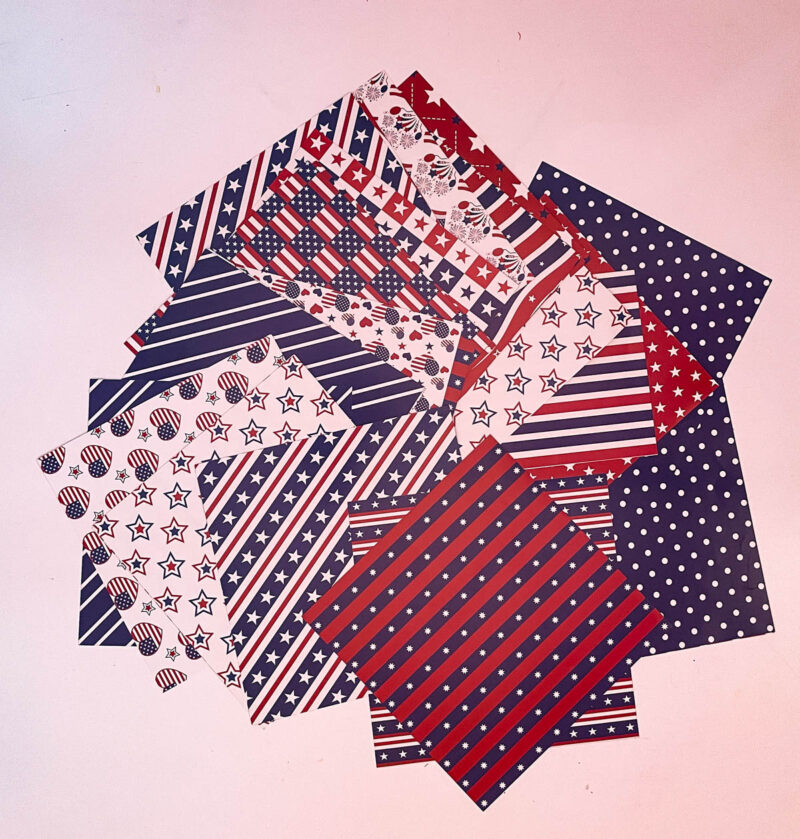
I rolled up one piece of paper in a tube and EUREKA, I had my firecracker base.
I picked out the patterns that I thought would make the best firecrackers. I used two of the stars and stripes. For the other firecrackers, I could cut two pages in half and get two firecrackers out of each for a total of six firecrackers.
I already had:
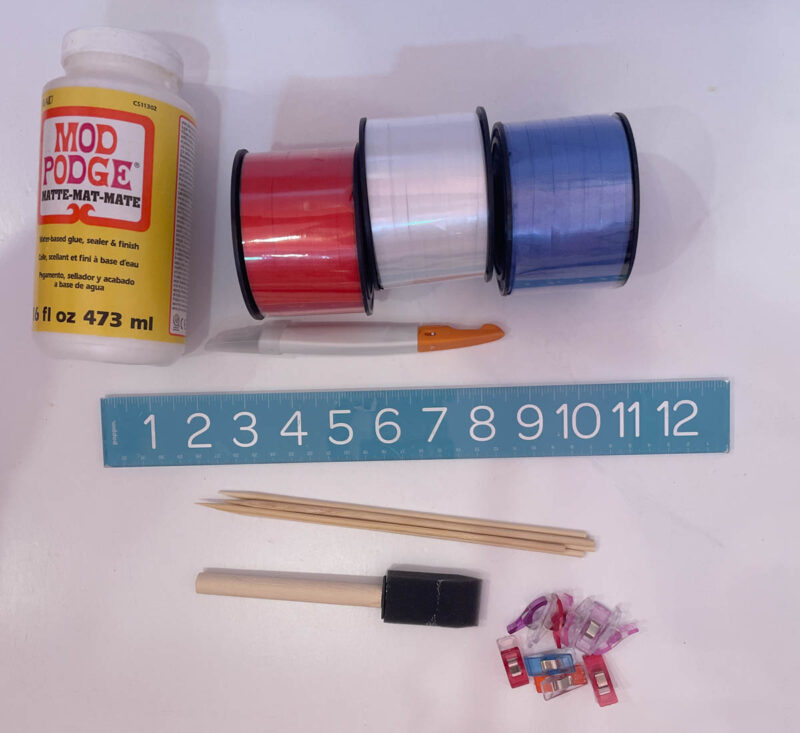
- Mod Podge, but any paper glue would work. I used Matte finish for this project since it wouldn’t show.
- 1-inch foam brush – I always buy these in packs -it’s much cheaper
- wooden skewers – from my kitchen drawer. Mine were 8 inches and the perfect size.
- craft exacto knife or rotary cutter – I’ve always used my rotary cutter for cutting paper, but this time I tried my craft exacto knife, and it was actually a little easier. Use whatever you have on hand. Scissors will work, but you don’t get quite the same sharp edge.
- cutting mat – a must have for cutting paper and fabric
- ruler
- plastic clips – I bought these to use in sewing, but they have worked well for craft projects.
I was totally out of skinny curly ribbon, so I purchased this 3-pack.
Making the Firecrackers
This is really so easy.
Step 1 – If necessary, cut any paper into 6 x 6-inch pieces.
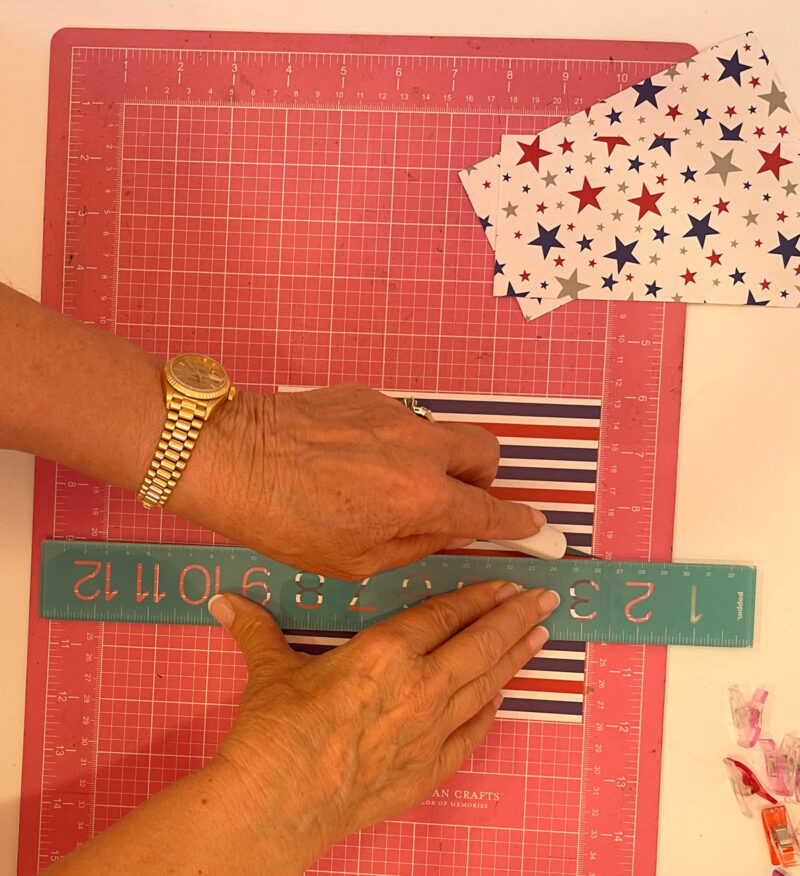
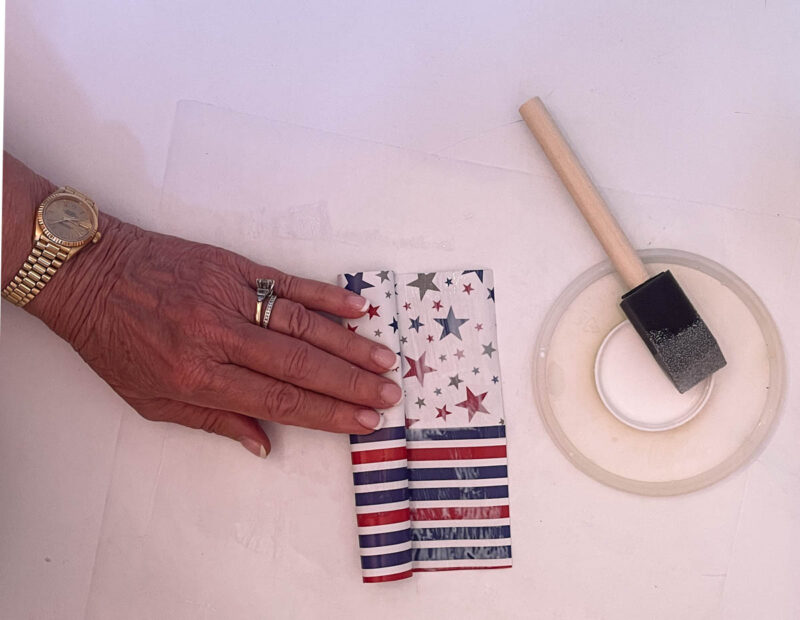
Step 2 – Combine the two pieces of paper – one stripe and one star – by running a thin strip of glue down one side and placing the opposite-patterned paper on top, overlapping by about 1/4 inch. Smooth any glue with your finger and set aside to dry.
TIP: Place a piece of wax paper on your work surface to keep it clean.
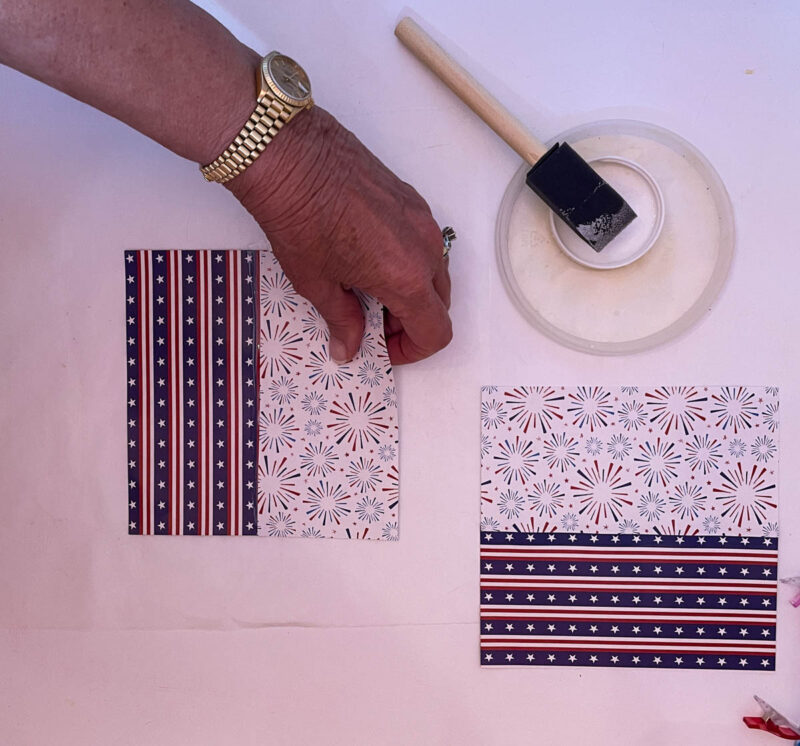
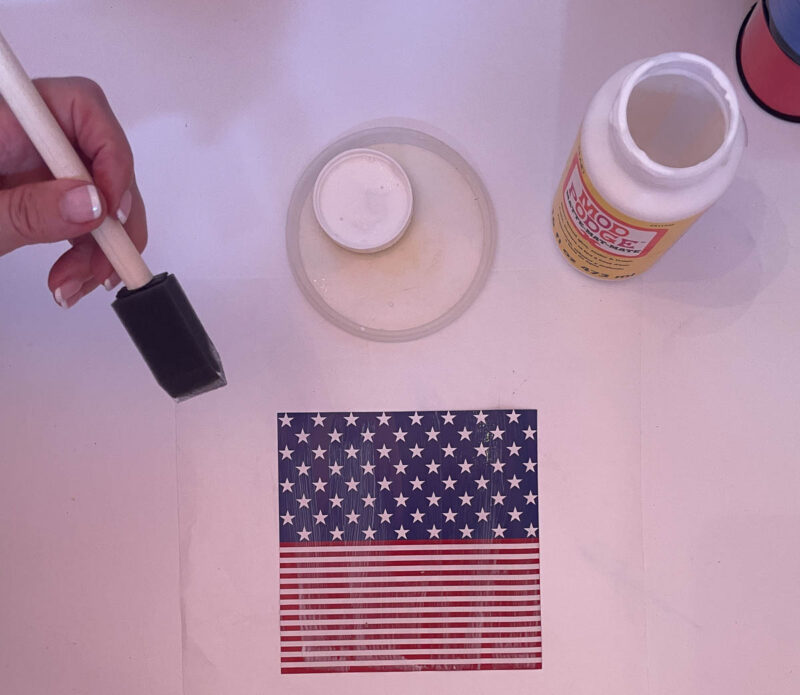
Step 3 – Pour a little Mod Podge into the jar lid, then set it on a plastic lid. This really helps to keep the glue from dripping and you have a place to set your brush. Brush a think layer of Mod Podge across the entire piece of paper.
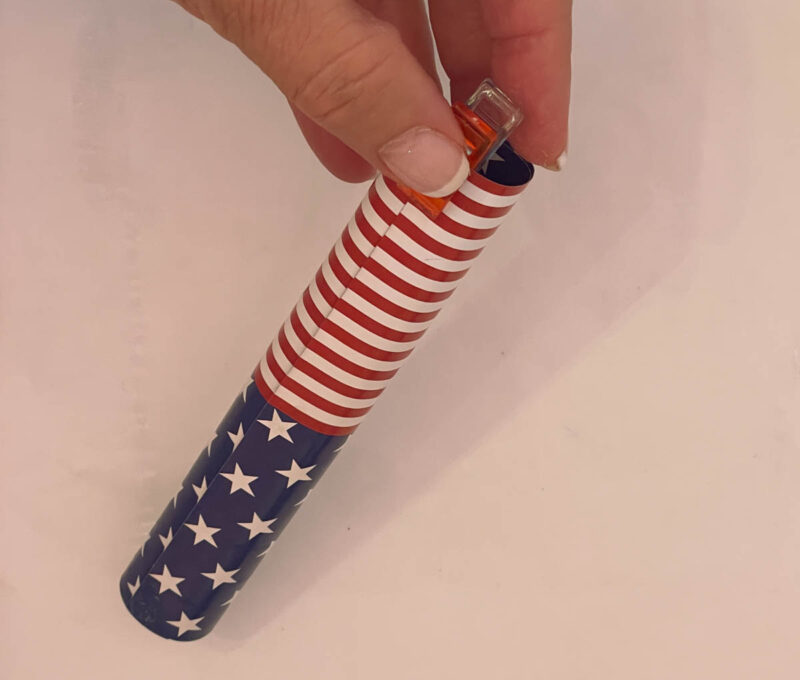
Step 4 – Carefully roll up the paper. Try to keep the stripes in line and the diameter of the “tube” about 3/4″ inches. This becomes the body of the firecracker.
Step 5 – Place a clip on both ends of the tube and set aside to dry. Repeat with all your other papers.
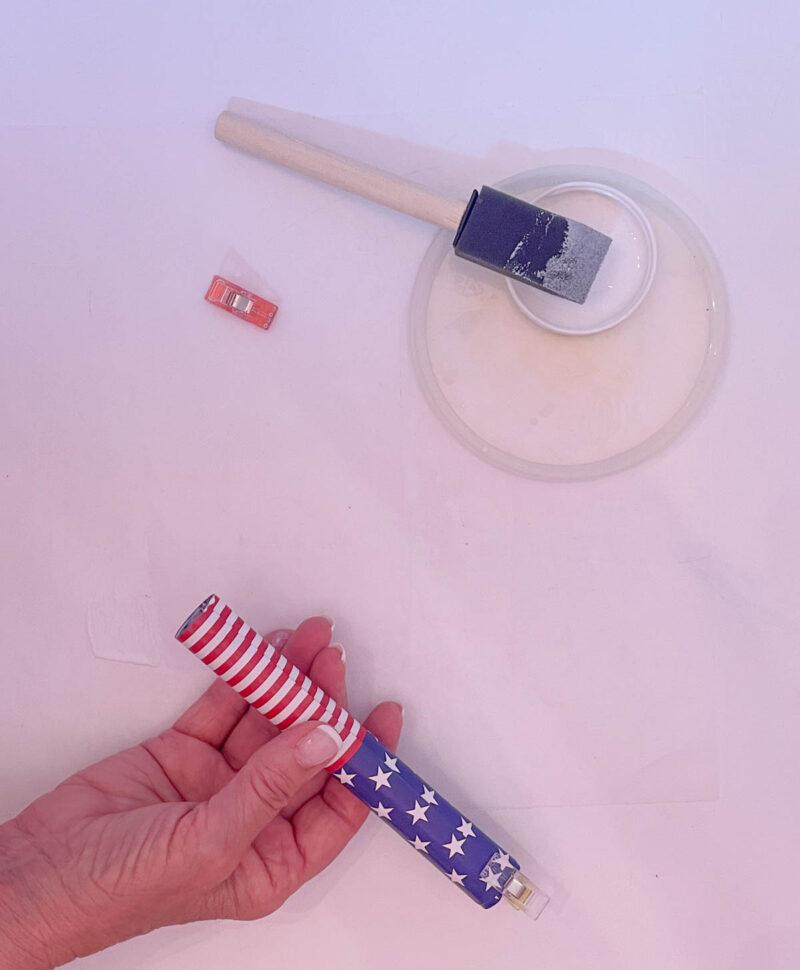
Step 6 – When all your firecrackers are dry (they will be stiff), it’s time to add your wooden skewer. I dipped about two inches of the skewer in the jar of Mod Podge, shook it to let any extra glue drip off, and then placed it in the bottom of the tube.
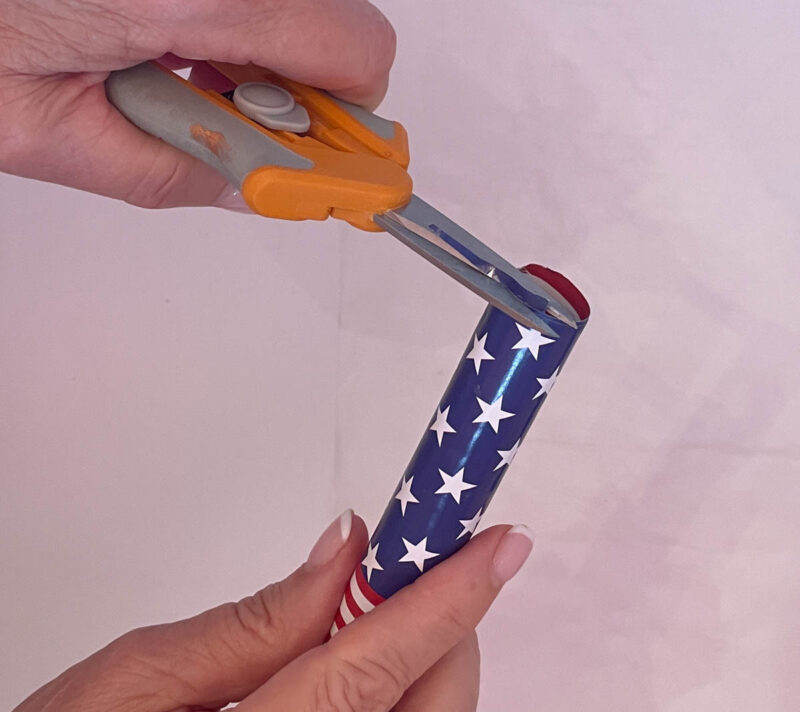
NOTE: If you have any uneven places on the top and bottom of the tube, clip the paper off with your craft scissors.
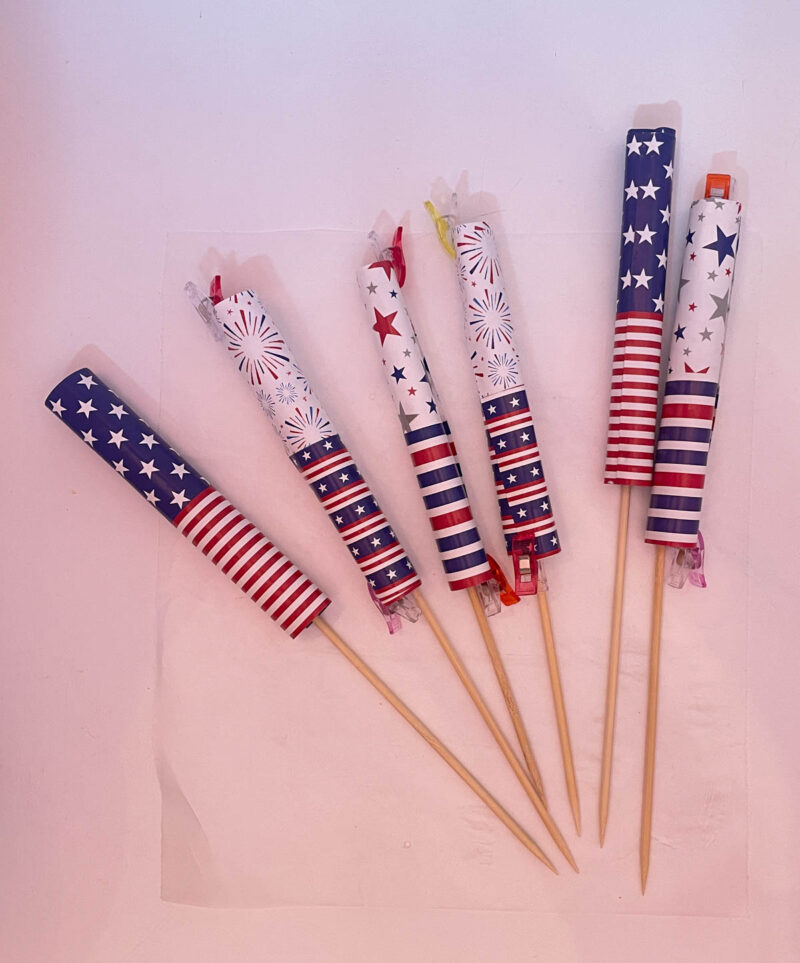
Step 7 – When the skewers are dry, remove the plastic clips. Now, cut off about 18 inches of red, white and blue curly ribbon and tie with a knot at the top of each firecrackers. Curl your ribbon with a sharp scissors.
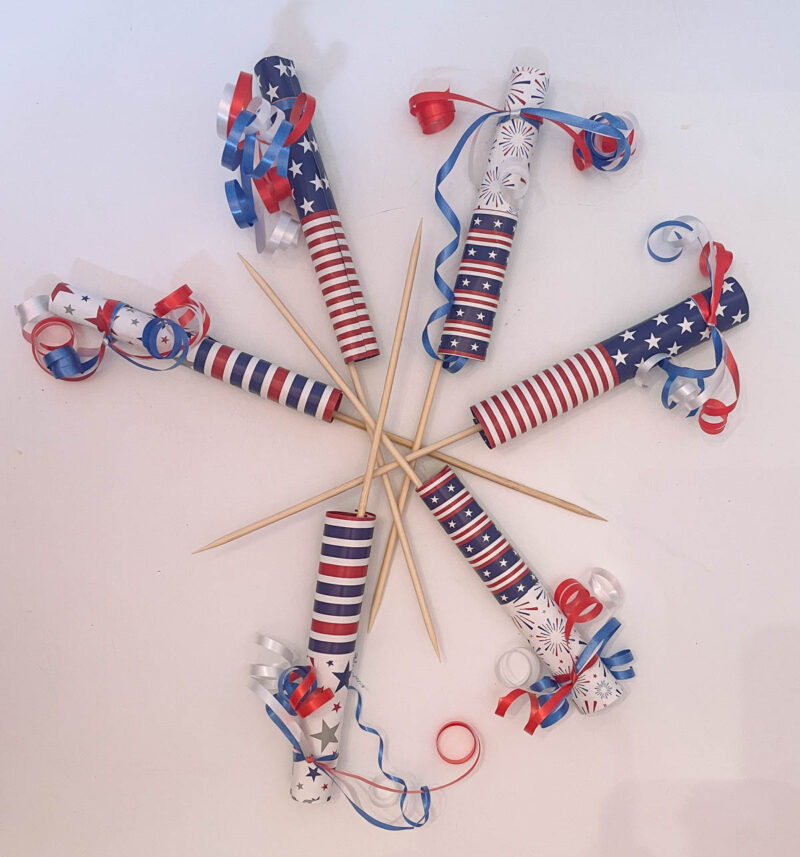
Your firecrackers are done and it’s time to arrange the 4th of July Centerpiece.

4th of July Centerpiece
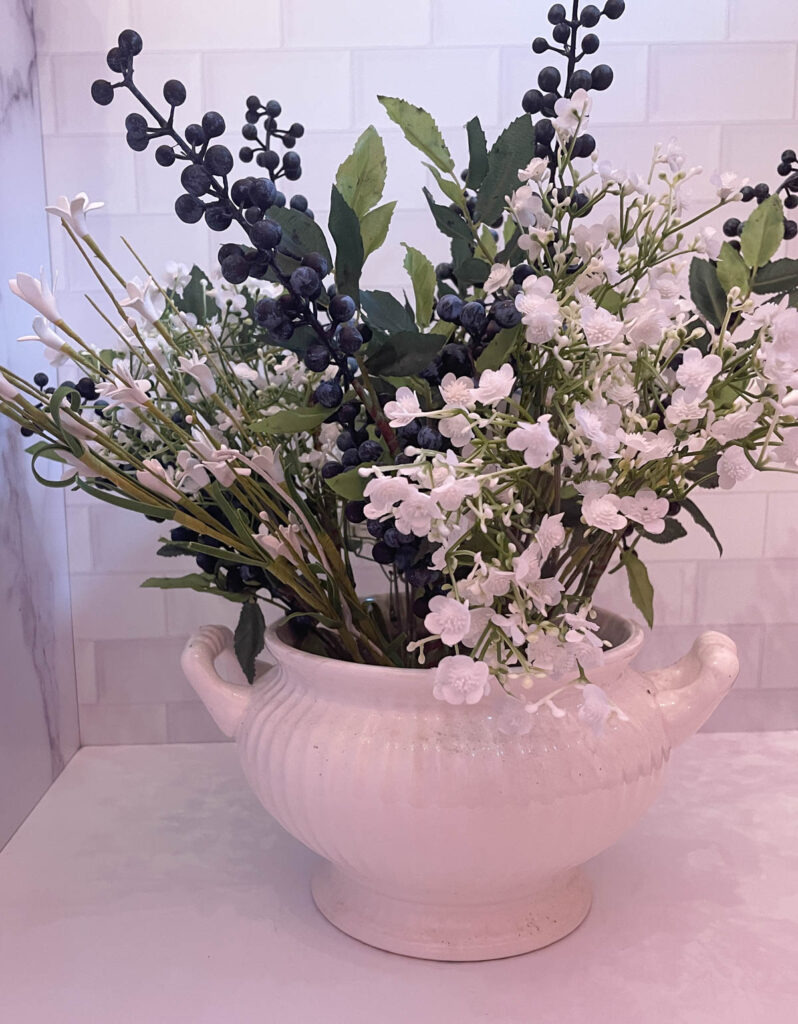
I knew that I wanted to use the same white tureen that I had used for my spring centerpiece. I hated to take it apart, but it had to be done.
Once I removed all the spring flowers, I was ready to add flowers in red, white, and blue.

My flower color palette, of course, was red, white, and blue. For the best longevity, I would use faux flowers.
I mixed small white ones that shared a white pitcher with real red Gerbera daisies for our patriotic entry vignette. (There was one pitcher on each side of the center vignette.) The Gerbera daisies had wilted, so I removed the white flowers and added them to the sour tureen. I’m not sure what kind of small white flowers they are.
It’s not easy to find blue faux flowers that don’t look fake. Then I thought of blueberries, and found the prettiest looking ones on stems. There were six stems of blueberries . I spread them out and added them to the white flowers in the soup tureen.
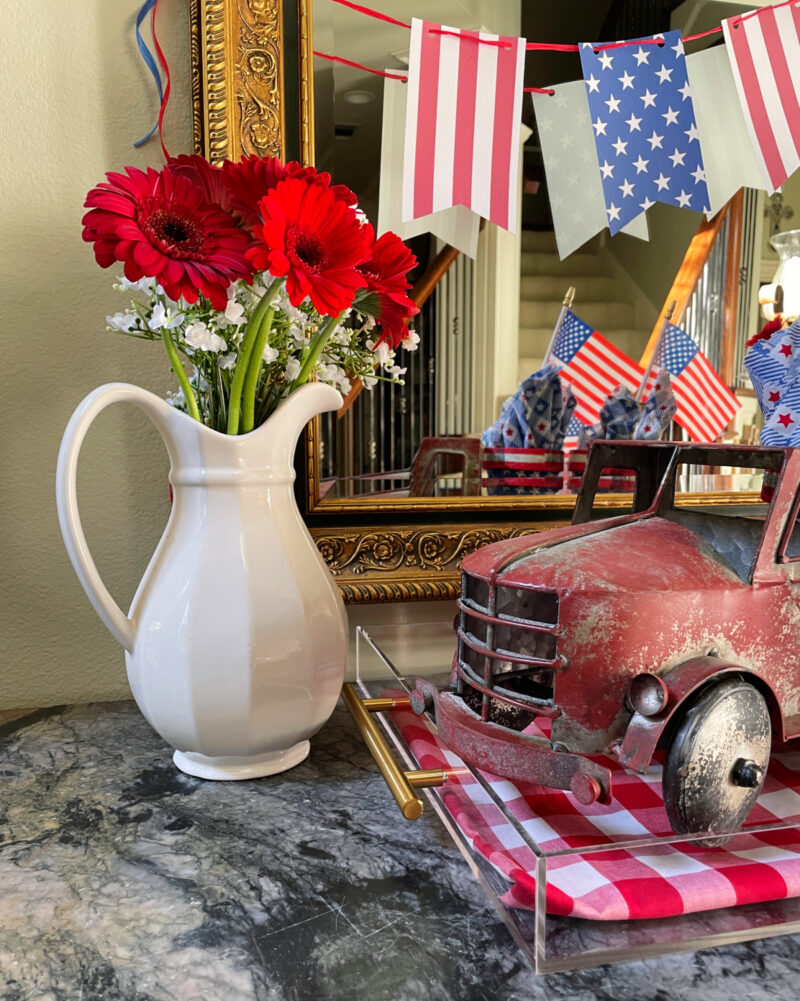
All my red roses were being used in the living room on the 4th of July mantel with my DIY banner. I decided that red geraniums would be perfect. I found this set of eight red geranium stems. I used five of the stems in the main arrangement.
I was so excited to put the centerpiece together that I didn’t take a picture of each addition. As you can see, I added the DIY firecrackers around the flowers.
I also added the red, white, and blue curly ribbon to the handles of the soup tureen. The brass tray covered in Super Moss has been on the table since February!
Next, I added red, white, and blue sparkling hearts to both sides of the tureen and covered them with red shreds. (Leftover from my daughter’s wedding guest favor bags. They just had their 20th anniversary last week! Can’t tell you how many times I have used that red shred.)
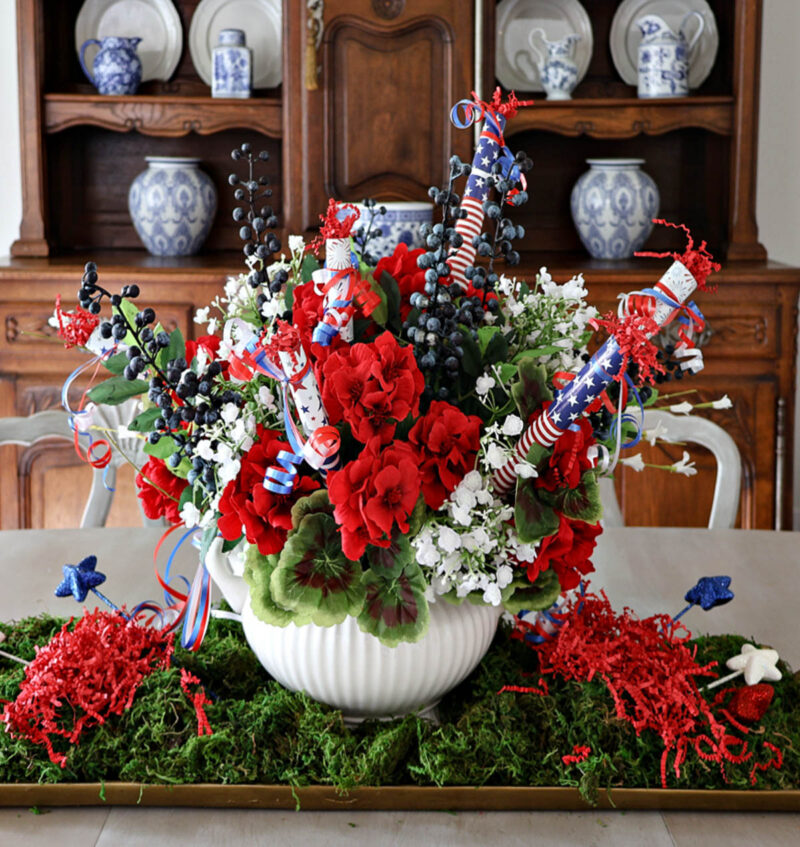
I tied more red, white, and blue curly ribbon on the handles of the brass tray.

As the finishing touch, I stuffed a bit of red shred into the tops of all the firecrackers.
Since I had three more stems of red geraniums, I used them in the two chinoiserie vases on the vasselier for a little punch of red.
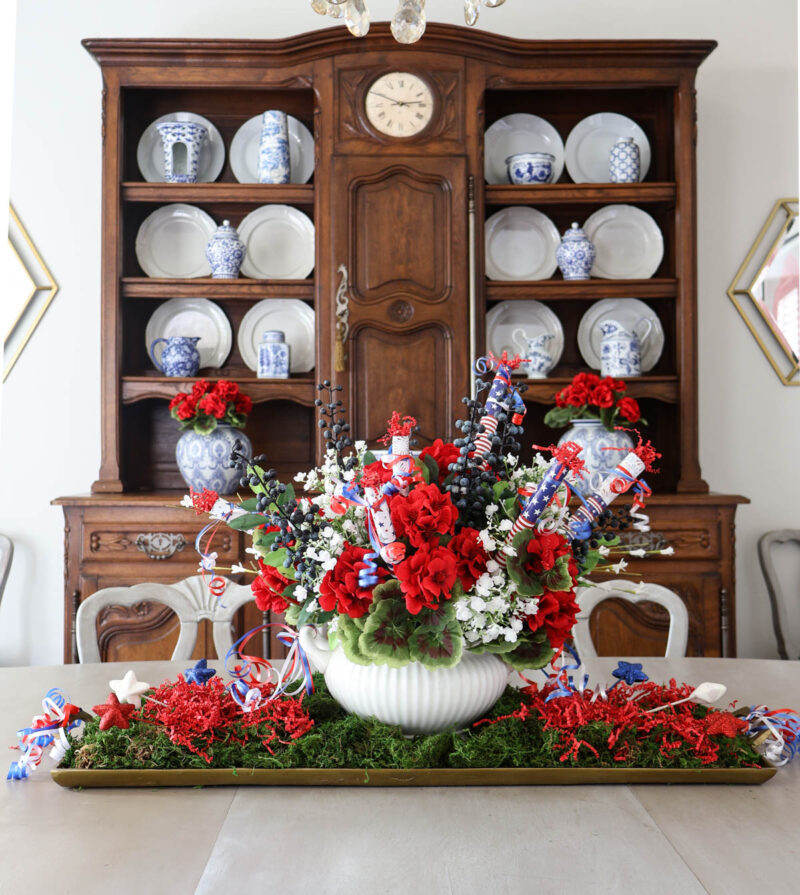
My 4th of July dining room is ready for a small gathering we are having on July 3rd.
This is such a festive look from the front door.
NOTE: You don’t have to use the firecrackers in your flower arrangement. Put them in a mason jar or a few small glass jars. Fill a bowl with them. I know you can think of other ideas.
I hope that you will PIN this 4th of July centerpiece idea and the DIY firecracker tutorial to your Pinterest. If it’s too late for this year, use it for next year. Celebrating 251 will be just as important as 250.
If you need a little 4th of July printable to dress up your patriotic decor, check out this vintage-style Happy Birthday Flag on my ETSY SHOP.

And check out more 4th of July ideas on these boards: Patriotic Holiday Ideas, Patriotic Tablescapes, Patriotic DIY Ideas, and a new Board, 4th of July Celebration Ideas.
And please head over to Lynne of My Family Thyme and see her idea for a pretty patriotic front door basket.


Love the firecrackers, featuring you at Wednesdays in the Studio!
Thank you so much, Jennifer! I appreciate the shout out.
Carol, your firecrackers are fantastic! What a clever idea to add festive firecrackers to an arrangement or even a plant! Love this project and your excellent tutorial my friend! Hope you have a wonder 4th of July!
Thank you so much, Michelle, it was such a fun project to add to my cenerpiece. YOu have a great 4th, too.
Carol, what a fun idea to celebrate the 4th!!!! I bet I have some patriotic papers in my stash from all the years of creating photo albums. 😉 Your bouquet turned out beautifully!!! Love the blueberry pick idea with the red geraniums. The red shreds add a nice finishing touch!
Happy 4th to you and your family! I hope your have a nice time with your guests on the 3rd.
Hugs,
Barb 🙂
I would have never thought to add handmade firecrackers! How cute! You are totally right that your guests will walk in and smile. I bet they’ll walk over to the table, touch it, and wish they had one of their own. I certainly would! Love the moss too. Makes everything stand out. All of your blue and white pieces are perfect, too. You are actually the person I think of when I see blue and white anything at the stores. You are also the one who inspired me to grab a few pieces and incorporate them it into my green home. 🙂 Hope you have a wonderful holiday celebration. pinned
This patriotic centerpiece is absolutely charming! The DIY firecrackers add such a creative and festive touch! Wishing you a safe and happy 4th of July!
Carol, your handmade fireworks turned out so cute and wow, that centerpiece is stunning! Hope you have a happy 4th!
Carol, this is so fun and festive! Love the firecrackers mixed in with the flowers. And it’s all set off so beautifully with the moss. Happy 4th!
What a fun centerpiece. It truly puts a spark in my heart!