How to Make A Farmhouse Sign
Signs and lettering are so popular today in home decor and we all know how popular farmhouse style is. Put signs and lettering and farmhouse together and you have a farmhouse sign. I recently learned how to make a farmhouse sign using a few products from A Maker’s Studio.
The making of this sign was part of a virtual class taught on Facebook live by Amy Howard. Anyone who bought the kit with all the supplies to make this project and registered for the virtual workshop had access to the live feed straight from Amy’s home in Memphis.
As I watched from my office, Amy and her assistant Lee showed everyone how to make a farmhouse sign. It was a fun, informative experience, learning as we went along, making adjustments and corrections.

How to Make A Farmhouse Sign
This post includes link to products that I use, love and highly recommend. If you purchase any product, I may receive compensation, but you do not pay a single penny more.
Although I had used ChalkArt to make some signs a few weeks ago, I was dying to learn how to make a farmhouse sign.
Supplies to Make the Farmhouse Sign
You can use any size sign you want. I chose a large one that was 18 X 20-inches. Here’s what all my supplies looked like when I unpacked my kit.
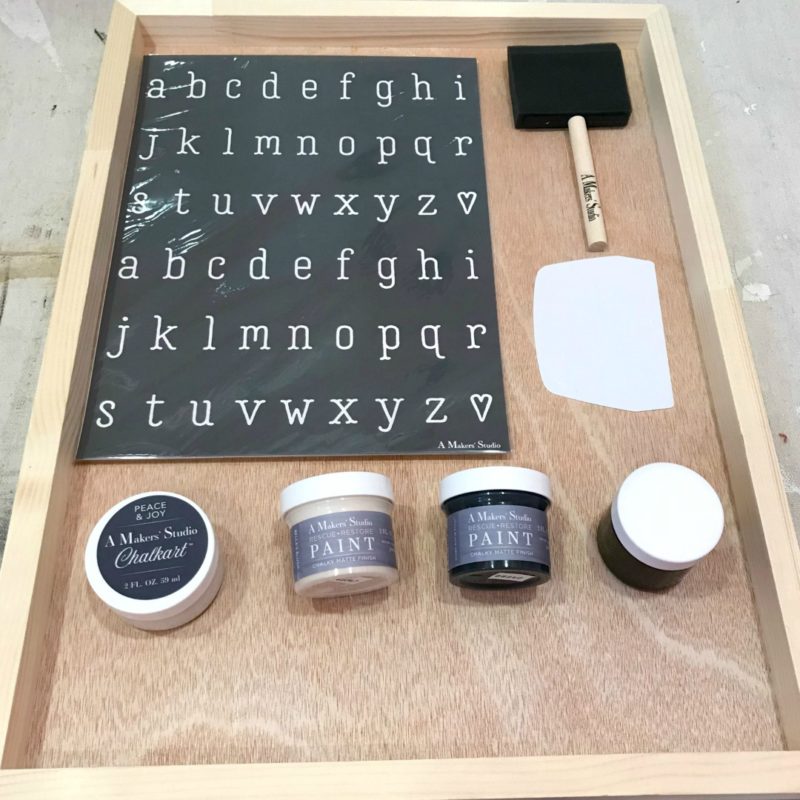
In addition to the sign, you received:
- 1 2~ounce jar of Rescue Restore Paint in Little Black Dress ~ that’s black. I love the names Amy gives the paints.
- 1 2~ounce jar of Rescue Restore Paint in Bella’s Blush ~ the prettiest, softest blush color.
- 1 2~ounce jar of ChalkArt in Peace & Joy ~ white, which I already had, so I’m saving this new jar.
- 1 2~ounce jar of Gel Stain in Hazel Mahogany ~ the stain color I already have, but I did use this one for the workshop.
- 1 3~inch wide foam brush
- 1 Alphabet Stencil Number 4 ~ a simple farmhouse style font
Other supplies that you need for this project:
- painter’s tape
- lint~free rags
- spray bottle of water ~ that’s my suggestion and I’ll show you why in the video.
- paper towels
- a couple of small plastic or glass bowls for the paint
Making the Farmhouse Sign

Unfortunately, I was so engrossed in watching the video that I didn’t take still shots. As you watch the video I made, here are the steps I went through to make the farmhouse sign. These steps will make sense as you watch the video.
Painting the Farmhouse Sign
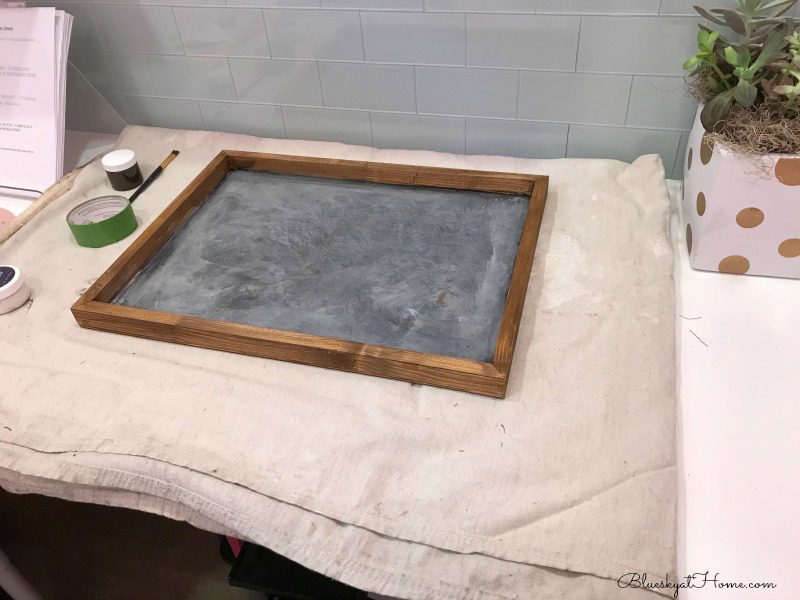
Step 1 ~ Tape the inner frame of wooden sign on all 4 sides with painter’s tape. I used Frog Tape.
Step 2 ~ Pour some of the Rescue Restore paint in Little Black Dress into one of the bowls. It won’t take much. Use either a sponge brush or a chip brush to paint the flat bottom of the sign.
Step 3 ~ Remove the painter’s tape. Tape the flat bottom edges of the sign with painter’s tape.
Step 4 ~ Use a lint free rag to apply the gel stain to all the surfaces of the frame of the sign. You can use one coat or 2 if you want the frame darker.
Step 5 ~ Pour a little of the Rescue Restore paint in Bella’s Blush into the other bowl. Add just enough water to make a wash. Stir to combine.
Step 6 ~ Wad up the lint~free rag and dip it into the Bella’s Blush. Using a blotting motion, go over the flat bottom of the sign. This technique makes the sign look like you just erased chalk from it which is a really cool technique.
Using the Stencils
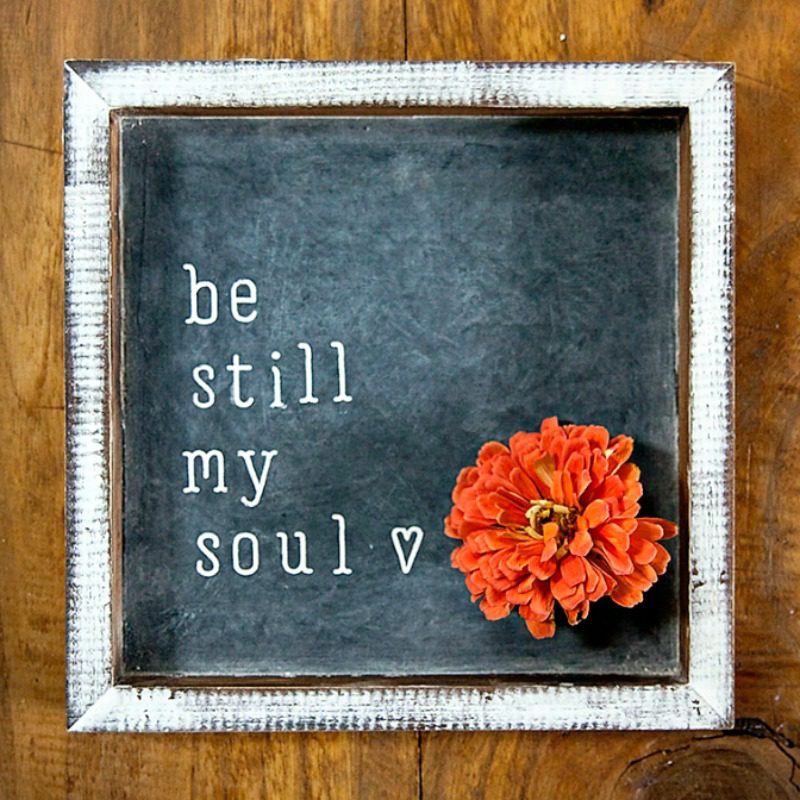
This stencil has 2 identical sets of letters. You really only need one set for this project, but if you want more letters available you can use the entire sheet of letters.
Step ~ Remove the stencil sheet from the plastic envelope. Keep the envelop and the backing paper inside for storing your stencils. Remember ~ they are washable and useable.
Step 2 ~ Using scissors or a paper cutter, cut the stencil letters into individual pieces. NOTE: I used a paper cutter which was super easy and allowed me to have the letters all equal in size. Keep your letters in alphabetical order.
Step 3 ~ Open your jar of ChalkArt in Peace & Joy. NOTE: Cut your spreader in half with scissors. The smaller size makes it easier to apply the ChalkArt to this small stencil.
Step 4 ~ Write out your saying or saying. Determine which stencil letters you will need and place them in order for your saying.
Step 5 ~ Determine where you want your letters to go on the sign. Place your first letter on the sign and rub over the entire stencil to adhere it to the sign. The stencil is slightly adhesive.
Step 6 ~ Place a small amount of ChalkArt on your spreader and carefully spread it across your stencil letter, holding the stencil firmly to the sign. Once the letter is covered, use the spreader, to scrape off the excess ChalkArt.
Step 7 ~ Use the corner of your spreader to carefully lift the stencil from the wood sign.
Step 8 ~ Continue with your remaining letters.
NOTE: If you get a little ChalkArt on your wood sign, no problem. Just dampen a paper towel and wipe it off.
Let your imagination lead you!
Watching the Farmhouse Sign Video
Watching Amy make the farmhouse sign was such a casual approach that you felt like you were in the kitchen with her. I didn’t finish my farmhouse sign during the live video for a couple of reasons.
- I really wanted to pay attention to what Amy was doing.
- I wasn’t sure what saying or quote I wanted on my sign.
So I decided to wait and finish my sign later and video my process for you. This really was a learn~as~you~go process. We used the Rescue Restore paint in a different application which was great to know about. I also continue to learn more ways to use ChalkArt which I can pass on to you. And this was the first time I have every used such small stencils on a project.
I came away from this project even more excited about the products and what they offer and about future projects.
Making My Farmhouse Sign Video
I hope you enjoyed learning how to make a farmhouse sign and you can see that learning about new products, new techniques and new projects is fun and satisfying. Please let me know what you think in the comments. I’d love to know what projects for your home that you would like to learn how to do. We can do them together.
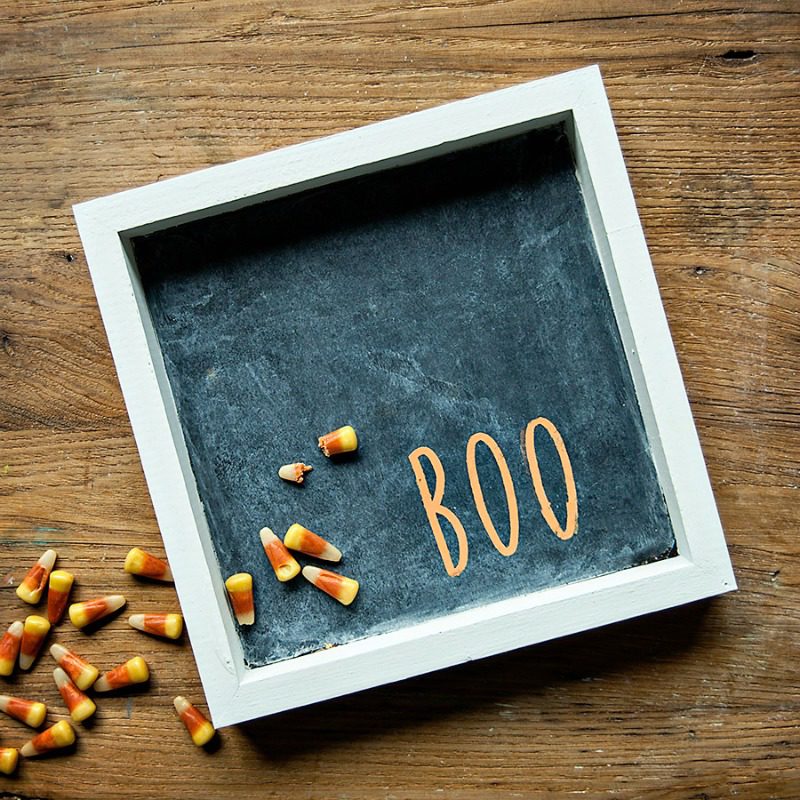
Don’t forget that the holidays will be coming up fast! Summer Melon and Mind Your Manners are the perfect fall and Halloween ChalkArt colors.


I love it, you did a great job Carol!
Thank you Christine.
Wow Carol, that sign looks amazing! I actually am not a huge fan of how “messy” chalkboard style signs can look but somehow this one really does it for me. I love the quote that you chose as well, so sweet. Going to pin, thanks for sharing at Sundays at Home!
Marissa, thank you so much. The products make creating the sign so easy and fun. More signs to come!
This is totally cute. I didn’t know Amy Howard sold these types of kits. I’ll have to check them out.
I found you via Katherine’s Corner. =)
Kimberly, You wouldn’t believe the range of products and projects in A Maker’s Studio. Thank you so much for visiting BlueskyatHome. I hope that you’ll visit again. I have so many more projects in the works.
HI Carol, That is a super fun crafty project! love the candy corn too! Happy Labor Day weekend! laura
Laura, You will love all the projects from A Maker’s Studio. Can’t wait to share more that I have in the queue. Thanks for dropping my.